
Every time you try to update your Windows 10/11, it fails. Have you experienced it before? Have you been struggling with this problem for weeks and are out of ideas on how to fix the issue? What should you do?
The blog post will provide a solution for users like you who are experiencing an error when trying to update their Windows 10/11 system. Particularly, we will be discussing the Windows Update error code 8024a112. It will offer step-by-step instructions that can be followed by anyone, tech-savvy or not, who is having this issue. In no time, you should get your computer up-to-date again.
However, let us first touch on the basics.
Windows Update and the Role It Plays
It’s no secret that Windows is a complex operating system and with this complexity comes the need for updates. Windows Update is designed to keep your computer up-to-date by downloading and installing security patches, fixes and new features.
Expert Tip: For smoother PC performance, consider using a PC optimization tool. It handles junk files, incorrect settings, and harmful apps. Make sure it's right for your system, and always check the EULA and Privacy Policy.
Special offer. About Outbyte, uninstall instructions, EULA, Privacy Policy.
The Windows Update system is a crucial component of the operating system and it will automatically download and install any available updates, including security patches. It’s important to keep your computer protected by making sure you’re running the latest version of Windows.
Unfortunately, like other components of the Windows 10/11 operating system, the Windows Update utility may be plagued by issues. One is the Windows Update error code.
What Is Windows Update Error Code 8024a112?
Have you encountered the Windows Update Error Code 8024a112 before? If not, consider yourself lucky. Some Windows 10/11 users have come across the error while restarting their Windows 10/11 devices after a Windows update. According to them, it came with this message:
“We’re having trouble restarting to finish the install. Try again in a little while. If you keep seeing this, try searching the web or contacting support for help. This error code might help: (0x8024a112)”
As you can see, the error does not let the user restart the computer to complete the installation process. Whenever they attempt to finish the installation, the update fails. There could be various reasons behind it, and we will discuss them in the next section. However, Microsoft said that it is likely to show to users who are logged in to their devices that are running the Windows Insider Build Program.
What Causes Windows Update Error Code 8024a112?
Again, there are many possible triggers to this error. Even that is the case, the result is often the same: it will leave your system vulnerable to threats. Below are some known causes of the Windows Update error code 8024a112:
- Your antivirus program is messing with the update. If you are experiencing this, temporarily remove or disable your antivirus suite.
- Startup applications are interfering with important system processes. Disabling them can sometimes do the trick.
- The important Windows Update components are disabled. Restarting and enabling them can fix the issue you are experiencing.
- The date and time settings of your Windows device are incorrect. If the current date and time of your computer are too far off, then there is a chance that you will encounter Windows Update errors.
- The Background Intelligent Service and the Automatic Update service are missing. This could happen as a result of a virus infection. To fix this, run a malware scan.
- A malware entity or virus may have attacked your system causing various error messages to appear.
- There is a problem with the Task Scheduler. Check it and have it fixed.
How to Fix Windows Update Error Code 8024a112
If you are struggling with the Windows Update error code 8024a112, then the fixes below will definitely help. We have prepared a list of solutions that worked for other affected users. You need not follow them in the suggested order. Try the fix that works best for your scenario. We’re confident that you can resolve the problem in no time.
Fix #1: Force Restart Windows
One possibility why you’re seeing the update error is that your system is in the middle of installing another update. This may happen if Windows 10/11 automatically downloaded and installed an update and required a restart to complete the process.
So, if an update is available and you try to install it, it may end up failing with the Windows Update error code 8024a112. To resolve this, you have to allow your operating system to finish installing the pending update.
Here’s how to do it:
- Click the Start menu and hit the Update and Restart button.
- Windows will now restart and complete installing the pending update.
- After your computer boots up, go back to the Windows Update utility and install the newest update.
- The error should now be fixed. Otherwise, proceed to another fix.
Fix #2: Run the Windows Update Troubleshooter
If force restarting your computer did not get rid of the issue, run the Windows Update Troubleshooter utility instead. According to some users, they were able to resolve the error by running the tool.
In case you are wondering what is the Windows Update Troubleshooter, it is basically an in-built utility on Windows 10/11 devices that are used to identify and resolve Windows Update-related errors and glitches. To run this tool, follow these steps:
- Launch the Run utility by pressing the Windows + R keys.
- Type ms-settings:troubleshoot into the text field and hit Enter. This should open the Windows Update Troubleshooter.

- Now, go to the Troubleshoot Scroll down through the list of suggestions and click Windows Update.
- Select Run the Troubleshooter.
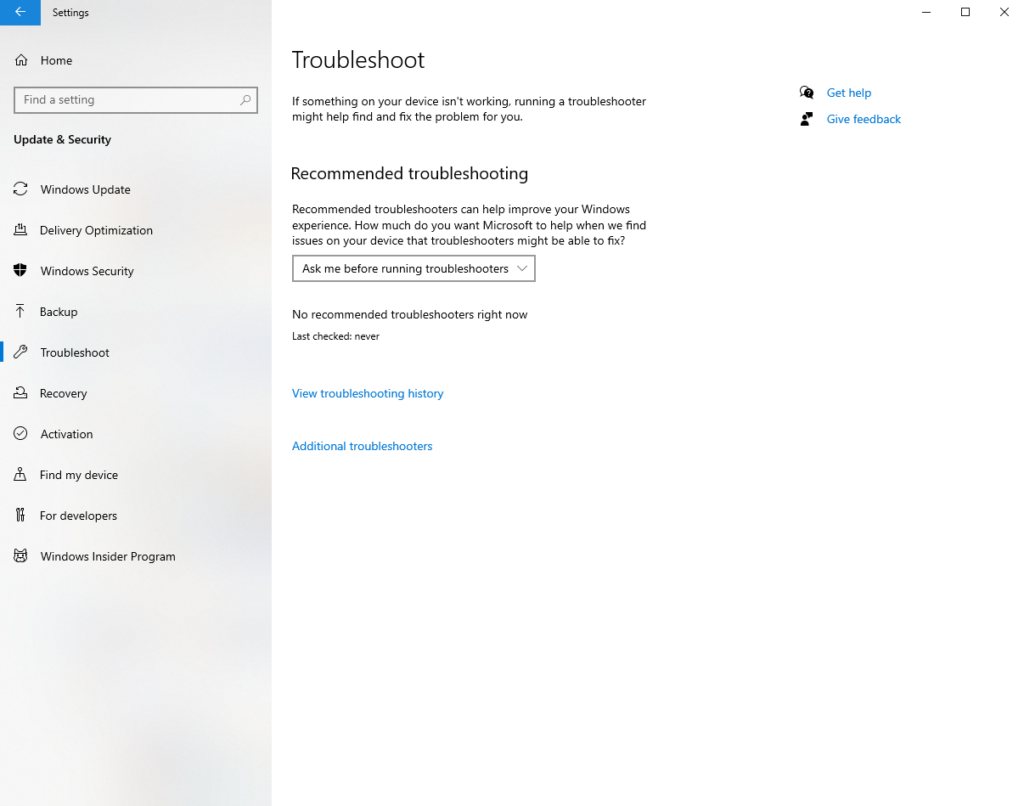
- Wait as the troubleshooter finds any potential issues with the Windows Update utility.
- Once the tool has completed the analysis, hit the Apply and Fix button.
- Finally, wait for the process to finish.
- Restart your computer.
Fix #3: Modify Task Scheduler’s Startup Type
As mentioned above, the error may be triggered by a corrupted or broken Task Scheduler. If this is the case, fix the problem by using the Registry Editor to re-enable the Task Scheduler. Below is a quick guide on what to do:
- Launch the Run utility by pressing the Windows + R keys.
- Type regedit into the text field and press the Ctrl + Shift + Enter keys. This will launch the Registry Editor with administrator rights.
- Navigate to the left pane of the Registry Editor and go to this location: HKEY_LOCAL_MACHINE \ SYSTEM \ CurrentControlSet \ Services \ Schedule.

- Go back to the right pane and double-click on the Start section.
- Find Start DWORD and change the Base value to Hexadecimal.
- Also, change Value Data to 2.
- Save your changes by hitting the OK button.
- Restart your computer and see if the error code still appears at the next startup.
Fix #4: Install the Update via the Windows Media Creation Tool
You may also force install the update by using the Media Creation Tool. To use this, follow the instructions below:
- Go to this website.
- Hit the Download Tool now button. The Media Creation Tool will now be downloaded.
- After downloading the tool, double-click on the MediaCreationTool executable file and wait for the tool to be initialized. Once ready, agree to the Terms by hitting the Agree button.
- In the next screen, choose the Upgrade This PC Now option.
- Hit Next to continue.
- Wait while the Windows 10/11 ISO file is being downloaded onto your computer.
- Click Next to proceed with the upgrade process.
- Restart your computer if prompted.
Fix #5: Reset the Windows Update Components
The Windows Update error may also appear if the Windows Update components are not working properly. To resolve this, you need to reset the Windows Update components.
There are many ways to reset the Windows Update components, but the easiest one is by using the Command Prompt. Follow the steps below:
- Press the Windows + X keys and select Command Prompt (Admin).
- Into the command line, run these commands:
- net stop wuauserv
- net stop cryptSvc
- net stop bits
- net stop msiserver
- Ren C:WindowsSoftwareDistribution SoftwareDistribution.old
- Ren C:WindowsSystem32catroot2 Catroot2.old
- net start wuauserv
- net start cryptSvc
- net start bits
- net start msiserver
- Hit Enter after each command.
- Restart your computer.
Fix #6: Disable Your Antivirus Temporarily
One reason why you’re seeing the Windows Update error is your antivirus suite. In some cases, users were able to resolve it by temporarily disabling the antivirus program or uninstalling it.
Based on reports, among the antivirus suites that are associated with the error are Norton and Avira. So, if you are using these tools, consider disabling them. If not, uninstall them.
It is worth noting that even if you uninstall your antivirus suite, you still have Windows Defender. This means you need not worry about your safety. Now, if uninstalling your antivirus does not solve the problem, consider using another antivirus solution. There are plenty of antivirus tools on the market today. For sure, you can find a decent one that matches your needs.
Fix #7: Remove Problematic Registry Entries
If you suspect that there are registry entries that are damaged or corrupt, then remove them. Although this fix sounds complicated, it is relatively simple. Just follow the steps below:
- Press the Windows + R keys to launch the Run utility.
- Type regedit into the text field to run the Registry Editor.
- Hit Enter.
- Navigate to the left pane and go to this location: HKEY_LOCAL_MACHINESOFTWAREMicrosoftWindowsCurrentVersionWindowsUpdateAuto UpdateRequestedAppCategories.
- Expand this section and right-click on 8B24B027-1DEE-BABB-9A95-3517DFB9C552. Remove it.
- Restart your computer.
Take note that playing around with registry entries can be risky. One wrong move and you may end up causing more damage than good. So, before you even consider this fix, make sure you have a backup file in handy.
Fix #8: Disable Third-Party Applications
If you are still seeing the Windows Update error on your computer, it is possible that a third-party application is messing with your system. To deal with such an app, disable it.
Follow these steps:
- Press the Windows + R keys to open the Run utility.
- Type msconfig into the text field.
- Hit Enter to open the System Configuration window.
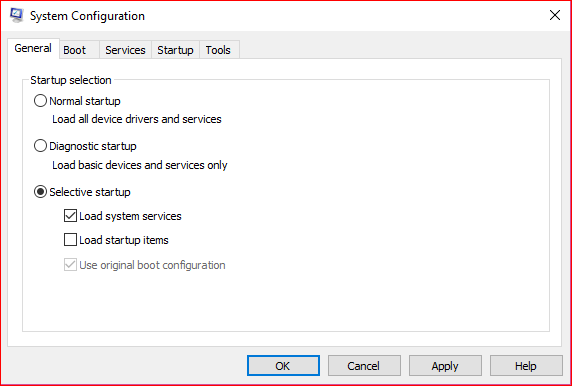
- Go to the Services tab and select the Hide All Microsoft Services option.
- Hit the Disable All button.
- Next, open the Startup tab and click the Open Task Manager link.
- Task Manager will now display a list of Startup applications. Right-click on the top-most entry and select Disable. Repeat this step until all startup applications are disabled.
- And then, go back to the System Configuration window.
- Hit OK to save your changes.
- Restart your computer and perform the update one more time.
Fix #9: Check Your Proxy Settings
Another trigger to this error is your proxy. It can interfere with system processes, including those that are associated with the Windows Update tool. But you can fix this problem by following these steps:
- Go to the Settings app.
- Open the Network and Internet section.
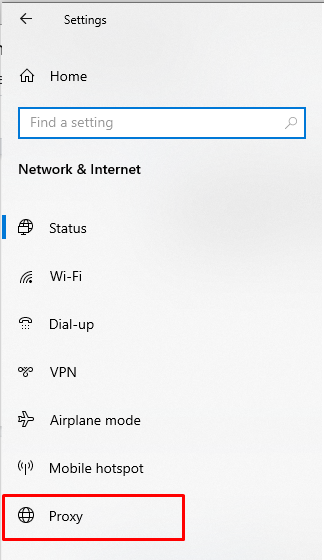
- Choose Proxy and disable all the options in the right pane.
- Check if the error persists.
If you wish to stay secure and private while browsing online, you can consider using a VPN. A virtual private network or VPN is a technology that provides the user with internet security and privacy. It works by encrypting all of the data being transmitted to and from your device. The result is that if you are working on public Wi-Fi, for example, then no one can see what you are doing or steal any information from your devices.
But this isn’t just about securing yourself in public places! These days there are many ways hackers can get into your home network through unprotected portals like routers and modems without you even realizing it! That’s why VPNs were invented to protect us in our own homes as well! They make sure we’re safe when browsing at home too because they encrypt everything coming into our house over an unsecured connection.
Fix #10: Download and Install the Update Manually
If you cannot install the update because of the error 8024a112, you can resolve the problem by manually downloading the update from the official Microsoft Update Catalog. But for you to be able to do that, you have to know the update code of the Windows update you wish to download.
Usually, the update code begins with KB. It is then followed by a combination of numbers. After you find this code, download it by following these instructions:
- Go to the official Microsoft Update Catalog website.
- Type the update code into the search field.
- A list of all matching updates will show. Find the most relevant one that is compatible with your system architecture.
- Hit the Download button next to it.
- Next, run the setup file and follow the installation wizard.
- Restart your computer to fix the problem.
Fix #11: Do an In-Place Upgrade
If you have tried everything but to no avail, then your last resort is to perform an in-place update. This involves reinstalling the latest Windows version while keeping all your settings, files, and applications in place.
To do this, simply do the following:
- Download and run the Windows Media Creation Tool.
- Once it starts, select the Upgrade This PC Now option.
- Hit the Download and Install Updates (recommended) button.
- Click Next.
- Be patient as the setup files are being downloaded.
- After that, follow the prompts.
- Once you reach the Ready to Install screen, select the Change What to Keep option.
- Make sure that you tick the Keep Personal Files and Apps option.
- Hit Next.
- Follow the instructions provided by the wizard to complete the process.
Fix #12: Check the Date and Time
An incorrect date and time setting can trigger the Windows Update error to appear. To change and fix this, do the following:
- Right-click on your current time.
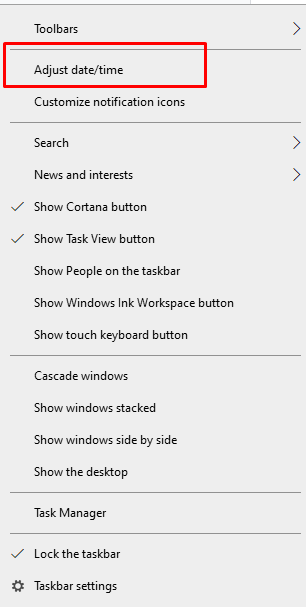
- Select Adjust Date/Time.
- A window should now open.
- Go to the Date and Time tab under the Change Date and Time section.
- Enter the current date and time.
- Hit the Change button. Your system date and time should now be updated.
Fix #13: Perform a Complete Malware Scan
Scanning your computer for any viruses or malware entity is easy. In fact, it just takes a few minutes, depending on the number of files you have. Here’s how to perform a malware scan:
- Go to Start and click Settings.
- Navigate to the Update and Security section and choose Windows Security.
- Click Virus and Threat Protection.
- Select Manage Settings and click Real-Time Protection. Toggle On the switch next to it.
Fix #14: Check Your Internet Connection
Though it appears obvious, if you are not connected to the internet, you cannot install or download updates. So, confirm if you have an active internet connection by following these steps:
- Go to the Start menu.
- Type cmd into the search field and click the top-most result.
- Into the command line, type this command: ping google.com -t.
- Hit Enter.
- Check if you are getting a response without any packet loss.
If you cannot connect to the internet, then try to check your connection. Check if the cables are properly connected or ask your internet service provider whether they are performing maintenance on their services.
Fix #15: Pause the Windows Update
Sometimes, you can easily resolve the error by simply pausing and resuming the update.
To pause and resume the Windows update process, do the following:
- Go to Settings.
- Select Update and Security and click Windows Update.
- Hit the Pause Updates for 7 Days button.
- Restart your device.
- Upon restart, launch Settings once again and go to Update and Security.
- Click Windows Update.
- Hit the Resume Update button.
- Check if the problem has been resolved.
Fix #16: Free Up Relevant Disk Space
Oftentimes, the lack of sufficient disk space can trigger Windows Update-related errors to appear. Therefore, you have to make sure you have enough disk space before installing an update.
Use these steps to free up space on your disk:
- Go to Settings and select System.
- Choose Storage.
- Navigate to the Local Disk C: section and open the Temporary Files section.
- Choose the items you want to remove.
- Finally, hit the Remove Files button.
- You should now have enough space to run the update.
Fix #17: Use the System File Checker Utility
It is possible that your system has corrupted system files. That is why you’re seeing the error message. Good thing you can easily repair these files using the System File Checker utility.
To use this tool, follow these steps:
- Click the Start button.
- Type cmd into the search field and right-click on the top-most result.
- Choose Run as Administrator.
- Into the command line, type this command: DISM /Online /Cleanup-image /Restorehealth.
- Hit the Enter key.
- And then, type this command: sfc /scannow.
- Hit the Enter to proceed with repairing the corrupted system files.
- Now, try running Windows Update once more. Check if it works fine.
Fix #18: Rename the Software Distribution Folders
The Software Distribution folder holds all the temporary Windows Update files. And in some cases, renaming this folder can resolve the common Windows Update errors. Here’s how:
- Click the Start menu and type cmd into the search field.
- Right-click on the most relevant result and choose Run as Administrator.
- Type the following commands followed by an Enter:
- net stop bits
- net stop wuauserv
- ren %systemroot%\softwaredistribution softwaredistribution.bak
- ren %systemroot%\system32\catroot2 catroot2.bak
- net start bits
- net start wuauserv
- Restart your Windows device and see if the issue is fixed.
Fix #19: Ask Help from Experts
If you think you have done everything but the error still appears, then you can always ask for help from people who are more familiar with the Windows environment: the people from Microsoft.
Microsoft has a responsive and friendly team that can help you with any Windows-related error you are facing. They can provide you with step-by-step guides to get rid of the issue once and for all. And in some cases, they can even connect to your device via remote connection to resolve the problem on your behalf.
Now, if you really have to resolve the problem immediately, you can always bring your device to an authorized service center. Authorized and expert technicians can take care of the Windows Update error for you.
Fix #20: Skip the Update
Yes, we know all the hassles that you have gone through. However, we have to accept the fact that Microsoft sometimes rolls out problematic Windows updates.
In such a case, your best bet is to just wait for a more stable update that is free of error. Don’t worry because Microsoft takes note of the errors that you are having; hence the patches. The next time you install the update, there will be no problem. Better yet, you can experience better functions and new features.
Summary
That’s it! That’s everything there is to know about the Windows 10/11 Update error code 8024a112. As you can see, it can be caused by different things. It could be your antivirus program messing with important system processes or a faulty Windows Update. It could also be the case of a disabled Windows Update component.
To fix this, a restart can sometimes do the trick. However, if it doesn’t, there are other solutions that you can try. You can perform a clean boot, disable your antivirus, reset the Windows Update components, or others. You can also remove problematic registry entries or install the update manually.
However, if you cannot resolve the problem by yourself, ask assistance from experts who know the craft and are familiar with the Windows 10/11 environment. You can even consider skipping the update until Microsoft releases a more stable update.
Is there anything else that you want to know about the Windows Update Error Code 8024a112?