
Regular updates from Microsoft serve to address bugs, introduce new features, and enhance overall system stability. It is highly recommended to apply these updates to ensure the security of your system against malware attacks.
Anyway, everything should be fine once you’ve installed the updates, but what should you do if the update process itself cannot be completed?
The error code 0x80244022 in Windows 10 and Windows 11 is a common issue that can occur during the installation process. This error can prevent your computer from updating to the most recent version of Windows and can also cause other problems.
If you recently attempted to locate and apply certain update patches on your Windows 10 device but were unable to do so due to the 0x80244022 error code, you have come to the right place.
Expert Tip: For smoother PC performance, consider using a PC optimization tool. It handles junk files, incorrect settings, and harmful apps. Make sure it's right for your system, and always check the EULA and Privacy Policy.
Special offer. About Outbyte, uninstall instructions, EULA, Privacy Policy.
What Is the Windows Update Error 0x80244022?
The 0x80244022 error code is associated with a specific software update issue and appears when a connection problem occurs during the update process.
If you receive this error, don’t worry; there’s nothing wrong with your Windows 10 system, and the problem is usually simple to resolve.
It is important to note that the error code does not describe a system problem, but rather an interrupted connection between your device and Microsoft’s servers.
Error Code 0x80244022 is a software update issue that affects both Windows 10 and Windows 11 operating systems. Error code: 0x80244022 is a more general term for this Windows Update problem. It is also called the WU_E_PT_HTTP_STATUS_SERVICE_UNAVAIL HTTP 503 error.
The error message reads:
There were some problems installing updates, but we’ll try again later. If you keep seeing this and want to search the web or contact support for information, this may help: (0x80244022).
This error may appear if the Windows Update service encounters problems while connecting to the Microsoft Update website, downloading, or installing updates. Because it is not always clear why this error occurs, it is recommended that a diagnostic scan of the system be performed to identify the source of the problem.
This issue is closely related to the Windows Store service and the error indicates that the service is overloaded. Everyone is busy and always in a hurry in today’s world, so when we do find time to upgrade our computers, we tend to install all software updates at once. Naturally, this results in download server overload and Microsoft Store error 0x80244022.
You can resolve this by rebooting the system and later checking for updates. If you’ve already tried this and each attempt results in the same annoying error, you may need to look for manual solutions to this unpleasant situation. According to Windows experts, the vast majority of issues with Windows Updates are caused by mismatches between your device and Windows Update server or proxy settings.
You might get lucky by resetting the Windows Update service first, and if that doesn’t work, try disabling the proxy settings as well. Another suggestion is to double-check the Date and Time settings, as incorrect synchronization may prevent the Windows Update service from downloading updates.
But before we delve into these solutions, let us first investigate why this Windows Update 0x80244022 error occurs in the first place.
What Triggers Error Code 0x80244022?
Windows 10 and 11 are two distinct operating systems that are used to run personal computers. However, users may occasionally encounter the same error code, 0x80244022.
Users of Windows 10 and Windows 11 may encounter the error code 0x80244022 when attempting to install updates. This issue has been reported to occur for a variety of reasons, including corrupted files, missing files, and conflicts with other software on the computer.
Corrupted Files – Users of Windows 10 and Windows 11 may encounter the 0x80244022 error when their systems are unable to access specific files. This can be caused by the corruption of these files, which prevents the system from correctly loading them. If this happens, users will most likely see a message indicating that the file is corrupted and cannot be accessed.
Missing System Files – In Windows 10 and 11, missing files can cause the error 0x80244022 to appear. This error, also known as the “Windows Store Error,” prevents you from installing or updating apps from the Windows Store.
This error can also prevent you from opening certain files or programs in some cases. The most common cause of this error is missing or corrupted system files. If these files are missing or corrupted, the system will be unable to properly process certain tasks, resulting in the 0x80244022 error.
Software Conflict – Users of Windows 10 and Windows 11 may encounter the (0x80244022) error if their computer is running conflicting software. This problem can be caused by multiple software programs installed on the computer at the same time, or by a single program that is incompatible with a Windows system file.
When two software programs clash, it is usually because they are attempting to use the same computer resource at the same time. This can wreak havoc on file access, network access, and even hardware devices.
If you are experiencing this error, you can try to resolve the conflict by disabling or uninstalling one of the programs.
How to Deal With Windows Store 0x80244022 Error
If you are currently looking for the perfect solution to this 0x80244022 Microsoft Store problem, you should try the troubleshooting solutions listed below. But before you do so, make sure to run a reliable optimizer such as Outbyte PC Repair to rule out other problems. Once you’re ready, go through our solutions below in the order presented.
Solution #1: Run the Windows Update Troubleshooter.
Microsoft, for the most part, tries to provide the necessary software so that you can work through some troubleshooting techniques. There are several approaches you can take to resolve the 0x80244022 error.
The Windows Update troubleshooter is one option. This is a built-in tool for diagnosing and resolving Windows Update issues. The troubleshooter can assist you in identifying and resolving software issues on your computer, including issues with Windows Update.
To use the troubleshooter, go through the following steps:
- To begin, navigate to your Windows Settings.
- After opening Settings, select “Troubleshoot” from the first option under System.
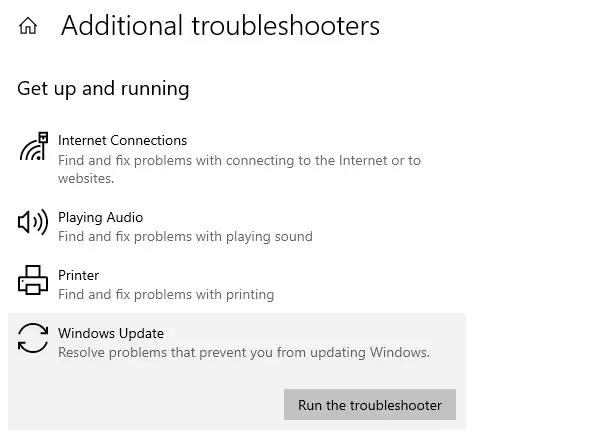
- After opening the Troubleshoot window, select the “Other Troubleshooters” option.
- In this final step, you will be able to troubleshoot “Windows Update” in the “Other troubleshooters” section. Select the “Run” option.
The Troubleshooter will take care of the rest, automatically resolving the “0x80244022” error in your window.
Solution #2: Reboot Your Computer.
Computers can encounter a wide range of problems, from simple to complex. When you see the error code 0x80244022 on your computer, it means that something is wrong with the Windows Update component.
You can try restarting your computer to see if that fixes the problem. This should resolve the issue by refreshing the Windows Update component.
- First, you must select the Windows icon from the taskbar.
- In the second step, you’ll see a Power icon to turn it off. Click this icon.
- When you click on it, select one of the three options that appear. One of these options is to restart your computer by selecting “Restart.”
These steps will resolve the “0x80244022” error on your computer. However, if these two methods do not resolve the error, try the methods listed below.
Solution #3: Set time and date automatically.
Although this method appears to be overly simple and pointless, it is capable of resolving the 0x80244022 error. Some Windows services are notorious for failing to connect to servers due to incorrect time settings. As a result, try the following and see if it helps. If not, you can skip this simple step and proceed to the more difficult ones below.
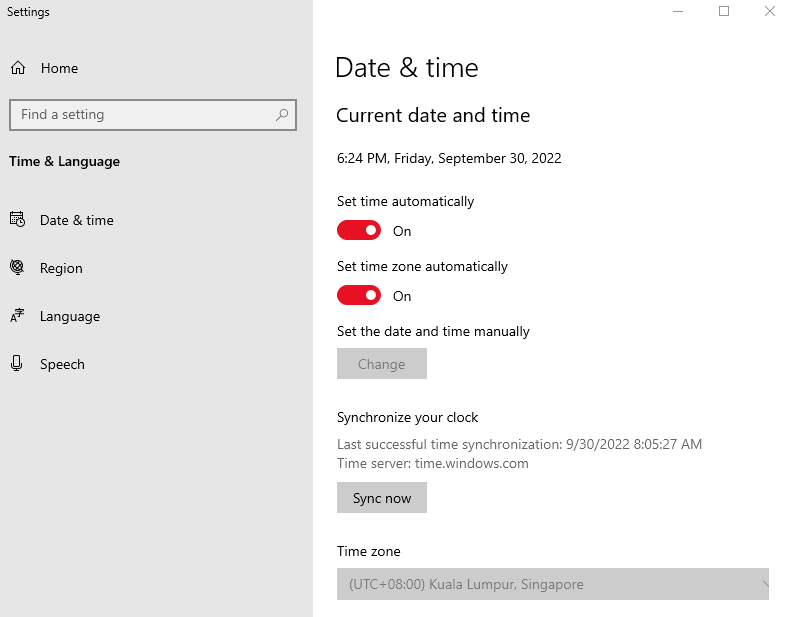
- Press the Windows key and the letter I at the same time.
- Select the Time & Language.
- Turn on the Set time automatically toggle in Date & time.
- Close the window and try installing the update again.
Solution #4: Verify that Microsoft’s servers are working.
Because Microsoft’s servers can become overloaded at times, the Windows Update service is unable to communicate properly with them.
There is no way to resolve the Microsoft server busy issue; you must wait a day or two and then try again until the update process is completed. Visit Microsoft’s official website and inform them about the Windows 10/11 error code 0x80244022.
Solution #5: Check the integrity of the system files.
As previously stated, update issues can arise as a result of missing or damaged files. These files are usually required for Windows services to function properly. If some of these files are not in their native environment, they are more likely to cause update errors. Below, we’ll use SFC (System File Checker) and DISM (Deployment Image Servicing and Management) to detect and restore missing components. Here’s how it’s done:
Via SFC
- Enter cmd into the search box next to the Start Menu button to launch Command Prompt.
- Choose Run as administrator from the context menu when you right-click on Command Prompt.
- Once the console is open, type sfc /scannow and press Enter.
- Restart your computer once the repair is complete.
Via DISM
- As we did in the previous step, launch Command Prompt.
- Copy and then paste this command into the console: exe /Online /Cleanup-image /Restorehealth.
- Wait until Windows finishes scanning and fixing before pressing Enter.
- After that, restart your computer and reinstall the update.
After running both of these scans, try installing a problematic update again. If this does not work, proceed to the next steps listed below.
Solution #6: Perform a clean boot.
Incompatibility issues may also cause the 0x80244022 error. Antimalware or other third-party software may interfere with Windows services, resulting in the error. Clean bootup ensures that your PC is started only with in-built apps and services to determine whether a secondary app is causing the problem. Simply follow the steps outlined below:
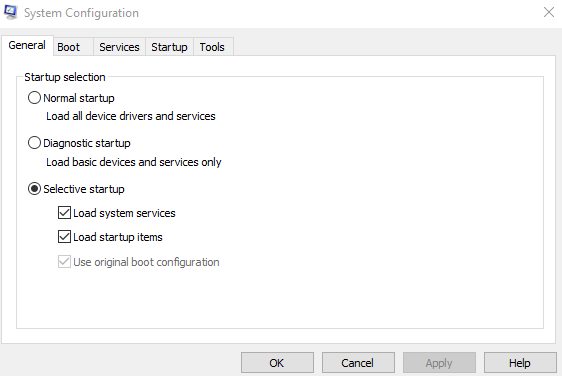
- Type in msconfig in the search box after pressing the Windows key + R
- Then, in the newly opened window, navigate to the Services tab at the top.
- Select Hide All Microsoft Services and then click the Disable all
- Select the General tab and then the Selective startup Make sure that only the box next to Load System Services is checked.
- Click Apply and then OK. Then restart your computer.
You can now attempt to update your system while in Clean Boot mode. Whether you installed the updates successfully or not, you should return Windows to its default startup settings. To accomplish this, simply redo the previous steps by enabling the disabled services and changing your startup option from Selective to Normal.
Solution #7: Check your proxy.
Connection issues may have an impact on the appearance of 0x80244022. Enabling proxy for LAN connection may interfere with proper server communication. As a result, we recommend that you disable this feature and see if anything changes when installing an update. This is how you can do it:
- Open Control Panel from the Start Menu.
- Check that View by is set to Large Icons.
- After that, look for Internet Options in the list and open it.
- Navigate to the Connections tab and then to the LAN settings
- Uncheck the box for Use a proxy server for your LAN below the Proxy Server Then, to save the changes, click Apply and OK.
You can now close the window and try installing the update again.
Solution #8: Reset the Windows Update components.
When it comes to troubleshooting update-related issues, resetting Windows Update settings is a good place to start. It is extremely beneficial and has been shown to be effective in numerous cases. Restarting the BITS, Cryptographic, MSI Installer, and Windows Update services, as well as renaming some update folders, are all part of the process (SoftwareDistribution and Catroot2). These folders contain temporary files required for Windows Update installation.
As a result, we will force Windows to delete corrupted elements and rebuild update components from the ground up. We’ll use the console to execute the necessary commands. This is more advanced, but it will not take much time or knowledge to complete. Simply follow the steps outlined below:
- Enter cmd into the search box next to the Start Menu button to launch Command Prompt.
- Choose Run as administrator from the context menu when you right-click on Command Prompt.
- Copy and paste this list of commands, one at a time, pressing Enter after each. (This action will disable the services in charge of Windows Updates.)
- net stop wuauserv
- net stop cryptSvc
- net stop bits
- net stop msiserver
- The above-mentioned folders must then be renamed. Simply copy and paste these commands, pressing Enter after each one.
- ren C:\Windows\SoftwareDistribution SoftwareDistribution.old
- ren C:\Windows\System32\catroot2 Catroot2.old
- Finally, all that remains is to reactivate the disabled services. So, just like before, execute these commands.
- net start wuauserv
- net start cryptSvc
- net start bits
- net start msiserver
We’re all done with it now. Return to the Windows Update center and retry the installation.
Solution #9: Install the faulty updates manually.
This is a time-consuming operation that is quite complicated – not because it is complex or anything.
In any case, if you have the time, try manually installing the update packages to bypass the Windows update error code 0x80244022. You must first record the version number for each update file – navigate to Update History and locate the most recent Windows 10 KBs; then record the KB numbers.
Finally, go to the official Microsoft Update Catalog and look for the KB codes you noted earlier. Download and manually install each update package on your Windows 10 device.
Bottomline
Windows Update error 0x80244022 and other similar errors can be extremely frustrating, but they are easily resolved thanks to effective instructions. We hope you are no longer experiencing this problem. If you encounter similar issues in the future, do not hesitate to follow the same steps to resolve an error. The methods we listed are applicable to a wide range of update-related issues that occur in all Windows editions.