
If your Windows 10/11 encounters issues or malfunctions, it could be due to missing or corrupted system files caused by cumulative updates or driver updates.
Whatever is causing the problem, the good news is that Windows users can rely on a tool designed to fix corrupted system files. It works by replacing damaged files with healthy copies. This utility is called System File Checker.
In this guide, we will walk you through everything there is to know about this tool, how to use it, and how it works.
What Is System File Checker?
System File Checker is a command-line tool built into the Windows OS. By default, it is stored in the C:\Windows\System32 folder.
Expert Tip: For smoother PC performance, consider using a PC optimization tool. It handles junk files, incorrect settings, and harmful apps. Make sure it's right for your system, and always check the EULA and Privacy Policy.
Special offer. About Outbyte, uninstall instructions, EULA, Privacy Policy.
Its primary role is to scan your system for any missing or corrupt system files and replace them with healthy ones.
This utility is integrated with Windows Resource Protection, which is designed to protect folders, registry keys, and system files. In the event that changes are made to these files and folders, they can be restored via a cached copy stored in Windows.
So, if you find that some of your system files have gone missing or unwanted tweaks have been made due to updates, you may consider using this utility first before performing any complex fixes.
What Is SFC /Scannow?
The SFC /scannow command is one of the functions associated with System File Checker. Although there are many things you can do with this tool, SFC /scannow is perhaps the most widely used of its functions.
You may ask, what does SFC /scannow do? SFC /scannow on Windows 10/11 inspects all your Windows system files and DLL files. If it finds a problem, it will fix it by replacing the problematic file with a healthy version.
In case you are wondering how long an SFC scannow scan takes, the answer depends on the number of files the tool has to check and the configuration of your computer. But in general, it can take minutes up to an hour to complete.
How to Run SFC /Scannow
It’s easy to run SFC /scannow on Windows 10/11. First, you need to open an elevated Command Prompt window by pressing the Windows key, typing cmd into the search field, right-clicking on the most relevant search result, and selecting Run as Administrator. If you skip this step, you will get an error message suggesting you must be logged in as an administrator in order to use the SFC utility.
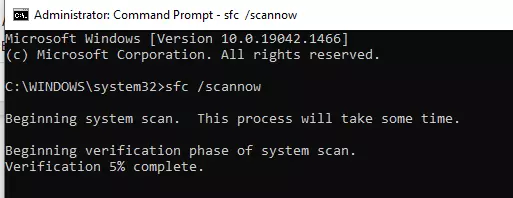
Next, in the window that opens, type this command and hit enter: sfc /scannow. Now, if you want to scan for and locate bad sectors and recover readable information, you can input the sfc /scannow /r command instead.
The SFC utility will now begin scanning your system for any signs of file corruption. It will automatically replace problematic files upon reboot.

What If SFC /Scannow Fails?
Like other Windows utilities, SFC /scannow is not immune to issues. There are times when users encounter the “sfc /scannow not working” error or the “sfc scannow windows resource protection could not perform the requested operation” message.
If this happens, you may want to check whether your Windows Installer service is enabled. To do this, input services.msc into the search field and hit Enter. Ideally, the service’s status should be set to Running.
If it doesn’t do the trick, you can download a freeware utility to help you get rid of the “SFC scannow not working” issue. Many tools out there can dig deeper into the error, showing you what could be causing it.
In any case, if SFC /scannow fails to function properly, try running the command in Safe Mode instead. Better yet, repair the broken Windows components using the DISM utility.
How to Run SFC /Scannow in Safe Mode
In Safe Mode, your Windows device has limited functionalities. This makes it easier to isolate problems. And in the case of a problematic SFC utility, starting Windows in this mode may help, too.
Here’s how to run the SFC /scannow command in Safe Mode:
- Press Win + I on your keyboard to open the Settings application.
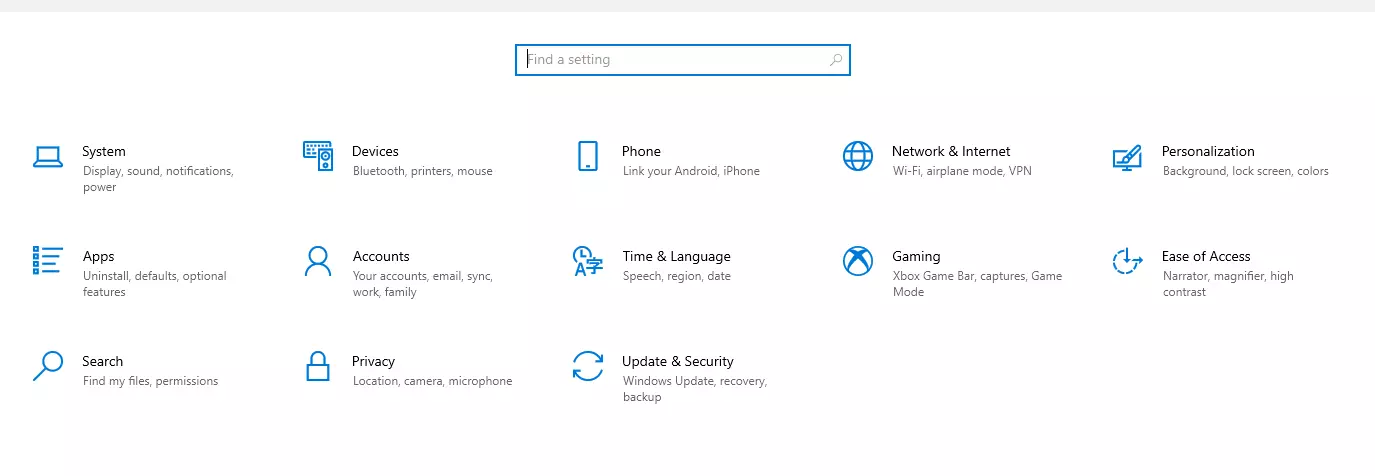
- Next, go to the Update and Security section and click Recovery.
- Navigate to Advanced Startup and select Restart Now. Your computer will now restart.
- When you reach the Choose an Option screen, go to Troubleshoot and select Advanced Options.
- Choose Startup Settings and click the Restart button.
- Your computer will restart once again.
- A list of options will now appear. Choose the option that allows you to restart your device in Safe Mode.
- After that, open an elevated Command Prompt. You can do that by clicking on the Start menu and typing cmd into the search box. Next, right-click on the top result and choose Run as Administrator.
- In the window that opens, type the sfc /scannow command and press Enter.
How to Check the SFC Log File
After scanning, the System File Checker utility writes all the details of the operation to the CBS.log file. You will easily find all SFC-related entries as each of them has the “SR” tag. The CBS.log file can be found in the %windir%\Logs\CBS folder.
To search for SFC log file entries, follow these steps:
- Open the Search field and search for cmd.
- Right-click on the top result, and choose Run as Administrator from the list.
- Next, input this command: findstr /c:”[SR]” %windir%\logs\cbs\cbs.log >sfcdetails.txt.
- Hit Enter.
- Then, go to File Explorer by using the Win + E shortcut.
- Select This PC and navigate to the Devices and Drives section.
- Go to Local Disk.
- Double-click on the sfclogs.txt file to open it via your default text editor.
- You will now see all the entries that have been recorded every time the System File Checker utility has run on Windows.
How to Use System File Checker Offline
You can also use the SFC utility offline. The steps are fairly easy to follow. Here’s what you should do:
- Go to Settings and locate the Update and Security option. Click on it.
- Navigate to Recovery.
- Go to the Advanced Startup section and click Restart Now.
- From the Choose an option screen, select Troubleshoot and then click Advanced Options.
- Select Command Prompt.
- Your device will restart at this point.
- Upon startup, choose your account under the Advanced Startup options.
- Confirm your account password and click Continue.
- Input the diskpart command to start the diskpart tool.
- Hit the Enter key to proceed.
- Next, type this command to find the location of the Windows and System Reserved partitions: list volume.
- Press Enter.
- Confirm the drive letter assignment. It’s usually the volume that has the biggest size.
- Type this command: exit.
- Hit Enter to exit diskpart.
- Then type this command to open System File Checker in offline mode: sfc /scannow /offbootdir=F:\ /offwindir=C:\Windows. Press Enter after that.
- Click the X button to close the Command Prompt.
- Lastly, click Continue to fix any problems with your system files.
- Your device should restart normally once done.
Can You Repair System Files without System File Checker on Windows 10/11?
System File Checker is indeed a handy tool that can be used to fix various problems related to system files. But are there any other ways to fix damaged files?
The answer to that is yes. Follow the instructions below.
Identify Corrupted System Files
First, you need to identify what files have been corrupted and need replacing. Here’s how:
- Go to the Start menu.
- Search for cmd via the search box and right-click on the top result. Choose Run as Administrator.
- Type this command followed by Enter: findstr /c:”[SR]” %windir%\Logs\CBS\CBS.log > C:\sfclogs.txt”.
- Open File Explorer using the Win + E shortcut.
- Click This PC and navigate to the Devices and Drives section.
- Access the Local Disk drive.
- Double-click on the sfclogs.txt file to open it.
- You will now see the files that SFC failed to repair.
Repair the Affected Files Manually
If you don’t have access to healthy files to replace the damaged ones, you can get them online. But of course, you will need the information from the previous step to know what files need to be replaced.
For a detailed guide, refer to these steps:
- Go to Start or press the Windows button, and search for cmd.
- Right-click on the top result, and from the list, choose Run as Administrator.
- Type this command: takeown /f C:\PATH\TO\FILE.
- Press Enter.
- Next, type this command to grant complete administrator access to the corrupted file: icacls C:\PATH\TO\FILE /Grant Administrators:F.
- Press Enter.
- And then, type this command to replace the corrupted version with a healthy file: copy C:\PATH\TO\SOURCE\GOOD\FILE C:\PATH\TO\DESTINATION\BROKEN\FILE.
- Press Enter.
- Now verify the integrity of the system files by typing the sfc /verifyonly command and hitting Enter.
- Once your finish the steps above and the new files pass the performed integrity test, all your Windows 10/11 problems should be resolved.
Other Alternatives to System File Checker
If you have been unable to fix damaged system files with System File Checker, your other option is the DISM tool. Though it is a bit more complex, performing a DISM scan is actually just a four-step process.
Here’s how to use the DISM tool:
- Press the Win + X shortcut and choose Windows PowerShell (Admin).
- Next, input the DISM /Online /Cleanup-Image /ScanHealth command and wait for the process to complete.
- After that, perform an advanced scan using this command: DISM /Online /Cleanup-Image /CheckHealth.
- Finally, if errors are detected, repair them using this command: DISM /Online /Cleanup-Image /RestoreHealth. This process may take a few minutes to finish, so you may want to grab a cup of coffee while waiting.
When to Use SFC /Scannow
System File Checker is designed to scan and repair Windows system files. Once it detects that a file has been modified or become corrupted, this utility will automatically replace it with the correct version.
When programs are crashing or if you’re getting random error messages informing you about missing DLL files, then it’s time to run this utility.
Fix Corrupted System Files with SFC
Now that you know how System File Checker works, fixing issues related to system files should be easy! But if you find that such problems persist and that you do not have the technical know-how to deal with them, do not hesitate to ask for help from certified Windows technicians.
Let us know your thoughts about this article. Comment below!