
The blue screen of death (BSOD) appears when your computer encounters a critical error, halting its operation and requiring a restart. Typically, these screens offer information about the error’s cause, along with an error message or code for troubleshooting and potential resolution.
It’s extremely inconvenient when you’re playing a video game and your Windows PC screen suddenly turns blue. Then you’re stuck with the msdn bugcheck clock_watchdog_timeout. Along with this irritating screen appearing, your system occasionally freezes and reboots, leaving you unable to use your computer.
In a multi-processor configuration, this Windows error is usually caused by a delayed clock disruption. This means that your system’s processor is having trouble getting its cores and threads to cooperate. RAM problems, BIOS updates, faulty drivers, and third-party software can also be to blame for the CLOCK WATCHDOG TIMEOUT error.
Users working on important files and documents may lose them forever if this error occurs because all the files that were open at the time of the error risk becoming corrupted. However, there are several options for resolving this issue; make sure you try each one and carefully follow the instructions.
Expert Tip: For smoother PC performance, consider using a PC optimization tool. It handles junk files, incorrect settings, and harmful apps. Make sure it's right for your system, and always check the EULA and Privacy Policy.
Special offer. About Outbyte, uninstall instructions, EULA, Privacy Policy.
What Is the Windows 10/11 clock_watchdog_timeout Error?
This is the message that greets users who encounter this error:
An expected clock interrupt on a secondary processor, in a multi-processor system, was not received within the allocated interval.
In a multiprocessor configuration, the CLOCK_WATCHDOG_TIMEOUT error usually indicates a delayed clock interruption. In other words, the processor has a problem and is unable to function properly.
A CLOCK WATCHDOG TIMEOUT error indicates a problem with your system’s hardware, specifically with how your system and processor communicate.
When you ask your computer to do something, the operating system interrupts the processor to inform it of the situation. This is a completely normal Windows function known as a system interrupt at the system level. You’ll get a bluescreen error if the system spends too much time in the interrupt phase, also known as the interrupt request level (IRQL).
The CPU is represented by the clock, and the watchdog is the process that monitors the interrupt. When the specified processor is not responding to interrupts, the CLOCK WATCHDOG TIMEOUT Blue Screen Stop Error can occur on a Windows system. It usually occurs when the processor becomes unresponsive or becomes stuck.
This state is known as a deadlock in technical terms when the processor is unable to continue processing tasks because its resources are occupied and the whole system gets stuck.
Wrong or corrupt hardware drivers can cause this error. It could also be caused by problems with the Random Access Memory (RAM), the CPU (Central Processing Unit), or the BIOS.
The good news is that the CLOCK WATCHDOG TIMEOUT error has several solutions, as described in the guide below. Today, we’ll try to figure out how to fix this Blue Screen error and keep it from happening again.
You have to boot Windows into Safe Mode with Networking if you are unable to log into Windows and receive this error on a regular basis.
What Causes the BSOD clock_watchdog_timeout?
Clock Watchdog Timeout is a blue screen error that appears on a Windows PC when the specified processor fails to process interrupts, indicating that the processor is malfunctioning. Furthermore, the stop code CLOCK WATCHDOG TIMEOUT can be caused by problems with the Random Access Memory (RAM), BIOS, hardware drivers, or third-party software.
If your computer can be restarted after the Clock Watchdog Timeout blue screen error, try the methods below to resolve the problem and prevent it from reoccuring.
- Corrupted hardware drivers – Updates for drivers can sometimes cause a bug in the driver, causing the device to behave abnormally. The best way to fix such issues is to revert to a previous driver version.
- Incompatible RAM – Manufacturers set a limit for RAM (Random Access Memory) in the system, and when a user plugs in RAM that exceeds the limit, it can result in a clock watchdog error.
- Malware or virus infection – The presence of infected files or malware in the system can cause harm to important files, lowering the system’s efficiency.
- Overclocked CPU – When a user increases the clocking or speed of the CPU from the BIOS settings to achieve faster output, the system may fail to meet the specified clocking speed, resulting in this error.
- System file problems – There may be problems with the system files that prevent the system from accessing them, which could be the cause of the BSoD errors.
- Miscommunication between multi-core processor threads
- Outdated firmware – The device may be unable to function properly due to outdated firmware. And if the device isn’t working properly, it won’t be able to complete the task in time.
- Faulty hardware – A clock watchdog error can occur when a user does not read all of the details and simply purchases a hardware component for their CPU. When the hardware cannot calibrate with other components, it causes a clock watchdog error.
Effective Fixes for the clock_watchdog_timeout Windows 10/11 Error
Before you begin troubleshooting your PC to resolve a clock watchdog timeout error, you should back up your files to a cloud storage service or an external drive. This way, if something goes wrong, you can recover and restore your files.
To resolve the clock watchdog timeout error, try the following fixes.
Solution 1: Remove external devices.
The first method for resolving the CLOCK WATCHDOG TIMEOUT error is to disconnect any external devices that are connected. An external device or peripheral connected to the computer may be interfering with the operating system. Restart the computer after disconnecting all peripherals and external devices, leaving only the mouse and keyboard connected.
Check to see if you’re still getting the CLOCK WATCHDOG TIMEOUT error. If the issue is resolved, one of the peripherals or external devices may be damaged or faulty, causing the issue. Replace the peripheral or external device in this case.
Solution 2: Stop CPU overclocking.

These errors are usually caused by overclocking your CPU. First and foremost, you should be aware that the CLOCK_WATCHDOG_TIMEOUT BSOD is frequently caused by processor issues, which you should investigate.
Overclocking is the process of increasing the frequency and speed of your processor above the factory settings. This can give your PC a significant speed boost, but you must be extremely cautious because PCs have been damaged after users overclocked them too much or were careless.
Returning your CPU’s rate and frequency to their original settings is dependent on the software you used to overclock in the first place. Intel and AMD have their own applications available for download that allow users to overclock their CPUs, but there are dozens to choose from.
Stop overclocking your PC and see if the BSOD reappears.
Solution 3: Update your BIOS.
BIOS (Basic Input Output System) is software that is stored on the motherboard’s small memory chip. You may need to access the BIOS to change the way the device works or to help troubleshoot a problem. The hardware causing the CLOCK WATCHDOG TIMEOUT error may be malfunctioning, and updating the BIOS may resolve the issue.
Keep in mind that updating the BIOS is a procedure for advanced users only; if not done correctly, it can result in permanent hardware damage.
Here are important instructions to remember:
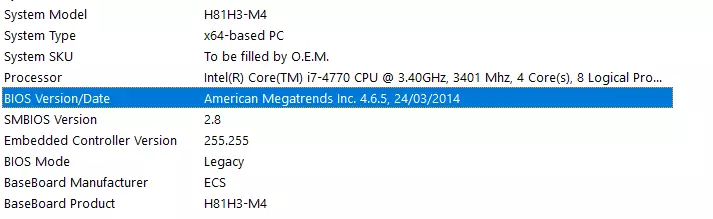
- Enter msinfo in the Start menu’s Search bar to find out what version of BIOS you have installed on your computer.
- Locate the BIOS version directly beneath your Processor model and copy or rewrite anything to a text file or a piece of paper.
- Determine whether your computer was bundled, pre-built, or hand-assembled by purchasing all components separately. This is significant because you do not want to use BIOS designed for one component of your PC when it doesn’t apply to your other devices, or you will overwrite BIOS with the incorrect one, resulting in major errors and system problems.
- Get your computer ready for the update. If you’re updating your laptop, make sure the battery is fully charged and that it’s plugged in just in case. If you are updating a computer, it is recommended that you use an Uninterruptible Power Supply (UPS) to ensure that your computer does not shut down during the update due to a power outage.
- To update the BIOS, go to the website of the motherboard manufacturer and download the most recent BIOS version for the motherboard. There should be a manual describing how to update the BIOS; make sure you read it thoroughly. If you do not know how to update the BIOS, seek the assistance of a professional to avoid causing damage to your computer.
Solution 4: Use Windows Driver Verifier.
Driver Verifier is a built-in tool in the Windows operating system that detects illegal function calls and other procedures that may corrupt system files in Windows kernel-mode drivers and graphic drivers. This method detects unsigned drivers that are not provided by Microsoft and attempts to verify or delete them.
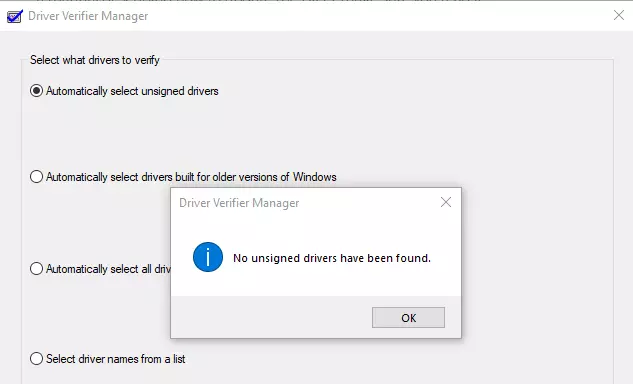
- Go to the Start Menu, type Verifier, and launch the utility as an administrator.
- Click Next after selecting the option to Create Standard Settings.
- Select the option Automatically Select Unsigned Drivers and then click Next. You should see a message stating that no unsigned drivers were found.
- Close the Driver Verifier Manager and reopen it, then select the option Create Standard Settings and press Next.
- Select all of the drivers that have an unknown Provider and click Finish.
- Your computer will be asked to restart. After restarting, reopen the Driver Verifier and select the option Delete Existing Settings before clicking Finish.
- Restart your computer once more.
Solution 5: Check PC for system file corruption.
You can use the Command Prompt to detect and repair any logical File System errors on the hard drive. Here we will demonstrate how to use the CHDSK command, which works differently depending on the type of file system partition.
This will attempt to repair both logical errors as well as recover any readable data that may have been corrupted due to bad sectors on the disk. This procedure will take anywhere from a few minutes to an hour.
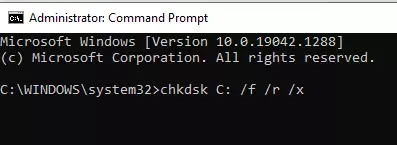
- Launch Command Prompt as Administrator.
- Enter the command chkdsk /f /r E: into the command line (Replace E with the Volume letter you want to Fix errors for)
- When this process is finished, restart your computer.
- If another program is currently using the volume, it will be checked for errors when you restart your computer.
After checking the disk for errors, you should also scan your computer for other issues using a PC Repair Tool like Outbyte PC Repair. The tool checks your system for performance issues that might be causing the BSOD error.
Solution 6: Run Windows Memory Diagnostics.
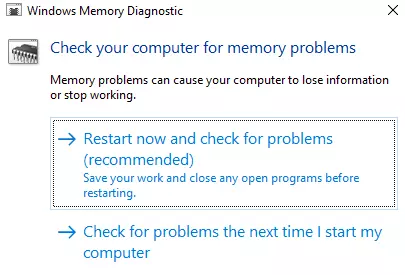
Clock Watchdog Timeout errors can also occur when the PC has incompatible Random Access Memory. Windows Memory Diagnostics is a utility in Windows 10/11 that scans the RAM for possible errors. After rebooting the system, Windows Memory Diagnostics will run and may take several minutes to complete.
Open the program by going to the Start Menu and typing Windows Memory Diagnostics.
If you select the option restart now, the computer will automatically check for problems when it restarts.
Solution 7: Update your drivers.
Blue Screen of Death errors are often caused by driver errors. A device driver instructs the operating system and other software on how to interact with a specific piece of hardware. If the correct driver is not installed, the device may not function properly, if at all, and may display a variety of blue screen of death errors, including CLOCK_WATCHDOG_TIMEOUT.
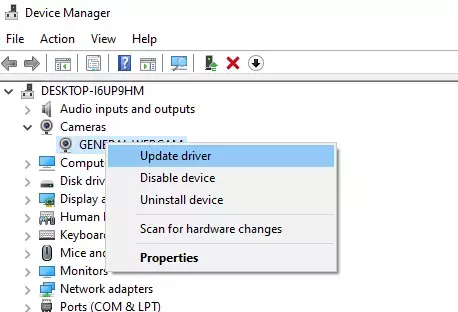
To update your drivers, open Device Manager by right-clicking the Start button and selecting Device Manager from the contextual menu, or by typing device manager into Search and selecting the Device Manager result.
In Device Manager, you’ll see a list of all the devices that are connected to your computer. Because determining which driver is causing the issue is difficult, you should update all of them unless you have observed specific circumstances under which the CLOCK_WATCHDOG_TIMEOUT error occurred.
Expand the device category, right-click the device, and from the drop-down menu, select Update driver.
You will be prompted to either automatically search for the updated driver software or browse your computer for driver software. If you choose the first option, Windows will search on your computer and the Internet for the most recent driver software for your device.
If you select the second option, you must manually locate and install the drivers. This option requires that you have previously downloaded the driver to your computer or USB flash drive. We recommend that you choose the first option and then follow the on-screen instructions. Follow the steps for all devices.
Solution 8: Uninstall third-party software.
Third-party software, according to some Windows users, can cause the Clock Watchdog Timeout Windows 10/11 error. Clock Watchdog Timeout errors have been reported by some users as a result of software such as Daemon Tools, VirtualBox, and other virtual image managers. If you discover that you have installed such programs on your computer, you can uninstall them and then restart your device.
To uninstall a program, press Windows key + R on the keyboard to open the Run dialog box, then type appwiz.cpl and press Enter. Then you can see a list of all the programs that are installed on your computer. Locate the software to be uninstalled and right-click it to select Uninstall. Then, simply follow the on-screen instructions to uninstall the application.
Wrapping Up
You should now be able to resolve the Clock Watchdog Timeout error and recover data from a Windows computer that has the Clock Watchdog Timeout error. If you encounter the same issue again, you should try the solutions listed in this post. If you have better suggestions, please share them with us.