
The dreaded “blue screen of death,” abbreviated as BSOD, can ruin your day. Although there are over 500 BSOD error codes, the Windows 10/11 Critical_Process_Died receives the most attention.
To be fair, BSODs are far less common in Windows 10 than in previous versions of the operating system, but they are still annoying when they occur. The loss of the materials you were working on is the least of your concerns.
So, how do you resolve this unexpected error in Windows 10? Continue reading and we’ll go over everything.
What Is the STOP Code Critical_Process_Died?
CRITICAL PROCESS DIED is one of the few Windows BSODs (Blue Screens of Death) that can be triggered. If you kill the svchost.exe process in Windows 10 (right-click in Task Manager and select “End process tree” from the pop-up menu), the machine will immediately crash with this error code.
Expert Tip: For smoother PC performance, consider using a PC optimization tool. It handles junk files, incorrect settings, and harmful apps. Make sure it's right for your system, and always check the EULA and Privacy Policy.
Special offer. About Outbyte, uninstall instructions, EULA, Privacy Policy.
This means that Windows will not start unless the generic system process that connects Windows services to dynamic link libraries (DLLs) is running. Because this is a critical component of how the Windows operating system works, the system will not function unless one (or more) instances of this service are running (at least one for each DLL in use, in fact).
In essence, CRITICAL PROCESS DIED indicates that a process critical to Windows’ proper operation has terminated abruptly and unexpectedly (to the OS, anyway). It’s not recommended for users to kill svchost.exe unless they’ve saved their work, closed all open applications, and are prepared for their PC to restart after the BSOD appears and the post-crash dump files are saved.
At its most basic, the cause is straightforward: a background process on which Windows relies has become corrupted. It could have either stopped completely or had its data incorrectly modified.
When you dig deeper, it becomes a lot more difficult to pinpoint the exact cause. Everything from faulty drivers to memory errors could be the source of the problem. Worse, there are nearly infinite scenarios in which the BSOD could occur. Perhaps it only happens when you’re gaming, logging into your machine, opening a specific app, or waking your machine from sleep mode.
When your computer crashes due to the stop code critical_process_died, you will see a blue screen with this notification:
Your PC ran into a problem and needs to restart. We’re just collecting some error info, and then we’ll restart for you. (x% complete).
Some computers will even enter a loop of continuous rebooting, making troubleshooting a huge headache.
Fortunately, there are some solutions to the Critical_Process_Died ntoskrnl exe error that you can try. Even if you are not a tech expert, these are simple to implement.
Try each solution one at a time; they are listed in the order of their likelihood of providing a quick fix. Reboot your computer after each solution to see if it worked.
Factors That Trigger Blue Screen Critical_Process_Died
The Windows operating system ensures that only authorized applications have access to specific data and system components. When a critical component of Windows detects an unauthorized modification to its data, it intervenes immediately, resulting in the BSOD critical_process_died.
As with most BSODs, your best bet for further investigation is to consider what has recently changed on your PC. According to statistics, the most common cause of this stop code is a rogue update, followed by system file corruption, which causes the executable for some critical system process (of which svchost.exe is an excellent example) to die. Among the potential causes are:
Faulty update: This term refers to a (usually recent) Windows update , such as a Cumulative Update, a security update, or another update, that causes unintended side effects on some PCs. If you can identify the update in question, there will usually be helpful notes in Microsoft’s update release notes. To that end, please look up the update’s Knowledge Base number and read what Microsoft has to say about that string.
To see what updates you’ve recently installed, go to the old Windows control panel, launch Programs and Features, and then click “View installed updates,” which displays a list of all updates in the order they were installed. If you need to remove one, right-click it and choose “Uninstall.”
Corrupt system files: This can be repaired with the DISM /Online /Cleanup-Image /CheckHealth command (run at an administrative CMD or in an administrative PowerShell session). If this command finds anything to report, clean things up with DISM /Online /Cleanup-Image /RestoreHealth. Next, run the system file checker until it reports nothing found or fixed (this may take 2 or 3 iterations): SFC /SCANNOW. If this works, it will frequently fix the IRQL error as well.
Incompatible device drivers: The majority of the time, perhaps 9 times out of 10, the error is caused by a bad driver. If you recently installed or updated a driver (for example, for a printer, sound card, or controller), this could be the source of the problem. If you’ve recently updated a driver, you should probably use the “Roll Back Driver” option in the Device Manager’s Driver tab for that device. If the tab is greyed out, you may need to manually uninstall the current driver and reinstall the previous version.
However, the cause of the error is not always obvious. There have been reports of the Critical Process Died error occurring on brand-new laptops, and it is not uncommon for the error to appear unexpectedly on a computer that has been running flawlessly for years.
That is why it is critical to take a broad approach and address multiple potential causes at the same time. You can begin with any method described in this article or try them all at once; the choice is entirely yours. We strongly advise you to conduct continuous testing after each step you take so you can determine which solution was the best.
How to Resolve Windows 10/11 Error Critical_Process_Died
If you’re stuck in a boot loop and can’t get out of the Blue Screen of Death, the first step is to restart your computer in Safe Mode. Windows starts in Safe Mode with a limited set of files, programs, and drivers. Startup programs are disabled, and only the drivers required to run Windows are installed. It is also a great idea to run a scan with a professional PC Repair Tool like Outbyte PC Repair to prevent BSODs like Critical_Process_Died from occurring.
How to Boot Into Safe Mode
Different PCs open Safe Mode in different ways, but the most common is to press “SHIFT + F8” or F8 by itself. This brings up the “Advanced Boot Options Menu.”
- To open Recovery Mode, restart your Windows 10 computer and repeatedly press SHIFT + F8 (or F8 by itself) before the Windows 10 OS loads.
- Using the arrow keys, select “Advanced Boot Options” and press Enter.
- Using the arrow keys, select “Safe Mode” and press Enter again.
Although Safe Mode with Networking is another option, if the BSO D is caused by the Wi-Fi chipset driver, this will not solve your problem!
If SHIFT + F8 or F8 by itself does not work on your PC, try using the Windows installation disk.
Alternatively, insert the Windows Recovery USB just before the startup process enters WinRE.
If you do not have an installation disk or USB, s imply restart the computer a few times, and it will eventually boot into the WinRE. WinRE is a repair tool included with Windows 10 that allows you to troubleshoot any issues with the operating system.
Once in WinRE, navigate to Troubleshoot > Advanced Options > Startup Settings, then “Restart.” When the computer restarts, navigate to the startup settings and perform the steps outlined above.
If the computer boots and you can log in, then you can perform the other steps below.
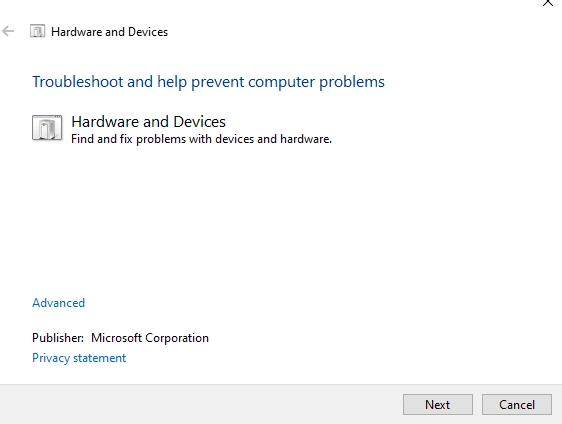
Fix #1: Scan Using Hardware and Device Troubleshooting Tool.
Let’s start with the simplest solution before moving on to the more complicated ones.
Windows now comes with a plethora of specialized troubleshooting tools. One of them is dedicated to hardware and device issues.
Regrettably, it is no longer available in the Settings menu. You must instead start it from the command line. Fortunately, it’s simple: open Command Prompt, type msdt.exe -id DeviceDiagnostic, and press Enter.
On the next screen, click Next, and your system will scan for problems for a few minutes. It will provide a report on its findings.
Fix #2: Run the DISM Tool.
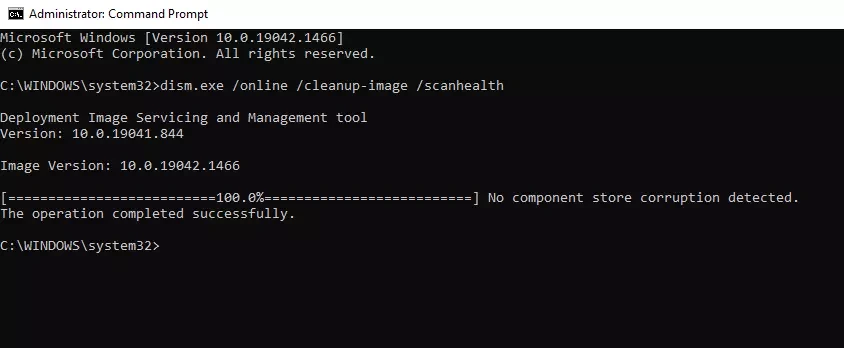
If the errors persist, it’s time to move on to the Deployment Imaging and Servicing Management (DISM) tool. A corrupt system image will be repaired.
The tool has three functions:
- /ScanHealth,
- /CheckHealth
- /RestoreHealth
We only care about the last one. To use DISM, launch Command Prompt as an administrator by following the steps outlined previously. When the app is open, enter DISM /Online /Cleanup-Image /RestoreHealth.
The procedure usually takes between 10 and 30 minutes. Do not be alarmed if the progress bar pauses at 20% for several minutes; this is normal behavior.
Restart your computer once the scan is complete.
Fix #3: Perform an SFC Scan.
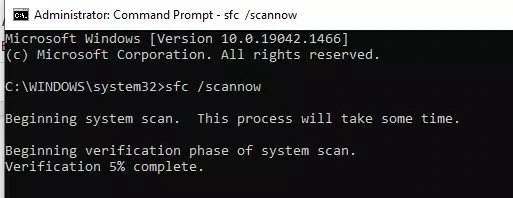
The following step is to launch the System File Checker utility. It’s a well-known utility that can repair corrupted or incorrectly modified system files to cure a wide range of Windows-based ailments.
In reality, it is not always useful; people use it more out of habit than necessity. However, in the case of the Critical_Process_Died W indows 10/11 error, this is a critical step in the troubleshooting process.
To run the checker, launch Command Prompt as an administrator. The simplest method is to search for cmd, right-click on the result, and choose Run as administrator.
When Command Prompt opens, type sfc /scannow and press Enter. The procedure may take some time to complete. When it’s finished, an on-screen list of any problems and the steps the scan took to fix them will appear. Restart your computer to proceed.
Fix #4: Scan for Malware.
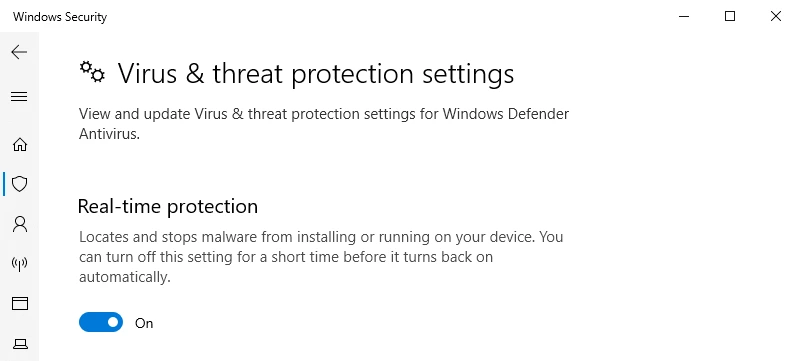
Malware on your system could be causing the stop code. Malware can corrupt system files and processes, rendering them inoperable.
You can use either Windows Defender or your preferred third-party antivirus suite. Just make sure to perform a thorough, full-system scan.
Fix #5: Update Your Device Drivers.
One of the most common causes of the stop code is a bad driver. As a result, it is prudent to ensure that none of them requires updates.
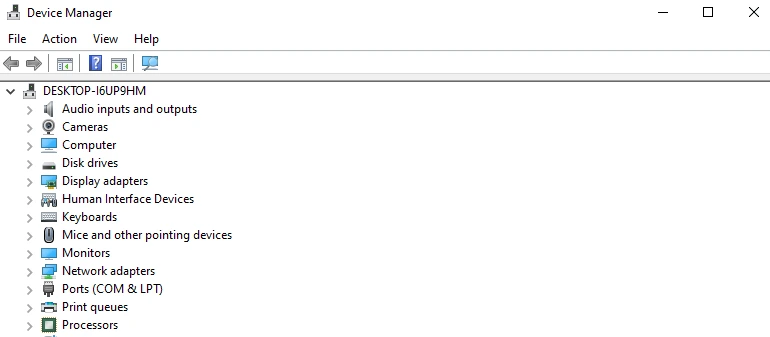
To check the status of your drivers, right-click on the Start tile, select Device Manager, and look for any devices with a yellow exclamation point next to them.
If an exclamation point appears, right-click on the device and select Update Driver Software from the context menu.
Fix #6: Uninstall Recent Windows Updates.
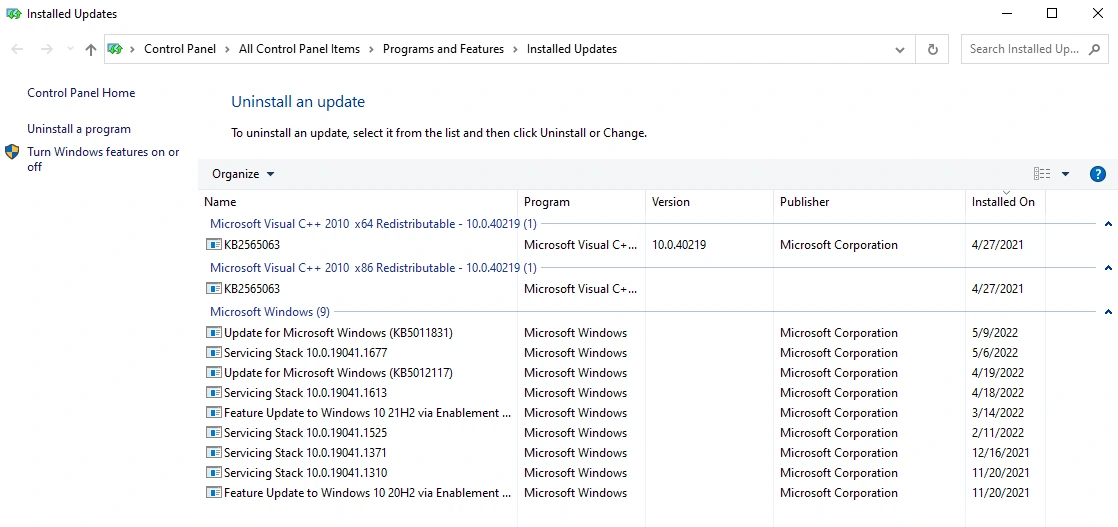
If your problem is new, a recent Windows update could be to blame. Fortunately, you can easily uninstall recent updates to see if your problem goes away.
To uninstall an update, go to Update & Security > Windows Update > Update History > Uninstall Updates in the Settings app. Highlight the update you want to uninstall, then click the Uninstall button at the top of the window.
Fix #7: Perform a Clean Boot.
A clean boot is a startup mode that uses the fewest number of drivers, processes, and programs possible. Once your computer is up and running, you can begin to load the missing processes in an attempt to isolate the issue.
To clean boot your computer, follow the steps outlined below:
- Enter System Configuration in the Start menu search bar and click on the best option.
- Select the Services tab.
- Uncheck the Hide all Microsoft Services checkbox.
- Select the Disable All option.
- Go to the Startup tab.
- Select Open Task Manager.
- Click on the Startup tab once more in the new window.
- Disable every item on the list.
- Reboot your computer.
Fix #8: Do a System Restore.
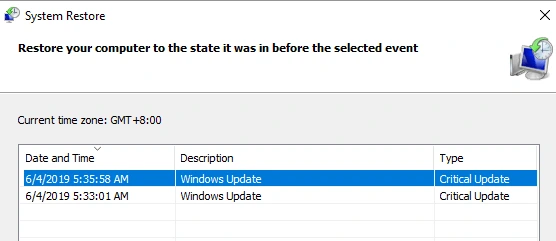
You can use the System Restore tool to restore your computer to a previous state. This option is only available if you enabled the creation of restore points prior to the onset of your stop code problems.
To use System Restore, navigate to Settings > Update & Security > Recovery > Reset this PC > Get Started > Keep Files and then follow the on-screen instructions.
Fix #9: Reinstall or Reset.
Is it time to throw your computer against the nearest wall and go shopping if none of the above solutions works?
Actually, there is one more roll of the dice. The final option is to reset Windows or reinstall it from scratch. If that fails, you almost certainly have a hardware problem on your hands.
Summary
The solutions described above should resolve most cases of the ‘CRITICAL PROCESS DIED’ error in Windows 10. Rebooting your computer into Safe Mode and Clean Boot is an essential step in troubleshooting. To repair your system, you can perform a system restore or use the SFC tool to repair corrupted files. Furthermore, the same techniques could be used to resolve a variety of other Blue Screen of Death (BSO D) issues in Windows 10.