
Windows 10/11 has a dedicated email client called Mail app that allows users to send and receive emails from multiple accounts in one place. It eliminates the need to switch between different services or log in to different accounts.
How to Add an Email Account to the Mail App
To add a new email account to the Mail app, follow the instructions below.
- Launch the Mail app by clicking on Windows Start menu > Mail.
- If this is the first time you’ve used the Mail app, you should see a Welcome page.
- Click Add account to get started.
- If you’ve opened the Mail app before, click Settings > Manage Accounts.
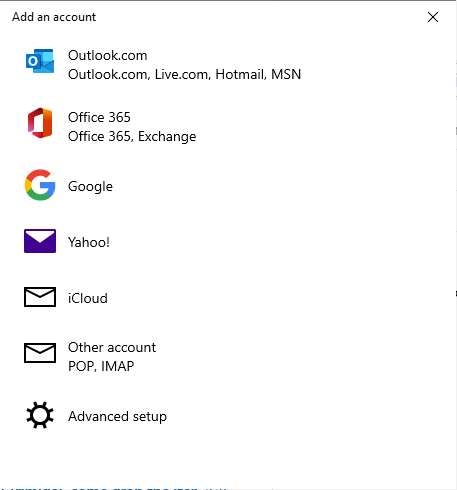
- Click Add account and choose the type of the account you want to add.
- To view all options, scroll down the Add an account dialog box.
- If you select Google, you have to sign into your Google account.
- Type in your 2-step verification code if it is enabled.
- Give Windows access to your information by clicking Allow.
- Your account should now be created.
- The steps are pretty much the same for other email accounts, except for minor differences.
- Type in the required information and click Sign in.
- Click Done and your data will start syncing as soon as your account is set up.
You can also choose to add an email account using the Advanced options, but this is a bit more complicated and requires some technological knowledge.
Are You Getting Error 0x80070490 When Trying to Add an Account to Mail App in Windows?
The process of adding an email account on the Mail app is a pretty straightforward process, especially if you use a Hotmail or MSN account to log into Windows. However, several users have reported coming across the error 0x80070490 when trying to add an account to Mail app in Windows.
Expert Tip: For smoother PC performance, consider using a PC optimization tool. It handles junk files, incorrect settings, and harmful apps. Make sure it's right for your system, and always check the EULA and Privacy Policy.
Special offer. About Outbyte, uninstall instructions, EULA, Privacy Policy.
According to the reports, the Mail app error code 0x80070490 can happen when adding any email account — Gmail, Hotmail, Yahoo, Outlook, or any other email service provider. When you launch the Mail app, it may throw the following error message on the screen:
Something went wrong. We couldn’t find your settings. Error code: 0x80070490.
This occurs mostly when a Gmail account is added to the Mail app, but other email accounts are also prone to this error.
In this article, we will show how to resolve the error Mail app error code 0x80070490.
What Causes Mail App Error Code 0x80070490
The main reason you’re getting this error is incorrect email settings. You need to verify that your login details for that account are updated and correct. Sometimes the error is affected by the factors that are out of the control of the user, such as when the email server is down or unresponsive. If this is the case, then there’s nothing else to do but wait until the issue has been resolved by your email provider.
There are instances when the error is caused by mundane factors, such as a very slow or unstable internet connection. Remember that you need to log into your email account when you sign up so any interruptions can cause the Mail app to go wonkers. An overprotective firewall might also be preventing your computer’s connection to the email server.
Another possibility is that your Mail app is outdated or there are corrupted registry entries related to the app. Corrupted system files are a common cause of Windows errors, regardless of the version. You should also take into account the possibility of malware infecting your files and messing with your settings.
Finding out the exact cause of the error can be troublesome because sometimes the issue is caused by multiple factors. To cover all bases, it is best to try all the solutions listed below when troubleshooting this error.
How to Fix Error Code 0x80070490 in Mail App
Before we go to the complicated solutions, let’s try some basic troubleshooting methods first to see if they will work.
- Close the Mail app first, then relaunch it.
- e cautious when disabling your antivirus and firewall temporarily before launching the Mail app, as this might expose your system to potential threats. This step should only be taken when you fully understand the risks, and it’s vital to re-enable them as soon as possible to keep your system protected.
- Consider using a reputable and reliable computer cleaning software, for example, Outbyte PC Repair to clean up your computer and get rid of junk files.
- Restart your PC.
Still no luck? Then here are the solutions you can try.
Method 1: Reset the Windows 10/11 Mail App.
This error possibly occurs due to having a wrong setting in the Windows 10/11 Mail app. In this case, you can try resetting the Mail app using the following instructions:
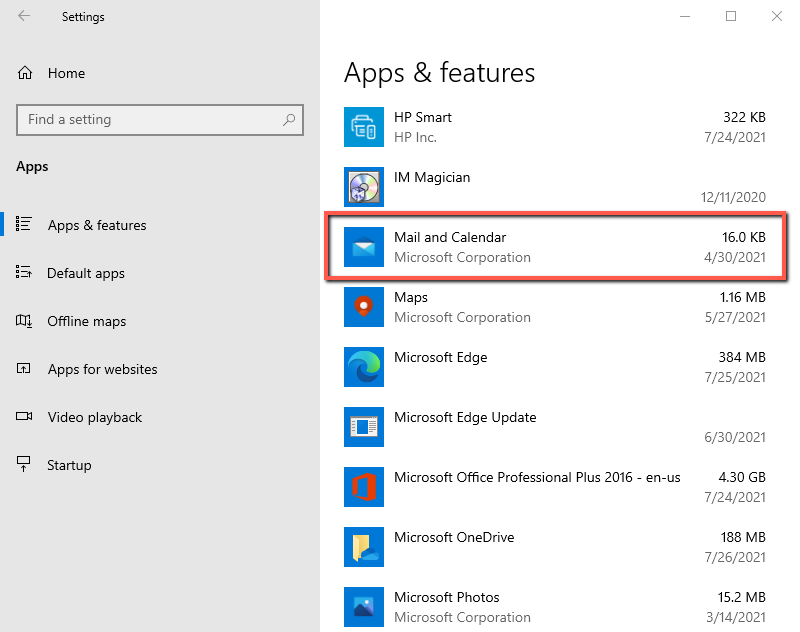
- Open Windows 10/11 Settings.
- Go to Apps > Apps & features.
- Locate the Mail and Calendar app and select it.

- Click on the link saying Advanced options.
- Under the Reset section, click on the Reset button.
- Click the Reset button again to confirm the changes.
After performing the above steps properly, see if the error code 0x80070490 is fixed now. If you still receive the same error, try the next option.
Method 2: Update the Mail and Calendar App.
Go to the Microsoft Store, search for the Mail & Calendar app, and hit the Update button. Alternatively, click on More options, and select Downloads and updates. Many users confirmed that installing the latest app version solved the problem.
Method 3: Run System File Checker.
The next solution is to run the System File Checker tool to scan and restore the corrupted system files. To try this, do the following:
- Open an elevated Command Prompt.
- Copy and paste the command line and hit Enter to execute it: sfc /scannow


It may take around a while to complete the procedure. So as long as the system scans the text code, you can perform any other work if you want. After the successful SFC scan, restart your Windows device and try to add your email account again.
Method 4: Check Your Privacy Settings.
Your Windows 10/11 privacy settings might be preventing apps from accessing your email. Navigate to Settings, select Privacy and go to Email, Calendar, and People. Then allow apps to access your email and calendar.
Restart your Mail app and try to add the problematic email account again. If the error persists, restart your computer and try again.
Method 5: Enable the Built-in Administrator Account.
If nothing helps you solve the error code, chances are your administrator account is not active. In this case, you need to enable the built-in administrator account to solve the error code.
- Press the Windows + I keys to open the Run dialog box.
- Type cmd in the text field and press Ctrl+Shift+Enter to open the command prompt as an administrator.
- If a UAC popup appears on the screen, click the Yes button to grant administrator access.
- In the command prompt window, type in: net user administrator /active:yes.
- Press the Enter key to execute the code.
- Now close the Command Prompt window and then restart your PC.
- On startup, try to sign in to the administrator account.
- After performing the above steps, try to set up the account again.
Method 6: Set up the Calendar App.
Other users suggested that you need to set up the Calendar app first and then customize your email settings.
- Launch the Calendar app, click on Settings, and go to Manage accounts.
- Select Add Account, and follow the on-screen instructions.calendar-app-manage-accounts
Wait until your calendar data syncs and then check your email settings.
Method 7: Reset the Mail and Calendar App.
If the issue persists, jump to the next solution on the list. Try resetting the app but keep in mind this solution will also delete your app data.
- Navigate to Windows Settings, select Apps, and then click on Apps & features.
- Scroll down to the Mail & Calendar app.
- Then select Advanced options.mail-and-calendar-advanced-options
- Hit the Reset button, re-launch the app and check the results.
Method 8: Uninstall the Mail App and Reinstall It.
This solution requires you to uninstall the Mail app and reinstall it again and see if it helps you fix the error code. The procedure to uninstall and reinstall the Mail app is as follows:
- Right-click on the Start menu.
- Select Windows PowerShell (Admin) from the menu list.
- When UAC prompts on the screen, click the Yes button to give your consent.
- In the PowerShell window, type the following command line: Get-AppxPackage Microsoft.windowscommunicationsapps | Remove-AppxPackage
- Press the Enter key to execute the code.
- Now close the PowerShell window and open the Microsoft Store app.
- Search for the Mail and Calendar app.
- Then download & install the Mail and Calendar app.
After installing the Mail and Calendar app, see if it fixed the error code.
Method 9: Add Email Account Using Advanced Options.
If the straightforward process of adding the email account did not work, try using the advanced option instead. Keep in mind that this is a complicated process so you need to follow the instructions to the ‘t’.
- Firstly, you’ll need to open Windows 10/11 Mail by clicking on the Start button, then click on Mail.
- Once Windows 10/11 Mail has opened, choose the Settings icon (the cog) from the menu located at the bottom of the app.
- Then simply choose Manage Accounts from the settings menu that appears on the right hand side of the screen.
- Click on the option labelled Add Account.
- After you have entered your email address and password, choose Advanced setup from the list of different account types.
- Click on Internet email to set up your account details.
- You will be presented with some new form fields to fill in.
- Email address – This is the name you’ll see in the left pane of the Mail app.
- User name – This is your full email address.
- Password – Enter your email account password.
- Account name – This is the name that you’ll see in the left pane of Mail for Windows 10/11, as well as in the Manage Accounts pane. You can choose any name you want.
- Send your messages using this name – Enter the name you want recipients to see when they receive your message.
- Incoming email server – You can get this information from your ISP or administrator. Usually, an incoming mail server address is in the format of mail.contoso.com or imap.google.com. For many email accounts, you can find this information in our POP and IMAP server name reference.
- Account type – Choose POP3 or IMAP4. Most email accounts use IMAP4. If you don’t know which one to choose, contact your ISP.
- Outgoing (SMTP) email server – You can get this information from your ISP or administrator. Usually, an outgoing email server address is in the format of mail.contoso.com or smtp.contoso.com.
- Finally, ensure the 4 checkboxes at the end of the form are all checked.
- When you have entered the relevant details, click Sign-in to proceed to the next stage.
- When you see the message: All done! – Your account is setup, click the Done button to complete the setup process. You are now ready to send and receive email using Windows 10/11 Mail.
Conclusion
The Mail app error code 0x80070490 prevents Windows users from setting up their email accounts, which can be a hassle if you’re using the computer for work purposes. Sending and receiving emails from multiple email accounts should be an easy process using the Mail app, but this error makes it impossible to do so. So if you cannot add your email accounts and you don’t want to manually sign in to your email services one by one, you can try the above fixes to see if one of them works.
This really helped, thank you
2nd option worked perfectly. Great job. Easy to follow instructions. Thank you.
2nd option works perfectly. Tnx a lot!!
Method 2 worked for me… by just updating the app. Thanks You