
Autorun.dll errors are common in Windows when installing or launching programs. These errors indicate missing or not found autorun.dll files, which are essential for program execution. Let’s explore the significance of the autorun.dll file and why it is necessary for proper program functioning.
What Is the Autorun.dll File?
All DLL files on Windows are important; if any of them is misplaced or deleted from their specific location, you will receive various types of error messages.
Autorun.dll is an example of an Autorun Wizard Pages file. It is most commonly found in Microsoft’s Windows operating system. It is a Win64 DLL (Executable application) file with the DLL file extension. It is one of the Windows operating system’s essential system files. It usually contains a set of procedures and driver functions that Windows can use. The AutoRun.dll file contains information on how the application or a Windows service must be executed.
Autorun.dll’s first version was released for Windows 10/11 in 2014 viaPhotoScape X 3.7. In 2011, version 10.0.16299.1004 for WinBuild.160101.0800 was launched for Microsoft Office Access 2010 14. Autorun.dll can also be found in Microsoft Office Access 2010 14, Free Convert to DIVX AVI WMV MP4 MPEG Converter 6.2, and Speakonia 1.3.5.
Expert Tip: For smoother PC performance, consider using a PC optimization tool. It handles junk files, incorrect settings, and harmful apps. Make sure it's right for your system, and always check the EULA and Privacy Policy.
Special offer. About Outbyte, uninstall instructions, EULA, Privacy Policy.
File Information
File Name: autorun.dll
File Extension: DLL file extension
Description: Autorun Wizard Pages
Object File Type: Executable application
File Operating System: Windows NT 32-bit
MIME Type: application/octet-stream
Software Developer: Microsoft Corporation
Software Program: Microsoft® Windows® Operating System
SHA1 Hash: cddc030d94dbbdd1c2d1d2cfef829536a4fc145f
Directory: C:\Windows\System32
What Is the Autorun.dll Error Code 0x7e?
Autorun.dll is an example of a Dynamic Link Library (DLL) file. Autorun.dll and other Dynamic Link Library files are essentially “guide books” that store information and instructions for executable (EXE) files to follow. These files are designed so that multiple programs, such as Office 365, could share the same autorun.dll file, thereby saving valuable memory allocation and making your computer run more efficiently.
Unfortunately, the same properties that make DLL files so useful and efficient also make them extremely vulnerable to errors. A “runtime” error message can be generated if something happens to a shared DLL file, such as it goes missing or becomes corrupted in some way. The term “runtime” is self-explanatory; it means that these errors occur when autorun.dll attempts to be loaded, either when Microsoft Office Access 2010 is starting up or, in some cases, while it is already running.
The following are some of the most common autorun.dll errors:
- “The program can’t start because Autorun.dll is missing from your computer”.
- “Autorun.dll Missing”.
- “Autorun.dll Not Found”.
- “Autorun.dll is missing from your computer. Try reinstalling the program to fix this problem.”
- “This application has failed to start because Autorun.dll was not found. Reinstalling the application may fix this problem.”
- “The file autorun.dll is missing.”
- “Cannot register autorun.dll.”
- “Cannot find C:\Windows\System32\\autorun.dll.”
- “Autorun.dll Access Violation.”
- “The file autorun.dll could not be loaded or is corrupted. setup cannot continue error code is 0x7e”
The error message “The file Autorun.dll could not be loaded or is corrupted; setup cannot continue; error code is 0x7e” can appear when you’re trying to install some applications. However, it might be possible to fix it by doing a full system scan. If you get the “Autorun.dll missing Windows 10/11” message,, you might need to perform both SFC and DISM scans to resolve it. But if it says that Autorun.dll is missing or corrupt, you should be able to fix the problem by performing System Restore.
Your autorun.dll file may have been deleted accidentally, uninstalled as a shared file of another program (shared with Microsoft Office Access 2010), or deleted as a result of a malware infection. Furthermore, autorun.dll file corruption may be caused by a power outage while loading Microsoft Office Access 2010, a system crash while loading autorun.dll, bad sectors on your storage media (typically your primary hard drive), or, more commonly, a malware infection. As a result, it’s critical to keep your anti-virus software up to date and scanning on a regular basis.
What Causes Autorun.dll Errors?
These are some of the most common causes of the autorun.dll 0x7e error:
- Damaged or invalid registry keys related to the AutoRun.dll file
- Malicious code injected by virus or malware or altered AutoRun.dll file
- The AutoRun.dll file was deleted by another application
- The current version of AutoRun.dll file was overwritten by another application
- Damaged hardware or a bad hard drive
Once you have understood the root of the problem, you can check out the different ways to deal with this error quickly and permanently.
How to Fix the Autorun.dll Error Code 0x7e?
The first thing you need to do is check whether the Autorun.dll file was accidentally deleted. Look into the Recycle Bin to see if it’s there. It’s possible that you unintentionally deleted the Autorun.dll file, which could explain why you’re getting errors like Autorun.dll not found and The file Autorun.dll is missing.
To do this:
- Click the Recycle Bin to open it.
- Now, in the search bar, type autorun.dll and press Enter.
- If you found the file, right-click on it and select Restore.
If you didn’t find the file there, follow the solutions below:
Solution #1: Fix Invalid Registry Entries.
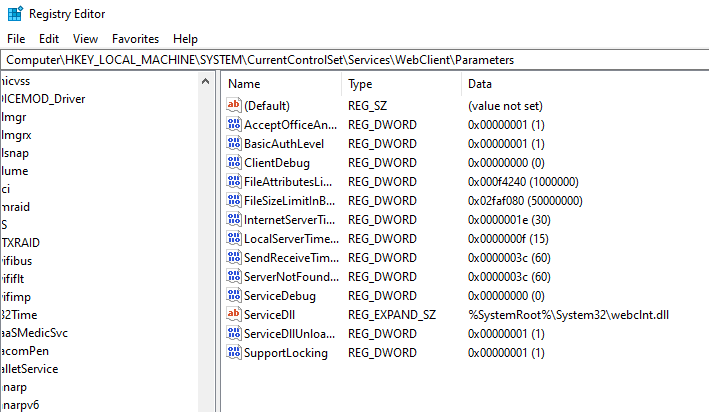
In many cases, the DLL error is caused by problems with the Windows registry. As a result, it is strongly advised to repair corrupt registry entries.
Repairing the registry entry manually can be risky, as a single mistake might damage the entire system. Some users prefer to use a professional registry cleaner, while others choose manual methods. Always take precautions and consider seeking professional assistance if unsure.
Solution #2: Scan for Malware.
Another cause of the Autorun.dll error is the presence of viruses or malware that interfere with DLL libraries. To validate this option, it is recommended that you run a full system scan to detect and remove malicious programs or applications that may cause autorun.dll errors. You can use your preferred antivirus software or the built-in option in Windows 10/11: Windows Defender. Wait for the process to complete to rule out the possibility that a virus is causing this error.
Solution #3: Reinstall Microsoft Visual C ++.

The Microsoft Visual C++ Redistributable Package can also cause the Autorun.dll error. You should check for software updates and reinstall it. Look for this action in Windows Updates. When you find the Microsoft Visual C ++ Redistributable package, you can update it or uninstall the program and reinstall it.
- Press the Windows logo key on the keyboard – select Control Panel, browse the categories, then click Uninstall.
- Examine the version of Microsoft Visual C++ Redistributable and uninstall any previous versions.
- Uninstall the remaining Microsoft Visual C++ Redistributables.
- Visual C++ redistributable 2015 Redistribution Update 3 can be downloaded from the Microsoft website.
- Run the installation file after downloading it and installing it on your computer.
- After a successful installation, restart the computer.
If this method is ineffective, proceed to the next step.
Solution #4: Use the SFC Tool.
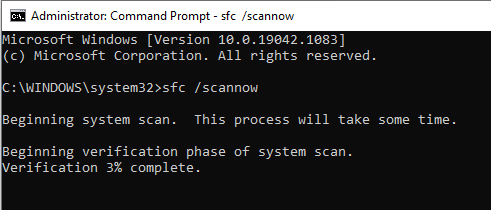
If you’re getting Autorun.dll errors on your Windows 10/11 PC, the problem could be file corruption. According to some users, the system files can become corrupted at times, causing autrorun.dll to become missing or corrupted.
However, you can always repair your files by running an SFC scan following the steps here:
- Select Command Prompt (Admin) from the list when you press Windows Key + X.
- If Command Prompt is not available, PowerShell (Admin) can be used instead.
- Enter the command sfc /scannow into the command line.
- When the scan is finished, restart your computer.
Once the SFC scan is complete, check to see if the problem has been resolved. Several users reported being unable to run SFC scan on their PC.
Solution #5: Uninstall then Reinstall Microsoft Office Access 2010 (If Microsoft Office Access 2010 Was Recently Installed).
Follow these steps to uninstall Microsoft Office Access 2010 software (Windows XP, Vista, 7, 8, and 10):
- Press the Start button to begin.
- Enter Uninstall in the search box and press Enter.
- Find and select Add or Remove Programs from the search results.
- Locate the Microsoft Office Access 2010 entry and select Uninstall.
- Uninstall the program by following the on-screen instructions.
After completely uninstalling the software, restart your computer and reinstall Microsoft Office Access 2010.
Solution 6: Run Windows Update.

If the previous steps haven’t resolved your problem, you should consider running Windows Update. Many autorun.dll error messages can be attributed to an out-of-date Windows operating system. Please follow these simple steps to run Windows Update:
- Press the Start button to begin.
- Enter Update in the search box and press Enter.
- Click Check for Updates (or a similar button depending on your Windows version) in the Windows Update dialog box.
- If updates are available for download, click Install Updates.
- Restart your computer once the update is complete.
If Windows Update did not resolve the autorun.dll error message, proceed to the next step.
Solution #7: Restore Your PC Back to the Latest Restore Point.
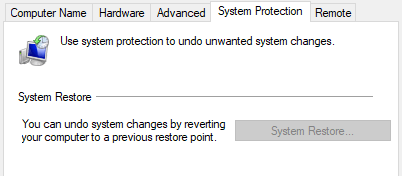
Performing a system restore allows users to return to a previous Windows state in which your Windows system is fully operational.
To get started with System Restore:
- Press the Windows Start button to begin.
- When the search box appears, type System Restore and press Enter.
- Find and select System Restore from the search results.
- Please enter the administrator password (if required).
- To select a relevant restore point, use the System Restore Wizard.
Restore your computer to the backup image you created.
Summary
We hope that these solutions were able to help you in resolving the Autorun.dll errors that you have encountered. Follow the suggested fixes one by one to see which one works best for you. To avoid further problems, make sure to carefully follow the provided fixes.