Windows operating systems, popular worldwide, are continuously updated by Microsoft to meet user demands. Consequently, Windows 10/11 may encounter occasional problems and errors.
In this post, we will discuss everything you need to know about one particular Windows 10/11 error: the error 0x800701E3. If you’re experiencing this problem then read on to find out more about what causes these issues and how you can solve them!
The Windows 10/11 Error Code 0x800701E3
Well, a lot of things can happen on your Windows 10/11 device. Even when you are completing a simple task or operation, a crash or a blue screen of death can take place. It could be due to the fact that many processes and operations need to be performed to execute bigger and major operations on your device.
Errors can also happen while trying to transfer a file from one disk to another in your Windows 10/11 device. According to some affected users, they encounter the 0x800701E3 error while performing such a task.
Expert Tip: For smoother PC performance, consider using a PC optimization tool. It handles junk files, incorrect settings, and harmful apps. Make sure it's right for your system, and always check the EULA and Privacy Policy.
Special offer. About Outbyte, uninstall instructions, EULA, Privacy Policy.
The error code is often accompanied by this error message:
“Error 0x800701e3: The request failed due to a fatal hardware error.”
Transferring Files on Windows 10/11
Before we proceed with the causes of this error, let’s first review how do you move or transfer tiles on Windows?
To transfer a file or folder from one window to another, simply drag the file or folder to where you want to transfer it while holding the right mouse button. The file or folder will simply move along with your cursor.
What Causes Error 0x800701E3 on Windows 10/11?
Generally, bad sectors on a disk drive trigger the 0x800701E3 error code to appear. These bad sectors are often a result of data corruption or damage on the disk platters.
Bad sectors can be classified as either logical or physical.
- Logical Bad Sectors – These are caused by corruption that took place at a software layer and at a logical level. And because the operating system does not know how to deal with bad sectors, then the bad sector is automatically marked as damaged and it can no longer be used by the file system. The type of data stored in that sector doesn’t matter. It will be marked as bad by the operating system right away. Once a user attempts to open data in a bad sector, the error code 0x800701E3 may be triggered.
- Physical Bad Sectors – These are often caused by physical damage to your hard drive. The damage may cause the operating system to be unable to read/write data. Also, the affected sector will be automatically marked as bad by the operating system.
As you can see, the error may appear because of many reasons. It could be triggered by damaged or poorly connected cables, which explains why data cannot be transferred. It could also be the case of malware entities messing with your system.
While there could be different scenarios that could lead to this error, many experts say that this issue is mostly associated with a complicated hardware problem that is hard to fix. And in most cases, it is triggered by a failing disk drive. That is why they always suggest that once you see the error code, create a backup of all your files as soon as possible.
Recovering Data from a Failing Disk
You will know that your hard disk is about to fail any time soon. You will experience signs like sluggish processes or data getting corrupted for no reason. So, before your hard disk dies completely, take action.
To recover data from a failing disk drive, you have two options:
Method #1: Booth via Ubuntu Live Using a USB Drive
Like Windows devices, Ubuntu is a popular operating system that can run on a USB drive. But to run it, you will need at least 4 GB of free space, a Windows computer with fast and stable internet access and a USB drive to store your recovered data.
To proceed with this step, do the following:
- First, you need to have the Ubuntu package. Download Ubuntu here. The file should be about 1 GB in size. Save it on your desktop for easy access.
- After the download is complete, obtain Rufus to create a USB bootable device.
- Be sure that you have copied everything you stored on your USB drive because it will be deleted in the next steps.
- After that, run the downloaded Rufus executable file. If prompted by the User Access Control, click Yes.
- Rufus will now launch. Go to Device and select your USB drive.
- In the drop-down menu, go to File System and select FAT32.
- Next, navigate to the Create a Bootable Disk Using section and select ISO Image.
- Now, click the CD icon to find the Ubuntu ISO file you have just downloaded.
- Hit the Start button to proceed.
- If any message appears on your screen, confirm it.
- Press Close when the process is complete.
- And then, connect your newly created Ubuntu USB drive to your target computer and turn it on. Keep pressing F12 until you enter the Boot menu.
- Once you enter the Boot Menu, choose the USB Drive as your first boot option.
- A loading screen with Ubuntu in it will now appear. After the screen completes loading, select Try Ubuntu. Make sure that you choose the correct option because we will only be using Ubuntu to recover data.
- Ubuntu’s desktop will now appear.
- Navigate to the left bar. Scroll down to the bottom and check your hard disk’s partition. It will be shown as a hard disk icon. Open it individually to check if your files exist.
- Next, connect an external drive. Its icon should then appear in the drive section.
- Open your drives. If you notice that a drive has a name with Windows on it, then it is where your Windows operating system is stored. If a file or folder that you want to recover is on your desktop, it will be saved on a folder named User.
- Click on your Windows account name.
- Select all content by using the Ctrl + A shortcut key.
- Right-click on a file/folder and select Copy to.
- At this point, a new window will appear. Choose the external drive you have just connected. Copying of files will now begin.
- If an error appears in the process of copying files, skip it.
- Follow the process above for all other drives.
- After that, your data will be recovered.
Method #2: Connect Your Hard Drive to Another Computer
If you have a faulty non-bootable drive, try to connect it to another computer using a SATA/IDE to USB adapter. It should allow you to connect your internal drive as an external drive to another computer via a USB port.
To proceed with this method, do the following:
- Remove your hard drive from your current computer.
- And then, connect it to the adapter.
- Insert the power cable into the hard disk that came with the adapter.
- Power the adapter and connect the USB to another computer.
- Your hard disk and the plug and play menu will appear right away on your screen.
- Copy all the files that you need to that computer.
Common Symptoms Associated with the Error Code 0x800701E3
Aside from seeing the error message while transferring files or when performing a clean install of Windows 10/11, here are other signs that are associated with the error code 0x800701E3:
- Poor system performance
- Slow boot-up
- Slow data access times
- Missing or damaged files
- SMART warnings appearing upon boot up
- Strange noises from the hard disk
Can I Fix the 0x800701E3 Error on Windows 10/11?
We understand how tempting it is to resolve the error on your own. But before you decide whether you must pursue fixing the error code on your own or not, you have to evaluate the importance of your data first. There will be risks associated with a DIY fix. One wrong move and you can destroy all your data. So, if your data is vital, do not attempt to take the DIY route. Otherwise, take your disk to a licensed or authorized professional.
And then, check if the disk is physically damaged or it is experiencing logical issues. While this may not sound like an easy task, you will know if your disk is physically damaged once you hear strange noises coming from the enclosure.
Logical corruption is also easier to identify. In new computers, hard disk and system health check utilities are created and they can run in the background without user intervention. If errors are detected, they will be logged into the system event log and the users will be warned.
How to Fix Error 0x800701E3 on Windows 10/11
We’ve mentioned above that the error is likely to be triggered by a failing drive. So, what should you do to fix it? What should you do about error 0x800701E3 on Windows 10/11?
Fix #1: Deal with Bad Sectors
Did you encounter the 0x800701E3 error while trying to perform a clean install of Windows? Then it is possible that your HDDs has plenty of bad sectors. And lucky for you, there are several in-built utilities in Windows that are designed to fix bad sectors. Among these are the CHKDSK and SFC utilities.
To use them, do the following:
- While the error is showing, force start your computer. Press any key to boot from an installation media.
- At the initial screen, select Repair Your Computer.
- Go to the Advanced Options menu.
- Navigate to Troubleshoot and select Command Prompt.
- Into the command line, input the following command: chkdsk /f X. Make sure to replace the value of X with the actual letter of the affected drive.
- Hit Enter to start running a CHKDSK scan.
- After the CHKDSK scan, type the sfc /scannow command.
- Hit Enter to begin the scan.
- And then, try to clean install Windows once again. See if the error still appears.
Fix #2: Disable Secure Boot
Some users said that disabling Secure Boot from the UEFI/BOOT menu has resolved the issue and allowed them to perform a clean install without a problem.
In case you didn’t know, secure boot is an industry standard that was created by top players in the PC industry to ensure that computers are using software that is exclusively from Original Equipment Manufacturers (OEM). But this standard often triggers errors with installation media, especially those that are created outside official channels.
To disable this security feature, do the following:
- Press the Setup/Boot key repeatedly after turning on your machine. This key should be displayed on your screen while booting up.
- Once you are in the BIOS menu, find the Secure Boot setting and make sure to set it to Disabled. Most often, the name and location of this feature differ from one manufacturer to the other. However, in most cases, you can find it under the Security tab.
- Save the changes and close the BIOS settings.
- Next, try to perform a clean install of Windows once again.
Fix #3: Change the SATA Cable or SD Card Adapter
As mentioned above, the error is also an indication that there is a problem with the SATA cable or SD card adapter. So, try to change them to rule out the possibility of a damaged or faulty peripheral. If the issue persists after changing the cables, then proceed with another solution.
You can ask any personnel at a PC repair shop for any SATA cable or SD card adapter that is compatible with your computer.
Fix #4: Try the Operation One More Time
If the data you are trying to move is important, you can still recover bits and pieces of them by trying the process again and again. Also, instead of copying all the files at once, move them one at a time and see if it proceeds without a hitch.
Other affected users have reported that they were able to copy the data by individually moving the files.
Do keep in mind, though, that this method only works if the SD card is failing. And even so, it only works as long as other sections of the card are not failing.
Fix #5: Use System Restore
Did you just apply new changes to your computer? Then these changes might be causing the error to appear. To fix this, undo the changes using System Restore.
System Restore is a Windows utility that can be used to restore your system to an earlier date. It helps you fix many errors and problems with the system, including registry issues, driver conflicts, malware infections, or other changes made by third-party software.
System Restore does not delete any of your files – it only restores them back to their previous state. This utility is also available from third-party vendors if your Windows PC did not come pre-installed with it.
Here’s how to do it:
- Press the Windows + R keys to launch the Run utility.
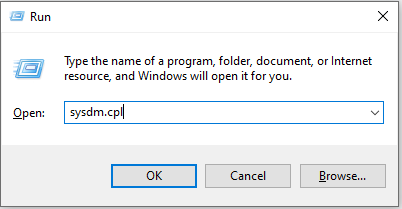
- Type sysdm.cpl into the search field and hit Enter.
- Next, navigate to the System Protection tab and click System Restore.
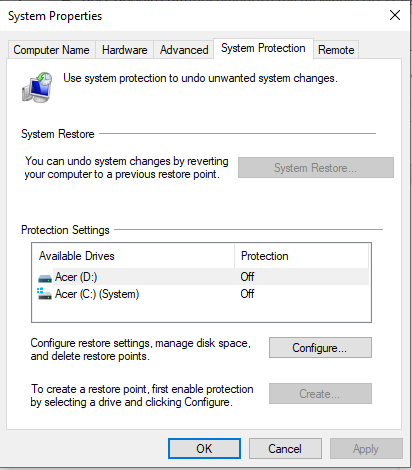
- A new window will now open with a list of restore points. Select a restore point prior to the appearance of the error.
- Follow the on-screen prompts to complete the restoration process.
- Restart your computer and check if everything is back to normal.
Fix #6: Format the Destination Drive
Formatting the destination drive may also resolve the error 0x800701E3 on Windows 10/11. To do so, follow these steps:
- Open File Explorer.
- Right-click on the drive where you have seen the 0x800701E3 error.
- Select Format.
- A new window will appear.
- Go to the File System menu and select NTFS.
- Tick the box next to the Quick Format option.
- Tap on the Start button.
- Now, all the contents of your storage drive will be removed.
- Restart your computer to apply the changes and check if the error still shows.
Fix #7: Verify Your Hard Drive Using SMART Attributes
Microsoft created the SMART analysis feature on Windows devices to analyze the hard drive and check some of its parameters. To use it, do the following:
- Press the Windows + S keys and input command prompt into the text field.

- Right-click on the top-most result and select Run as Administrator.
- Next, input the wmic diskdrive get status command and hit Enter.
- The results will be shown on your screen. If everything is normal, proceed by running a third-party program that could repair corrupted or damaged registry entries.
Fix #8: Update Your USB External Disk Drivers
To fix the error code 0x800701E3, try updating your USB external disk drivers. An outdated driver can lead to interrupts in your hard drive’s operations, and you don’t want that to happen.
To update your USB external disk drivers, here’s what you should do:
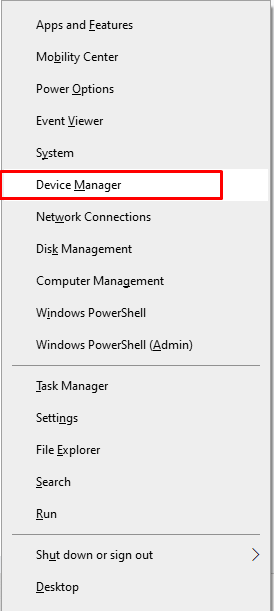
- Press the Windows + X keys simultaneously.
- Select Device Manager.
- Go to Disk Drivers.
- And then, select the external drive driver that you want to update. Right-click on it.
- Select the Update Driver Software option.
- Wait for the update process to complete and check if the error message still appears.
Alternatively, you can use a third-party disk driver updater tool to complete the task. Not only will it update the disk drive that you are currently having problems with, but it will also update all other drivers that are outdated. Plus, you don’t have to worry about compatibility issues!
Fix #9: Reset the Windows Update Components
If you have just installed a Windows update before the error appeared, then try resetting the Windows Update components. Doing this allows you to delete all the files from the Catroot2 and SoftwareDistribution folders.
To get past the error 0x800701E3, you need to delete all previous Windows Update files. Follow the steps below:
- Click the Start button.
- Into the search field, type cmd.
- Right-click on the most relevant result and select Run as Administrator.
- Type the following commands. Don’t forget to press Enter after each one of them:
- net stop bits
- net stop wuauserv
- net stop appidsvc
- net stop cryptsvc
- Next, delete the files in this location: C:\Windows\SoftwareDistribution. To do so, input this command and hit Enter: Del “%ALLUSERSPROFILE%\ApplicationData\Microsoft\Network\Downloader\qmgr*.dat”.
- And then, type this command and press Enter: cd /d %windir%\system32.
- Now, restart the Winsock utility using the following command followed by pressing Enter: netsh winsock reset.
- After that, restart the services you stopped earlier. Enter these commands:
- net start bits
- net start wuauserv
- net start appidsvc
- net start cryptsvc
- Exit Command Prompt.
- Restart your computer.
Fix #10: Run a Complete Malware Scan
The error 0x800701E3 on Windows could also be caused by a malware or virus infection that messed with your system files and important processes. To fix this, you need to get rid of the virus or malware entity once and for all.
For this, you may use the in-built Windows Defender utility. You can also use a third-party antivirus program of your choice. For better results, you can run both utilities one after the other. After the scan, fix or remove the problematic entities.
Fix #11: Have Your Device Fixed at an Authorized Service Center
If this solution does not work, then your last resort is to take your device to an authorized service center. If the technicians find that the issue is caused by physical damage to your hard drive, they will suggest having it fixed. But if the problem is internal, then they can try troubleshooting the problem and find a fix that works.
Wrapping Up
If you’re running Windows 10/11, there’s a chance that error 0x800701E3 has popped up at some point. It may be because of an issue with your device driver or hardware malfunction
And of course, there is no need to panic. There are many ways that one can fix the 0x800701E3 Windows 10/11 error with a little bit of research and patience. The most common fixes for this particular issue include updating drivers that might be conflicting with your current device setup, updating outdated versions of software on your computer, cleaning up any junk files from the system drive (C), running disk checks if necessary, disabling secure boot, or trying the whole process once again! Your best bet is to contact Microsoft support directly for assistance if this doesn’t work.
Please feel free to comment below if you have any questions about these topics or want to share your own stories about Windows errors that were fixed!