
Billions of devices utilize Windows 10/11, but many still operate on outdated versions. To enhance performance and security, Microsoft releases updates that address bugs, introduce new features, and protect against emerging threats from malicious sources.
Unfortunately, many choose to skip these updates. Perhaps users want to avoid compatibility issues. Or maybe they want to retain their existing software setup. Whatever the reason is, there are downsides to not installing Windows updates, and not being able to avail of new features and security measures is probably the most obvious one.
The May 2021 Update
The most recent version of Windows 10/11 was rolled out in May. It was named 21H1. It is only a minor update that aimed to resolve bugs. It also came with a few other changes, such as better multicamera support for Windows Hello.
To check if you have the latest Windows 10 version, go to the Start menu and select Settings. Navigate to System and click About. Scroll down to the Windows Specifications section to know what version you’re running. If you don’t see the 21H1 version, then you’re running an outdated version.
Expert Tip: For smoother PC performance, consider using a PC optimization tool. It handles junk files, incorrect settings, and harmful apps. Make sure it's right for your system, and always check the EULA and Privacy Policy.
Special offer. About Outbyte, uninstall instructions, EULA, Privacy Policy.
Now, how do you install this update? The answer is already built-in on your device. Installing Windows updates is possible thanks to Windows Update.
The Windows Update Utility: What You Should Know
Windows Update is a Microsoft service that allows users to install service packs and security patches. It also provides updates for device drivers and other Microsoft software.
To use it and install available Windows updates, click the Start button. And then, select Settings. Go to Update and Security and click the Windows Update button.
If in the process you decide to temporarily pause the update, simply go to Start > Settings > Update and Security > Windows Update. Here, you will find the option to Pause Updates for 7 Days. Click on it.
You may ask, how long does it take to download these Windows updates? This depends on some factors: your internet connection speed, the update size, and your network settings. To make the download faster, connect to a fast and stable network and make sure there is enough disk space.
Should you wish to see all the installed updates, just check the update history by clicking the View Update History button.
While these updates are beneficial, there are times when downloading them results in issues. Among these errors are the following:
- 0x8024402F – This is said to be associated with the design of the Lightspeed Rocket software that is designed for web filtering.
- 0x80070BC9 – This is triggered by policies that control the start behavior of the Windows Module Installer.
- 0x80200053 – This is caused by firewalls that filter downloads.
- 0x8024A10A – This can occur due to a long period of inactivity. As a result, the system fails to respond appropriately.
- 0x800b0003 – This is a BSOD error that can be triggered by outdated drivers, malware infection, or missing registry entries.
In this article, we will discuss another Windows Update error that has plagued many Windows users. This the Windows Update Error 0x800f0805. What is it and what causes it to appear? Can it be fixed? Read on to find answers.
What Is Windows Update Error 0x800f0805?
According to reports, the Windows Update Error 0x800f0805 appears when trying to upgrade from Windows Home to Education or Professional. However, it may also surface while trying to install any Windows update.
But what causes Windows Update Error 0x800f0805, you may ask? There are many possible triggers to this error. Below are just a few of them:
- Corrupt Windows Registry Entries – Corrupt Windows registry entries can trigger the Windows Update Error 0x800f0805. This is because if Windows is unable to find the files needed for the update, it will be unable to boot properly. This will result in an error.
- Damaged Windows File System – If important Windows files get damaged, it may result in the Windows Update Error 0x800f0805.
- Unstable Internet Access – A stable internet connection is required to install a Windows update. If your connection is unstable, then you will likely encounter a Windows update error.
- Disabled Windows Update Service – You need to enable the Windows Update service to be able to download and install a Windows update. Otherwise, an error message will be thrown.
- Misconfiguration – If your Windows Update settings are not properly configured, then there is a chance that you will encounter the Windows Update Error 0x800f0805.
- Malicious Entities – Malicious entities like viruses, malware, and adware are notorious culprits behind different Windows errors, and the Windows Update Error 0x800f0805 is no exemption.
What to Do about Windows Update Error 0x800f0805
Before you proceed with the solutions below, do the basic Windows Update troubleshooting steps first. Once you complete them, install the Windows update. Hopefully, you can proceed without any problems.
- Check if your computer has enough disk space. Ideally, you will need at least 32 GB of free disk space. If you don’t meet this requirement, then delete unnecessary files on your device manually or by using a third-party PC Repair tool that is capable of removing unwanted files.
- Disable any third-party antivirus program temporarily.
- Check for any bad sectors in your hard disk.
- Connect to a fast and stable internet connection.
Yes, the Windows Update Error 0x800f0805 can be tricky to handle. However, the solutions below should help you resolve them. You don’t need to try all of them. Just try one that you think best applies to your situation.
Solution #1: Run the Windows Update Troubleshooter
The Windows 10/11 operating system is known to be plagued by a plethora of update errors. But the good news is that Microsoft is aware of it. That is why they create the Windows Update Troubleshooter to help you address these errors in just a few clicks.
Follow these steps to run the Windows Update Troubleshooter and hopefully resolve the error:
- Press the Windows + I keys to launch the Settings utility.
- Click Update and Security.
- Select Troubleshoot and expand the Windows Update Troubleshooter section.
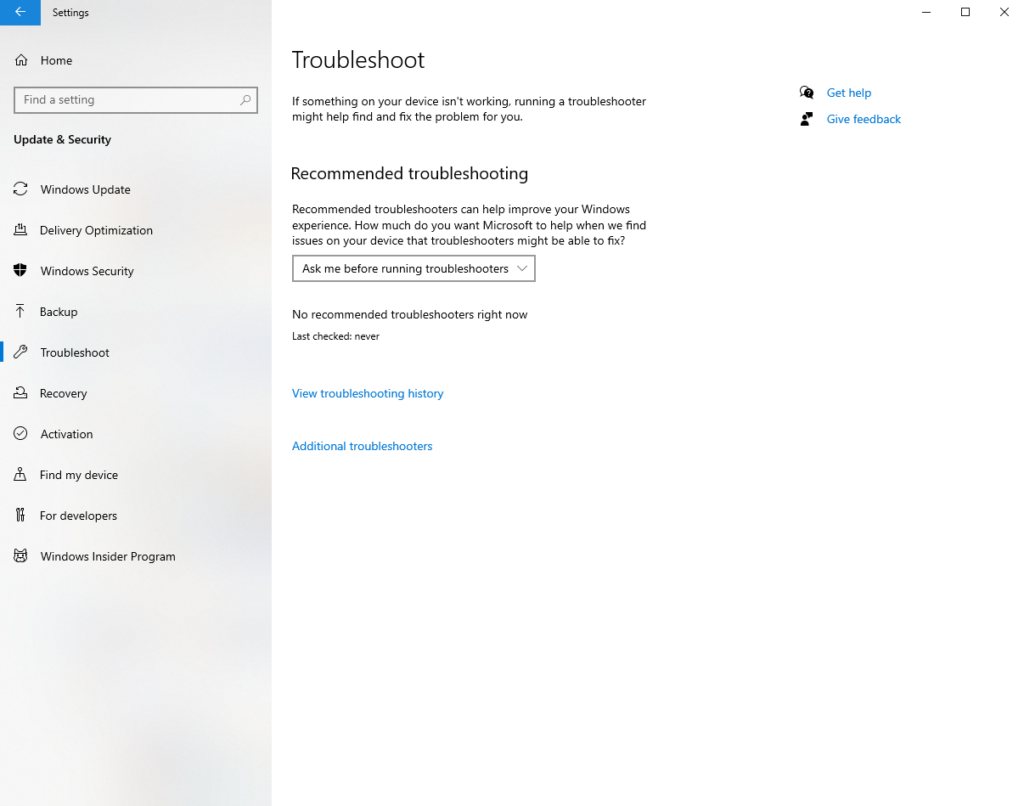
- Click the Run the Troubleshooter button.
- Once the troubleshooter is done with scanning errors and fixing them, try to install the update once again. Check if the Windows Update Error 0x800f0805 shows.
Solution #2: Use the SFC and DISM Commands
If the Windows Update Troubleshooter fails to resolve the issue, proceed with a more advanced solution. That is to use the SFC and DISM commands.
At times, we encounter system file corruption, and that is normal. However, when these corrupt system files get in the way while installing an update, it’s a completely different story. When this happens, you will need the SFC and DISM commands.
The System File Checker or SFC is a tool in Windows 10/11 that checks and resolves problems with your system files. To launch it, follow these steps:
- Click on the Start menu and enter command prompt into the search field.
- Select Run as Administrator and hit Yes.
- When the Command Prompt window appears, input the sfc /scannow command.
- Hit the Enter key to start the scanning process. Wait for the process to complete. You should know that it is done once you see the message “Verification 100% complete.”
- Exit Command Prompt by typing exit.
- Hit Enter.
- Restart your device.
- Check if the error is resolved.
Deployment Image Servicing and Management or DISM, on the other hand, is another command-line tool that is used to fix and service Windows images. To run it, here’s what you should do:
- Click on the Start menu.
- Into the search field, input command prompt and select Run as Administrator.
- When the Command Line window appears, input the DISM /Online /Cleanup-Image /ScanHealth command.
- Hit Enter to proceed.
- Next, enter the DISM /Online /Cleanup-Image /RestoreHealth command.
- Hit Enter to continue.
- Once the scan is complete, restart your computer.
- Try to update your system once again.
Solution #3: Reset the Windows Update Service
Like any other services on Windows 10/11, the Windows Update utility relies on certain services for it to perform what it’s supposed to do. But if these services go awry, then you can always reset them and force your system to create a new folder for storing new updates. You have two ways to reset the Windows Update service: manual or automatic.
To reset these services manually, follow these steps:
- Click the Start menu.
- Search for Command Prompt and right-click on the most relevant result.
- Choose Run as Administrator.
- Into the command line, type the following commands. Don’t forget to hit the Enter key after each one of them:
- net stop bits
- net stop wuauserv
- net stop appidsvc
- net stop cryptsvc
- Next, enter the following command to delete the qmgr*.dat files created by the BITS service. Press Enter after the command: Del “%ALLUSERSPROFILE%\Application Data\Microsoft\Network\Downloader\*.*”
- Confirm your action by hitting the Y key.
- After that, clear the Windows Update cache to enable Windows 10/11 to download the updates once again. You can do that by entering the following commands. Again, press Enter after each line:
- rmdir %systemroot%\SoftwareDistribution /S /Q
- rmdir %systemroot%\system32\catroot2 /S /Q
- And then, reset the BITS and Windows Update services to their default settings by typing the following commands and hitting Enter after each one of them:
- sc.exe sdset bits D:(A;;CCLCSWRPWPDTLOCRRC;;;SY)(A;;CCDCLCSWRPWPDTLOCRSDRCWDWO;;;BA)(A;;CCLCSWLOCRRC;;;AU)(A;;CCLCSWRPWPDTLOCRRC;;;PU)
- sc.exe sdset wuauserv D:(A;;CCLCSWRPWPDTLOCRRC;;;SY)(A;;CCDCLCSWRPWPDTLOCRSDRCWDWO;;;BA)(A;;CCLCSWLOCRRC;;;AU)(A;;CCLCSWRPWPDTLOCRRC;;;PU)
- Type this command to navigate to the System32 folder and hit Enter: cd /d %windir%\system32.
- Now, register the Windows Update DLL files on the Registry and hit Enter after each line:
- regsvr32.exe /s atl.dll
- regsvr32.exe /s urlmon.dll
- regsvr32.exe /s mshtml.dll
- regsvr32.exe /s shdocvw.dll
- regsvr32.exe /s browseui.dll
- regsvr32.exe /s jscript.dll
- regsvr32.exe /s vbscript.dll
- regsvr32.exe /s scrrun.dll
- regsvr32.exe /s msxml.dll
- regsvr32.exe /s msxml3.dll
- regsvr32.exe /s msxml6.dll
- regsvr32.exe /s actxprxy.dll
- regsvr32.exe /s softpub.dll
- regsvr32.exe /s wintrust.dll
- regsvr32.exe /s dssenh.dll
- regsvr32.exe /s rsaenh.dll
- regsvr32.exe /s gpkcsp.dll
- regsvr32.exe /s sccbase.dll
- regsvr32.exe /s slbcsp.dll
- regsvr32.exe /s cryptdlg.dll
- regsvr32.exe /s oleaut32.dll
- regsvr32.exe /s ole32.dll
- regsvr32.exe /s shell32.dll
- regsvr32.exe /s initpki.dll
- regsvr32.exe /s wuapi.dll
- regsvr32.exe /s wuaueng.dll
- regsvr32.exe /s wuaueng1.dll
- regsvr32.exe /s wucltui.dll
- regsvr32.exe /s wups.dll
- regsvr32.exe /s wups2.dll
- regsvr32.exe /s wuweb.dll
- regsvr32.exe /s qmgr.dll
- regsvr32.exe /s qmgrprxy.dll
- regsvr32.exe /s wucltux.dll
- regsvr32.exe /s muweb.dll
- regsvr32.exe /s wuwebv.dll
- Reset the network configurations that may be causing the error by entering these commands. Again, don’t forget to press Enter after each one of them:
- netsh winsock reset
- netsh winsock reset proxy
- Finally, restart the essential services required by the Windows Update utility by entering the following commands:
- net start bits
- net start wuauserv
- net start appidsvc
- net start cryptsvc
- Press Enter and restart your computer.
- Install the Windows update once again.
To reset the Windows Update service automatically, do the following:
- Open your preferred web browser and go to this page.
- Click the Download button to download the Reset Windows Update Agent utility.
- After downloading the file, extract the contents using any decompression utility.
- And then, double-click on the ResetWUENG.exe file.
- Hit the Yes button.
- Follow the instructions provided to complete the process.
- Restart your computer and see if the update can be installed without problems.
Solution #4: Perform a Clean Install
It is possible that a corruption issue exists that can only be resolved using advanced solutions like a clean install. But before you can proceed with this solution, you need to have a backup of your important files and folders. With a backup file in handy, you can reduce the chances of data loss.
There are many ways to create a backup of your files. The most popular method involves using the cloud. Here’s how to do so:
- Click the Start menu and select Settings.
- Navigate to the Update and Security section.
- Choose Backup.
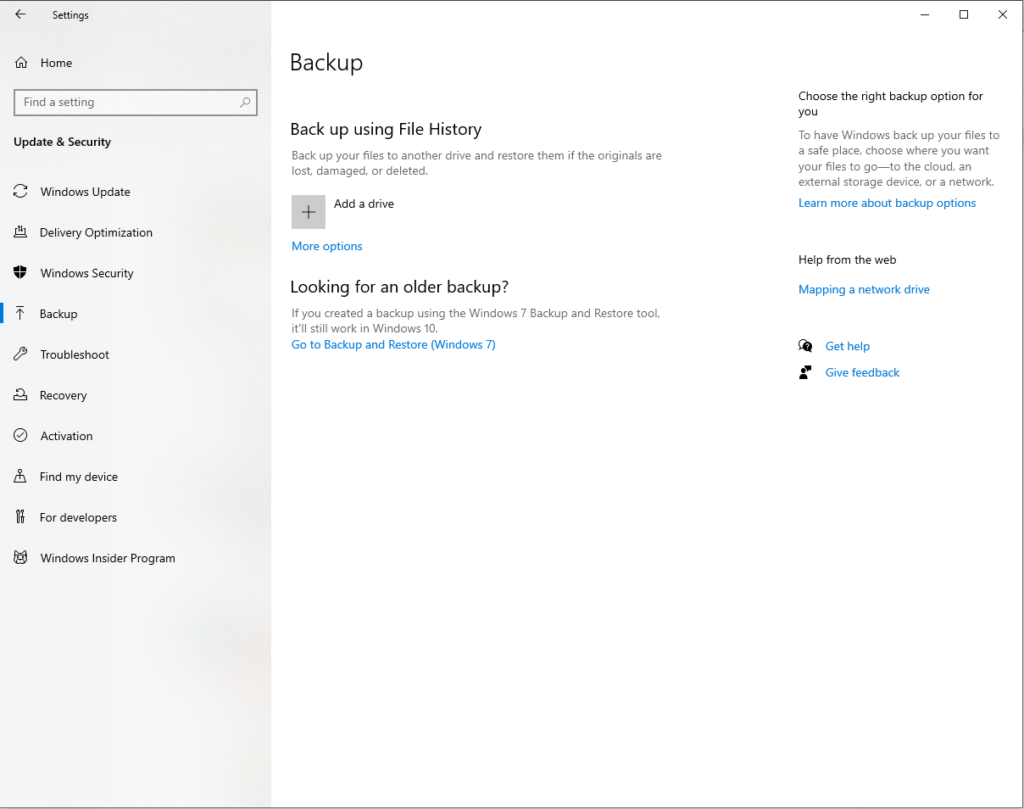
- Go to the Back up files to OneDrive section and press the Back Up Files button.
- Once you have created a backup file, all your files in the Desktop, Pictures, and Documents folder will be automatically backed up.
Now that you have a backup of your files, you should check if you have at least 4 GB of free storage space on your disk. Also, take note of your operating system’s product key. Finally, proceed with the following steps:
- Download the Windows Media Creation Tool.
- Once downloaded, right-click on the tool and run it as administrator.
- Agree to the License Terms.
- Select the Upgrade This PC option.
- Follow the on-screen prompts to complete the installation.
Solution #5: Download the Update Manually
Another way to avoid the Windows Update Error is by manually downloading the update from the official Microsoft Update Catalog. Here’s a detailed guide on how to download the update on the Microsoft Update Catalog:
- Press the Windows + I keys to launch the Settings app.
- Select Update and Security.
- Here, find and take note of the identification code that is associated with the problematic update.
- Now, go to the official Microsoft Catalog.

- Find the problematic update by typing the identification code on the search field.
- Hit Enter.
- Wait for the download to complete. Install the update and restart your computer.
Solution #6: Get Rid of Trash and Unwanted Files
If you think the error shows because your computer is running low in disk space, then you may need to free up hard disk space. This is to give way to new installation files. Below are a few ways to free up space on Windows 10/11.
via the Recycle Bin
To free up space on Windows 10/11 using the Recycle Bin, follow these steps:
- Click the Start button.
- Into the search field, type Recycle Bin. Click on the most relevant search result.
- Next, go to the Recycle Bin Tools tab.
- Hit the Empty the Recycle Bin button.
- Click the Yes button.
- Once done, your system will have about more free space.
via the Disk Cleanup Tool
To remove temporary files using Disk Cleanup, follow these steps:
- Click the Start menu.
- Type disk cleanup into the search field and click the top-most result.
- Go to the Drives drop-down menu and select the drive where your operating system is installed.
- Hit the OK button.
- Press the Cleanup System Files button.
- Click OK to proceed.
- Next, check all the things you want to remove.
- Proceed by clicking the OK button.
- Finally, tap the Delete Files button.
via Manual Method
Another way to reclaim significant system space is by uninstalling apps that you no longer need. To do this, use these steps:
- Go to Settings and select Apps.
- Navigate to Apps and Features.
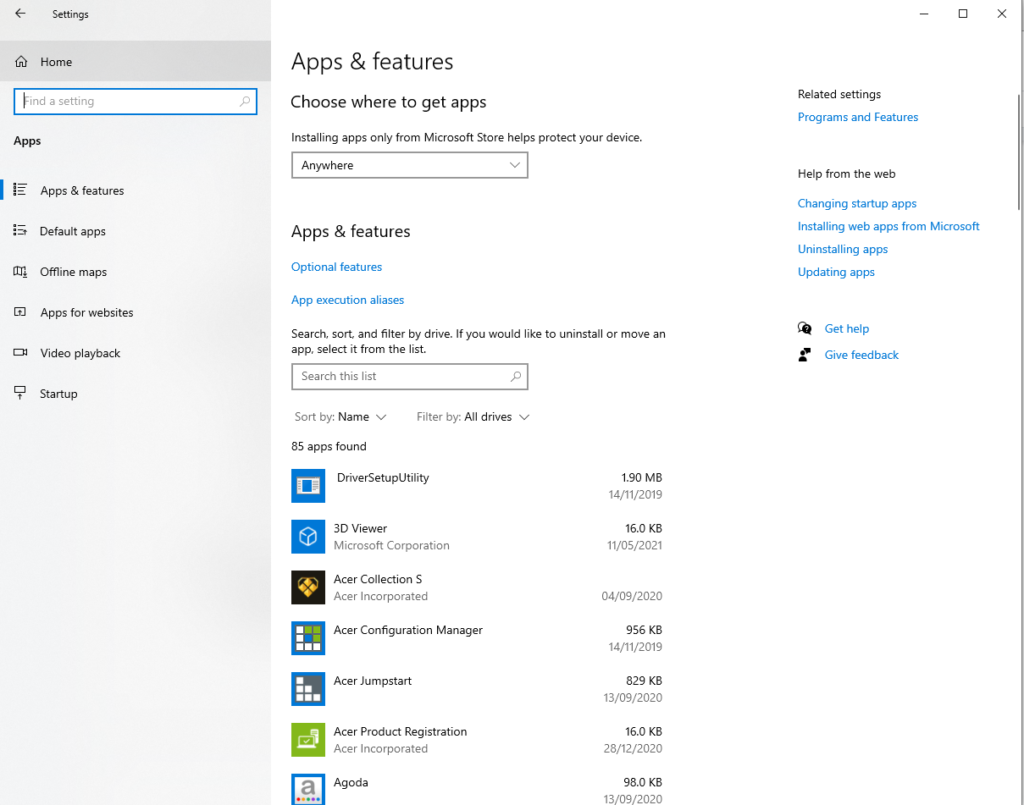
- Click the Sort by filter and choose Size to identify the apps that consume the most space.
- Select an item you wish to remove and hit the Uninstall button.
- Confirm your action by clicking the Uninstall button again.
- Continue by following the on-screen instructions.
- Repeat the above steps to remove all unnecessary apps and files.
Solution #7: Perform a Thorough System Scan
If you suspect that a malicious entity has triggered the Windows Update Error that you’re experiencing, then we suggest that you perform a thorough system scan. This way, you can identify and get rid of them once and for all.
To scan your system and identify threats, you can use the built-in Windows Defender tool. Here’s how:
- Navigate to the system tray and double-click on the shield icon.
- A wizard will now appear. Click Virus and Threat Protection.
- Select Scan Options.
- Make sure to tick the Full Scan option, and then press the Scan Now button.
- Defender will begin scanning your system. If a malicious entity is detected, it will be removed right away.
- After the threat has been removed, reboot your computer.
- Upon restart, try to install the update.
Aside from using Windows Defender, you have the option to install a third-party antivirus software program. You can even use it after performing a scan with Defender. Whatever your preference is, make sure that you apply the suggested actions to free your system of threats.
Solution #8: Disconnect Any External Component
Did you install a new printer or a headset before the error appeared? Then you have found a possible culprit. An external component can cause the Windows Update Error 0x800f0805 to appear, especially if it is not properly connected or if an incompatibility issue persists.
To fix this, you need to disconnect all your non-essential hardware components like printers, secondary monitors, and speakers. After that, connect them again one at a time until you figure out what’s causing the issue.
If you feel that the error is a result of incompatibility problems, then you may need to install a device driver that works for your Windows operating system version. To make this task easier for you, use a device driver updater tool to find a device driver that is compatible with your system.
Solution #9: Disable Startup Items
Some processes and programs that launch at startup can also trigger the Windows Update Error 0x800f0805. If you think this is your problem, try disabling them, especially those that are not important.
To proceed with disabling startup items, you need to log in using an administrator account. And then, follow these instructions:
- Open the Run dialog box by pressing the Windows + R keys.
- Type msconfig into the text field and hit Enter.
- Navigate to the General section and choose Selective Startup.
- Uncheck the Load Startup Items option.
- Find all the unnecessary services and select the Hide All Microsoft Services option.
- Click the Disable All button.
- Now, restart your device and install the Windows update again.
Solution #10: Disable Any Active VPN Connection
Are you connected to a VPN network when you installed the Windows update? Then you have found another possible trigger. An active VPN connection can confuse the Windows Update utility. It may even interfere with how information is exchanged between Microsoft’s server and your device. So, to avoid Windows Update-related errors, disable any active VPN connection prior to installing an update.
Take the instructions below as your guide on what to do:
- Click the Start menu and go to Settings.
- Select Network and Internet.
- Go to the left-side menu and click VPN.
- Click on your active VPN connection and hit the Disable button.
- Once disabled, try to install the update once again.
Solution #11: Seek Help from Professionals
Are you still having problems with installing the Windows update? Then it doesn’t hurt to seek help or assistance from Windows professionals. You can visit the official support page of Microsoft. But if you want immediate actions, take your device to the nearest authorized service center.
You can also turn to official forums and read threats related to your experience. You can also create your own thread and share your experience. If you’re lucky, a certified Windows personnel may reply and provide you with a more specific fix.
Solution #12: Forget About Updating Your OS
Well, there are times when we simply have to skip the update and wait for the next one to be released. This is because Microsoft sometimes releases problematic updates.
Thus, if you think you can’t resolve the issue because the update itself is the problem, consider skipping the update and wait for a more stable one to be rolled out.
In Summary
Like most Windows Update errors, we have to admit that the Windows Update Error 0x800f0805 is also a tricky and challenging one. It could be caused by corrupt registry entries, damaged system files, an unstable internet connection, misconfigured system settings, or malicious entities. However, it is one that can be fixed.
Before you proceed with more advanced steps, we suggest that you check if you have sufficient disk space first. You will need at least 32 GB of free disk space to successfully install an update. And then, disable any third-party antivirus programs temporarily. If the error is resolved at this point, you can re-enable your antivirus program to benefit from real-time protection.
If the basic troubleshooting methods don’t work, you can proceed with more advanced ones. You can begin with using the Windows Update Troubleshooter tool. If it doesn’t resolve the issue, use the SFC and DISM commands or reset the Windows Update service. Other solutions you can try include performing a clean install, downloading the Windows update manually, getting rid of trash and unwanted files, performing a virus scan, and disabling any active VPN connection.
Now, if you feel that the problem needs expert hands, then don’t hesitate to reach out to professionals who are more familiar with the Windows 10/11 environment. Better yet, skip the update once and for all until Microsoft releases a more stable version.
Let us know your thoughts about the Windows Update Error 0x800f0805. Comment on them below.