
0x8024200D is a critical Windows error. It displays the error message “Installation Failure: Windows failed to install the following update with error 0x8024200D: Feature update to Windows 10/11, version 1709.”
Also known as WU_E_UH_NEEDANOTHERDOWNLOAD, this error usually appears when users try to update their Windows operating system.
While it most commonly occurs during the installation of the Fall Creators Update (V-1709), the issue also affects the Anniversary Update and Creators Update. Despite the fact that all three of these updates were released a long time ago, they continue to fail with various alphanumeric codes during the download or installation process.
If you have recently encountered this error, you can use the methods listed below to resolve the situation.
Expert Tip: For smoother PC performance, consider using a PC optimization tool. It handles junk files, incorrect settings, and harmful apps. Make sure it's right for your system, and always check the EULA and Privacy Policy.
Special offer. About Outbyte, uninstall instructions, EULA, Privacy Policy.
What Is the Windows 10/11 Update Error 0x8024200d?
The Windows error code 0x8024200d is not new to the Windows 10/11 Anniversary Update; it has been present for some time. It simply means that there is an issue with the download and that some of the update files are corrupted or missing.
Files often get corrupted while being downloaded from the Internet, which is why you may be having corrupt or missing update files. Because of a faulty instruction sent back to the servers indicating that a certain file has already been downloaded, the file download may be interrupted or even terminated halfway through. If the file cannot be properly decoded or encoded, it is bound to be corrupted or even discarded by the system and thus will be missing from the update files.
This means you can’t proceed with the installation until the corrupted or missing files are replaced. Although the 0x8024200D error is not fatal, it prevents the system from being updated or upgraded, which means the system’s security may deteriorate and the user will miss out on new Windows 10/11 features.
What Causes the Windows 10/11 Update Error 0x8024200d?
As mentioned above, the root cause of the error is that you might have some missing or corrupted files on your system. The problem may occur while downloading files from the Internet. Incompletely downloaded update files can also be the reason behind this issue.
Aside from missing installation files, this error can also be triggered by any of the following issues:
- Malware attacks
- Corrupted registry entries
- Interference from a firewall or third-party security suite
Solutions to the Windows Update Error 0x8024200d
Before you begin, you should try resolving the issue by restarting the computer: Although the likelihood is very low, there is still a chance that the problematic update will run afterwards. It is also a good idea to run a reliable PC repair tool like Outbyte PC Repair to get rid of glitches that could trigger more errors.
The following are some solutions you could try to solve this problem:
Method 1: Run the SFC tool
If you have any corrupted or damaged files on your system, you may encounter the error code 0x8024200d. SFC is a built-in Windows tool that allows users to scan their PCs for corrupted system files.
To run the System File Checker on your computer, perform the following steps:
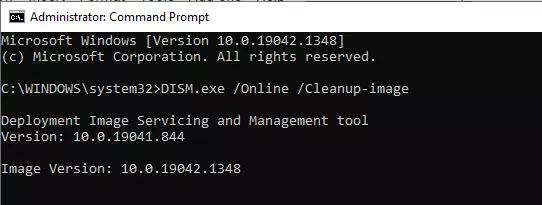
- Press the Win + S shortcut on your keyboard, then type cmd into the search box. When the Command Prompt appears in the list of results, right-click it and choose Run as administrator. You will be asked to grant permission. To launch the Command Prompt, click OK.
- If you are currently running Windows 7, please skip this step. Otherwise, enter the following command: DISM.exe /Online /Cleanup-image /Restorehealth.
This operation may take several minutes to complete. - When this process is finished, type the following command and press Enter on your keyboard: sfc /scannow.
- When the scan is finished, close the Command Prompt and run Windows Update to see if this method works. If you are unable to install Windows updates, please try the next method.
Method 2: Delete update files and download them again
If your downloaded files are corrupt or you are unsure what is missing, try re-downloading the update as it will give you all the files you need and replace the corrupt ones. To do this, you may need to boot into Safe Mode (to delete the current corrupt download). Here are the instructions to follow:
- While holding down the Shift key, select the Restart option from the Windows Start menu.
- When the computer boots, select Troubleshoot.
- Select Advanced and go to Startup Settings.
- Choose Restart.
- After the machine has rebooted, press F4 (the key on your PC may differ) to select Enable Safe Mode.
- Once your computer is in Safe Mode, navigate to ‘C:\Windows\SoftwareDistribution\Download.’ This is where you’ll find the downloaded update files.
- Delete everything in that folder.
- Restart your computer in regular mode.
- Go to Settings > Update and security.
- Select Check for updates to restart the update process.
Windows will begin downloading your files again, and hopefully, this time, your update will be installed correctly.
Method 3: Run the Windows Update Troubleshooter
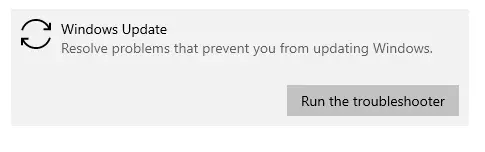
Running the Windows Update Troubleshooter is the best way to resolve this Windows Update issue. Here are the steps to take:
- Navigate to the Settings menu and select the Update & Security category.
- Select Troubleshoot from the left column, then move to the corresponding right-hand side.
- Next, scroll down and select Windows Update.
- Click the Run the Troubleshooter button.
- This will automatically scan for and repair any Windows Update faults, so please be patient and let the process run uninterrupted.
Method 4: Download the update from the Microsoft Update Catalog manually
If none of the methods mentioned above work for you, you can try downloading the update you failed to install from the Microsoft Update Catalog and manually installing it:
- To open Windows Update, press the Windows logo key + S, type Windows Update, then press Enter.
- Select View update history to check your failed update’s KB number.
- Follow the steps below to determine your system type:
- To open the Run dialog, press the Windows logo key and R at the same time on your keyboard. Open the Command Prompt by typing cmd and pressing Enter.
- To view your system type, enter the command line systeminfo and press Enter.
- “X64-based PC” denotes a 64-bit Windows operating system; “X86-based PC” denotes a 32-bit Windows operating system.
- Go to the Microsoft Update Catalog.
- Enter the number of the update you wish to download.
- Select the appropriate update for your operating system from the list of search results and click Download.
- If your Windows operating system is 64-bit, you should download the update with the words “x64-based.”
- Click the link in the pop-up window to begin downloading the update.
- To install the update, double-click the downloaded file and follow the on-screen instructions.
Method 5: Restart the Windows Update service

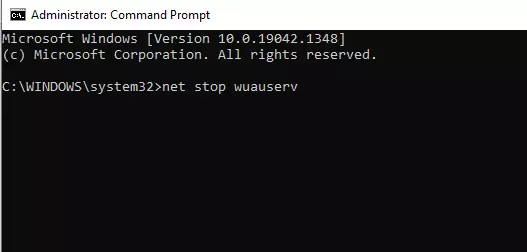
This error code may appear if there is a problem with the Windows Update service. To resolve this issue, try restarting the Windows Update service. Here’s how to go about it:
- Press the Windows logo key and R at the same time on your keyboard to open the Run dialog, then type services.msc and press Enter to open the Services window.
- If Windows Update’s status is “Running,” right-click it and select Stop. Please skip this step if the Windows Update service is not running.
- To open File Explorer, press the Windows logo key and E at the same time on your keyboard. To access the DataStore folder, copy the path below and paste it into the address bar, then press Enter on your keyboard: C:\Windows\SoftwareDistribution\DataStore
- Delete all of the files in the DataStore folder.
- To open File Explorer, press the Windows logo key and E at the same time on your keyboard. Copy the path below and paste it into the address bar, then hit Enter on your keyboard to open the Download folder: C:\Windows\SoftwareDistribution\Download.
- Delete all of the files in the Download folder.
- Right-click Windows Update and select Start in the Services window.
Check Windows Update once more to see if you can perform a Windows update. If this method does not work, please try the next one.
Method 6: Uninstall any third-party antivirus software
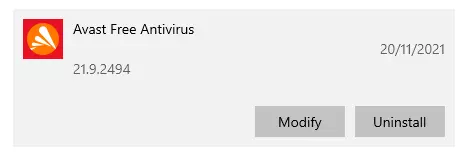
Third-party antivirus software can sometimes prevent your system from upgrading. This usually occurs as a result of an internal conflict.
Some update files may be deleted or blocked by third-party antivirus or anti-malware software. As a result, it is recommended that you remove a third-party antivirus program after several failed attempts to upgrade your system.
Hopefully, you can now install the update on Windows 10/11 without encountering the error 0x8024200d.
Method 7: Reset Windows Update components using a batch script
Using a batch script is the simplest way to reset Windows Update components. You can get a Windows Update reset script from this page. After downloading it, right-click it and select “Run as Administrator”. Allow the process to complete before checking for updates again.
You can also create your own batch script by following the instructions below.
Open Notepad and paste the following text:
@ECHO OFF
echo Simple Script to Reset / Clear Windows Update
echo.
PAUSE
echo.
attrib -h -r -s %windir%system32catroot2
attrib -h -r -s %windir%system32catroot2*.*
net stop wuauserv
net stop CryptSvc
net stop BITS
ren %windir%system32catroot2 catroot2.old
ren %windir%SoftwareDistribution sold.old
ren “%ALLUSERSPROFILE%\Application Data\Microsoft\Network\Downloader” downloader.old
net Start BITS
net start CryptSvc
net start wuauserv
echo.
echo Task completed successfully…
echo.
PAUSE
Save the file on your desktop as WUReset.bat. To run the script, simply right-click on it and click Run as Administrator.
If all else fails…
Performing a complete system reinstall is your last option. We understand that this may appear to be a time-consuming process, but it will resolve the majority of your issues.
Because you can’t do it while the system is running, you’ll need a drive (a USB stick or DVD) to store the installation setup files. To create a bootable drive, use the Windows Media Creation Tool. Make a backup of your files from the system partition and write down your license key.
We have reached the end of our guide. If you have any comments or questions, please leave them in the comments section.