
The Windows 10/11 installation error 0x80070001 is a common occurrence when installing or upgrading to Windows 10. It can also surface when installing or upgrading other software programs.
In this article, we’ll show you how to deal with the error 0x80070001 in any Windows version.
What Is the Windows Install Error – 0x80070001?
The Windows 10/11 installation error 0x80070001 or 0xa00f4271(0x80070001) often appears when attempting a Windows update. When it shows up, you cannot proceed with installing or downloading a Windows update.
Various issues, like a broken or damaged file, can trigger this error. The most common type of file that breaks during a software update is an INI file. To fix it, you will need to uninstall and reinstall your hardware device drivers with updated software from your computer’s manufacturer.
Expert Tip: For smoother PC performance, consider using a PC optimization tool. It handles junk files, incorrect settings, and harmful apps. Make sure it's right for your system, and always check the EULA and Privacy Policy.
Special offer. About Outbyte, uninstall instructions, EULA, Privacy Policy.
However, this error can also be triggered by a problem with the Windows update components themselves. And when it shows up, it may come with the error message “incorrect function.0x80070001” or simply “Windows error 0x80070001.”
Don’t worry because we will discuss more of these causes in the next section.
What Causes the Error Code 0x80070001?
A failing system component is primarily responsible for the 0x80070001 incorrect function error. But the cases below can also lead to the error:
- Incorrect or failed installation or uninstallation of Windows software.
- Invalid registry entries may still be sitting in the Windows registry.
- Your PC has been infested by malware
- Miscommunication between the Windows update server and your PC
- Sudden PC shutdown
- Missing DLL files
- Corrupt system files
- An unstable internet connection
- Corrupt programs and apps
How to Resolve the Incorrect Function 0x80070001 Error
The fix for error 0x80070001 varies, and it depends on what’s causing it. Outlined below are some possible solutions you can try to get rid of the problem once and for all and restore your PC’s stability and efficiency.
Basic Troubleshooting
Before you proceed with the technical fixes, start with the easiest and most straightforward troubleshooting steps:
- Restart your device. Sometimes, that is all you need to resolve Windows errors.
- Check your router or modem. Switch it off and back on then make sure you have good reception.
- Run a malware scan to rule out the possibility of a malware infection.
If none of these troubleshooting steps works, proceed with the solutions below.
Solution #1: Reset Winsock
The WINSOCK kernel and system library is a TCP/IP client-side implementation that exists to allow Windows apps to communicate over a network, whether it be wireless or wired. Since it’s part of Winsock that’s responsible for creating connections to and from apps, if there’s a bug within it, those connections can break down. The solution is simple: reset Winsock.
Here’s how:
- You need to open an Administrator command prompt (right-click Start and select Command Prompt) then type “netsh winsock reset” without quotes into it.
- Hit Enter and restart your computer when asked to do so.
- And then, check your connection status by clicking on Start, Control Panel, System and Security > Network Connections.
- See if the situation has improved.
Solution #2: Fix the DNS Cache
The DNS cache is a great tool to increase your computer’s speed as it helps your computer load websites faster by pre-fetching and storing frequently visited webpages on your hard drive. You can also choose not to clear it if you have already set up your own DNS servers in order for them to work properly.
If you do not know how to do so, we recommend checking out this guide. When clearing your cache, follow these steps:
- Click Start then go to Control Panel.
- Select Network and Internet -> Network and Sharing Center.
- Next, choose Manage network connections.
- Right-click Local Area Connection and click Properties.
- You will be presented with two options – TCP/IPv4 and TCP/IPv6.
- Select whichever one applies to you and click Properties again.
- Now, select Internet Protocol Version 4 (TCP/IPv4) or Internet Protocol Version 6 (TCP/IPv6) from the list of protocols at the left and click Properties once more.
- Open Advanced properties. This option is usually found near the bottom of the window under This connection uses.
- Click OK after doing so.
- Once you are back in your main Network Connections window, right-click on Local Area Connection and select Rename from its drop-down menu.
- Give it a name like Local Area Connection – CLEAR CACHE and press Enter.
- Next, open Command Prompt (run cmd as administrator) type ipconfig /flushdns, then press Enter.
- After that, restart your PC and see if that has fixed your problem.
Solution #3: Clear Browsing Data
Browsing data, also called cookies, is information stored locally by web browsers. Cookies are used to store user preferences and history and can be specific to individual sites or applications.
Clearing browsing data can often resolve lingering issues with website performance or update installation, especially if no errors appear in your browser’s console (like IE).
Here’s how to clear browsing data for Chrome:
- On your computer, open Chrome.
- At the top right, click More.
- Click History and then Clear browsing data.
- Click Clear Browsing Data and then click Clear Browsing Data again in the window that pops up afterwards.
- Exit Chrome and check if the 0x80070001 error persists.
Solution #4: Reinstall the TCP/IP Stack
TCP/IP is a fundamental piece of software in any Microsoft-based operating system. It’s used to connect to websites, servers, and other computers. A driver is an important element for establishing a connection with TCP/IP stack, which works together with a network interface card (NIC) to enable or disable functionality over a network.
However, some recent Windows updates may have caused some problems with this software. And to resolve them, you will need to reinstall TCP/IP stack.
Here’s how:
- Press the Windows + X keys, and from the pop-up window, select Device Manager.
- Right-click on your network adapter, press Uninstall, and then confirm it when prompted.
- Now, open Control Panel > Network and Sharing Center > Change Adapter Settings.
- Right-click your network adapter, press Install, and confirm it when prompted by a UAC dialog.
- Restart your computer after completing all these steps.
Solution #5: Reinstall Network Adapter Drivers
Network adapter drivers are software that allows your computer to communicate with your network. If one of these fails, you can usually fix it by reinstalling network adapter drivers.
To do so, you must uninstall them and then install them again through Control Panel. Here’s how:
- Click the Windows Start button and then type Device Manager into the search box.
- Right-click network adapter -> Uninstall -> OK.
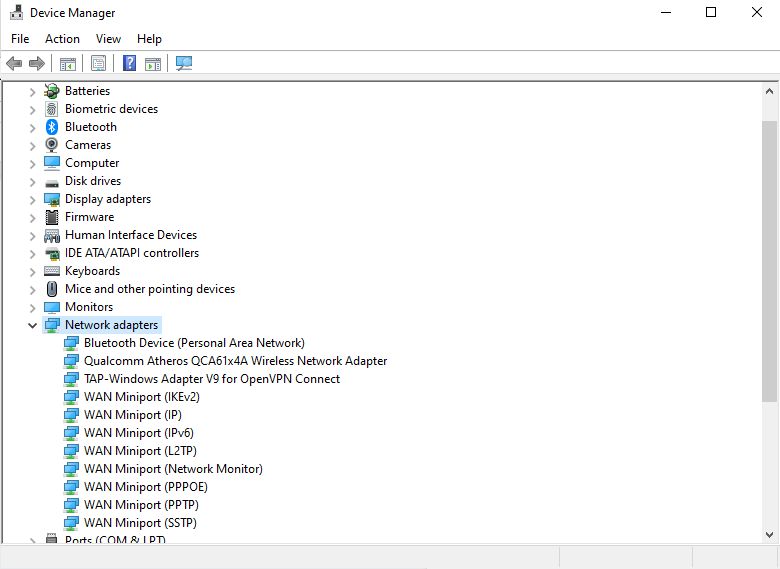
- Restart your computer after it is done uninstalling.
- On the Device Manager window, right-click network adapters -> Update Driver Software -> Browse my computer for driver software.
- Choose to search automatically for any updated driver software. It is the recommended option.
- After updating, reboot your computer.
Solution #6: Clear the Windows Update Cache
Many users have reported that a simple cache clear is all it takes to get Windows Update working again.
To clear your cache, navigate to C:\Windows\SoftwareDistribution\Download and delete everything inside of it. Just make sure you are deleting C:\Windows\SoftwareDistribution\Download and not the entire C:\Windows\SoftwareDistribution folder. Once you’ve deleted everything in that folder, try restarting your computer and checking for updates again.
Solution #7: Reset the Windows Update Components
The Windows Update utility has several main components. Sometimes, these components might get corrupted and stop working correctly. In such cases, you can try resetting them to fix your 0x80070001 error.
Follow these steps to reset your update components:
- Open up Services from your Start Menu by pressing (Win Key + R) to open Run and then entering services into its text field.
- Then hit Enter to open it.
- Here, you’ll see a list of services running on your computer and if any of them are currently paused.
- If there are any, press the Start button to start it again.
- After doing so, check if you still have issues updating your device with Windows Update.
Solution #8: Delete Temporary Files and Folders
You might also want to clear some temporary files and folders to free up space on your device’s hard drive. Computer files and folders that are temporary can sometimes cause your computer to act up, especially if they’re not getting deleted.
To eliminate these temporary files and folders, perform a disk cleanup. It’s often overlooked, but a disk cleanup a great way to purge unneeded files and help your computer run faster and more efficiently.
Here’s how to do it:
- Click Start then type in Disk Cleanup.
- Select Disk Cleanup from the list of programs.
- Click OK.
- Under Drives (or Partitions), select C: drive if it isn’t already selected.
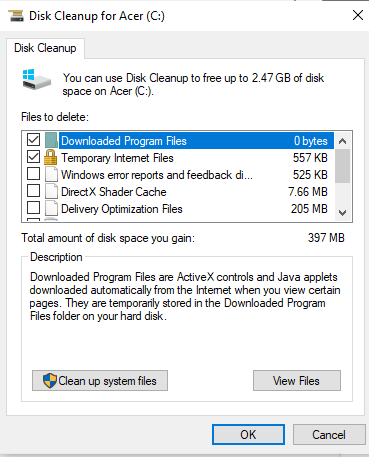
- Click OK.
- Wait for a moment while Disk Cleanup scans your hard drive for unnecessary files. and then choose whether or not you want to delete them.
Solution #9: Clear the Windows Update Download Folder
This isn’t a permanent fix, but it might resolve your issue until Microsoft can deliver a proper patch.
To do so, open File Explorer and browse to C:\Windows\SoftwareDistribution (you may need to enable Hidden Files in order to see that folder). Here, you’ll find all of your Windows updates, including whatever it is that’s causing your error. Select everything and then delete it. In most cases, clearing out these files will be enough for you to access Windows Update again.
Solution #10: Try a Reliable PC Repair Tool
If the 0x80070001 error persists despite your efforts to fix it manually, consider using a trusted PC repair tool. When choosing such a tool, ensure that it’s from a reputable provider. These tools typically come with a simple, easy-to-navigate interface that allows for quick problem-solving. They offer both quick and deep scan modes, enabling you to tailor the tool’s use based on your specific needs.
Before you start using any PC repair tool, it’s crucial to update it to the latest version to prevent any compatibility issues.
Solution #11: Perform an SFC Scan
The SFC scan is a troubleshooting tool that checks the integrity of your Windows system files. If an SFC scan finds corrupted files, it replaces them with fresh versions from a cached folder in your %systemroot% folder.
Usually, you’ll need to restart after an SFC scan to ensure everything is in order, but sometimes a reboot isn’t necessary. To perform an SFC scan:
- Select Start > Run (or press + R).
- Type cmd and click OK.
- In Command Prompt, type sfc /scannow and press Enter.
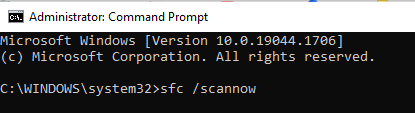
- Once your computer has completed scanning for errors, shut it down and then restart it normally.
Solution #12: Scan Your PC for Malware
Malware is a term that gets thrown around a lot in online security, but what exactly does it mean? Malware, short for malicious software, refers to programs designed to harm your computer or personal information. A malware scan searches for malicious software that’s already infected your computer and removes it.
The easiest and fastest way to identify malware is by running a scan with your antivirus or anti-malware software of choice (i.e., Avast, AVG, Bitdefender). If you haven’t installed one yet, give Microsoft Windows Defender a try. It’s free and excellent at finding rootkits and other hidden infections. Just open it and run a full system scan.
Solution #13: Perform System Restore
This solution is like going back in time. It allows you to restore your PC to an earlier point when everything was working fine. Although it won’t delete any files added since the restore point, it will remove new programs or updates potentially causing problems.
Performing a system restore should be your last resort since it is a bit technical. But if you are not confident in doing this, do not hesitate to seek help from someone who is familiar with this.
In Summary
The 0x80070001 error code is actually a very common problem, especially for Windows 10/11. It’s an error code commonly encountered when downloading or updating Windows. If it happens to you, don’t panic. Just refer to the fixes above and you should be able to get rid of it right away.
Were you able to resolve the error 0x80070001? Let us know how in the comments!
Make sure that the disc you are using Windows on isn’t converted into a dynamic disc. Also make sure you don’t have a drive designed to letter’s A and B as it seems that Windows needs that somehow for updates.
I just had similar problem with Store and Windows update neither working with RAMDISKs configured to letters A and B. Changing those designations to U and V everything started working again.