
Regular Windows Updates are released by Microsoft to enhance security, fix bugs, improve performance, and introduce new features to Windows 10/11. It is essential to install these updates to maintain optimal PC functionality and ensure system security.
Windows Update is an essential service that automatically downloads and installs security updates on Windows computers. Unfortunately, there are times when issues come with these updates. It even reaches a point where Windows users cannot install them. One common Windows Update issue is the Windows Update 0x8900002A error in Windows 10/11.
What Is 0x8900002A Error in Windows 10/11?
0x8900002A error is a Windows 10/11 issue related to a faulty update or a system issue. It is possible that there are some bugs or issues with the update that needs to be installed in the Windows system. If this is the case, updating or rolling back the latest update should help.
When 0x8900002A error error message pops up, it shows nothing but a code or the issue indication. Users are not able to understand what the problem is when they only see the notification on the screen. The error message only states:
Expert Tip: For smoother PC performance, consider using a PC optimization tool. It handles junk files, incorrect settings, and harmful apps. Make sure it's right for your system, and always check the EULA and Privacy Policy.
Special offer. About Outbyte, uninstall instructions, EULA, Privacy Policy.
The operation requested is not supported by the hardware backing the volume. (0x8900002A)
It is possible that the drive has errors, preventing your computer from completing the update. It could also be due to system folders or files that got corrupted because of various reasons, including cyber infections, incorrect program installation, and compatibility issues. A quick and easy way to fix the 0x8900002A error in Windows is running a scan using Outbyte PC Repair, a PC optimizer that resolves common Windows error.
Such PC repair tools and similar optimization applications can indicate affected or damaged files in various machine parts like Windows registry and system files. If you recently changed things on the machine or installed applications before the error occurred – it might be the trigger for this problem. You should assess these facts, troubleshoot system issues, and then move on to methods listed if nothing gave needed results.
What Causes 0x8900002A Error in Windows 10/11?
The Windows Update error 0x8900002A can be caused by a wide range of factors, including:
- Windows Update glitch – This issue can occur due to a recurring WU problem. Under certain circumstances, the updating component will become stuck and unable to install any new pending update.
- Windows update service is stuck in a loop – This issue can also occur if one or more Windows services are either started or stopped.
- WU associated DLLs are not registered properly – Windows Update relies on dozens of Dynamic Link Library files when searching for and installing pending updates. If any of these files is missing, then WU won’t run properly.
- System File corruption –Windows Update is part of the system utilities. A single corrupted file can effectively break the whole WU component. Therefore, if some of its files are corrupt, the system is bound to show the error message. To fix this, the affected user must run an SFC scan through the Recovery Menu.
- Third-party AV is closing ports used by Windows Update –Third-party security tools can be so overprotective that they have a tendency of closing legitimate ports used by Windows Update.
- 3rd Party Conflict – This usually occurs when there is a third-party security software program that is blocking Windows Update from accessing MS servers. In other instances, it can be a generic driver that was replaced with an equivalent from a third-party. If that’s the scenario, you can solve the issue by using System Restore to take your computer back to a point when this issue wasn’t occurring.
Each of these factors requires a different approach to solving the issue. However, if you’re not sure of the actual factor responsible for the Windows Update Error Code 0x8900002A, you can apply these solutions chronologically.
What to Do About 0x8900002A Error in Windows 10/11?
Fix #1: Reboot Your Computer.
This Windows Update Error 0x8900002A fix is by far the easiest. Sometimes, the glitches that cause the update error can be fixed by restarting the computer. Close all the apps and documents you are working on so you don’t lose any progress. Restart your computer, then try and run the update again.
To restart your PC, follow these steps:
- Click on the Start menu.
- Go to the Power options and select Restart.
- Your PC should now restart.
- Reinstall the Windows update.
Fix #2: Check Your Internet Connection
Your network connection may interfere with the downloading of the update and consequently lead to this error. To fix this, try switching to a LAN connector if you are on Wi-Fi or vice versa. Once done, try downloading and installing the update again.
Fix #3: Check the Windows Update Logs
The first solution you need to try is to check the Windows Update logs. To access this, just press and hold the Windows + R keys. And then, do the following: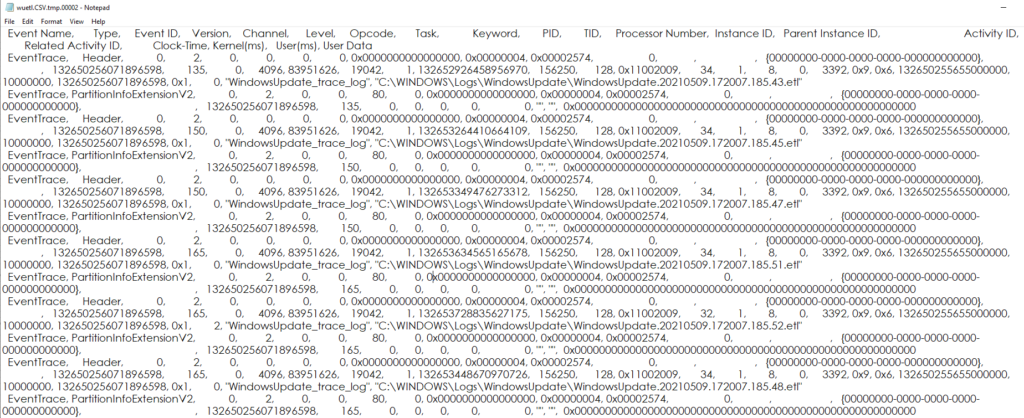
- When the Run dialog box appears, input windowsupdate.log and hit OK.
- After that, a notepad file will open. The first column usually shows the date. Just scroll down to find the latest log files. Whenever you install an update, it will be automatically added into that section.
- Now, if the recently added log file indicates a failure, troubleshoot it. Most often, it is caused by your router, antivirus, or firewall that is blocking the update file from being downloaded. To test this, copy the URL of the update on your browser and see if it works. If it does, try to install the update manually by opening Command Prompt with administrator privilege.
- Into the command line, input the command /dism /online /add-package /packagepath:C:\update\myupdate.cab. Make sure that you replace C:\update\myupdate.cab with the actual location of the update file.
- Hit Enter to execute the command.
- At this point, the update should be installed.
- Reboot your PC and check if the problem persists.
Fix #4: Update Your Date and Time Settings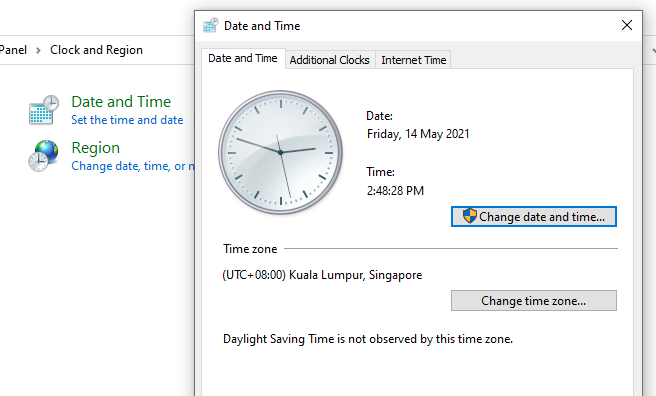
Sometimes, an incorrect date and time settings can prevent the update files from being downloaded or installed. So, make sure you have set them correctly. To do so, follow these steps:
- Press and hold the Windows + X keys.
- Select Control Panel.
- Go to the Clock, Language, and Region section and click Set the time and date.
- Navigate to the Internet Time tab.
- Click on the Change settings link.
- Next, press the Update Now button.
- Hit the OK button, then click Apply.
- Finally, click OK again to confirm and apply the changes.
- Try to update Windows.
Fix #5: Clear the Software Distribution Folder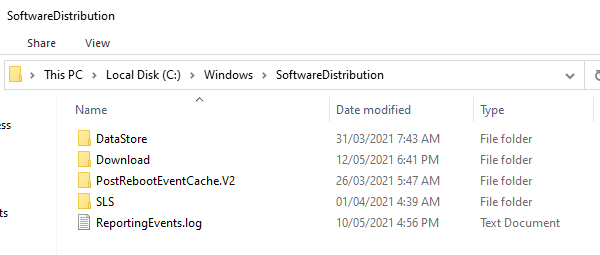
Every Windows 10/11 operating system has a Software Distribution folder located in the Windows directory. This is where files required to install Windows Updates are temporarily stored.
In this solution, you may have to delete the contents of this folder and retry the update process.
Here’s how:
- Click the Start menu.
- Into the search field, input cmd and right-click on the most relevant search result. Select Run as Administrator.
- Once the Command Prompt opens, input this command into the command line: net stop wuauserv. Hit Enter.
- Next, input this command to stop the Background Intelligent Transfer Service: net stop bits. Hit Enter.
- Now, use the Windows + R keys to launch the Run utility.
- Browse this path: C:Windows\SoftwareDistribution.
- Select all the contents and hit the Delete button to remove them.
- Go back to the Command Prompt and input this command: net start wuauserv.
- Hit Enter.
- And then, start the Background Intelligent Transfer Service by entering this command: net start bits.
- Hit Enter. At this point, you should have successfully cleared the contents of the SoftwareDistribution folder.
Fix #6: Reset the Catroot2 Folder
The Catroot2 folder is essential for Windows Updates as it contains critical Windows Update components. In case there are problems with this folder, any Windows Update may fail. Thus, to repair Windows Update-related problems, you may try to reset the Catroot2 folder.
Here’s how:
- Right-click on the Start button.
- Select Command Prompt (Admin). This will open an elevated Command Prompt.
- Into the command line, input the following commands one by one and press Enter:
- net stop cryptsvc
- md %systemroot%\system32\catroot2.old
- xcopy %systemroot%\system32\catroot2 %systemroot%\system32\catroot2.old /s
- Next, delete everything in the Catroot2 folder.
- Into the command line, input this command: net start cryptsvc.
- Hit Enter.
Fix #7: Run the Windows Update Troubleshooter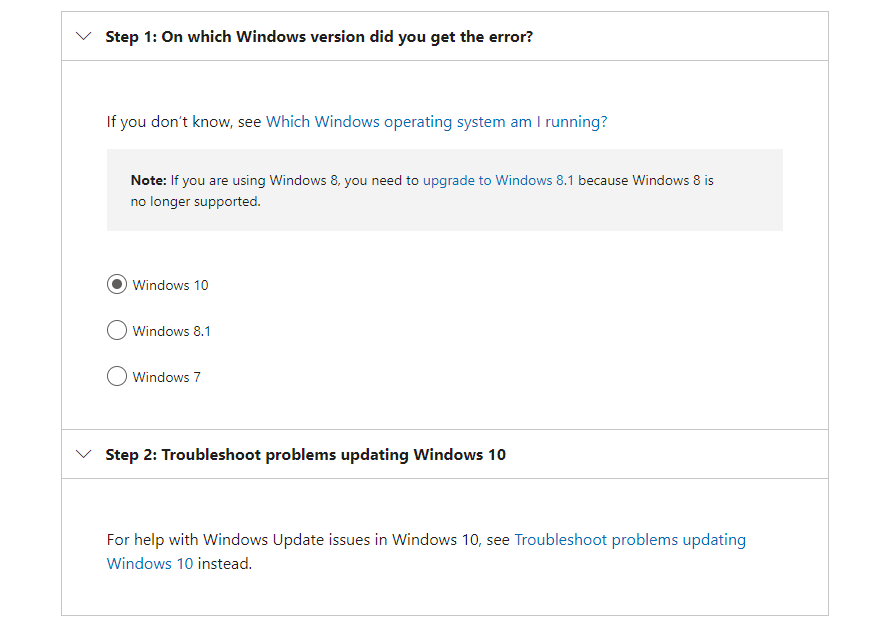
Did you know that Microsoft has created a troubleshooter tool that can be used in case Windows Update issues arise? Use it to resolve the problem.
If you’re facing any issues related to Windows Update, this is the first approach to finding the solution. This is an automated solution that doesn’t require much of your input. Windows Update Troubleshooter is a useful in-built Windows 10/11 utility developed by Microsoft.
The tool is designed to scan and detect any issues that may be the cause of system failure to download and install any pending Windows Updates. The tool is capable of clearing related temporary files, erase SoftwareDistribution folder contents, and check Windows Update Services status. It can also reset or repair any damaged Windows Update components.
There are two ways of running the Troubleshooter. The first involves using Microsoft’s online Troubleshooter. Microsoft’s online troubleshooter will help you fix the 0x8900002A error and other common ones. To get started:
- Visit the Microsoft official website to run the online troubleshooter.
- Select your version of OS from the list. Your options include Windows 7, Windows 8.1, and Windows 10/11.
- Accept or click Yes when prompted to run the Windows Update Troubleshooter.
- A list of recommendations and the steps to take next will come up. Carry through and work as advised by the Troubleshooter.
- The second option, which you can easily control, is to troubleshoot offline using your PC Troubleshooter.
Here’s how to run the Troubleshooter manually:
- Launch Troubleshooter by pressing Win+I on the keyboard.
- Navigate to Update & Security > Troubleshoot > Additional Troubleshooters.
- On the page that opens, select Windows Update, and then hit the Run the Troubleshooter button.
- The Troubleshooter will automatically launch and pick up any issues, then start working on resolving them.
- Wait for the Troubleshooter to finish working, then restart your Windows PC.
Fix #8: Switch off Windows Firewall
If you suspect that your Windows firewall is triggering the error code to appear, then switch it off temporarily. You can do so by following these steps:
- Press the Windows + R keys to launch the Run utility.
- Next, input the firewall.cpl command and hit Enter. This will open the Windows Defender Firewall.
- In this window, click the Turn Windows Defender Firewall on or off link.
- Go to Private Network Settings and Public Network Settings and click the Turn off Windows Defender Firewall (not recommended) option.
- Hit OK to apply the changes.
Try to update Windows again and check if the error code 0x8900002A still appears.
Fix #9: Check your Windows Update Settings
If the date and time settings of your device are properly set, it is possible that an incorrect Windows Update setting is messing up with the entire Windows Update process. To check and make the necessary changes, do the following:
- Click Start and input Windows update into the search field.
- Select the most relevant result from the list.
- Go to Change Settings.
- Untick the Give me recommended updates the same way I receive important updates option.
- Tick off Give me updates for other Microsoft products when I update Windows option.
Fix #10: Ensure that the Windows Update Service is Running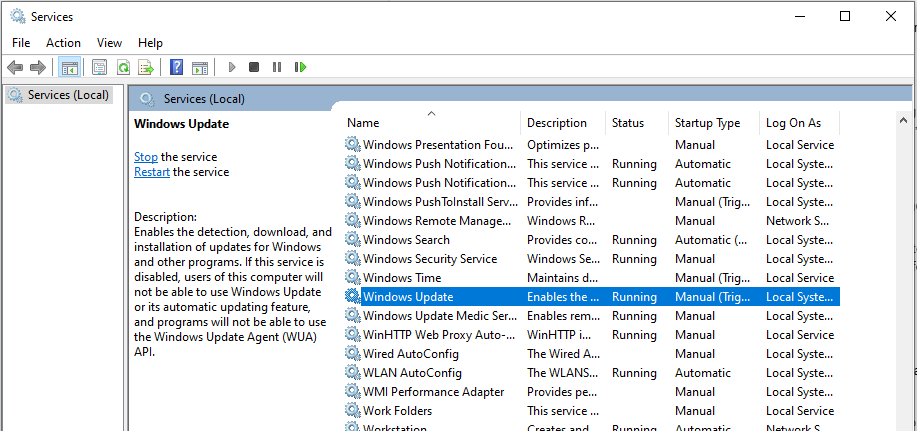
If the Windows Update Service is not running, it may be the cause of the error 0x80246002. To check if the service is running:
- Press Win-key + R.
- Into the dialogue box, type services.msc then press Enter.
- On the new window containing Windows Service, locate Windows Update.
- Check if it is written “running,” if not right-click on it and select “start.”
- Click OK to save your settings.
- Restart your PC to apply the changes.
Fix #11: Clean/Clear the Windows Update Temporary Cache
Temporary files are stored in the Windows Software Distribution folder located in the Windows directory. If there are corrupted temporary files in the Software Distribution folder, they may affect Windows Update and cause the Windows Update error 0x80246002.
To clear the Windows Update temporary cache:
- Press Win-key + R.
- In the dialogue box, type %windir%\SoftwareDistribution\DataStore and press Enter.
- Delete all content of the Windows Explorer folder. Hint: Use Ctrl + A to select all files and folders then press ‘delete’.
- This process should clear all the contents of the Software Distribution folder. If they were the cause of the error, it should resolve the issue.
Note: Before you clear the Windows Update temporary cache, ensure Windows Update Services is not running. You can follow the steps above to stop it. Then restart it after clearing the cache.
Fix #12: Launch System File Checker (SFC).
Another useful utility from Microsoft which comes as a built-in Windows 10/11 tool is System File Checker. The utility is used parallel to Deployment Imaging and Servicing Management (DISM) tool. Both of the utilities do the same task using different approaches. SFC fetches fresh copies to replace or repair damaged/missing OS files from a local cached Windows folder. DISM on the other hand downloads fresh copies from an online Microsoft server to replace missing or damaged ones.
To launch SFC utility here is how:
- Launch Elevated Command Prompt by simultaneously pressing the Windows + R keys to bring up the Run dialog.
- Type “cmd” (no quotes)+ in the search field and hit Ctrl + Shift + Enter keys simultaneously to run elevated Command prompt.
- If prompted by the User Account Control window, click on the Yes button to give admin privileges.
- Now, inside the Elevated Command Prompt field, insert the following line and press the Enter key:
- sfc /scannow
- The SFC utility will begin to scan for any issues. If problematic files are found, they will be replaced in the next system startup.
- When done, you can reopen the Elevated Command Prompt field and this time, insert the following command line before hitting the Enter key to run DISM utility:
- Dism /Online /Cleanup-Image /RestoreHealth
Note that, for this procedure to work, your system must be connected to a stable Internet connection and it may take up to 15 minutes or more depending on how corrupt the system files are. Once done, reboot the system for changes to take effect.
Fix #13: Run Windows Update Under Clean Boot
Clean Boot is a process used to launch the Windows OS utilizing the minimum set of resources which include drivers and programs. This approach helps prevent software conflicts that may occur during program installation, an update, or when running a particular program.
Note that there is a difference between Safe Mode and Clean Boot with the former engaging an extra mile to troubleshoot and diagnose advanced issues related to the Windows 10/11 system.
Here is how to launch the system under Clean Boot State:
- On the Taskbar search field, type “MSConfig” (no quotes) and press the Enter key to launch System Configuration window.
- Under the General tab, enter the Selective Startup field and uncheck the Load Startup Items box. Make sure the Load system services, as well as Use original boot configuration boxes, remain checked.
- Now, go to the Service tab and check the box next to Hide all Microsoft services before clicking on Disable all.
- Click Apply, followed by the OK button before restarting the machine.
- In the next startup, Windows will load under Clean Boot State.
You may then try to install the pending Windows Updates without experiencing the Error Code 0x8900002A .
Fix #14: Reset All the Windows Updates Sections
Try manually resetting your Windows Updates Sections. To get that done, follow these commands:
- Simultaneously press Win+R on your keyboard to launch the Run dialog box
- In the box that opens, type in cmd then press Ctrl+Shift+Enter. This opens an elevated Command Prompt
- An elevated Command Prompt window should appear. Into the command line, type the following successive commands followed by hitting Enter after each:
- net stop bits
- net stop wuauserv
- net stop appidsvc
- net stop cryptsvc
- The Windows Update Service, Background Intelligent Transfer Service (BITS), and Cryptographic service will stop running.
- Remove all qmgr*.dat files from your system to reset all Windows Update Sections. Do this by entering this command: Del “%ALLUSERSPROFILE%\ApplicationData\Microsoft\Network\Downloader\qmgr*.dat”
- Type Y from the keyboard to confirm.
- The next step is to rename the catroot2 and Software Distribution folders. Type the commands in the appropriate command prompt window and press Enter after every command:
- Ren %systemroot%\SoftwareDistribution SoftwareDistribution.bak
- Ren %systemroot%\system32\catroot2 catroot2.bak
- Reset the Windows Update service and BITS service to their default security settings. After each command, hit Enter to execute. Type the commands below into the appropriate prompt window:
- sc.exe sdset bits D:(A;;CCLCSWRPWPDTLOCRRC;;;SY)(A;;CCDCLCSWRPWPDTLOCRSDRCWDWO;;;BA)(A;;CCLCSWLOCRRC;;;AU)(A;;CCLCSWRPWPDTLOCRRC;;;PU)
- sc.exe sdset wuauserv D:(A;;CCLCSWRPWPDTLOCRRC;;;SY)(A;;CCDCLCSWRPWPDTLOCRSDRCWDWO;;;BA)(A;;CCLCSWLOCRRC;;;AU)(A;;CCLCSWRPWPDTLOCRRC;;;PU)
- To remove the System32 directory, type the command below in the next line followed by Enter: cd /d %windir%\system32
- Redo the Registry that is associated with the Windows Update, including the related DLL and BITS files. To do so, carefully input the following long list of commands. Don’t forget to hit Enter after every command to activate them:
- regsvr32.exe atl.dll
- regsvr32.exe urlmon.dll
- regsvr32.exe mshtml.dll
- regsvr32.exe shdocvw.dll
- regsvr32.exe browseui.dll
- regsvr32.exe jscript.dll
- regsvr32.exe vbscript.dll
- regsvr32.exe scrrun.dll
- regsvr32.exe msxml.dll
- regsvr32.exe msxml3.dll
- regsvr32.exe msxml6.dll
- regsvr32.exe actxprxy.dll
- regsvr32.exe softpub.dll
- regsvr32.exe wintrust.dll
- regsvr32.exe dssenh.dll
- regsvr32.exe rsaenh.dll
- regsvr32.exe gpkcsp.dll
- regsvr32.exe sccbase.dll
- regsvr32.exe slbcsp.dll
- regsvr32.exe cryptdlg.dll
- regsvr32.exe oleaut32.dll
- regsvr32.exe ole32.dll
- regsvr32.exe shell32.dll
- regsvr32.exe initpki.dll
- regsvr32.exe wuapi.dll
- regsvr32.exe wuaueng.dll
- regsvr32.exe wuaueng1.dll
- regsvr32.exe wucltui.dll
- regsvr32.exe wups.dll
- regsvr32.exe wups2.dll
- regsvr32.exe wuweb.dll
- regsvr32.exe qmgr.dll
- regsvr32.exe qmgrprxy.dll
- regsvr32.exe wucltux.dll
- regsvr32.exe muweb.dll
- regsvr32.exe wuwebv.dll
- The next step involves resetting network configurations that are possibly the causative agents of the error. There are only two commands to be typed. Make sure to hit the Enter button after each one of them:
- netsh winsock reset
- netsh winsock reset proxy
- After following through, you can then restart the services that were paused in step 4. Enter the commands below to get the services running once again:
- net start bits
- net start wuauserv
- net start appidsvc
- net start cryptsvc
- Close the Commands Prompt window by typing Exit. Hit Enter.
Restart your Windows PC for all the changes made above to take effect. This is a long, manual way of solving the Windows Update Error Code 0x8900002A .
Fix #15: Download and install the Windows Update Manually
If you haven’t changed anything on your PC, not even installed an application recently, then you may try to download and install the Windows Update manually.
Follow these steps for more info:
- Visit the official Microsoft website to check the most recent update released for your operating system version. You should be able to identify it quickly because it is located at the top-most part of the website.
- Take note of the KB or Knowledge Base number.
- Go to the official Microsoft Update Catalog and do a quick search using the search button.
- Hit the Download button and select the architecture of your device (32-bit or 64-bit).
- Run the installer and follow the onscreen prompts to complete the update process.
- Once the update is done, restart your PC and check if the same error persists.
Fix #16: Run a Malware Scan
Although malware entities are less likely to cause this error, we should not eliminate the fact that they can affect Windows Updates, too. So, in this case, you need to run a malware scan.
For this, you may use a third-party antivirus solution. Once you have downloaded and installed one, run a complete scan to ensure your device is free of any threats that could trigger error codes to show.
Fix #17: Undo the Windows Update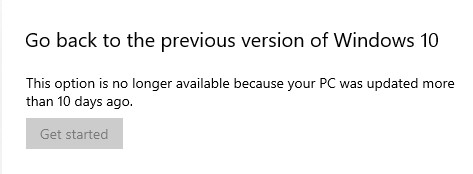
If all else fails, you may try to undo the Windows Update. Follow the steps below and check if everything goes back to normal as before:
- Press the Windows + I keys to launch the Windows Settings utility.
- Select Update and Security.
- Go to Recovery.
- Under the Go back to the previous version of Windows 10/11 section, select Start Now.
- Choose a reason to uninstall your current Windows version.
- Hit Next.
- Click No, thanks.
- And then, hit Next twice to proceed.
- Lastly, click the Go back to the previous version option.
Fix #18: Restore Your PC – Return to a System Restore Point
If you run into problems after modifying your system, you can return to a previously created restore point, instead of wasting time troubleshooting the issue. If you can still access the desktop, open the System Properties window and follow these steps:
- Highlight the System Protection tab, and then click the System Restore button.
- In the pop-up window, click Next, then select the restore point you manually created. You can also click on the Show more restore points option to see all the available restore points.
- Before you move on, it’s a smart idea to Scan for affected programs to see which apps, programs, and drivers will be affected if you use this restore point.
- After that, hit the Close button and click Next.
- Click Finish to complete the process.
Fix #19: Reset Your PC
Reaching this point is a strong signal that you’re most likely dealing with an advanced sort of system corruption that can’t be conventionally resolved. In such a scenario, it’s best to execute Cloud Reset.
This solution lets you recover operating system files from the Cloud without having to use an ISO image. The earlier version of this feature required the user to use ISO if the system was damaged beyond repair. In contrast, the new feature is geared to withstand any level of system damage.
Here is how you can reset or reinstall Windows 10/11 Operating System through the Cloud:
- Launch Windows 10/11 Settings by simultaneously pressing Windows + I keys.
- Click on Update & Security before selecting the Recovery tab.
- Under Reset this PC, click on the Get started button to initiate the process.
- Choose the option Keep my files, and then click on Cloud download.
- Finally, click on Reset.
Summary
No matter what safety precautions you take, you cannot avoid Windows Update errors, especially if the Windows Update version itself is at fault. But lucky for you, there are fixes that can help you get rid of them. As for the case of the 0x8900002A error, you can just refer to the solutions above and you should be all good in no time. Then again, if you are not sure what to do, let Windows professionals fix the problem for you.
What other Windows Update errors have you encountered? How did you deal with them? Share your experience in the comments!