Apple’s Time Machine, a popular backup system frequently used by Mac users, offers easy and convenient data protection with minimal setup requirements. Once set up, Time Machine can be configured to create backups automatically, adhering to your preferred frequency and schedule. Then you can forget about it.
Typically, Time Machine works seamlessly and quietly in the background. You won’t even know when it is currently making backups because it was designed to be non-intrusive. However, this seamless operation may be a drawback when unexpected errors occur.
If Time Machine encounters a problem, you may not realize it until you manually open the application or receive a notification – which might not always happen. Consequently, issues could potentially remain undiscovered until you check the application.
A common but often overlooked error is when Time Machine fails to create a snapshot for the backup disk symbolized as ‘Disk %@’, or fails to generate a local snapshot for backing up. This issue often arises when Time Machine tries to create automatic backups of your files but encounters an error.
Pro Tip: Scan your Mac for performance issues, junk files, harmful apps, and security threats
that can cause system issues or slow performance.
Special offer. About Outbyte, uninstall instructions, EULA, Privacy Policy.
What Does the ‘Disk %@’ Error Mean in Apple’s Time Machine?
Time Machine has been an integral part of the Apple ecosystem since it was introduced with Mac OS X Leopard in 2007, but it’s not immune to errors and issues that can occur, either.
Indeed, Apple has published an article that details some of the most common issues users encounter when using Time Machine. These can include both internal issues with your computer and external factors unrelated to your device.
In the specific context of Time Machine errors, ‘Disk %@’ stands for the designated drive where backup files are supposed to be stored. In short, it is the backup drive. It can be any of the following:
- External drive connected to your Mac, such as a USB or Thunderbolt drive
- Network-attached storage (NAS) device that supports Time Machine over SMB
- Mac shared as a Time Machine backup destination
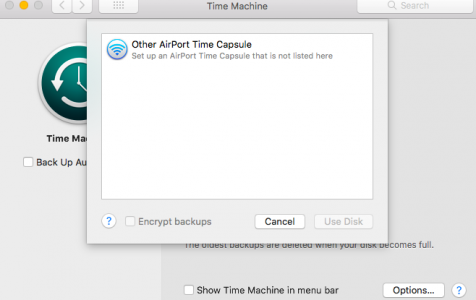
- AirPort Time Capsule, or external drive connected to an AirPort Time capsule or AirPort Extreme Base Station (802.11ac)
When users get this error, it means that Time Machine cannot save the backup files on that drive, hence the error message. If the error happened some time ago, you’ll notice that Time Machine has stopped backing up your files when the error happened. This means that your backup is outdated and you can’t afford to have a computer emergency because you will lose your most recent files.
If you encounter issues backing up your device with Time Machine, here are some tips to resolve these problems swiftly and effectively.
What are the Potential Causes of the “Time Machine could not create a local snapshot to back up from” Error?
Most often, Time Machine errors occur due to insufficient storage space on the backup drive. If there is not enough space on the drive, Time Machine won’t be able to create new files. The same is true if the drive is corrupted or does not have sufficient permissions. Time Machine won’t be able to save new files to the drive.
The error could also arise from using an outdated version of the Time Machine app. This is most likely if you have recently upgraded to macOS Big Sur or you haven’t updated your apps in a while. A conflict happens between Time Machine and the system, resulting in the “Time Machine could not create a local snapshot to back up from” error.
In addition to these common factors, potential malware infections and corrupted files should also be considered when identifying the cause of this error.
Solutions if You Cannot Back Up Data Using Apple’s Time Machine
Before you try to troubleshoot this error, here are some checks you need to perform first:
- Ensure that macOS is updated.
- Reboot Mac and check if the Time Machine is working again.
- If you are using Airport Time Capsule, update the firmware on the Airport Time Capsule.
- Check if your Mac is connected to the same network as the backup drive. For example, if you are trying to backup data using the AirPort Time Capsule or the server, make sure you are connected to the same device network.
- If your drive is connected to a port on your Mac or AirPort Extreme Base Station, make sure that the drive is switched on.
- Connect the drive directly to your Mac. Do not use a USB hub.
- If you’re backing up to an external third-party drive, make sure the drive’s firmware is up to date.
If everything looks good and Time Machine is still getting the same error, then you can try the solutions given below.
Solution #1: Ensure Adequate Storage Space for Time Machine Backup
Although Time Machine deletes old backups regularly, there are times when the deletion cannot catch up with the rate of backing up. To make sure you have enough storage for your backups, clean up your drive using a Mac cleaner. This tool removes all unnecessary files, freeing up enough space for your Time Machine backups.
Solution #2: Remove the /Volumes/com.apple.TimeMachine.localsnapshots directory
This is a hidden directory that you should try deleting if you’re encountering issues like this. You can use the Terminal to delete this directory as long as you have sudo or root permissions.
To do this:
- Open Terminal from the Utilities folder or by searching for it via Spotlight.
- Type in the following command: sudo rm -r /Volumes/com.apple.TimeMachine.localsnapshots
- Press Enter.
- Delete the local snapshots using this command: sudo tmutil deletelocalsnapshots /
- Press Enter.
- Restart Time Machine and check if it is now working correctly.
Solution #3: Delete the Time Machine Preferences
Sometimes you need to reset Time Machine in order to resolve backup errors such as “Time Machine snapshot could not be created for the disk “%@” or “Time Machine could not create a local snapshot to back up from”.
To resolve this Time Machine backup issue, perform the following steps:
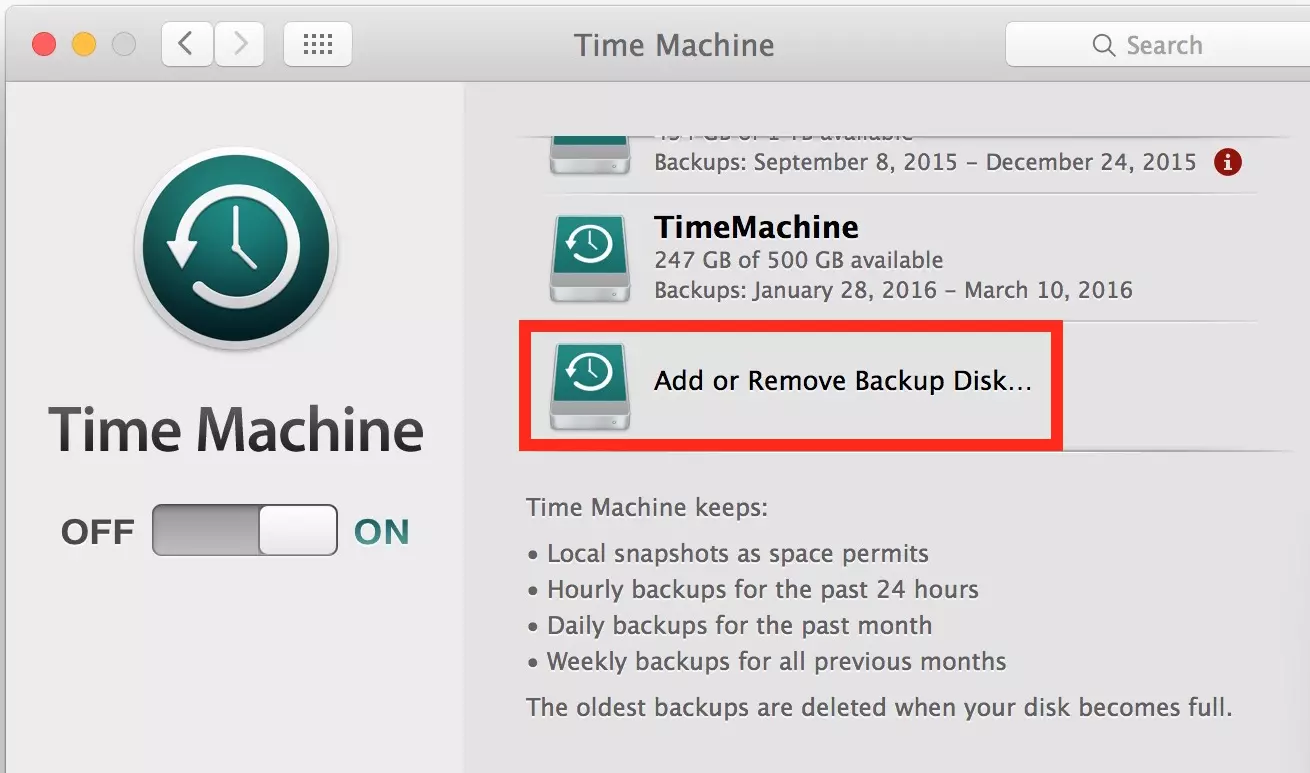
- Go to Apple menu > System Preferences > Time Machine.
- Turn off Time Machine.
- Go to Macintosh HD > Library > Preferences
- Delete apple.TimeMachine.plist.
- Start Time Machine from System Preferences.
- Add your external drive as a Time Machine backup destination.
- Create a backup to the drive.
The newly created backup file should now be accessible. The above steps will help you to resolve the Time Machine corruption error that was preventing backup in Mojave.
Solution #4: Re-launch Time Machine
The last step to fix any Time Machine backup error is to reset the backup process manually. You can do that by following the steps here:
- In the Finder window, navigate to the path: /TimeMachineBackupDrive/Backups.backupdb/Backup Name.
- Here Backup Name is the name of the backup drive.
- In the backupdb folder, search for a file with the extension, .inProgress and delete the file.
- Quit Time Machine and restart your Mac.
Once your Mac restarts, verify that Time Machine is functioning properly again.
Solution #5: Reset Your Hard Drive
One of the quickest and easiest fixes for this error is resetting your hard drive. However, it is a fairly drastic measure as it will completely wipe your hard drive clean and start from scratch. That being said, it’s likely worth trying before you spend hours scouring the internet for a solution.
All you need to do is boot up your Mac and hold down Command+Option+P+R when it displays the Apple logo in order to get into recovery mode, then choose Disk Utility from the top menu bar. In the left-hand column, select your device and then press Erase on the upper side of the screen.
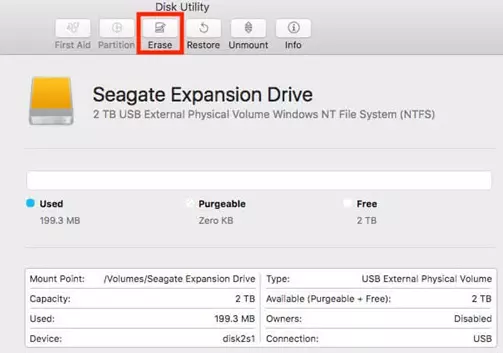
Choose Mac OS Extended (Journaled) under Format options, set Erase Free Space to No, click on Security Options and make sure that all checkboxes are unchecked under both sections labeled Inherit and Permissions. You should also confirm that Quick Format is selected. Finally, click on Erase to start wiping your hard drive.
Solution #6: Get a Faster Hard Drive
To address the “Time Machine snapshot could not be created for the disk “%@”” error on your Mac, it is crucial to ensure that the hard drive is capable of being backed up.
Ideally, the hard drive you are backing up will be faster than your computer’s main hard drive. If the drive is significantly slower than the main hard drive, then backing up could take a lot of time and this, in turn, causes errors on a Mac that may cause other programs not to work. This includes Time Machine.
Time Machine backups should always use an external disk or at least a fast built-in disk. Many people do not realize that they have a slow internal disk as their primary storage device. The most common culprit is the laptop’s SSD because of its size limitations and one small connector (USB).
Even if you have 2 drives in your MacBook, they will still be connected via cable. So, while these cables transfer data quite quickly, they cannot compare to the speed of Thunderbolt (10Gbps) or USB 3.0 (5Gbps). Consider getting a secondary hard drive with a Thunderbolt to free up space on your laptop’s SSD while also providing a faster backup solution for the Time Machine error on your Mac.
Solution #7: Remove Bad Backups
This straightforward fix can resolve the issue swiftly. First, you will need to locate your backups. You can find them in Finder by opening Finder -> Go -> Library. Then, right-click on a backup file and click Move to Trash. Repeat this process until all of the Time Machine backups are removed. After that, restart your computer and try creating a new backup again.
Summary
Time Machine is an integral part of macOS because it is what you rely on during emergencies. If your files get corrupted, or your Mac gets bricked, you can immediately get back on your feet using your backup. Hence, it is important to keep Time Machine functioning properly at all times, especially since it runs backups automatically in the background. If you encounter any error with the backup process, just follow the steps above and they should be able to resolve any Time Machine problems.
Hi Vicrey, can you be more specific where yo say in Fix #4 “In the Finder window, navigate to /TimeMachineBackupDrive/Backups.backupdb/Backup Name.” ? Can you provide a folder or subfolder name or am I missing something here ?