Apple launched new Mac models with an Arm-based M1 chip in November 2020. The M1 chip is highly efficient and offers excellent performance, representing more than 10 years of work on chips for iPhones and iPads.
 Unlike Intel chips built on the x86 architecture, the Apple Silicon M1 uses an Arm-based architecture much like the A-series chips that Apple has been designing for iPhones and iPads for years now.
The M1 chip is the most powerful chip that Apple has created to date, and it is similar to the A14 chip in the latest iPhone and iPad Air models, built on a 5-nanometer process by Taiwan Semiconductor Manufacturing Company (TSMC). TSMC builds all of Apple’s chips and has done so for many years.
Apple calls this a system on a chip (SoC) because it takes several components that are usually separate and puts them all on a single chip. This includes the CPU, graphics processor, USB and Thunderbolt controllers, Secure Enclave, Neural Engine, image signal processor, audio processing hardware, and more. This results in better performance and battery life.
Pro Tip: Scan your Mac for performance issues, junk files, harmful apps, and security threats
that can cause system issues or slow performance.
Special offer. About Outbyte, uninstall instructions, EULA, Privacy Policy.
Apple decided to initially release its own silicon in its more affordable Macs that are popular with general consumers. These Macs are:
- MacBook Air
- 13-inch MacBook Pro
- Mac mini
Apple announced a two-year transition, meaning that within two years every Mac will have chips of Apple’s own design. So, more Macs with Apple silicon are coming.
What is Personalisation Error on Mac with Apple M1 Chip?
Apple has revealed a solution for a personalization issue that users encountered when restoring and reinstalling macOS on a new Mac with the M1 chip.
Previous reports revealed that setting up a new M1 chip-powered Mac can lead to an error if the device is restored. Users have raised complaints in online forums ask for help regarding the issue, which renders the new devices unusable unless fixed.
Here’s how the error happens, according to a user: first, the user will try to restore the Mac (likely with the intention of removing unwanted software so that it will feel like their older Mac). Then, during the installation process, an error message will appear on the screen.
The message reads,
An error occurred preparing the update. Failed to personalize the software update. Please try again.
The user said that at the time, Apple had already received 75 calls from users complaining about the same problem. The company also had no solution for the issue at the time the user called for help.
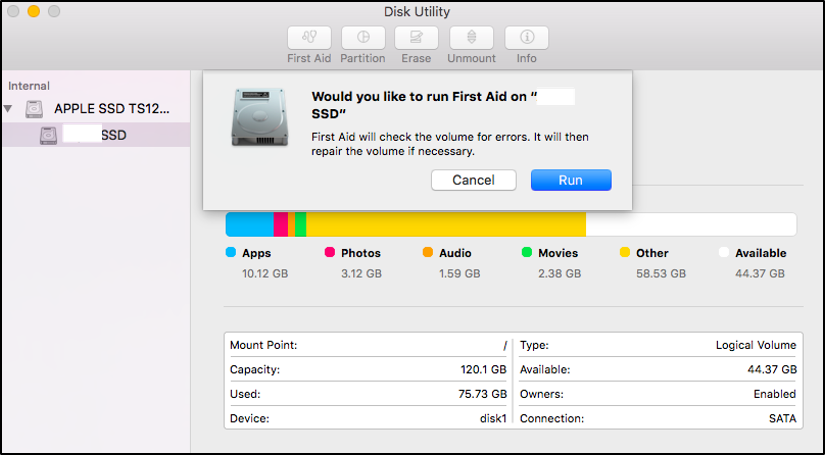 Some users shared a few solutions that worked for them. One user shared a three-step process that involved using Disk Utility to erase the internal SSD device. Another user shared a link to an Apple support document providing instructions on how to use the Apple Configurator 2 to fix issues.
If you erased your Mac with Apple M1 chip before updating to macOS Big Sur 11.0.1, you might be unable to reinstall macOS from macOS Recovery,” Apple said in the document.
The company provides three solutions to the problem: one method requires the use of two Macs and a suitable flash drive to create a bootable installer, and two methods require the use of Terminal in macOS Recovery.
How to Fix Personalisation Error on Mac with Apple M1 chip
If you’re reinstalling macOS on Mac with Apple M1 chip and getting personalization error, here’s how you can fix it according to Apple:
Method 1: Use Apple Configurator
If you have the following items, you can resolve the issue by reviving or restoring the firmware of your Mac:
- Another Mac with macOS Catalina 10.15.6 or later and the latest Apple Configurator app, available free of charge from the App Store.
- A USB-C to USB-C cable or USB-A to USB-C cable to connect the computers. The cable must support both power and data. Thunderbolt 3 cables aren’t supported.
To use the Apple Configurator, follow the steps below:
- Set up the Mac with Apple Configurator 2 and connect the USB-C cable.
- Prepare the Mac mini by plugging in a monitor so you can see when the process is complete.
- Disconnect the Mac mini from power for at least 10 seconds.
- Press and hold the power button, then reconnect power while still holding the power button.
- Release the power button, the status indicator light should be amber in color.
- Prepare the Apple notebook computer by restarting and holding down the Power button, the right Shift key, the left Option key, and the left Control key.
- After 10 seconds, immediately release the three keys but continue to hold down the power button until it appears in Apple Configurator 2.
- In the Apple Configurator 2 device window, select the Mac whose chip firmware you want to revive and whose recovery OS you want updated to the latest version.
- Do one of the following:
- Choose Actions > Advanced > Revive Device, then click Revive.
- Control-click the selected device, then choose Advanced > Revive Device, then click Revive.
Note: If you lose power to either Mac during this process, begin the revive process again.
- Wait for the process to complete. During this process, an Apple logo will appear and disappear.
- After the process completes, your Mac will reboot.
Important: When you revive the firmware, you must verify that the process was successful because Apple Configurator 2 may not alert you.
- Quit Apple Configurator 2, then unplug any adapters and cables.
If you want to restore the firmware instead, you need to erase all data and reinstall the latest version of recoveryOS and macOS. To do this:
- In the Apple Configurator 2 device window, select the Mac to be restored.
- Do one of the following:
- Choose Actions > Restore, then click Restore.
- Control-click the selected device, then choose Actions > Restore, then click Restore.
- Wait for the process to complete. During this process, an Apple logo will appear and disappear.
- After the process completes, your Mac will restart.
- Important: When you restore the Mac, you must verify that the process was successful because Apple Configurator 2 may not alert you.
- If the process was successful, you’re presented with the macOS Setup Assistant.
- Quit Apple Configurator 2 and unplug any adapters and cables.
If you don’t have the items above or the solution did not work for you, follow the steps in the next section instead.
Method 2: Erase your Mac, then reinstall.
Before you start, make sure you have enough time to complete all of the steps.
Erase using Recovery Assistant
- Turn on your Mac and continue to press and hold the power button until you see the startup options window. Select Options, then click Continue.
- When you’re asked to select a user you know the password for, select the user, click Next, then enter their administrator password.
- When you see the utilities window, choose Utilities > Terminal from the menu bar.
- Type resetpassword in Terminal, then press Return.
- Click the Reset Password window to bring it to the front, then choose Recovery Assistant > Erase Mac from the menu bar.
- Click Erase Mac in the window that opens, then click Erase Mac again to confirm. When done, your Mac restarts automatically.
- Choose your language when prompted during startup.
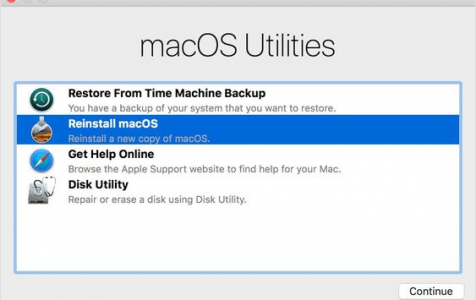
- If you see an alert that the version of macOS on the selected disk needs to be reinstalled, click macOS Utilities.
- Your Mac will begin activating, which requires an internet connection. When your Mac is activated, click Exit to Recovery Utilities.
- Perform steps 3 to 9 once more, then continue to the next section below.
- After you’ve prepared your Mac as described above, use any of these methods to reinstall macOS.
Option 1: Use the Reinstall macOS Big Sur utility
If your Mac was using macOS Big Sur 11.0.1 before you erased it, select Reinstall macOS Big Sur in the utilities window, then follow the on-screen instructions. If you’re not sure, use one of the other methods instead.
Option 2: Use a bootable installer
If you have another Mac and a suitable external flash drive or other storage device that you don’t mind erasing, you can create and use a bootable installer for macOS Big Sur.
Option 3: Use Terminal to reinstall
 If neither of the above methods applies to you, or you don’t know which version of macOS Big Sur your Mac was using, follow these steps:
- Select Safari in the utilities window in macOS Recovery, then click Continue.
- Open the article you’re reading now by entering this web address in the Safari search field:
- https://support.apple.com/en-au/HT211983
- Select this block of text and copy it to the clipboard:
- cd ‘/Volumes/Untitled’
- mkdir -p private/tmp
- cp -R ‘/Install macOS Big Sur.app’ private/tmp
- cd ‘private/tmp/Install macOS Big Sur.app’
- mkdir Contents/SharedSupport
- curl -L -o Contents/SharedSupport/SharedSupport.dmg http://swcdn.apple.com/content/downloads/00/60/071-05432-A_QOY2QE0UMR/puuz6c0epc7o0ozyovvi6tjxhzpf6uf04s/InstallAssistant.pkg
- Bring Recovery to the front by clicking outside the Safari window.
- Choose Utilities > Terminal from the menu bar.
- Paste the block of text you copied in the previous step, then press Return.
- Your Mac now begins downloading macOS Big Sur. When done, type this command and press Return:
- ./Contents/MacOS/InstallAssistant_springboard
- The macOS Big Sur installer opens. Follow the on-screen instructions to reinstall macOS.
- If you need help or these instructions aren’t successful, please contact Apple Support.
Install macOS from a bootable USB drive. This is the easier of the two DIY methods, but it requires another Mac and an empty USB storage device large enough to hold the installer files. Apple’s support page can guide you through the process.
Conclusion
If none of those recovery methods work for you, then the final option is to have your new M1 Mac serviced at a local Apple Store or certified repair shop. No matter what, make sure you contact Apple Support to get a sense of your options—especially those that you can handle from home, which will keep you as safe as possible during These Times.