Disk Utility is a reliable tool but sometimes you may encounter an error message saying “Erase process has failed. Couldn’t unmount disk: (-69888)” on Mac. This error can occur during disk verification, repair, partitioning or formatting, and can be frustrating.
There is usually very little to no additional details given as to how to fix the problem or even what the problem is about, making it harder for users to understand this issue.
Basically, the “Erase process has failed. Couldn’t unmount disk: (-69888) error on Mac pops up when the current boot drive is being modified. It could also happen if the disk you are trying to erase has failed the process with a Couldn’t unmount disk error.
If the boot drive is being modified as the first situation suggests, the easiest fix is to boot from another drive and run Disk Utility from there. For the boot drive, it does matter what version of Mac OS X or macOS it was created for, as long as it has Disk Utility – which they all do. This should allow you to fix the problem.
Pro Tip: Scan your Mac for performance issues, junk files, harmful apps, and security threats
that can cause system issues or slow performance.
Special offer. About Outbyte, uninstall instructions, EULA, Privacy Policy.
What Is the Erase process has failed Error on Mac?
Are you getting the error 69888 while partitioning a drive? This error mostly happens when you erase the data from your hard drive and try to reinstall your macOS or OS X version only for the process to fail along the way and throw out this error. The good news is that there’s several troubleshooting tips you can do to fix this issue.
The Erase process has failed error on Mac is troublesome because users can’t access their hard drive files and apps unless the issue has been fixed. Some users also reported that this error can affect the system’s processing speed and even terminate abruptly, resulting in data loss.
If you are facing the same situation and looking for the perfect solution for this error, then you need not worry because this guide should be able to help with that.
What Causes Erase process has failed Error on Mac?
What causes “Erase process has failed. Couldn’t unmount disk: (-69888)” error on Mac? To learn different ways to fix the Mac Disk Utility erase process has failed error, it is important to diagnose it first. The following are some of the major reasons for the error to help you understand its causes.
There are various reasons behind the emergence of Mac Terminal Error 69888 creating panic situation. Any inconsistencies pertaining to Mac OS X files system might result in corruption of data thus making it completely inaccessible. Let’s take a look at some of the probable reasons for the same.
- Human mistakes: It might be due to unintentional mistakes such as accidental deletion, formatting mac files and volumes during normal course of operation
- Emptying Trash: Many a time users might empty their trash files without cross checking them, which might result in complete wipe of even important Mac data.
- Sudden termination of system files: Some time due to power surge, Mac system gets terminated abruptly, due to which some of the files fail to mount and become unresponsive.
- Interrupted read/write operation: The chances of Mac file corruption or deletion also takes place when we interrupt the ongoing read/write process in midway resulting in Mac Terminal Error 69888 situation.
- Unintentional Formatting: Pressing wrong button will sometime lead to emergence of very critical Mac Terminal Error 69888 problem.
- Sharing of data/file on unsupported platforms: Due to presence of unsupported platform, sometimes shared files becomes unresponsive and get corrupted.
- Malware attack: Although Mac is considered a lot more safe as compared to Windows but still few nasty viruses are being written for it. Downloading apps and other related files will lead to security issues, which further influence the entire file system.
- Modification in BIOS setting: Sometime when we go for some changes into the BIOS sector it will lead to emergence of several erroneous situation related to Mac Terminal Error 69888 problem which you would never like to have.
- Corruption in header file: Header files are one of the crucial files that contain entire information about the file that you are going to access. Hence, if there is a problem the requested file fails to respond and even generates Mac Terminal Error 69888 corruption messages.
- Catalog files node corruption: Catalog is the system generated file which keeps record of file type and its recent accessing type.
- Problem with boot sector: When there is a problem with the boot sector, the Mac system fails to load and as a result you are unable to access the stored data files and there arises Mac Terminal Error 69888 issues.
- Kernel Panic issues: Like BSOD in Windows, Mac users might come across kernel panic issues.
- Improper installation of program: installing of unwanted apps & programs without checking its source and agreement.
- Hardware or software issue: It is also a common factor that is quite responsible for Mac file corruption and in a lieu emergence of erroneous situations.
All the above mentioned reasons are the probable causes for inaccessibility of Mac data. There are a lot of factors that cause this issue to a USB device or an external drive that includes the modification of the boot drive. Also, this error can occur if different other programs are using the USB drive. If you want to erase your USB when you are copying or reading a file, this error may occur at that time. In short words, there is no specific reason for this issue.
How to Fix Erase process has failed Error on Mac
Since there could be various reasons for getting the erase process has failed error on Mac, you might look for different ways to fix it. Here are some suggestions that you can implement to fix the Disk Utility erase process has failed error.
But before you do so, here are some of the basic troubleshooting you should take care of first:
- Close all applications and files before attempting the repair.
- Make sure you have enough permissions to read and write to the drive you want to modify.
- Run a scan to check for the presence of malware. Delete any malicious software detected using your antivirus and delete all related files.
- Disable your security software after running the scan because it might prevent the processes from pushing through.
- Declutter your system by cleaning up your computer with a Mac cleaning tool. This should fix any errors related to corrupted junk files or cached data on your Mac.
- Restart your computer.
Once you’ve completed the steps above, you can now proceed with the main solutions below.
Solution #1: Erase your Disk via Terminal
 If there is a problem with the Disk Utility application on your Mac, then you can try to do the same via Terminal. It is a cleaner approach to erase a disk and would help you meet your requirements easily.
- To start with, go to Finder and navigate to Applications > Utility to launch the Terminal app as an administrator.
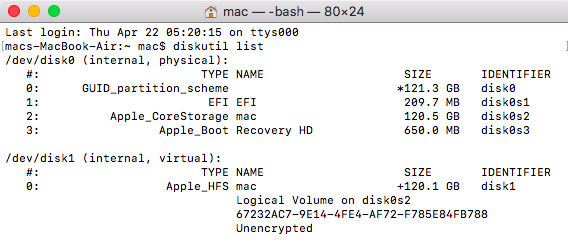
- Once the Terminal application is opened, just type the command “diskutil list” and press return. This will display detailed information regarding various disks and volumes in your Mac. From here, please note the identifier of the disk you wish to format (like disk2 or disk1).
- Once you have noted the identifier, use the “erase disk” command to erase the entire disk or the “ease volume” command to just erase a volume.
- The entire format of the diskutil command is diskutil erase disk. For instance, to format the disk2 in the HFS+ format, you can just enter the command “diskutil eraseDisk HFS+ DISK disk2” and press the return key.
- After that, just wait for the commands to process as your selected disk would be formatted in the supported file system.
Solution #2: Update macOS
 As stated above, if your Mac is running on an outdated firmware version, then it can encounter the Disk Utility erase process that has failed the problem. Thankfully, it can easily be fixed by updating your Mac to its latest supported firmware. You can look for the latest update for macOS from the App Store. Alternatively, you can also click on the Apple logo from the top, go to System Preferences > Software Update and check for updates from here.
Solution #3: Erase Selected Volumes Instead
Sometimes, users get the erase process has failed error on Mac while formatting the entire disk. Therefore, you can consider formatting selected volumes of the disk instead. In this way, you can check whether the issue is with a selected volume or not.
- Firstly, go to your Mac’s Finder > Applications > Utility and launch the Disk Utility application on your system.
- Once the Disk Utility application is launched, go to the top-left corner of the interface. From the dropdown menu, you can choose to view all volumes or external devices.
- Now, just select a volume from the sidebar (instead of the entire disk) and click on the “Erase” button on the toolbar to format it.
Similarly, you can try to erase the entire disk as well to further diagnose the problem. In this way, you can be sure whether the problem is with the entire disk or selected volumes.
Solution #4: Adjust the Security Levels for Formatting an External Device
 If you are getting the Disk Utility to erase the process has failed error while formatting an external device, then you should follow this drill. Ideally, if the security level for the USB drive or the external hard disk is too high, then the Disk Utility might not be able to successfully format it. To adjust its security level and fix the erase process has failed on Mac, follow these steps:
- Firstly, launch the Disk Utility application on your Mac and make sure the external device is connected to it.
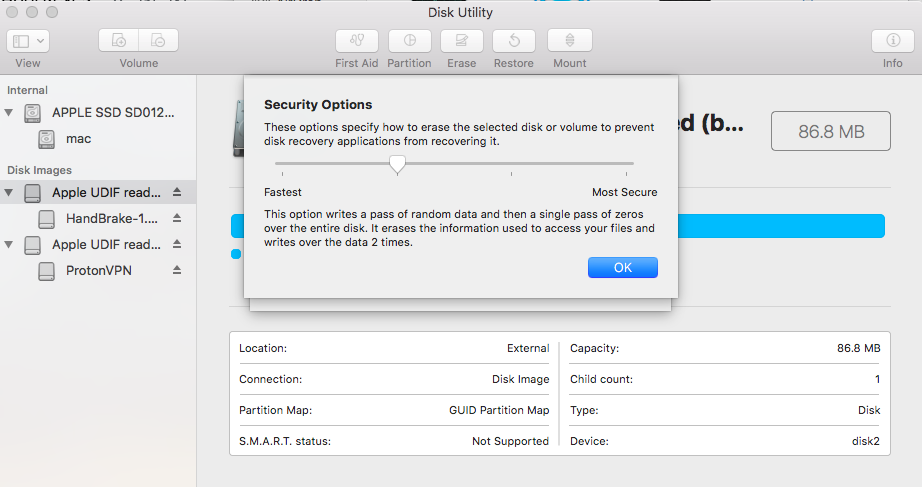
- Now, select the external device from the sidebar and click on the “Erase” button. As the following pop-up would be launched, go to its Security Options.
- From here, you can just adjust the security level for formatting the external device. I would recommend keeping the security level on the lower side to avoid getting the erase process has failed error on Mac.
Solution #5: Use a USB Boot Drive
This is the recommended method because it should always fix the error. You will need any Mac OS X boot drive to complete this task, I used a Mavericks boot installer drive for this purpose but others should work too, whether they are installation drives or just recovery drives, the important thing is they are bootable and separate from the primary boot disk that stores the installed OS:
- Attach the USB boot drive to the Mac and reboot
- Hold down the OPTION key during boot, then select the attached boot drive (typically has an orange icon at the boot menu)
- At the boot menu, choose “Disk Utility” (if using an Installer disk, pull down the “Utilities” menu to access Disk Utility)
- Go to “First Aid” and verify the disk, then repair if needed
- Now perform the original task that threw the “Couldn’t Unmount” error
- I ran into this twice recently, first when attempting to modify partitions on a drive, which came right along with a separate “partition failed” error, and again was triggered when attempting to format those partitions. The above steps did the trick and everything was working again as expected.
This is a good example of why it’s very valuable to have a bootable USB thumb drive set up with whatever version of Mac OS X is running on your Macs, because without a separate boot drive some of these errors would be unresolvable. Such boot drives are easy to create on your own, here are instructions for making boot disks for OS X 10.9, OS X 10.8, and OS X 10.7. For older Macs running prior versions of Mac OS X, typically anything running OS X 10.6 or earlier will have a SuperDrive, and thus shipped with a bootable DVD that can serve this same purpose.
Solution #6: Use Mac Recovery Partition
 If the error is triggered by first aid or formatting a non-boot partition, you may be able to fix the error by booting from the Recovery partition that is included with all new versions of Mac OS X. This will not work if the error was triggered by attempting to modify the boot disk through partitions or formatting, and you will need to use the method above with a boot disk instead.
- Reboot the Mac holding down the “Option” key and choose the Recovery partition
- Select “Disk Utility” from the boot menu
- Go to “First Aid” to verify and repair the disk, or go to “Erase” to format the disk
- Again, if the disk throwing the errors is the same as the primary boot partition that Recovery is also on, the above method may not work to resolve the problem. In that case, you’ll need to boot from a separate USB drive to fix the error.
Solution #7: Forcibly Unmount a Disk via Terminal
Another method uses the command line to force unmount a disk, but this is not the top recommended option because of potential for data loss.
Caution must be used with this approach however because forcibly unmounting a disk can cause data loss of the drive being forcibly unmounted. Thus this is only appropriate if you plan on formatting and erasing the disk that you are force ejecting anyway.
- From the command line of Mac OS, enter the following string: diskutil unmountDisk force /Volumes/DRIVENAME
- Replace “DRIVENAME” with the name of the volume you want to unmount, then hit RETURN key to force the drive to unmount.
- If that doesn’t work, you can take this a step further:
- You might also need to target the disk by device identifier to forcibly unmount it, in which case you can first find the disk with:diskutil list
- Then when you find the matching disk to the identifier (/dev/disk1, /dev/disk2, /dev/disk3, etc), you can target the disk to unmount as so. For the example syntax here we’ll use /dev/disk3 to forcibly unmount from command line, and using sudo which will gain superuser privileges for the task: sudo diskutil unmountDisk force /dev/disk3
- Hit return and enter the admin password to forcibly unmount the disk from the Mac.
When finished you can quit out of Terminal as usual.
How to Erase Hard Drive on Mac
By following the above-listed techniques, you would be able to overcome the Disk Utility erase process has failed issue. Though, if you don’t want to encounter it in the first place, then make sure you take all the right steps to erase a hard drive on Mac. If you don’t make any mistakes and there are no issues with your system, then you will not encounter the Mac Disk Utility erase process has failed issue.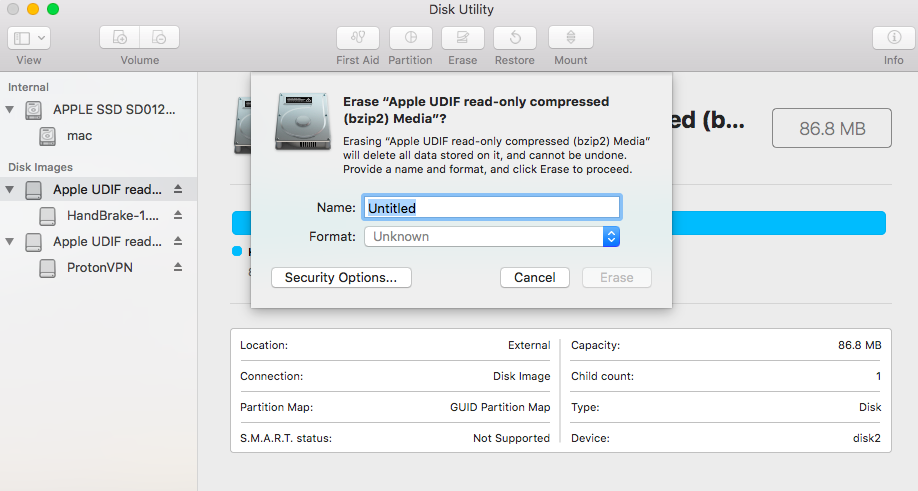
There can be different reasons for formatting a hard drive or an external device on Mac. Some of them can be as follows:
- You might wish to troubleshoot an issue by formatting the hard disk.
- There can be an issue with your external device and formatting it can fix it.
- You might want to change the file system or the partition style of your Mac’s drive.
- If malware has corrupted your Mac, then you easily fix it by formatting the disk.
- If you are reselling your Mac, then you might wish to format it to protect your data.
It doesn’t matter what your reason for formatting a hard drive or external device is – the process is extremely easy. I have already provided a smart solution to format a disk via Terminal above that you can follow. Although to format the disk via Mac’s graphic user interface, the following steps can be taken.
1. Launch the Disk Utility application
As you know, Disk Utility is responsible for running formatting and erasing operations on the disk. Therefore, you can just go to Finder > Applications > Utility and launch the Disk Utility application from here.
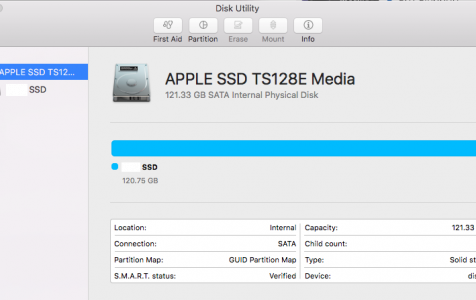
2. Select a Disk or Device to format
Now, you can view a list of all the available disks and the connected devices on the sidebar of the Disk Utility application. If you want, you can go to the dropdown menu from the top-left corner to view all volumes and devices. From here, you can just select a disk, volume, or even an external device that you wish to format.
3. Erase the selected disk
After selecting the internal drive or the external device of your choice, just go to the Disk Utility toolbar on the right and click on the “Erase” button.
This will launch a pop-up window so that you can make the needed changes to format the drive. For instance, you can give it a new name, change its file system, or even its partitioning scheme. After making the appropriate changes, just click on the “Erase” button and wait for a while as the selected drive would be erased.
What if the Erase Button in Disk Utility is Grayed Out?
You’re probably reading this article because the Erase or Partition button was grayed out when you tried to erase or reformat a drive using Disk Utility. Use the steps below to fix it and let us know in the comments which one worked for you.
1. Show All Devices and Erase the Parent Drive
By default, Disk Utility only shows the Volumes on your connected drives, rather than the drives themselves. A Volume is the partition or section of a drive you store data in.
Open Disk Utility and select View > Show All Devices from the menu bar. You should see the device names for each of your drives appear in the sidebar.
Alternatively, use the shortcut Cmd + 2. Select the parent folder for the drive you want to reformat or erase, then click the Erase button again. Take note that when you erase a device, it erases all the Volumes contained within it as well.
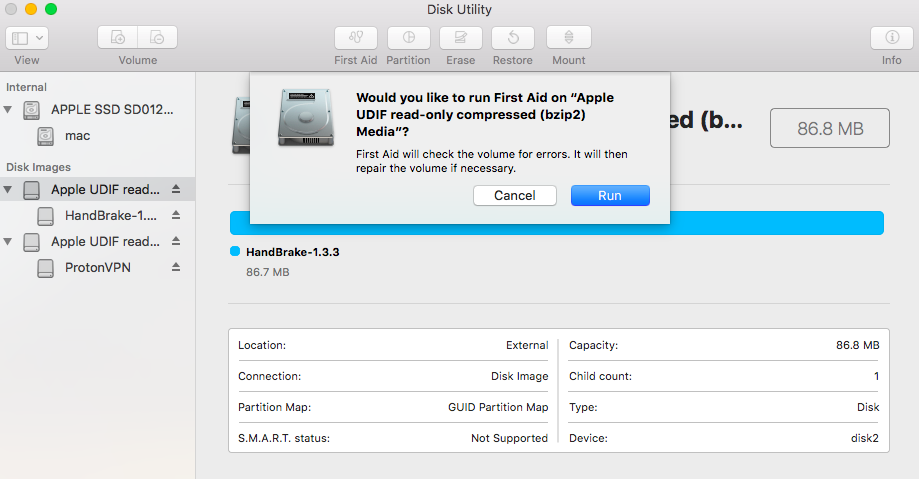
2. Run First Aid to Repair Your Drive Before Erasing It
Disk Utility has a First Aid feature that fixes all kinds of issues related to your drives: slow performance, corrupt files, or unexpected behavior. When you run First Aid, it scans the entire disk for errors and lets you know if there are any it can’t repair.
Open Disk Utility and select the drive you want to erase from the sidebar. At the top of the window, click the First Aid button, then agree to Run First Aid. Run First Aid on any problematic drives. The length of time First Aid takes to run depends on the size of your drive, how much data is on it, and how many errors need fixing.
Combine this step with the previous one to run First Aid on the parent device for your drive, as well as the individual Volumes.
3. Boot Into Recovery Mode to Erase Your Startup Disk
If you’re trying to reformat or erase the startup disk on your Mac, you need to boot into Recovery Mode first. The startup disk is the main hard drive on your computer: the one that stores macOS and all your data. It’s not usually possible to erase the startup disk because your Mac is using it to run macOS.
Recovery Mode is a special partition on your Mac you can use to restore from a backup, reinstall macOS, get online support, or erase your startup disk.
You should back up your Mac before trying to erase or reformat it.
When you’re ready to boot into Recovery Mode, restart your Mac and hold Cmd + R while it boots up. Keep holding both keys until you see an Apple logo or hear a startup sound. Recovery Mode appears as a Utilities window.You should see a macOS Utilities window appear. Select Disk Utility from this window and try erasing or reformatting your drive again.
How to Reinstall macOS After Erasing Your Drive
After erasing or reformatting the startup disk—if that was your goal—you need to reinstall macOS before you can use your Mac again. This is because the original macOS installation was on the startup disk you just erased. Here are the instructions on how to reinstall macOS on M1 Macs.
Your Mac prompts you to set it up again after you factory reset it. Boot into Recovery Mode once more to reinstall macOS or follow our guide to factory reset any Mac. When you reinstall macOS, your Mac behaves as though it’s a brand new machine, with no data on it waiting for you to set it up.