
Error 0x800706be is a common issue that Windows users may encounter during OS updates. It is often related to compatibility problems and system file errors. This post will provide an explanation of the error, its causes, and effective solutions to resolve it.
What Is the Windows Update Error 0x800706be?
The 0x800706be error is a Windows error code that appears when a system file fails. Other Windows compatible software and driver vendors may also display this error. This is a general error that indicates a faulty or corrupt system file. As a result, you may encounter this error at various events.
This error may appear when you click the audio icon in the system tray. This error may appear whenever a Windows Update or Upgrade fails. As a result, you may encounter this error on multiple occasions. However, the purpose of this article is to explain and resolve the 0x800706be error that appears during Windows Update.
If you attempt to install the most recent Windows updates, you may encounter the error 0x800706be. This error message will be displayed alongside a Windows Update failed message. Obviously, you won’t be able to update Windows while this error message is displayed. This error code will continue to appear during Windows Update even after a reboot or multiple attempts.
Expert Tip: For smoother PC performance, consider using a PC optimization tool. It handles junk files, incorrect settings, and harmful apps. Make sure it's right for your system, and always check the EULA and Privacy Policy.
Special offer. About Outbyte, uninstall instructions, EULA, Privacy Policy.
When attempting to install the Windows 8.1 upgrade in Windows 8, the error code 0x800706be also appears. This error has been observed on a variety of laptop models. The upgrade begins, but after displaying error code 0x800706be, it returns to Windows 8.
When there is a problem with your system files, the error code 0x800706be is displayed. System files can be corrupted or misconfigured. The corruption in Windows Update Components is the most likely cause of this error. File corruption can happen to anyone, at any time, and it is completely normal. Corrupt Windows Update Components or corrupt Windows Update files will prevent Windows Update from being installed successfully.
Others have also reported encountering this description: An authentication error has occurred 0x800706be when attempting to install a feature update for Windows 10/11.
Unsurprisingly, 0x800706be is a common error code associated with Windows updates. However, there are other contexts in which you may (or may not) come across it, including the following instances:
- Media capture failed event 0x800706be – Camera error code 0x800706be is another name for this. A related stop code is 0xa00f4271, which can be resolved by running the dedicated Windows Troubleshooter for this app.
- Minecraft error 0x800706be – This error happens when playing Minecraft but can plague Xbox games as well.
- 0x800706be Remote Desktop – You might get the RDP authentication error 0x800706be and other related errors due to the poorly configured Remote Desktop app.
- Install error 0x800706be Windows 11, 10, 7. All of the Microsoft-based OS, including specific Windows 10 versions such as 1803 or 1809, can be impacted by this Windows Update error.
- Remote procedure call failed 0x800706be. – Also known as WMI Error in SQL Server 2012, this usually happens when you have SQL Server 2008 or SQL Server 2008 R2 running on the same machine as SQL Server 2012, or when you install Visual Studio 2012, which includes SQL Server 2012 components.
What Causes Windows 10/11 Error Code 0x800706be?
In most cases, it is caused by a service handling conflict (transmission of the file between client and server is disabled), but there are a variety of other causes that can result in Windows 10/11 Update Error 0x800706be.
App conflicts, a blocked firewall, damaged system files, incorrect system date and time, incompatible hardware, outdated system drivers, and other factors can all contribute to Windows Error Code 0x800706be.
You may encounter the 0x800706be error code while attempting to boot the system or running specific applications, among other things.
The 0x800706be error also disables newly added hardware devices, preventing the OS from communicating with them. As a result, the system’s USB ports are sometimes disabled.
When you receive the Windows 10/11 update error 0x800706be, you may encounter the following issues:
- System crashes
- Poor system performance
- Screen freezes
- Cannot run a specific application
- Cannot download the available system update
Now, learn how to resolve the 0x800706be error by carefully implementing the solutions provided.
How to Resolve Error Code 0x800706be
Error 0x800706be can occur as a result of simple PC issues such as antivirus incompatibility, an unstable network, or an incorrect computer shutdown. To solve the problem, try the following workarounds:
- Adjust your router to ensure that your network is stable and that Windows Update can be downloaded.
- Delete junk files on your computer and optimize its processes using a PC Repair Tool like Outbyte PC Repair.
- Restart your computer normally, taking care not to repeat the previous error.
- Scan your computer for malware or viruses using professional antivirus software.
After completing each of these workarounds, reinstall Windows Update to see if the error has been resolved. If these solutions do not yield a positive result, move on to the technical solutions listed below.
Solution #1: Fix Registry Issues.
The 0x800706be error code could be caused by corrupted registry entries. As a result, scanning the registry with registry cleaner (or repair) utilities may resolve the problem.
Although Windows does not include a built-in registry cleaner, there are numerous third-party system optimizers that include registry repair tools.
Solution #2: Resolve Corrupted System Files.
Corrupted system files are another possible cause of the 0x800706be error.
If there are corrupted files, Windows includes a System File Checker utility that scans for and repairs them, so that should fix the problem.
System File Checker is a command-line utility that can be used in the Command Prompt as shown below.
- To begin, launch Command Prompt as administrator by pressing Windows + X.nd selecting Command Prompt (Admin).
- Before running SFC, type DISM.exe /Online /Cleanup-image /Restorehealth.into the Command Prompt and press Enter. It should be noted that if the Windows Update client is broken, the Deployment Image Service tool may not work.
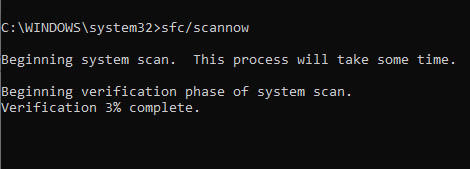
- To start an SFC scan, type sfc /scannow and press Enter.
The scan may take up to 30 minutes, and when it is finished, a Command Prompt message will inform you whether Windows Resource Protection fixed anything. Restart your desktop or laptop if WRP does repair files.
Solution #3: Run the Windows Update Troubleshooter.
Another tool that may be useful in resolving the 0x800706be error is the Windows Update troubleshooter. This troubleshooter can detect and resolve Windows update errors.
This is how you use Windows 10/11 to access the Windows Update troubleshooter.
- To open the search box for that app, click the Cortana button.
- In the search box, type in ‘troubleshooter.’
- Within the Settings.pp, select Troubleshoot.o open a list of troubleshooters.
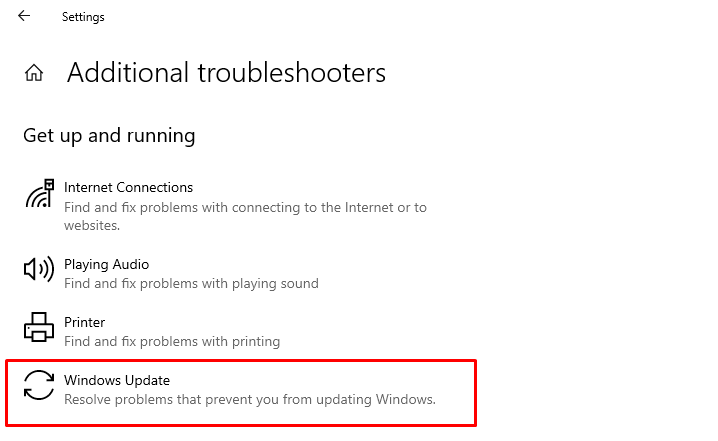
- Select Windows Update and click the Run the troubleshooter button to launch the troubleshooter.
- Then you can run the troubleshooter, which may detect problems and provide solutions.
Solution #4: Reset Windows Update Components.
This method is very effective and has been used by many users to resolve Windows update error 0x800706be; therefore, try resetting Windows Update Components.
This error is typically caused by damaged Windows Components, so deleting old files and resetting the components will assist you in overcoming this bug.
To accomplish this, follow the steps outlined below:
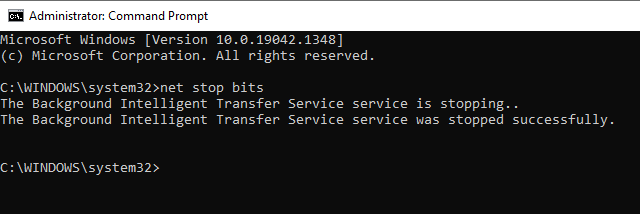
- Open the command prompt with administrative privileges. To do so, press Windows Key + X and select Command Prompt (Admin).
- The BITS, Cryptographic, MSI Installer, and Windows Update Services must now be disabled. This task can be completed by running the commands listed below in the order listed (Press the Enter key after each of the commands to run them separately.)
- net stop wuauserv
- net stop cryptSvc
- net stop bits
- net stop msiserver
- After we’ve disabled all Windows components, we’ll rename the SoftwareDistribution and Catroot2 folders. To accomplish this, execute the commands listed one by one.
- ren C:\Windows\SoftwareDistribution SoftwareDistribution.old
- ren C:\Windows\System32\catroot2 Catroot2.old
- At this point, we will re-enable the BITS, Cryptographic, MSI Installer, and Windows Update Services that we disabled in Step 2. To accomplish this, execute the commands listed below in the order listed.
- net start wuauserv
- net start cryptSvc
- net start bits
- net start msiserver
Restart your computer after closing the command prompt. Now, try to update your computer by running Windows Updates.
Solution #5: Uninstall Recently Installed Cumulative Updates.
If the error 0x800706be appears after a recent patch update, the recently installed cumulative update is most likely to blame. There is no need to be concerned because you can always undo the recent changes by using System Restore points or uninstalling the problematic cumulative updates.
Solution #6: Clear Windows Cache Folders.
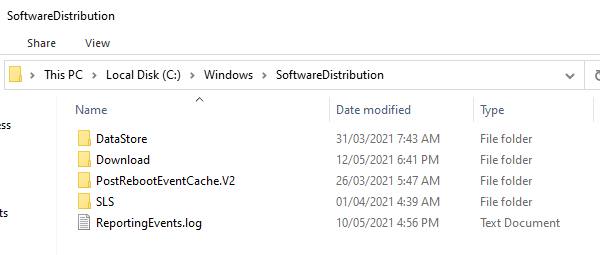
Every second Tuesday of the month, Microsoft releases new security updates. Non-security updates, out-of-band updates, and optional updates are also rolled out on a regular basis. When you install these numerous updates, they all take up space on your computer and the information is stored in Windows cache folders. Catrrot2 and SoftwareDistribution are two major folders of this type.
With so many patches installed, it is necessary for you to purge both of these folders on a regular basis. However, we as users do not engage in such behavior unless and until we encounter bugs or issues. We recommend that you delete these folders now that you are experiencing update-related issues on your PC. Before clearing any Windows cache folders, make sure to turn off all update-related services. After you have cleaned both of these folders, restart the services that you had previously stopped.
Solution #7: Manually Install Buggy Windows Updates.
If you receive the error code 0x800706be while installing available security/non-security updates, you can manually locate and reinstall them. To do this:
- Navigate to the Microsoft Update Catalog website and enter the cumulative update number into the search bar.
- When you press the Enter.ey, a list of well-matched results appears in the display. This website shows all updates, whether they are security, non-security, or out-of-band patches.
- Choose the best match for your system architecture and click the Download button.
- Select the top link in the subsequent window.
- Navigate to the location where you want to save this file.
- Double-click on the file in the directory where it is located.
- The system will run the installer and verify that everything is in order before installing the standalone package on your PC. This entire process will take a few minutes, so please be patient.
- When the system is ready to install the downloaded package, a prompt appears on the screen.
- To begin the installation, answer Yes.o the prompt.
- Following that, your PC will restart and begin installing the standalone packages that you previously selected.
- The entire package installation will take 5-10 minutes, depending on the size of the update.
Solution #8: Use the Microsoft Update Readiness Tool.
When this error happens due to some corrupted catalog files, manifest files, or MUM files on your computer, here’s what you can do:
- Download the Microsoft Update Readiness Tool available at https://support.microsoft.com/kb/947821
- On the problematic computer, launch the Microsoft Update Readiness Tool.
- Once the scan is completed, open the %Systemroot%\Windows\logs\CBS\Checksur.log.file.
- Search for corrupt data in the files.
- Copy these files into the following folder: %systemroot\Windows\Servicing\Packages. But first, you need to have control over that folder by using the following commands: takeown /F c:\Windows\Servicing\Packages /D y /R
- Next, assign full control over the directory using the next command: cacls c:\Windows\Servicing\Packages /E /T /C /G “UserName”: F
- After this, you have to gather the missing or corrupted files from the checksur log, then download the missing KB files: servicing\packages\Package_for_ KB978601 ~31bf3856ad364e35~amd64~~6.0.1.0.mum
- Unpack the files using this command: Expand -F:\* UpdateKBXXXX.msu x:\DestinationDirectory
- After expanding, find the UpdateKBXXXX.cab File and expand it as well: Expand -F:\* UpdateKBXXXX.CAB x:\DestinationDirectoryCAB
- Grab these two files inside the folder: update.mum and update.cat.
- Rename the copied files (update.mum and update.cab) exactly as they are named in the checksur.log. For instance: update.mum for KB978601 will be Package_for_ KB978601 ~31bf3856ad364e35~amd64~~6.0.1.0.mum
- Do the same for all the other missing/corrupt files and place them into the directory specified in checksur.log (/servicing/packages).
- Once done, the problem should be fixed, no reboot required.
Solution #9: Restore Windows Using a Restore Point.
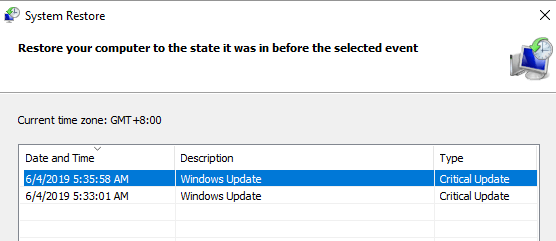
The System Restore utility, which undoes registry changes and restores system files, may also help to resolve error 0x800706be.
You can use that utility to restore Windows to a point before the 0x800706be error occurred on your laptop or desktop.
So, restoring Windows may be worthwhile, and here’s how you can do it using the System Restore utility.
- Using the Windows + R.eyboard shortcut, open the Run.ccessory in Windows.
- To open the System Restore.window, type ‘rstrui’.nto the Run utility and press OK.
- On the System Restore window, click the Next.utton.
- Expand your selection of system restore points by selecting Show more restore points.
- Select a restore point to which you want to roll back Windows.
- You can also check what software was removed for a restore point by pressing the Scan for affected programs button.
- Press the Next.nd Finish.uttons to confirm the selected restore point. Windows will then restart at the last known good restore point.
Solution #10: Clean Install Windows 11/ Windows 10/11.
If the error 0x800706be persists after applying the above fixes, your copy of Windows has reached a point where it can no longer be resolved. In such cases, your best bet is to download an ISO image of Windows 11/ or Windows 10/11 (whichever you prefer) and clean install it on your computer.
Summary
The methods listed above will show you how to easily fix Windows Error Code 0x800706be. Carry out all of the steps outlined above on your Windows 10/11, PC to quickly resolve this issue. If you have questions or other recommended solutions, please leave your thoughts in the section below.