
The Blue Screen of Death(BSOD) is triggered by Windows when it identifies potential threats to your computer’s stability, such as hardware issues or faulty components. It serves as a safeguard to prevent further damage. One specific BSOD error is the “Reference by Pointer” error with the code 0x00000018.
REFERENCE BY POINTER, also known as 0x00000018, is a specific issue that indicates an object’s illegal reference count based on its state. Users who encounter this problem experience a Blue Screen of Death, which is typically hardware-related. This error code typically causes the system to crash, rendering users unable to perform any operations.
Some of the most common causes of the error code 0x00000018 are outdated drivers, inconsistencies in timing, and generic bugs infecting the system. We’ve listed several effective troubleshooting methods that will get you back up and running in no time. But before we do that, let’s explore this bugcheck 0x00000018 and what leads to its occurrence.
More Information About ‘The bugcheck was: 0x00000018’
Reference by pointer BSoD error (also known as MSDN bugcheck reference by pointer 0x00000018) can be annoying on Windows 10, but there are a few solutions.
Expert Tip: For smoother PC performance, consider using a PC optimization tool. It handles junk files, incorrect settings, and harmful apps. Make sure it's right for your system, and always check the EULA and Privacy Policy.
Special offer. About Outbyte, uninstall instructions, EULA, Privacy Policy.
When this error occurs, your computer will crash. It occurs on both older Windows versions and the most recent systems.
This error is sometimes followed by the name of the file that caused it. As a result, users have reported getting the following message:
Reference_by_pointer wdf01000 sys/ ntoskrnl.exe/ atikmdag.sys/ tcpip.sys/ ntkrnlpa.exe/ win32k.sys
Another version of the message reads:
Unhandled Exception: exception_access_violation reading address 0x00000018
If this occurs, you must conduct some investigation before determining which application or driver is to blame. If you get the memory error 0x00000018, then the BSOD is related to your machine’s RAM.
In a few reported occasions, the error was caused by the device overclocking, so consider the processes you’ve recently run on it.
Causes of BSOD Reference by Pointer 0x00000018
When a driver uses a pointer to an object, the driver calls a kernel routine that increases the object’s reference count by one. When the driver has completed its work with the pointer, it calls another kernel routine to reduce the reference count by one.
Calls to the routines that increase (reference) and decrease (dereference) the reference count must be matched by drivers. This bug check is caused by an inconsistent reference count in the object. Typically, the inconsistency is caused by a driver that repeatedly decreases an object’s reference count, resulting in extra calls that dereference the object. This bug check can occur when an object’s reference count reaches zero while the object still has open handles. It may also occur when the object’s reference count falls below zero, regardless of whether the object has any open handles.
In short, the REFERENCE BY POINTER BSOD error is caused primarily by a poorly coded driver, but it could also be caused by one or more of the following factors:
- Drivers or system files that are out of date or corrupted
- Hard disk or other hardware problems
- Faulty third-party software
Please keep in mind that if you can’t boot your device normally, as is usually the case with a BSOD, you may have to work in Safe Mode for most of the solutions below.
How to Resolve the Bugcheck 0x00000018
The solutions listed below may assist you in resolving the Reference by Pointer Blue Screen on Windows 11/10:
Step 1: Check your memory.

If you encounter the Windows error code 0x00000018, the first thing you should do is check your system’s RAM, as this error is frequently caused by corrupted memory.
To accomplish this, launch the built-in Windows Memory Diagnostic Tool, which is extremely useful for troubleshooting issues when the computer begins to run slowly, freezes, hangs, or displays a blue screen. Using it, you can determine whether or not problems with installed applications on the computer are caused by memory errors.
Enter Windows Memory Diagnostic in the taskbar’s search bar and press Enter.
Select Restart now and check for problems in the dialog box that appears on your screen. Then, wait for the memory test to finish.
A diagnostic message will appear after your computer has restarted. This message appears at the bottom right corner of Windows 10. If no memory errors are found, your memory module is functioning properly. In this case, try the next troubleshooting method listed below. However, if the tool detects any errors, you should contact your PC manufacturer for assistance, as memory errors typically indicate a problem with your PC’s memory chips.
Step 2: Install the latest graphics driver.
It is critical to have the most recent drivers installed on your Windows 10 PC if you want to ensure maximum performance and stability.
However, issues with drivers can arise from time to time, and you may need to uninstall certain drivers from your PC.
If you’re having issues with your graphics card and need to uninstall its drivers, you might be interested in DDU: Display Driver Uninstaller.
- Get Display Driver Uninstaller.
- Run the program after you’ve downloaded it.
- When the DDU starts, follow the on-screen instructions to remove your graphics card driver.
AMD and NVIDIA users reported that the reference by pointer error was resolved after installing the basic version of the graphics card driver. You can use this solution even if you don’t have an AMD graphics card.
After removing the driver completely, you must download the most recent minimal version of the graphics card driver.
To obtain the basic version of the graphics card driver, go to the website of your graphics card manufacturer, locate your graphics card, and download the most recent drivers for it. Choose the minimal version of the driver, which excludes any unnecessary software.
The error should be permanently fixed after installing the most recent minimal version of the driver. Don’t forget to keep your graphics card driver up to date. Outdated drivers are frequently the source of BSOD errors and crashes, so it’s critical that you update them as soon as possible.
Step 3: Disable or uninstall your antivirus.

Although your antivirus software is essential, it can occasionally interfere with Windows and cause the error to appear.
To resolve the issue, turn off your antivirus software and see if that resolves the problem. If the problem persists, you should remove the antivirus software.
Because simply uninstalling the antivirus isn’t always sufficient, it’s a good idea to use a dedicated uninstaller tool to completely remove it. Most antivirus companies provide dedicated uninstallers for their software, so make sure to get one for yours.
Make sure that you remove all leftover files from the antivirus installation using a PC Repair Tool, such as Outbyte PC Repair. Some antivirus programs won’t work properly if traces of another security program are present in the system.
Check to see if the problem has been resolved after removing your antivirus. If it was the source of the problem, it is recommended that you switch to a different antivirus solution.
Step 4: Uninstall problematic software.
Check to see if your computer is stable after it has restarted. If there are no BSOD errors, the problem was caused by one of the installed applications.
You only need to find the problematic application now, and to do so, repeat the steps and enable applications and services one by one until you find the one causing the problem.
Once you’ve identified the problematic application, it’s best to uninstall it and see if that resolves the issue. To do so:
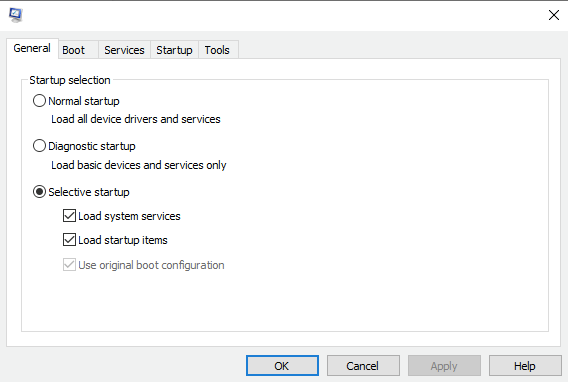
- Enter msconfig in the Run box after pressing Windows Key + R.
- To run the command, press Enter or click OK.
- Select Selective Startup and uncheck Load startup items when the Windows Configuration window opens.
- Select Hide all Microsoft services from the Services tab.
- Now, select the Disable all option.
- Navigate to the Startup tab and select Open Task Manager.
- Select Disable from the menu by right-clicking each item on the list.
- Return to the System Configuration window and click Apply and OK after you’ve disabled all startup items.
Step 5: Run the CHKDSK Utility.
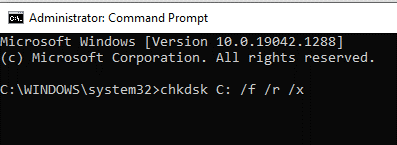
If your RAM is error-free, the next step is to inspect your hard drive for errors. This can be accomplished by using Command Prompt or your computer to run the chkdsk utility.
We will walk you through the steps of running this utility on a computer with this method.
- Start File Explorer and right-click on the drive you want to examine for errors.
- From the context menu, choose Properties.
- Navigate to the Tools tab in the Properties window and click the Check button under Error Checking.
- When you launch the utility, it will begin scanning the selected drive for file system errors and other issues, such as bad sectors.
- If an issue is discovered, restart your system to begin the repair process.
To resolve the 0x00000018 error, CHKDSK will run in the first few seconds after your computer boots up to fix any and all errors it detects, as well as any bad sectors or other problems it finds on your hard drive.
Step 6: Run SFC and DISM Scans.
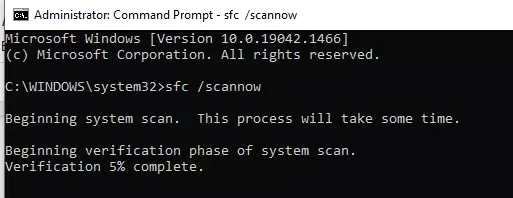
As previously discussed, errors like the one at hand are frequently caused by corruption errors and system bugs.
The good news is that Windows includes several built-in troubleshooting utilities that allow you to scan for errors and fix them without much user involvement. Two such utilities are System File Checker (SFC) and Deployment Image Servicing and Management (DISM).
Most cases of file corruption can be resolved by running the SFC and DISM utilities, so we recommend that you try them. Hopefully, they will solve the problem quickly.
Step 7: Use the Driver Verifier Manager Tool.
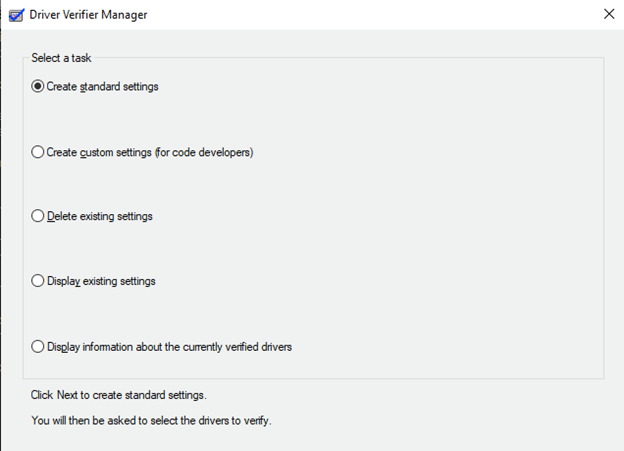
Using the Driver Verifier Manager tool, you can also identify the corrupted driver that is causing the 0x00000018 error.
Driver Verifier, as the name implies, is a program that determines which drivers have failed. This tool does not resolve the issue as SFC, CHKDSK, and other troubleshooting tools do, but rather assists in identifying the driver responsible for the error.
- To launch Command Prompt with administrative privileges, type cmd in the search area of your taskbar and select Run as administrator.
- Type the following command into the Command Prompt window and press Enter: verifier
- Then, in the Driver Verifier Manager, choose Create standard settings and click Next to continue.
- Select the option to automatically select all drivers installed on this computer, then click Finish.
- Allow the utility to scan for errors before restarting. When your computer restarts, it will examine all installed drivers. Any issues discovered will be reported to you.
Update any broken drivers that are discovered. It will take some time to run the Driver Manager Verifier tool. Consider rolling back, updating, or reinstalling the faulty or outdated drivers once the troubleshooting process is complete.
IT administrators may use a debugger like WinDbg or crash dump analyzer software to help analyze this problem for advanced troubleshooting.
Step 8: Check your hardware.
Many Blue Screen of Death errors, including reference by pointer, are caused by hardware, so if you installed new hardware recently, make sure to remove or replace it.
Aside from new hardware, faulty hardware is a common cause of BSOD errors.
Faulty RAM is usually the root cause of these types of errors, so test each RAM module one by one to find the faulty one.
MemTest86+ or a similar tool can be used to perform a thorough examination of your RAM.
Check other major components such as your motherboard, hard drive, and so on if your RAM is working properly.
Step 9: Check for overheating.
Overheating is one possible cause of this error, so if you’re experiencing it, check the temperature of your PC.
You can do this by using a CPU temperature monitoring tool. After installing such a tool, keep it running in the background and monitor the temperature of your computer.
If your CPU or GPU temperature rises above the recommended levels and causes the crash, you may need to clean your PC.
To do this, simply unplug your PC from the power outlet, open the computer case, and clean your components with pressurized air.
We must emphasize that opening your computer case may void your warranty, so keep that in mind. Several laptop users reported that cleaning their PC of dust solved their problem, so give it a shot.
Wrapping Up
Blue Screen of Death errors should not be taken lightly because they are frequently caused by a hardware malfunction. The reference by pointer BSOD error can be annoying, but we hope you were able to resolve it using one of these solutions. You can protect your system from further damage by investigating the cause of the BSOD error.