
If Windows 10/11 isn’t working properly, it could be due to missing or corrupted files. This guide will walk you through the process of repairing the installation with the Deployment Image Servicing and Management (DISM) and System File Checker (SFC) command-line tools.
Deployment Image Servicing and Management is a command-line tool that enables administrators to prepare, modify, and repair system images, such as Windows Recovery Environment, Windows Setup, and Windows PE (WinPE). Anyone with a local recovery image, on the other hand, can use the tool to resolve common system issues.
Furthermore, when you need to troubleshoot a specific error, determine why the device stops booting correctly, or resolve performance issues, you can use the System File Checker command-line tool to scan for and replace missing or corrupted system files using the recovery image.
Expert Tip: For smoother PC performance, consider using a PC optimization tool. It handles junk files, incorrect settings, and harmful apps. Make sure it's right for your system, and always check the EULA and Privacy Policy.
Special offer. About Outbyte, uninstall instructions, EULA, Privacy Policy.
Although the commands in this guide are non-destructive, it is still recommended that you create a full backup of your data before proceeding because you will be making system changes. It is also best to run a PC repair tool like Outbyte PC Repair to try and fix any error you might be experiencing.
What Is DISM?
The Deployment Image Servicing and Management Tool (DISM) is a Windows administrator-level command-line executable that can be used to repair your Windows image or modify Windows installation media. It can mount Windows images in .wim, .vhd, or .vhdx format and troubleshoot problems with the currently installed Windows operating system.
It first appeared in Windows 7 and Windows Server 2008 R2 and resulted from a shift in Microsoft’s thinking about how to properly deprecate ImageX, address the growth of WIM and Virtual Images, and include some additional features that may be useful to administrators and end users alike.
DISM can be used with older Windows image files, but not with images that are newer than the installed version of DISM.
DISM can service Windows images beginning with Windows 7, Windows Server 2008 R2, and the WinPE and WinRE versions that go with them. The commands and options available for servicing an image vary depending on which Windows operating system you are servicing and whether the image is offline or a running OS.
When to Use DISM
When your computer has startup or performance problems or encounters unexpected errors, one of the first tools to use should be the good old System File Checker (sfc /scannow), which will detect and replace any corrupted or missing files on the local image.
However, there are times when the problem is deeper within the image and the SFC tool cannot repair it. In these cases, the next best option is to use DISM to try and repair the underlying problem.
According to Microsoft, there are a few scenarios in which DISM is best used:
- Managing the data or information contained in the Windows image, such as enumerating or taking an inventory of the image’s components, updates, drivers, or applications, capturing or splitting an image, appending or deleting images within a .wim file, or mounting an image
- Servicing the image itself, which includes adding and removing driver packages and drivers, changing language settings, enabling or disabling Windows features, and upgrading to a higher edition of Windows
Basically, this entails gathering information, upgrading, and repairing.
DISM is located in the c:\windows\system32 folder of all Windows 10 and Windows 11 installations, but you can run it from any location in the Command Prompt. DISM must be launched from an elevated Command Prompt.
DISM on Windows 10/11

DISM in Windows 10/11 supports the following new features:
- Full Flash Update (.FFU): The Full Flash Update (.FFU) format, which captures all drive information, including partition information, is supported by DISM. This can help to speed up and simplify deployment.
- Capabilities: You can use this new Windows package type to request services such as .NET or languages without specifying the version. To find and install the latest version, use DISM to search multiple sources, such as Windows Update or your corporate servers.
- You can compress the operating system and provisioning packages and run the operating system and other system files from the compressed files to save space on a Windows image. This takes the place of Windows 8.1’s WIMBoot feature.
How to Run DISM in Windows 10/11
As previously stated, you do not need to manually navigate to C:\Windows\System32 to locate DISM.exe. To execute DISM commands, use the Command Prompt or Windows PowerShell instead.
To obtain sufficient privileges, you should run the Command Prompt or Windows PowerShell as an administrator:
- To enable Windows search in Windows 10/11, press Win + S.
- In the bottom text box, type cmd or powershell.
- Right-click the most relevant search result and select Run as administrator.
- Next, type in the DISM command you want to use and wait for the results.
What Is the DISM /Online /Cleanup-Image /ScanHealth Command?
To check for corruption, run DISM /Online /Cleanup-Image /ScanHealth on the image. This command is used to assist users in scanning for and locating problems in their operating systems.
ScanHealth only performs an initial scan and reports on findings – no repairs are performed.
Follow these steps to run an advanced scan with DISM:
- Launch Start.
- Search for Command Prompt, then right-click the top result and choose Run as administrator.
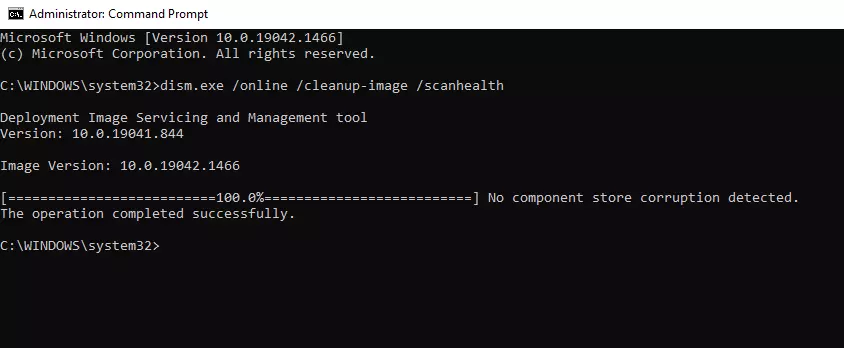
- To perform an advanced DISM scan, type in the following command and press Enter: DISM /Online /Cleanup-Image /ScanHealth.
This process will take longer to complete than CheckHealth, but it will have a higher chance of detecting issues.
Scanhealth vs Checkhealth: What’s the Difference?
DISM includes the /cleanup-image parameter for scanning, checking, and restoring the health of a specific Windows target image. You can test this for yourself by running the following commands on the Windows 10/11 image you are currently using.
Let’s take a look at two different commands that can check the health of an image. You’ll need to launch an administrative Command Prompt or PowerShell session to use either or both of them.
These are the commands:
- dism /online /cleanup-image /checkhealth
- dism /online /cleanup-image /scanhealth
It is possible to understand what distinguishes them by delving into the reference material. The Checkhealth command simply examines existing logs to determine whether any Windows processes reported errors when attempting to run items from the Windows component store. This command is only looking for already existing errors and completes its scan very quickly.
Scanhealth examines each item in the component store, computes a hash value for the current file, and compares it to a previously calculated hash value for a known healthy version of that file, which Microsoft routinely computes as part of its release and integrity management processes. While it chunks through the items in the component store, Scanhealth also writes a log file.
That’s why Scanhealth takes so much longer to complete: it’s actually doing a lot more. If you look at the performance monitor or other tools that report on real-time CPU and storage resource consumption, you will notice a significant difference in the amount of activity required to complete Checkhealth versus Scanhealth.
If you use Checkhealth, it will notify you if any errors are discovered. It will also indicate whether a Windows image is healthy, repairable, or unrepairable. You don’t need to use Scanhealth if it’s healthy, and you’re done in a matter of seconds. If it’s repairable, running Scanhealth will tell you what needs to be fixed if you’re willing to put in the time and effort to review the CBS.log file that DISM writes by default to %windir%/Logs/CBS.
Note that CBS stands for component-based servicing, which is what DISM is really doing behind the scenes with the component store. If an image is reported as unrepairable, Microsoft advises that “you should discard the image and begin again” (short words for a time-consuming and sometimes difficult process). If an image can be repaired, you can use the Restorehealth option to fix it.
On the other hand, it’s always possible that something is wrong with a Windows image that hasn’t caused an error log entry for Checkhealth to discover. If a Windows installation is acting strangely and Checkhealth finds nothing wrong, it may be worth running Scanhealth anyway to force an item-by-item check of the component store. I’d save this as a last resort if Checkhealth returns no results and Windows continues to veer off the rails.
Components of DISM /Online /Cleanup-Image /Scanhealth
As previously stated, this command reports on issues that have been identified in your current operating system.
But what exactly does each of the switches in this command do? We’ll explain what they mean and put everything together for you here.
DISM.exe /Online vs /Image
When you run the DISM.exe command, you must specify either the /Online or /Image switch.
When the /Online switch is used, DISM.exe does not expect a path to an offline image. Instead, the command tool will target the currently running operating system.
If you use the /Image switch, the Deployment Image Servicing and Management tool will expect you to specify the path to the root directory of an offline Windows image.
DISM.exe /Cleanup-Image
The /Online or /Image switch must be followed by other image servicing commands for the DISM.exe command to function. The /Cleanup-Image switch is one of the command-line options for the DISM.exe /Online switch.
So, in the “DISM /online /cleanup-image /scanhealth” command, what does the /Cleanup-Image switch do? The /Cleanup-Image switch cleans up and recovers the currently running operating system.
DISM.exe /Scanhealth
The /ScanHealth component scans the image for component store corruption. This option resolves no corruption. It only checks for component store corruption and writes it to the log file. This could take 5-10 minutes to complete. It will remain at 20% for a while before proceeding.
DISM /Online /Cleanup-Image /ScanHealth Results
How long does the DISM scanhealth scan take? The command to check the Windows image can be quite time-consuming (10-30 minutes). And it will produce one of the following three outcomes:
- No component store corruption detected – DISM discovered no errors in the component store.
- The component store is repairable – DISM has found and fixed errors in the component store.
- The component store is not repairable – DISM is unable to repair the Windows component store (try using a newer version of DISM, or you will have to restore a Windows image from a backup or reset or completely reinstall your Windows instance).
How to Fix Common DISM Scanhealth Errors
Users encounter various errors when running the DISM scanhealth command. Let’s take a look at some of them.
Stuck DISM /online /cleanup-image /scanhealth
There have been some reports of DISM processes getting stuck at scanhealth. Some even get stuck for several hours without any progress.
The first thing you can do is look for an update. Install available updates to bring the OS build up to date. It may be able to repair some system files. This error could be caused by a problem with your system files. The ISO file could also be used to perform an offline repair.
DISM exe /online /cleanup-image /scanhealth Error 87
When using DISM /CheckHealth or DISM /ScanHealth, you may encounter “DISM error 87: the parameter is incorrect” as a result of entering the incorrect command. In this case, the first thing to look for is whether you entered the command correctly.
If the command you use is confirmed to be correct, you can look into the following possibilities:
- Windows Update is having issues. When DISM detects corrupted images or files, it will use Windows Update to download the required files. The process will be terminated if Windows Update fails.
- DISM /AddPackage was used to copy a file larger than 48GB from one partition to another.
- The required service does not start – for example, you are unable to connect to a network.
To resolve this error, type the command correctly, including a space before the slash. Remember to run cmd as an administrator, as not doing this is one of the causes of DISM error 87.
If the error persists, you can revert Windows Update to a previous working state and clean up the component store. Your final option is to perform a system restore.
If you’re running the DISM /ScanHealth switch on Windows 7 and Windows Server 2008, you need to install the KB2966583 update first. Otherwise, you will receive the following message: “Error 87. In this context, the ScanHealth option is not recognized.”
Hopefully, our guide has been helpful. Do not hesitate to contact us if you have questions or suggestions regarding the topic.