
Encountering a Blue Screen of Death (BSOD) prompts the need for a reboot, as these alarming screens indicate a critical error that Windows cannot rectify without a system shutdown.
The ugly thing about blue screens or stop codes is that they appear without warning, and you could lose unsaved work instantly.
Unfortunately, Windows has a lot of blue screen errors, but some are more common than others.
Users have been scouring the net in search of solutions for the problem. Unfortunately, even the PFN_LIST_CORRUPT Reddit offers more confusion than help.
Expert Tip: For smoother PC performance, consider using a PC optimization tool. It handles junk files, incorrect settings, and harmful apps. Make sure it's right for your system, and always check the EULA and Privacy Policy.
Special offer. About Outbyte, uninstall instructions, EULA, Privacy Policy.
However, this article will go through the causes of the issue and offer proven solutions.
What is the “PFN List Corrupt” blue screen of death?
Short for Page Frame Number, PFN is the number that hard drives use to locate files on the physical disk. The stop code is triggered when the indexing number is corrupted, missing, or affected by any system bug. The pfn_list_corrupt BSOD’s code is 0x0000004E. It can appear on Windows 10/11, 8, 7, and Vista PCs.
Generally, stop codes are caused by hardware-related issues, but that’s not the case every time. The blue screen pfn_list_corrupt can be triggered by the following root causes:
- Faulty system memory
- Faulty device drivers
- Damaged Windows registry keys
- Malware infection
- Bad system files
How to Fix the PFN_LIST_CORRUPT on Windows 10/11, 8, and 7
Fixing the underlying problem is the only way to get rid of the stop code for good. The methods in this article will show you how to troubleshoot known triggers of the blue screen.
So, whether you’ve been searching for “PFN_LIST_CORRUPT Windows 8,” “PFN_LIST_CORRUPT Windows 7,” or “PFN_LIST_CORRUPT Windows 10/11,” you’ll find the answers you’ve been looking for here.
Let’s start.
First Method: Fix Driver Problems
According to Microsoft, the error might be showing up because a driver is malfunctioning. For example, it could be feeding the operating system a bad memory descriptor list. This is a sign that one or more device drivers are corrupt or outdated.
In this case, you’ll have to replace or update the driver. You can detect faulty drivers by going through the Device Manager. Sometimes, the tool will flag bad drivers by displaying yellow exclamation marks beside them.
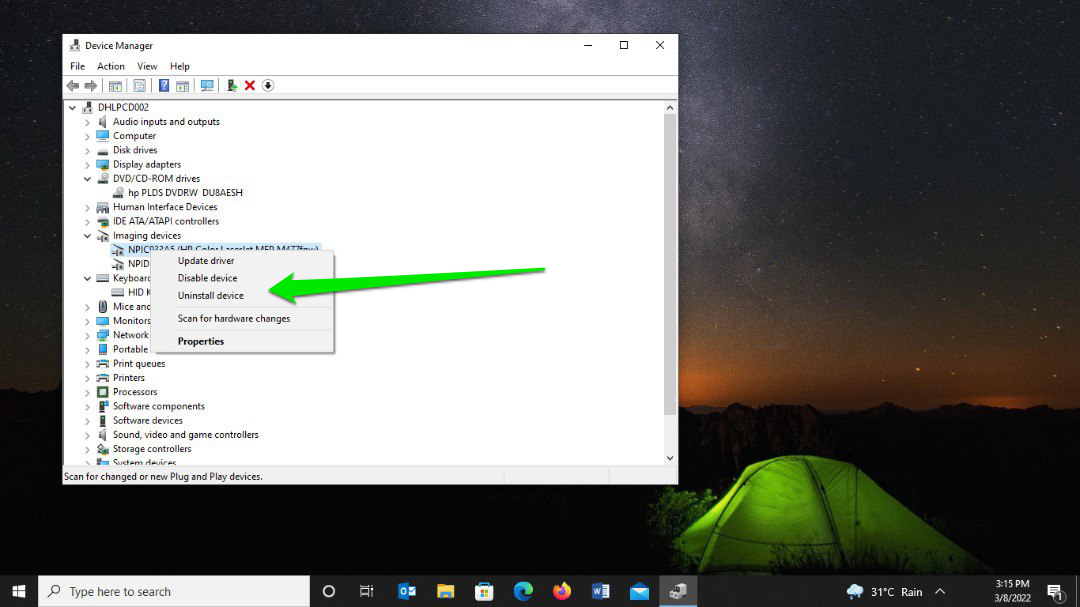
To open the Device Manager, right-click the Start menu or tap the Windows and X keys on your keyboard together and click on Device Manager. After the program opens, look through the list of devices and find those with issues.
If you see such a driver, your first step should be to uninstall it. First, right-click it and select Uninstall Device. Next, click on the Uninstall button in the confirmation pop-up and restart your computer. Windows will attempt to reinstall the driver once your PC restarts.
You can also use the Driver Verifier Manager to find unsigned and outdated drivers. For example, you can use it to detect and display drivers built for older Windows versions. Here’s how to use the tool:
- Tap the Windows and R keys on your keyboard to start the Run dialog box.
- After Run shows up, type “verifier” and hit the Enter key.
- Select Yes once the user account control box appears.
- After the Driver Verifier Manager opens, choose “Create standard settings” under Select a Task and click Next.
- After that, select the “Automatically select drivers built for older versions of Windows” option and click Next.
- The tool will now display drivers not developed for your current Windows version. You can now use the information you have to update the driver.
Once you identify drivers to update, you can go through the Windows Update utility in Windows 10/11 and 8. For Windows 10/11, you’ll have to open the Optional Updates page, then expand the Drivers section to choose which driver to download and install. As for Windows 8.1, Microsoft automatically shows you new driver updates. So, if you haven’t updated your PC in a while, head to its update page and do that.
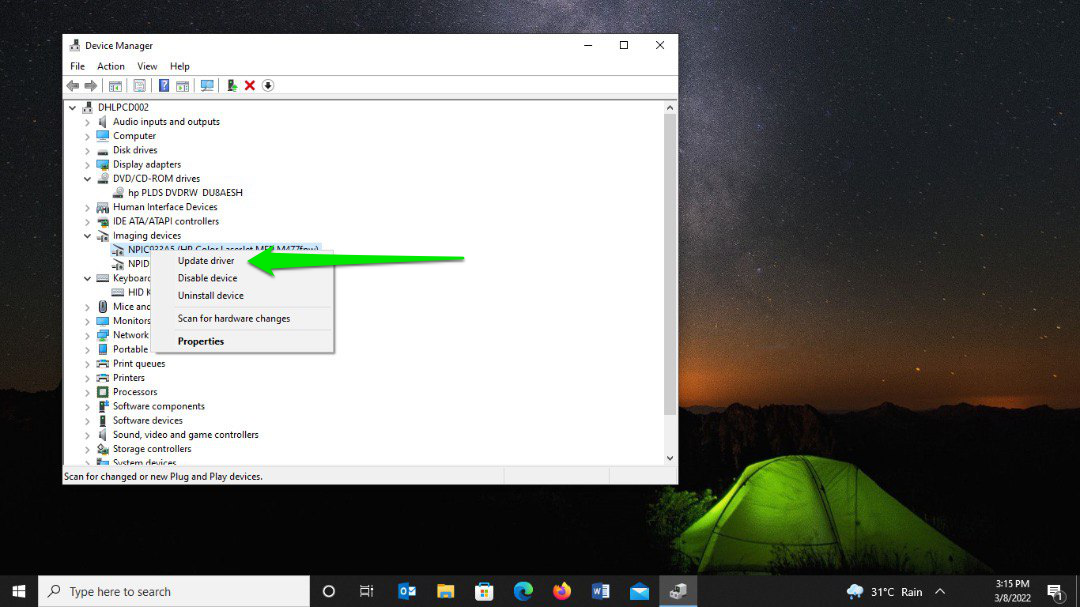
The Device Manager is another tool to download and install updates. Once you launch the program, go to the device, right-click it, and select Update Driver. Then, follow the instructions that pop up to complete the process.
You can also go to the device’s manufacturer’s website to download and install the latest driver. You’ll have to make sure you search for the right driver that matches your device’s make and model, your operating system version, and its architecture.
Automatically Download Driver Updates
While the driver verifier and Device Manager can notify you about problematic drivers, they don’t always detect corrupt or outdated ones. One way to find outdated drivers without manually comparing online versions with yours is by using an automated tool. For example, Outbyte Driver Updater can help you find outdated device drivers on your system and automatically install their official updates.
Fix Hard Drive Errors
As you know, the stop code shows up because you’re dealing with a corrupt PFN. The issue could be caused by bad hard drive sectors. Thankfully, you can use the CHKDSK tool to find bad sectors on the disk and prevent your system from using them in the future.
The tool can also attempt to recover some readable files on bad sectors. Once it’s done its job, Windows won’t have to deal with the error again.
Here’s how to run the CHKDSK tool through the File Explorer window:
- Tap the Windows logo and E keys simultaneously to launch File Explorer.
- After the File Explorer opens, go to the left pane and click on This PC.
- Head to the right pane and right-click on your main drive.
- Click on Properties in the context menu.
- After the Properties dialog window appears, switch to the Tools tab.
- Next, click on the Check button under Error Checking and confirm any prompt that shows up.
- If the utility doesn’t find any error, you’ll see a dialog informing you that you don’t need to check the disk. That said, you’ll find a “Scan drive” option in the dialog that allows you to run the CHKDSK tool anyway. Click on that button.
- The process might run for a couple of minutes or even hours.
- When you see the message that reads, “Restart your computer to repair the file system. You can restart right away or schedule the error fixing on the next restart,” allow your system to restart.
You can run a more advanced check by going through the Command Prompt window. Follow these steps:
- Type “CMD” in the Windows search explorer.
- Right-click Command Prompt on the next screen and select Run as Administrator.
- Click on Yes once you see the UAC prompt.
- Now, type the following line in the Command Prompt and hit Enter:
chkdsk /r x:
Replace “x” with the drive letter of the disk you wish to check with the tool.
- You can restart your system normally and check if the BSOD shows up again.
Restore Your System to a Previous Date
The problem might have started after installing or uninstalling a new driver, application, or update. But as it turns out, you can undo that recent change. Windows normally creates restore points when significant modifications occur, giving you a chance to reverse harmful tweaks.
These steps will show you how to restore your computer:
- Press the Windows logo and E keys together, or click on the folder icon in your taskbar to launch a File Explorer window.
- After File Explorer opens, switch to the left pane and right-click This PC.
- Choose Properties from the context menu.
- Once the System window opens, click on Advanced System Settings in the left pane.
- The System Properties dialog will now open.
- Navigate to the System Protection tab and click on the System Restore button.
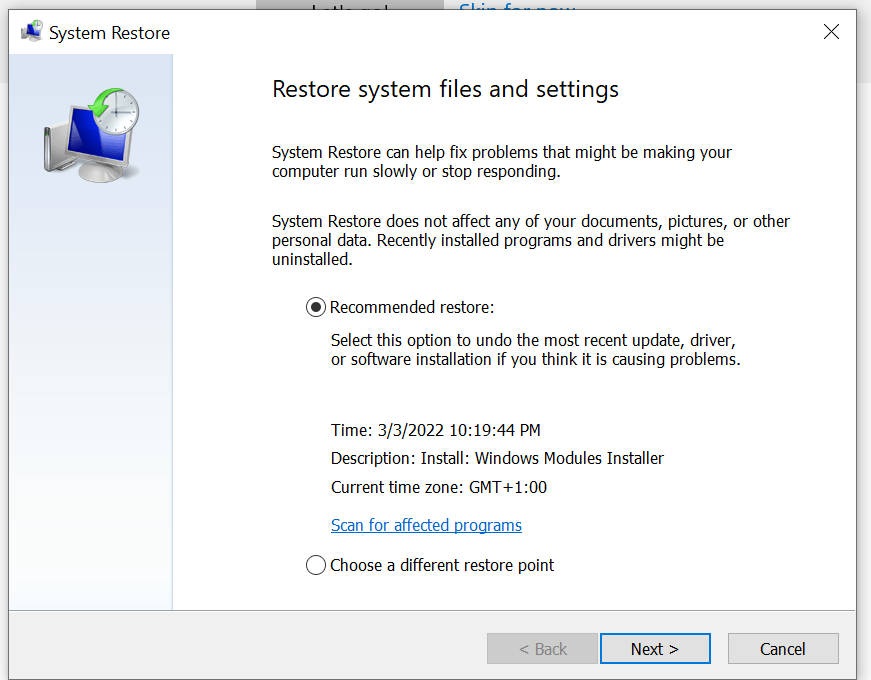
- Once the System Restore wizard opens, click the Next button.
- Choose a restore point where you were not experiencing the error and click Next.
- Confirm your decision and allow Windows to complete the process.
- Check for the error once your system reboots.
Clean Up Your Hard Drive
The issue could also be the result of accumulated junk data. Applications create temporary files they work with as you use your computer. These files become useless after they’ve served their short-term purposes but remain on your hard drive.
Over time, they clog your hard drive and even become corrupt, causing different kinds of problems. Clear out the junk files and check if the BSOD issue will disappear.
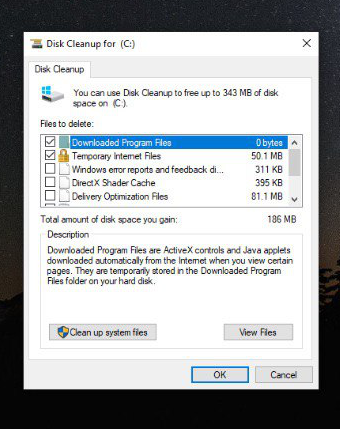
One way to get rid of these data is by running the Disk Cleanup tool. Here’s how:
- Open the Start menu and search for Disk Cleanup.
- Click on Disk Cleanup, select a drive, and click the OK button.
- You should now see a list of temporary files under Files to Delete.
- Select the files you want to clear out and click the OK button.
- You can also click on Cleanup System Files to remove temporary operating system files.
The Settings app also has a utility that scans for and removes temporary files. Head to Settings and click on the System icon. Select Storage in the left pane of the System page. Next, click Temporary Files under the Storage interface. The next page will now list different categories of temporary files. Choose the ones you want to delete and click Remove Now.
Automatically Clear Junk Files
Even after cleaning up your drive, junk files will build up again over time. This means you have to make sure you carry out the routine of clearing them out periodically. That said, you don’t have to go through that stress since there are tools like Outbyte PC Repair. The program is designed to perform regular scans to weed out junk data, including leftover registry keys that could harm the computer. It also shores up your privacy and security by keeping spyware away from your hard drive.
The tool is compatible with Windows 10/11, 8, and 7.
Scan Your PC for Malware
Malicious programs downloaded from the internet or copied from external drives can wreak all sorts of havoc on your computer. They can mess up with your device drivers and trigger the BSOD. So, run a full scan using your antivirus program to find and remove these harmful applications.
Here’s how to run a full scan using Windows’ native protection tool on Windows 10/11:
- Type “virus and threat” in the search explorer and click on Virus & Threat Protection.
- After the Virus & Threat Protection tool shows up, select Scan Options.
- Next, click on Full Scan, then tap or click the Scan Now button.
Follow these steps if you use Windows 8:
- Tap the Windows logo on your keyboard, type “Windows Defender,” and hit the Enter key.
- Select Full under Scan Options and click on Scan Now.
Follow these steps if you use Windows 7:
- Type “Microsoft security essentials” after opening the Start menu and hit the Enter key.
- Choose Full under Scan Options, then click on Scan Now.
Run a Clean Boot
A Clean Boot allows you to confirm if a startup application or service is triggering the BSOD. Sometimes, apps and services that are programmed to start after Windows boots up may clash with hardware drivers and cause fatal errors.
This troubleshooting method will let you know if that’s the case. It involves preventing the startup apps and services from running after your next reboot.
If the BSOD doesn’t come up after that, one of the startup programs is the cause of the issue.
Let’s start by disabling startup applications:
- Launch Settings and click on Apps.
- After the Apps interface shows up, click on Startup in the left pane.
- Next, toggle off the switch beside each startup app.
You can also go to the Task Manager’s Startup tab (works in Windows 8.1 and Windows 7) to disable startup programs.
Follow these steps to disable startup services.
- Press Windows + R to open Run.
- Type “msconfig” into the Run dialog box and tap the Enter key.
- Head to the Services tab of the System Configuration window.
- Tick the checkbox for “Hide all Microsoft services.”
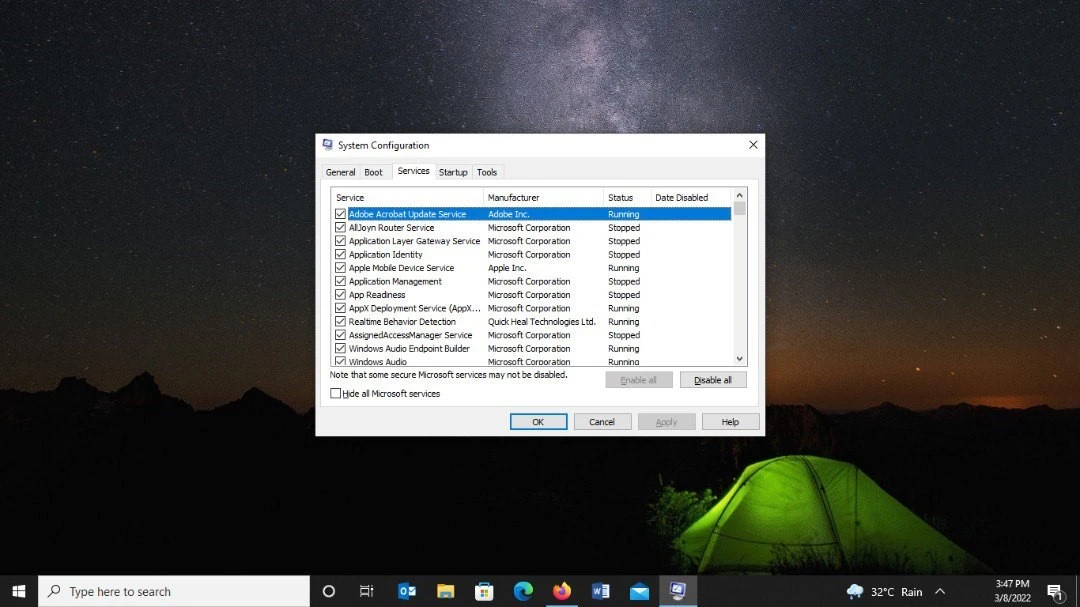
- Select the Disable All button.
- Restart your computer.
After restarting your PC, use it normally to check if the BSOD returns. If it doesn’t, then one of the programs you disabled is the cause of the problem.
To find the app or service, enable them one after the other. Once you enable one service, restart your computer and check for the problem.
You can start by enabling all the services in the System Configuration window. Then, if the BSOD shows up, you have to check the services one by one. If it doesn’t, you should check the startup apps one after the other instead.
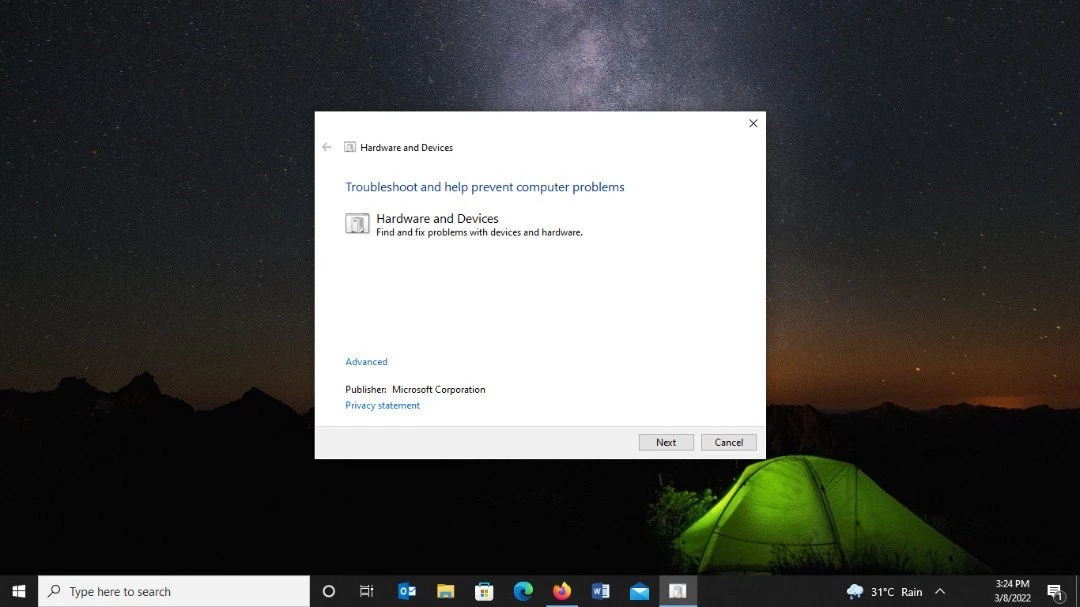
Run the Hardware Troubleshooter
The hardware troubleshooter checks for issues with your devices and automatically fixes them. If it can’t fix a problem it finds, it’ll tell you what the issue is, and you can research to resolve the glitch.
You can go through the Settings app to run the hardware troubleshooter. Once you open Settings, click on Update & Security and select Troubleshoot in the left pane of the next window. Click on Additional Troubleshooters.
Note that newer Windows 10 versions don’t display the Hardware and Devices troubleshooter in the Settings app anymore. Instead, you’ll have to go through Run.
Right-click Start and select Run from the menu. After the Run dialog box appears, type the following and hit Enter:
Msdt.exe -id DeviceDiagnostic
Now click Next to scan for hardware problems and follow the prompts.
Run the System File Checker
Faulty system files will no doubt destabilize your operating system. The PFN_LIST_CORRUPT BSOD is one of the many symptoms of missing and damaged operating system files. You can find out if such files are lying around your hard drive by running the System File Checker.
The tool works alongside the inbox Deployment Image Servicing and Management (DISM) tool, which provides the files used to replace the problematic system files. Both tools are command-line utilities, so you’ll be running them in the Command Prompt. Follow the steps below:
- Right-click on the Start button.
- Once the Power User menu opens, click on Run.
- After Run opens, type “CMD” (no quotes) into the text field, and then press down the CTRL, Shift, and Enter keys simultaneously.
- Once the User Account Control pops up, click on the Yes button.
- After that, type the line below and hit Enter to run DISM:
DISM.exe /Online /Cleanup-image /Restorehealth
Allow the tool to complete its job before moving to the next step. For example, if Windows Update fails to deliver the replacement files, insert the bootable USB you created earlier and run the following command:
DISM.exe /Online /Cleanup-Image /RestoreHealth /Source:C:\RepairSource\Windows /LimitAccess
Note: replace the C:\RepairSource\Windows part of the command line with the Windows folder’s path in the USB drive.
- Next, type “sfc /scannow” (no quotes) into the elevated Command Prompt window and hit the Enter key.
- The tool will now scan your PC for missing and damaged system files and replace any that it finds.
Reset Your Operating System
If none of the solutions above worked, then resetting your system could be the PFN_LIST_CORRUPT Windows 10/11 fix for you. It should also work for previous Windows versions if you meet the same end.
Follow these steps to reset Windows 10/11:
- Right-click the Start button and then click on Settings.
- Click on Update & Security once Windows Settings opens.
- Go to the left side of the Update & Security interface and click on Recovery.
- Next, go to the right side of the screen and click on Get Started under “Reset this PC.”
- Click on Remove Everything if you wish to start from scratch,
- Click on “Keep my files” to prevent Windows from wiping out your files.
- If you chose the Remove Everything option, the next screen would show you two options: “Just remove your files” and “Remove your files and clean drive.” Choose one option.
- Once you get to the Warning screen, click on the Next button and click Reset.
Allow Windows to reset your PC, and then click Continue when the process is complete.
To reset Windows 8.1, follow these steps:
- Press the Win + I shortcut and click on “Change PC Settings.”
- Click on the Update & Recovery option.
- Next, select Recovery.
- Click on the Get Started button under “Remove everything and reinstall Windows.”
Conclusion
That’s how to fix this scary BSOD for good. Whether you’re dealing with the Windows 10/11 or Windows 7 PFN_LIST_CORRUPT BSOD error, these solutions should resolve the issue for you.