
During attempts to install the .NET Framework 4 or a Windows update, some users have encountered the error code 0x80070659, which indicates that the installation is forbidden due to system policies. This error has been reported by users in both scenarios, highlighting the need for a solution to overcome this issue.
If you are among the unlucky few who have seen the error, then you have come to the right place. Here, we will discuss what the error 0x80070659 is all about. We will also share some fixes that have worked for others.
What Is Error 0x80070659 in Windows?
The error 0x80070659 that you’re seeing on your Windows device is an indication that there are configuration issues that exist on your system. It is also your system’s way of telling you that there are settings that have been incorrectly altered; hence they should be fixed.
In some cases, corrupt or damaged registry entries can lead to this error code. However, the most common scenario where users encounter this error is while trying to perform a system upgrade.
Expert Tip: For smoother PC performance, consider using a PC optimization tool. It handles junk files, incorrect settings, and harmful apps. Make sure it's right for your system, and always check the EULA and Privacy Policy.
Special offer. About Outbyte, uninstall instructions, EULA, Privacy Policy.
What Causes Error 0x80070659 in Windows?
Well, the causes of this error may vary from one system to another. But what’s common is that this problem can be frustrating because it affects your device’s performance.
Below are some of the common causes of the error:
- Configuration problems – If your system detects configuration problems, then it will throw the error 0x80070659.
- Incorrect system settings – Did you just make any recent change in your system settings? Then make sure you have done it correctly. Otherwise, you will see the error 0x80070659.
- Corrupt or damaged registry entries – Damaged registry entries are notorious for causing error messages to occur. Fix them to resolve the error 0x80070659.
- Problems with updating Windows – Is your internet connection unstable? Is the update itself problematic? Then you may encounter the error. When trying to download an update, make sure your internet connection is stable or fast. Also, read reviews first before attempting to manually download an update. The update itself may not be stable or has bugs, causing the error.
- Issues with system files – If your system files are experiencing problems, then you may see the error on your screen. Fix your system file issues using the System File Checker utility.
- Malware infections – Sometimes, malware and virus infections may cause the error 0x80070659 to surface. To fix this, get rid of the virus once and for all.
- Incomplete updates – If the update is incomplete, then the error 0x80070659 may appear.
Getting Error 0x80070659 in Windows? Here’s What You Should Do
What should you do if you are getting the error 0x80070659 in Windows? Below are some solutions that you should try:
Solution #1: Use the Windows Update Troubleshooter
The Windows Update troubleshooter is an automated tool that helps fix any Windows Update issues you might be experiencing. It will automatically detect the problem, and provide steps to get your PC running smoothly again. The troubleshooting process includes checking for Windows Updates, downloading the latest updates from Microsoft’s servers, and re-running the installation of these updates on your computer.
To use this utility, here’s what you should do:
- Go to Settings and select Update and Security.

- Navigate to the Troubleshooting section.
- Select Advanced Troubleshooter and go to the Windows Update section.
- Click the Run the Troubleshooter button.
- Once done, restart your computer and see if the error still appears.
Solution #2: Check If the Necessary Windows Update Services Are Up and Running
The Windows Update Services are a set of services that provide updates to your Windows operating system and optional software. These services include Windows Server Update Service, Microsoft Update, and Automatic Updates. These services manage the updates for the Windows operating system of all machines on your network.
To ensure that all the necessary services are enabled, here’s what you should do:
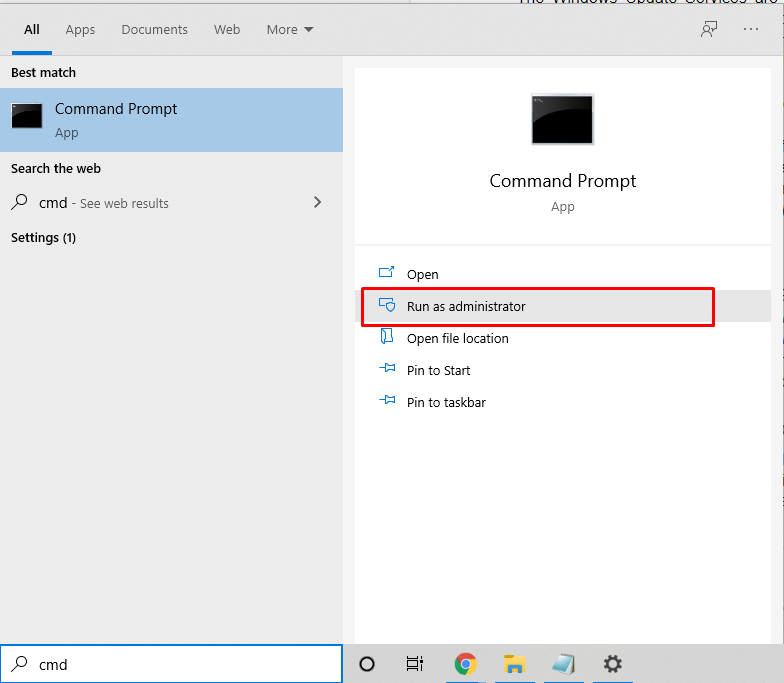
- Type cmd into the search field.
- Select Run as Administrator.
- Type the following commands followed by Enter:
- taskkill /f /fi “SERVICES eq wuauserv” (enter this multiple times)
- net stop cryptSvc
- net stop bits
- net stop msiserver
- ren C:\\Windows\\SoftwareDistribution SoftwareDistribution.old
- rmdir C:\\Windows\\SoftwareDistribution\\DataStore
- rmdir C:\\Windows\\SoftwareDistribution\\Download
- After running all these commands, close the Command Prompt.
- Restart your computer and try to install the update once again.
Solution #3: Clean the Temporary Cache Folder
The Temporary Cache folder in Windows is a temporary storage location for files that are either being downloaded or have been copied from one place to another. The cache ensures that you can continue downloading your file even if the network connection momentarily goes down. It also speeds up performance by storing the most commonly used parts of the file on your hard drive rather than on the internet so it doesn’t have to be re-downloaded every time you access it.
When you delete a file, Windows deletes any copies stored in your temporary cache but leaves those still located on your hard drive untouched until they’re overwritten with new data. This means deleting something may not actually remove it from your computer!
Unfortunately, this folder is notorious for causing issues on Windows and is susceptible to virus and malware attacks. That is why experts recommend clearing this folder once errors surface on your Windows device.
To clear the Temporary Cache folder, do the following:
- Press and hold the Windows + R keys simultaneously.
- Type %windir%\\SoftwareDistribution\\DataStore into the text field and hit
- This will launch a new Windows Explorer.
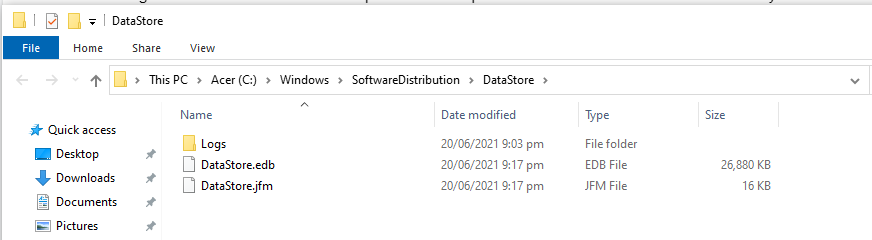
- Now, delete everything in this folder.
- Restart your computer.
Solution #4: Run the System File Checker Utility
The System File Checker Utility, or SFC for short, is a Windows utility that can be used to scan the system files on your computer. This tool is built into Windows and can be accessed from the Command Prompt by typing “sfc”.
It’s recommended to check your system files regularly with this utility as it provides an additional level of protection against malware and other security risks. How often you should use this utility will depend on what type of activities you do online but as a general rule, once every few weeks should suffice unless something changes in your personal habits.
This tool can also be used to scan your computer for missing or corrupted files. It can be used to repair the problem with these files, and it’s often used as part of troubleshooting procedures. The SFC makes use of the Windows Resource Protection (WRP) feature to ensure that there are no corrupted or missing files on your PC.
To use the System File Checker utility, do the following:
- Press the Windows button and type cmd into the search field.
- Right-click on the most relevant search result and select Run as Administrator.
- The Command Prompt window will now appear. Into the command line, type this command: sfc /scannow.
- Hit Enter.
- Wait for the scan to complete.
- Once done, restart your computer and try to install the update once again.
Solution #5: Check the Software Restrictions Policy
Software Restrictions Policy is a feature of Windows 10/11 that allows IT Administrators to lock down what software can be installed and run-on devices. It’s a great way to ensure only approved applications are used in an organization.
Basically, Software Restrictions Policies are a set of security policies that allow you to control how software is used on your computer. This can be useful for limiting the damage done by malicious code or stopping some types of malware entities from installing in the first place.
It is also important to note that Software Restrictions Policies only work with Windows 10/11 Professional and Enterprise editions, so if you’re using Windows 8 Pro or Home edition then this won’t apply to you.
To check your current software restrictions policies, here’s what you should do:
- Launch the Control Panel.
- Select System and Security.
- Navigate to Administrative Tools.
- Go to Local Security Settings.
- Tap on the Software Restrictions Policies section.
- If there are no restrictions that have been set up, right-click on the Software Restriction Policies node.
- Choose New Software Restriction Policy.
- Double-click on the Enforcement section.
- Select the All Users Except Local Administrators option.
- Hit OK.
- Restart your computer and try to install the update once again.
Solution #6: Remove Any Recently Installed Security Software
Your Windows computer may be secure, but sometimes it needs a little boost of security. That is why we install security software programs.
These programs are designed to protect your Windows computer against virus attacks or other threats. However, they can also cause other applications to act weird and trigger errors to occur. As a result, you will have to remove them temporarily.
There are a number of reasons why people might want to uninstall security software from their system; if it’s not working correctly, is constantly asking for updates, has security issues due to being out-of-date (or doesn’t have any security at all), or just simply taking up too much hard drive space.
In the case that you want to uninstall your security software because it is preventing you from installing a Windows Update, here’s a detailed guide on what to do:
- Right-click on the Start menu.
- Select Control Panel.
- Go to Programs and Features and find the security software you need to uninstall.
- Right-click on it and hit the Uninstall button to proceed with the uninstallation.
- Restart your computer and check if the update problem has been resolved.
Solution #7: Make Sure All Windows Update Services Are Running
If all the essential Windows Update services are disabled, then you may encounter the 0x80070659 error on your Windows device.
Below is a step-by-step guide on how to enable all essential Windows Update services:
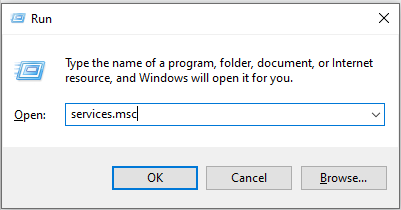
- Right-click on the Start menu and select Run.
- Into the text field, input services.msc and hit OK.
- In the window that pops up, right-click on Windows Update and select Properties.
- Next, set the Startup Type to Automatic.

- And then, check if the Service Status is stopped. If that is the case, hit the Start button to start it. Hit the Apply button then click OK to proceed.
- Now, right-click on Background Intelligent Transfer Service (BITS) and select Properties. Set the Startup Type to Automatic and make sure the Service Status is set to Running. Hit OK to continue.
- Lastly, right-click on Cryptographic Service and choose Properties. Set its Startup Type to Automatic and make sure the Service Status is Running. Hit OK to save the changes.
- Restart your computer and check if you are still experiencing the error.
Solution #8: Free Up Disk Space
Sometimes, Windows updates fail because there is not enough space on your system drive. So, it is a good idea to increase the free space of your disk space to proceed with the Windows update installation without any problem.
There are many ways to increase the free space of your system drive. The easiest involves using the Disk Cleanup utility.
The Disk Cleanup Utility is a Windows utility that helps you remove files from your computer to free up space. When the disk cleanup utility is running, it will show a list of files for deletion and then prompt you to delete them or not. If there are many files on your computer, it can take some time before the process is completed because it has to go through every single file one by one.
This utility can be accessed from the Start menu. Its main function is to free up hard drive space by removing unnecessary data such as old log files and cached images or videos from web pages you’ve seen before. This allows for more storage capacity on your machine, so you don’t need to constantly worry about freeing up space when running out of room.
To use this utility, follow these steps:
- Right-click on the Start menu and select Run.
- Type msc into the text field and hit Enter to continue. This will open the Disk Management window.
- Select the system drive you want to free up space.
- And then, click Properties.
- A pop-up window will appear. Select Disk Cleanup.
- It will take a couple of minutes to provide an estimate of how much time it will take to complete the cleanup process. Hit OK to proceed.
- A pop-up message will then appear. If you want to proceed, hit the Delete Files button.
Solution #9: Roll Back to the Most Recent Update
The Windows update may have failed because there is something wrong with the update itself. When you install a Windows update, you have at least 10 days to roll back the changes made by the update. So, if you don’t take action right away, you can’t revert to the last update anymore.
Here’s how to roll back your last update:
- Open the Start menu.
- Type windows update settings into the search field.
- Select Recovery.
- Find the Go back to the previous version of Windows 10/11 option.
- Choose Get Started.
- Follow the on-screen prompts.
- Restart your computer once done.
Solution 10: Make Sure Your Device Drivers Are Up to Date
Although the Windows Update utility can take care of the components of your system, some third-party drivers are beyond its control. So, you may need to perform the driver update manually to prevent issues in the long run.
Here’s how to update your device drivers:
- Type device manager into the search field.
- Select Device Manager.
- Choose a device category and right-click on the driver that you want to update.
- Select the Search Automatically for Updated Driver Software option.
- Click the Update Driver button.
- If Windows cannot find a new driver, try downloading it directly from the device manufacturer’s official website. And then, follow their instructions.
- Restart your PC.
Alternatively, you may use a device driver updater tool to automate the entire process. By using such a tool, you don’t have to check which driver needs to be updated. The tool will take care of the update process for you and make sure you get a version that is compatible with your device. This will save you from any problems.
Solution 11: Reach Out to Microsoft’s Support Team
If no solution has worked so far, take time to speak with a professional from Microsoft’s support team. You should be able to get help from experienced personnel. They can take over your device to quickly diagnose and rectify the issue.
This is highly recommended if the reason that the recent update failed is because of an error that Microsoft is aware of. You can reach out to Microsoft’s Support team via their official website.
Summary
The Windows error code 0x80070659 can be caused by a number of factors, and it’s important to diagnose the issue before you make any changes. This article has discussed how this error code is triggered as well as some potential causes and troubleshooting steps that may help identify the problem.
Generally, this error is caused by configuration issues, incorrect system settings, damaged registry entries, issues with system files, problematic Windows updates, or malware infection.
To fix this, you can always use the Windows Update Troubleshooter utility. If it does not work, make sure all the necessary Windows Update services are up and running or clean the Temporary Cache folder. You may also use the System File Checker utility if you suspect that the error is triggered by corrupted files. Other solutions that you can try include removing any recently installed security software, checking the Software Restrictions Policy, freeing up disk space, and making sure all device drivers are up to date.
If you have additional questions or comments about this blog post, please feel free to share them below!