
When installing Windows 10 through Windows Update or the Update Assistant, you might come across the Windows update error code 0x80070070 or the “Windows 10 Update Assistant not enough disk space” issue.
The error code 0x80070070 indicates that there is insufficient space on the drive (ERROR DISK FULL). While the problem may be related to a lack of disk space, it is usually caused by a lack of contiguous free space on the hidden system partition (recovery partition).
What does the error code 0x80070070 mean? How can it be resolved? In this post, we’ll show you several ways to resolve the Windows 10 error code 0x80070070.
What Is the Error Code 0x80070070?
You may encounter the Windows 10 update error code 0x80070070, 0x80070070–0xc19001df, 80070070, 0x80070070–0x50011, 0x80070070–0x50012, or 0x80070070–0x60000 on your Windows 10 PC during the update process. This means that your computer does not have enough disk space to install the new Windows 10 version.
Expert Tip: For smoother PC performance, consider using a PC optimization tool. It handles junk files, incorrect settings, and harmful apps. Make sure it's right for your system, and always check the EULA and Privacy Policy.
Special offer. About Outbyte, uninstall instructions, EULA, Privacy Policy.
The Windows Update error code 80070070 indicates that updates are not installed on your PC, usually due to a lack of disk space, particularly after installing Windows 10. In this case, before attempting the following solutions, you can try deleting unnecessary files. You can also try moving files to another drive (such as a USB stick, network drive, or local drive) or uninstalling applications that you no longer use from your computer.
The amount of space required is determined by the updates you wish to install. However, nowadays, most updates require at least 2GB of free space. That said, computers may crash even if they have a total of 2.5GB. Monthly cumulative updates, in particular, require a lot of space because they involve downloading, extracting, and installing. These procedures will at least triple the size of a 450MB general update.
The error 0x80070070 can also occur when upgrading Windows 10 to 20H2. A large number of files must be copied when upgrading Windows 10 to a newer version. Before you begin, you must have at least 8GB of free space. In fact, you may need 12GB or more to accommodate the latest Windows updates.
Prior to installation, Windows 10 20H2 checks the drives for available space. The setup will not leave you hanging with a half-installed system. However, it is best to double-check it beforehand.
Some users receive the same error when attempting to upgrade using the Windows 10 Media Creation Tool. The error says “Something Happened” and then shows “0x80070070 – 0xC19001DF.” It occurs during the media creation phase, and the download and verification appear to be normal.
You may also see the error code 0X80070070 in the following situations:
- When trying to access the Windows Update page, you get the message “Windows Update has encountered a problem and cannot display the requested page. 0X80070070”
- When a Windows update fails, the message “Download Failed. Result code: 0X80070070” pops up.
- When installing Windows from a DVD or USB drive, the message “Installation Failed 0X80070070” appears.
- When the upgrade to Windows 10 fails, you’ll get the “The installation failed in the Safe_OS phase with an error. 0X80070070” message.
When prompted with this error code, it’s best to start your troubleshooting process by ensuring that your drive has enough disk space. If freeing up space on the drive does not resolve the issue, it is almost certainly related to the system reserved partition.
Below is a list of fixes that have successfully helped users to resolve the 0X80070070 error. Please apply them in the order in which they are listed until you find a solution that works in your situation.
Depending on the circumstances surrounding the 0X80070070 error, you may or may not have access to some of the options described in the methods below. Only implement the fixes that are relevant to your situation.
What Causes the Windows 10 Error 0x80070070?
Aside from having not enough storage space, there are several other causes of the error code 0x80070070, a few of which are as follows:
- Not enough computer resources, such as memory and CPU power
- Malware infection
- A corrupted registry key
Once your system displays this error code, you will be unable to perform a number of other tasks or actions:
- You will not be able to install any of the available updates on your PC.
- You will receive an error message if you attempt to update the installed apps.
- You won’t be able to install additional software.
- If your computer is infected with malware, important files related to the system, user, media, and so on may be corrupted.
Now that you have an idea of what the Windows 10 error code 0x80070070 is all about, let’s apply the solutions that are proven to be effective by those who have tried them.
Solutions to the Windows 10 Error Code 0x80070070
The first thing you can try when you get this error, or any error for that matter, is to restart your computer. It usually helps in clearing up glitches that might be affecting your computer’s performance. If it does not help, refer to the solutions below:
Fix #1: Clear some disk space
If you’re getting the Windows 10 0x80070070 0xc19001df error because your PC is running low on free space, you may be unable to install critical Windows updates, and your PC’s performance may suffer as a result. Some methods for freeing up space on your computer include uninstalling unused apps, deleting large files, and adding additional storage space.
To see how much disk space is still available on your Windows 10 device, open File Explorer from the taskbar and then navigate to This PC on the left. The amount of free space on your drive will be displayed under Devices and drives.
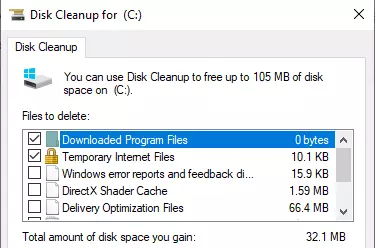
If that isn’t enough, you can use Disk Cleanup to clean up system files. This is what you must do:
- To open the Run window, press the Windows logo key + R shortcut and type cleanmgr, then press Enter to open the Disk Cleanup dialog box.
- To clean up your system files, click the Cleanup system files button. At this point, you may be asked to provide the admin password.
- By clicking OK, you will run the cleanup tool for the file types you’ve already selected. You can also check the boxes next to Windows Update Cleanup, Temporary Files, and Windows Update log files if you need even more space.
- Clicking Delete Files confirms your action and starts the deletion.
Restart your computer and try upgrading or downloading the update. If the error message persists, proceed to Method 2.
Fix #2: Run a PC Repair Tool
If the above-mentioned solution does not clear up enough storage for your update, you should try running a reputable PC repair tool. Many of these tools are user-friendly and multifunctional, allowing you to delete junk files, reclaim disk space, and detect and fix a variety of PC errors, including DLL errors, BSOD errors, registry problems, and more. Some tools also provide features like fixing corrupted or inaccessible system files and protecting against viruses to enhance your device’s performance.
Fix #3: Move the Temp folder
By moving the Temp folder to a different partition/disk, some users have been able to resolve the error 0X80070070. If you have not been able to clear enough disk space, try this method.
The Temp folder is used to temporarily store large files when the system needs to manipulate them. The user will be prompted with the 0X80070070 error if it does not have enough space to store them. You can avoid this problem by moving the Temp folder to a different partition with more available space. Here’s a quick guide to doing so:
- To open the Run window, press Win + R.
- To open System Properties, type sysdm.cpl and press Enter.
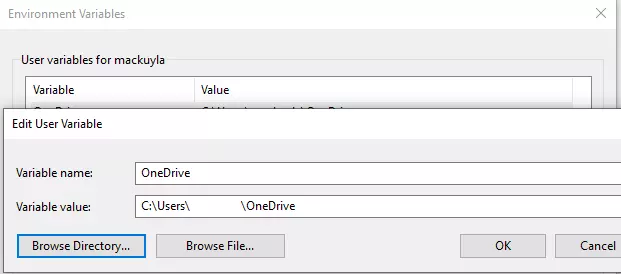
- Go to the Advanced tab in System Properties and select Environment variables.
- Click the Edit button after selecting the Temp folder.
- Then, using the Browse Directory button, move the Temp folder to a different partition with more space. To confirm, click OK.
Reboot your computer and try the update/upgrade once more. If the 0X80070070 error persists, proceed to Method 3.
Fix #4: Disable disk quotas
A disk quota is a limit set by the system administrator to track and control disk usage by user or volume. Disk quotas are useful for rationally allocating limited disk space. If you have disk quotas enabled on your drive and you go over the limit, you’ll get the 0X80070070 error.
Here’s how to disable disk quotas on your system quickly:
- To open the Run command, press Win + R and type diskmgmt.msc. To open the Disk Management dialog box, press Enter.
- Select Properties from the context menu when you right-click on your Windows partition.
- Uncheck the box next to Enable quota management on the Quota tab. To confirm, click Apply.
- If you need to keep using disk quotas, instead of disabling quota management, try adjusting the disk space limit.
Restart your computer and try installing the upgrade/update. Proceed to the next method if the 0X80070070 error persists.
Fix #5: Repartition the Hard Drive from Disk Management

When trying to install Windows 10, some users encounter the 0X80070070 error. If your OS drive has enough storage space, this might happen because the upgrade wizard is attempting to copy files to the recovery drive. If this is the case, one option is to expand the recovery drive so that it can accommodate the new files.
Follow the steps below to repartition the hard drive so that it has enough space for the installation:
- To open the Run command, press the Windows key + R combo and type diskmgmt.msc. To open the Disk Management dialog box, press Enter.
- Right-click C (or whatever your Windows drive letter is) and select Shrink Volume from the context menu. The query may take some time to complete.
- Next, extract the space required for the upgrade wizard by checking the box next to Enter the amount of space to shrink in MB.
- To be sure, over 15 GB of free space should be available (15000 MB). After that, click Shrink and wait for the process to finish.
- Rename the recovery drive to something else now that you’ve extracted space from the Windows drive. To do so, right-click the recovery drive and select Change Drive Letter and Paths from the context menu.
- If the drive doesn’t have a letter assigned to it (it’s usually labeled D), click Add and type G. Use the Change button to change the letter D if it has already been assigned.
- Note that any letter other than G can be assigned. The goal is to change the recovery drive’s name from D to something else. Because the upgrade setup insists on writing to the D drive, this step is required.
- Finally, select New Simple Volume from the right-click menu of the unallocated volume on the C drive.
- Follow the volume wizard’s instructions to make sure you use all of the remaining unallocated space. When you get to the Assign Drive Letter or Path stage, select Assign the following drive letter from the drop-down menu and choose the letter D.
- At the next two prompts, click Next and Finish to finish the process.
Restart your device and go through the upgrade wizard once more. Move on to the next method if the process fails with the same error.
Fix #6: Upgrade Windows via the Media Creation Tool
If you’ve tried everything else and still can’t get rid of the 0X80070070 error, try using the Media Creation Tool. Even if the Upgrade Assistant has previously failed, this Microsoft-developed tool is usually capable of completing the installation. This method should allow you to complete the upgrade if you receive the 0X80070070 error when trying to upgrade to Windows 10.
In addition to downloading the files needed for a clean installation, the Media Creation Tool can also upgrade your Windows version. Here’s a quick guide to upgrading Windows with the Media Creation Tool:
- Use this official link to download the Media Creation Tool.
- At the first prompt, choose Upgrade This PC Now to start the tool.
- The software will download the necessary files and verify that all system requirements are met. If your system specifications are sufficient, the setup will begin installing the upgrade on your computer.
- During this process, your computer will restart several times.
Conclusion
The installation error 0x80070070 is usually caused by a lack of space on the hard drive. Therefore, freeing up disk space can help to alleviate this problem. This bug may also appear because of the attached peripheral devices in some cases. Performing a disk cleanup, disabling disk quotas, and moving the Temp folder to a partition other than C: may assist in resolving this recurring error. If none of these solutions work, simply upgrade your current Windows 10 OS build to the latest version. This should resolve any error you might be facing, including the Windows error code 0x80070070.
Disclaimer
The information provided in this article is for general informational purposes only. While we strive to keep the information up-to-date and accurate, following the instructions and solutions provided herein may require technical knowledge and could result in loss of data or other issues if not executed properly. If you are unsure or uncomfortable with any of the processes described, it may be wise to consult with a professional technician or service provider.