Windows 10/11 allows you to create multiple user accounts – useful for shared computer access. However, the default login screen displays all these accounts, which can be cumbersome and tedious when selecting the correct username icon each time.
In addition, having many user accounts displayed on the login screen can pose a security risk as it may reveal crucial information to potential attackers. If the Remote Desktop feature is enabled, it might allow malicious individuals to remotely identify a logged-in user from the information listed on the sign-in screen.
The simplest solution for most users is to delete redundant accounts. However, a common issue reported by users is the reappearance of a deleted user on the Windows 10/11 login screen. This problem is our topic of discussion in today’s article. In this article, we will guide you through the steps to eliminate the deleted user accounts that persistently reappear on the sign-in screen.
Why Should User Profiles on Windows Be Deleted?
Deleting surplus user profiles in Windows 10 can help address a variety of system issues. For example, if your user profile becomes corrupted, certain apps stop working, or you want to reset your profile’s settings to default, this may help.
Expert Tip: For smoother PC performance, consider using a PC optimization tool. It handles junk files, incorrect settings, and harmful apps. Make sure it's right for your system, and always check the EULA and Privacy Policy.
Special offer. About Outbyte, uninstall instructions, EULA, Privacy Policy.
User profiles, made up of a series of folders, allow you to tailor your user account. If you want to delete your user profile, make sure you do so from another user account, not the one that will be deleted soon.
Furthermore, the account you will use to delete the user profile must have administrative privileges. When a user profile is deleted, all photos, videos, documents, and other types of files are also deleted. Therefore, it’s crucial to back up all these files or create copies that can be securely stored.
What to Do When an Old User Profile Still Appears on the Login Screen?
Regardless of whether you’re using a Microsoft account or a local account, there are multiple methods to remove a user account from the login screen. Let’s get started.
Having multiple accounts comes in handy when multiple users share the same computer. It not only prevents the disruption caused by an online administrator account, but it also provides some privacy protection. However, if you deem these multiple accounts as no longer useful, there’s no obligation to keep them.
The following are the various methods for deleting user accounts in Windows 11.
Method 1: Delete the User Account via Settings
Multiple user accounts can be deleted from Windows Settings. Here’s how it’s done:
- Go to the Start menu search bar, type ‘settings,’ and then click the Best match You can also use the Windows key + I keyboard shortcut.
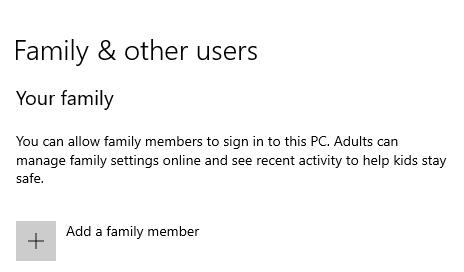
- Choose Accounts > Family and other users.
- Select the user account you want to delete and press the Remove
- Finally, press the Delete account and data
If you do this, your user account information will be removed.
Method 2: Delete the User Account from the Control Panel
If the Settings method from above does not help you solve the problem, you can use the Control Panel. This is how you begin.
Here’s how it goes for Windows 10 users:
- Press the Windows + R keyboard combo to open the Run dialog box.
- Next, type control and press Enter to launch the Control Panel.
- Once it opens, navigate to System and Security > System > Advanced System Settings.
- Under the User Profiles section, hit on the Settings button.
- Now, choose the user account you want to delete and tap on the Delete button.
For Windows 11 users, follow these steps:
- Open the Control Panel by clicking the Start button.
- Remove user accounts by heading to User Accounts.
- Choose the account you want to delete and click Delete the account.
- Finally, go to Delete files > Delete Account.
If you do this, your account and all files associated with it will be successfully deleted.
Method 3: Using Netplwiz to Remove the User Account
Netplwiz (or netplwiz.exe) is a user account management program (tool) that comes standard with almost all Microsoft Windows operating systems. Netplwiz is an abbreviation for Network Places Wizard. Netplwiz is a useful program for managing user accounts in most Windows operating systems.
This tool enables us to create and modify user accounts, change their access and groups, and even alter their names. So, if you’re experiencing any issues with your user profile, the first thing you need is the Netplwiz utility.
Follow the steps below to remove a user profile using the netplwiz utility:
- Launch the Run dialog box by pressing the Windows + R keyboard combination.
- Now, type netplwiz into it and hit Enter.
- If prompted by UAC, click Yes.
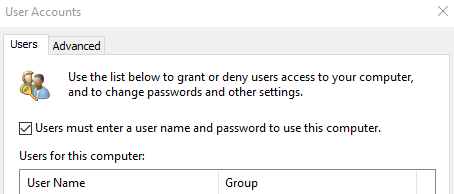
- Under the Users tab, check the ‘Users must enter a user name and password to use this computer’ box. Otherwise, it will be impossible to access the user list.
- Next, highlight the user account you want to delete and tap on the Remove button. Also, click Yes to confirm your selection.
- After that, navigate to the Advanced tab and activate the Require users to click CLT-ALT-DEL option, under the Secure sign-in section.
- Click Apply > OK to activate the changes.
Method 4: Remove or Deactivate Your Antivirus Program
For users with ESET Smart Security installed, a deleted user often continues to show up on the Windows 10/11 login screen. If you have this program on your computer, then you need to delete your ESET phantom account first via the ESET settings. Here is how to do it:
- Open your preferred browser, and then log into ESET Anti-Theft.
- Now, choose the ‘I recover my device’ option.
- Next, select the relevant device from the list of devices protected by ESET Anti-Theft.
- Click View details and select Settings.
- After that, select the phantom account and hit on the Delete button.
- Besides this, you can also turn off the ESET Anti-Theft setting. To do that, open ESET Smart Security, then select Setup and Security Tools.
- From here, turn off the Anti-Theft option.
Method 5: Use Command Prompt to Delete the User Account
If the above tricks did not work, try deleting the account via an elevated Command Prompt. The command line is a text-based interface that allows you to run and manage all Windows programs with a few keystrokes.
To begin, navigate to the Start menu search bar, type ‘command prompt,’ and then run it as administrator.
Enter the following command into the interface: net user
It will display all user accounts on your computer. Choose the one you want to delete, then enter the following command: net user <username> /delete
Replace <username> with the username of the account you want to delete. If you follow the steps above, the account will be deleted immediately.
Method 6: Delete the User Account Via the Registry
A user account can be deleted by a computer administrator without the use of a password. This is a significant disadvantage, but it is also by design giving admin users ultimate authority. It is possible that you deleted a user account, but its User Account Picture is still visible on the Windows Logon screen for some reason. In this case, attempting to log in will fail. This post will show you how to remove the User image from the list. Press the Windows + R shortcut to open the Run dialog box.
The problem typically doesn’t arise if you delete a user account via the standard method, that is, via Settings > Accounts. However, if the administrator deletes the folder manually, the registry entry is not deleted. To fix it, follow these steps:
To open the Registry Editor, type regedit in the Run prompt (Win +R) and press the Enter key. Then take the following route: HKLM\Software\ Microsoft\Windows NT\CurrentVersion\ProfileList or HKEY_LOCAL_MACHINE\SOFTWARE\Microsoft\Windows NT\ CurrentVersion\ProfileList.
Take note of the number of folders under the ProfileList; those with extended names beginning with S are the user accounts.
Expand one of the folders and look for the string—ProfileImagePath—to confirm it belongs to the deleted user account. When you double-click to open, you’ll see a user folder path that ends with the user name.
Once confirmed, delete the Registry Entry that contains the ProfileImagePath.
After that, restart the computer, and you should no longer see the user account listed.
Friendly Warning: The Registry Editor is a potent tool, and any misuse could render your system non-functional. But as long as you follow the right instructions, performing the above trick is a pretty simple hack, and you shouldn’t expect any problems. However, if you haven’t worked with the Registry Editor before, then it is safer to use a PC repair tool to automate everything for you. Sometimes, a deleted profile can be seen on the Windows 10/11 login screen because of corrupted registry files. We recommend that you use the Outbyte PC Repair tool for this task.
Method 7: Disable or Hide the User Profile
If you still have problems deleting the user account, why not disable it instead? This option will remove the user account from the sign-in screen. Follow these steps to disable your user profiles:
- Restart your PC.
- When the Windows 10/11 login screen appears, click Cancel.
- Next, tap on Start > Settings, then open the Control Panel.
- Now, double-click on Passwords.
- Navigate to the User Profiles tab, and then select All users of this PC use the same preferences and desktop.
- To activate the changes, click OK.
And there you have it. You’ve successfully removed a deleted user that kept reappearing on the Windows 10/11 login screen. With this issue sorted, it may also be beneficial to learn how to fix errors that may occur when signing into your Windows 10/11 account.
Hopefully, the above solutions worked for you. Please note that you can’t delete your old user account if you have signed into Windows 10/11 with that account. If you still have any question or issue, leave a comment below.
Amazing thanks Method 5 worked a treat. I have added your page to my favourites.
After checking all of those, none of which show the user, the account and old picture still appears on the lock screen to sign in. Apparently, what appears on the lock/login screen is not based on information in those 7 places.