Windows errors are a common occurrence across different builds and versions. They can range from minor, temporary bugs that resolve themselves to more severe blue screen errors that require thorough troubleshooting and resolution measures.
The Windows problem that we will address today is the error code 0x800704EC. This involves the Microsoft account that you use to sign into Universal Windows Platform (UWP) apps. This is also the reason why the error only manifests itself when accessing these apps, particularly Windows Defender and the Microsoft Store. Several users encountered this hiccup when they attempted to turn on Windows Defender. Instead of turning on, the app’s icon became grayed out and unresponsive. Or sometimes it throws out the error code 0x800704EC.
Other users, on the other hand, encounter the error when they open the Microsoft Store app to try and install their favorite programs. For some reason, the store does not load and instead displays the same error message above.
The resolution for this error is feasible. It may require a certain level of troubleshooting, but numerous fixes are available when you encounter difficulties in signing in with your Microsoft account on your computer. This guide aims to assist with resolving this specific error.
Expert Tip: For smoother PC performance, consider using a PC optimization tool. It handles junk files, incorrect settings, and harmful apps. Make sure it's right for your system, and always check the EULA and Privacy Policy.
Special offer. About Outbyte, uninstall instructions, EULA, Privacy Policy.
How to Use a Microsoft Account in Windows 10
A Microsoft account allows you to sync content, settings, and other configurations across multiple Windows 10 devices. Microsoft account offers a single login for all of your devices running Windows 10 if you wish to keep your browser settings, passwords, visual themes and colors, and other key settings synced across each device.
And in most cases, you’ll need a Microsoft account to log into a computer that’s running Windows 10 as its operating system. If you have an existing Outlook, Hotmail, Xbox, Skype, Office 365, OneDrive account, then the email address and password used to access that account will also serve as your Microsoft account. Just enter those same details to log into Windows 10.
If you don’t currently have an account with any of the aforementioned services, it indicates that you don’t possess a Microsoft account for use. You will need to create one in order to log into Windows 10 or use Microsoft services.
To create a Microsoft account, follow the steps below:
- Next to No account? click on the Create one link.
- A Let’s create your account dialog pops up.
- Enter the details required for the account, including your name, password, existing email account, your country, and your date of birth. You can either use an existing email account or create a new one.
- Click Next.
- Type in your current Windows password then hit Next.
- On the next screen, you have the option to create a PIN, composed of numbers that are easier to remember than your password.
- Choose the option to Set a PIN if you want, then click OK to confirm it.
- If you don’t want to use a PIN, click on Skip this step.
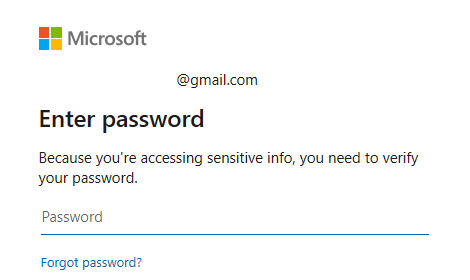
You should now be able to use your Microsoft account to sign in to Windows. The same Microsoft account will also be used to access UWP apps, such as Windows Defender and Microsoft Store. Unfortunately, a lot of Windows users have been complaining about not being able to access these UWP apps due to an error involving their Microsoft account.
What Is Error 0x800704EC on Windows 10?
Universal Windows Platform (UWP) programs encompass a variety of Windows apps accessible via your PC, including Xbox, HoloLens, Windows Defender, and Microsoft Store. When you come across the error 0x800704ec when you log into your PC, you might see the following message pop up on the screen:
Can’t sign in with a Microsoft account
This program is blocked by group policy. For more information contact your system administrator. (Error Code: 0x8000704ec)
What does this error message mean? Basically, error code 0x800704EC means that the program you are trying to use won’t open because there are some issues with the Microsoft account used for signing into that service. It could be that you changed the password for that account recently and you need to update it. Or it could be that your computer is finding it difficult to connect to the Microsoft server. Because of this, the program is blocked and triggers the 0x800704EC error code.
What Causes Can’t Sign in with a Microsoft Account Error 0x800704EC?
The reason for this is that an antivirus software is currently installed and active on the computer and in order to avoid conflicting software operations, an antivirus software automatically disables Windows Defender. The following methods provide steps on how to resolve this issue.
Sometimes, the error code 0X800704EC appears by the loss of the Windows system files. Corrupted system file entries can be a big risk for your device. There may be a number of incidents that can result in system file errors, like improper deletion/installation/ uninstallation of hardware or applications.
In the case of Windows Defender, the error code signifies that the application cannot start. This can be caused by multiple factors. For example, when Windows Defender has been disabled through the Group Policy Editor, when the user clicks the program icon, the following message is displayed:
If that isn’t the cause, the error is likely due to conflicts caused by the antivirus software installed on the system. Defender might be unable to operate while third-party protection software controls the real-time protection task for the system. Thus, try as one might, Defender simply will not work while the other software exercises control.
Regardless of whether Error Code 0x800704EC in Windows Defender stems from faulty Group Policy settings, malware, incompatible security software, or even corrupted system files, the consequences can be quite problematic.
This error code can also emerge if your computer recovers from a hardware attack, a virus, or an improper shutdown. Any of the mentioned incidents can result from the deletion or corruption of entries in the Windows system files.
- Third-party antivirus software
- A corrupted Group policy
- Damaged Registry files
How to Fix Can’t Sign in with a Microsoft Account Error 0x800704EC
It is quite frustrating when the Error Code 0x800704EC shows up in Windows 10.
Therefore, this section has been curated to assist in resolving the issue and to enable the operation of your UWP apps once again. Each of the fixes presented here has been tested and confirmed working by multiple users. You can attempt these methods, and their efficacy should yield a positive outcome.
Fix #1: Allow Microsoft Account on your PC.
If you’re faced with this issue, you need to ‘Allow’ a Microsoft account on your Windows 10 device. You can configure this option in both of two ways via:
- Local Group Policy Editor
- Registry Editor
‘Allow’ Microsoft account via Local Group Policy Editor
Do the following:
- Press Windows key + R to invoke the Run dialog.
- In the Run dialog box type gpedit.msc and hit Enter to open Group Policy Editor.
- Inside the Local Group Policy Editor, use the left pane to navigate to the path beneath:
- Computer Configuration > Windows Settings > Security Settings > Local Polices > Security Options
- On the correct pane, double-tap on Accounts: Block Microsoft accounts to alter its properties.
- Under the Local Security Setting tab, click on the drop-down and select This policy is disabled.
- Click Apply > OK to save the changes.
- Leave Group Policy Editor.
- For Windows 10 Home users, you can add the Local Group Policy Editor feature and then carry out the instructions as given above or you can do the vault method beneath.
‘Allow’ Microsoft account via Registry Editor
Do the following:
Note: Since this is a library operation, it is suggested that you back up the vault or create a framework reestablish point as necessary precautionary measures. Once done, you can continue as follows:
- Press Windows key + R to invoke the Run dialog.
- In the Run dialog box, type regedit and hit Enter to open Registry Editor.
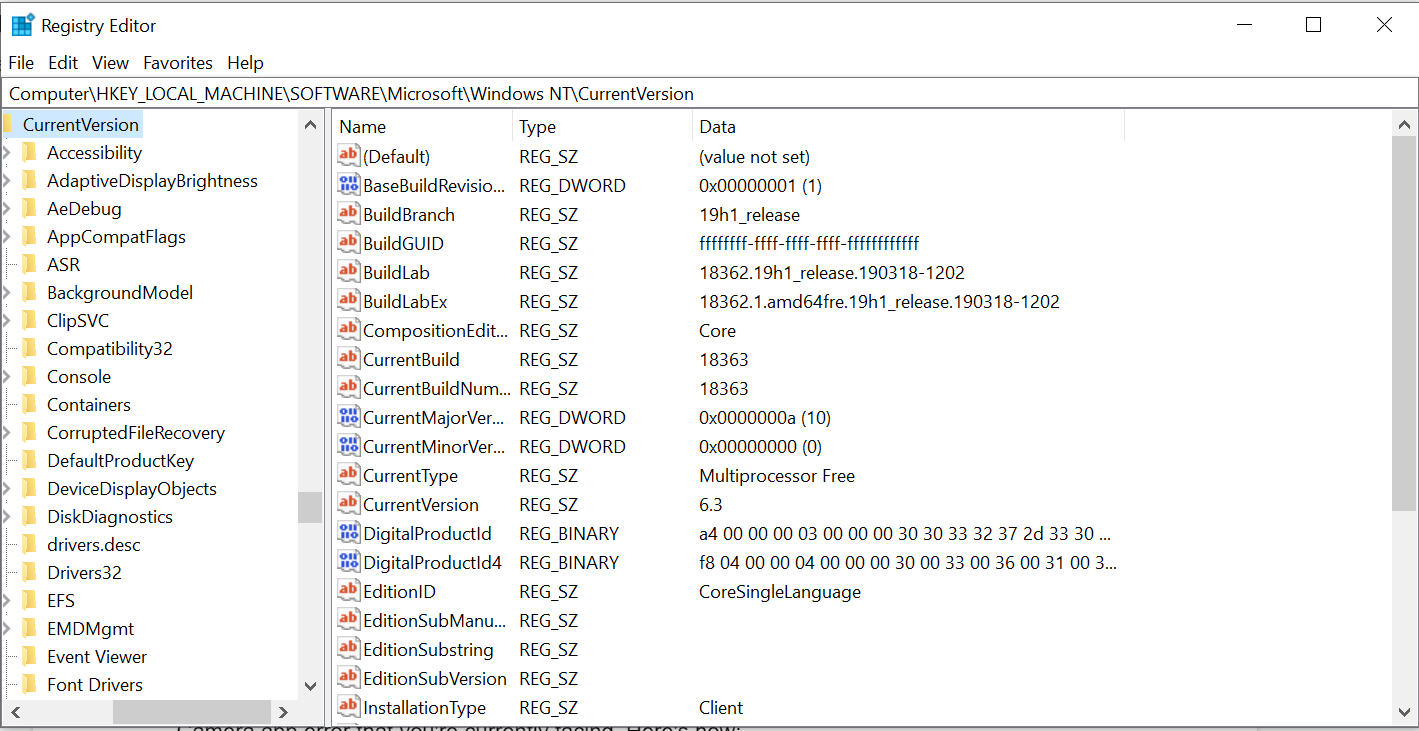
- Navigate or leap to the vault key path underneath:
- HKEY_LOCAL_MACHINE\SOFTWARE\Microsoft\Windows\CurrentVersion\Policies\System
- At the location, on the correct pane, identify the NoConnectedUser key. The key value may be set to one or the other 1 or 3.
- Now, double-tap the NoConnectedUser passage to alter its properties.
- Input 0 in the Value data field and hit Enter to save the change.
You can now leave Registry Editor and restart your PC. You should now have the option to sign in to your UWP apps without the error.
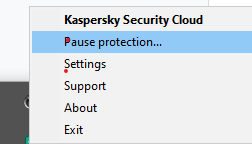
Fix #2: Disable Third-Party Virus Protection
 From the explanation of the core causes of the Error Code 0x800704EC, it should be clear that conflicts between security tools are the main culprit. During the first decade of this century, Defender used to be known as Microsoft Security Essentials. Far from being a full-fledged antivirus, it was more of an extra security aid. Many users still relied on a variety of protection products available on the market, including but not limited to Avast, Bitdefender, Norton, Avira, and others. Microsoft Security Essentials worked alongside any of these without much conflict.
Defender came into its own as a full security suite in Windows 8. It came pre-installed on Windows and took on the role of the main malware protector. However, many users still preferred to use alternative products, due to their familiarity and diverse offerings for system protection.
Back to the issue at hand, protection on Windows is best left to one security tool at a time. And that is either Defender or your third-party option, but not both. If you wish to use Defender but also have an active alternative, you’ll likely have to turn the latter off first.
Since the antivirus can come in handy in the future, you don’t have to uninstall it. Simply disabling its real-time protection feature should be enough. Once the system detects that it isn’t being protected, Windows Defender will automatically be enabled. Thus, should Defender run into problems later, you can simply go into the other software’s settings and enable its protection feature once more.
Fix #3: Remove Your Third-Party Antivirus
If the above method doesn’t work for you, you have the option to totally remove the third-party antivirus software. If you have purchased a license, you don’t have to worry about this as you can simply reinstall the tool later, enter your license key and resume enjoying the service. Before you begin, you should end the processes associated with the program via Task Manager.
Open Control Panel, click the “Uninstall a program” option under Programs, find the antivirus in the program list, right-click it, and select Uninstall. Follow the onscreen instructions. You may need to reboot your PC once for all the software files to be removed.
Some security tools come with their own uninstallers. Clicking the Uninstall button in Control Panel sometimes launches the uninstaller for the program. Generally, using the app’s custom uninstaller is the better option. That way, the chances that all the software files are actually removed are high. You may use a third-party removal tool to ensure that there are no leftover files or registry items.
However, some programs like Avast have been observed to give an error message when the user tries to uninstall them. Avast, for example, has a self-defense mechanism that kicks into gear when it detects an uninstallation attempt. This mechanism is put in place to stop malware from removing the tool. So, before you can remove Avast, you need to turn off the mechanism. Only then will you be able to close its processes in Task Manager and uninstall it via the Control Panel.
Launch the Avast application.
- Go to Menu > Settings > Troubleshooting.
- Find the Enable Self-Defense checkbox and untick it. Click OK on the confirmation prompt.
- Close Avast.
- Now, you can close and uninstall Avast without any errors. If you’re using another antivirus with an anti-removal feature, consult its help guide for how to turn the feature off.
Regardless of whether disabling or removing your third-party security software resolves the issue or not, some experts argue that having two layers of protection can be beneficial, though it could potentially lead to conflicts. It would be nice to have a companion that blocks malware alongside Defender. However, as you have doubtless noticed, many of these types of programs conflict with Defender and with which other.
The application will have been successfully uninstalled by the time you reach the end of the uninstallation wizard, although you may need to restart the computer for the changes to take effect.
Uninstalling the third-party security application is, unfortunately, the easy part in the case of most applications. The challenging aspect is dealing with the residual files and settings that many of these applications might leave behind upon uninstallation. If you do not get rid of the files and settings a security application leaves behind once you have uninstalled it, they will only cause trouble for you in the future. To get rid of any and all files and other elements left behind by a third-party security application that you have uninstalled, you need to:
- Go to the list of the removal tools for all widely used third-party security applications.
- Go through the list and locate the entry for the security program you uninstalled from your computer.
- Click on the provided link for the respective application’s removal tool.
- Carefully read any instructions you find on the page the link directs you to, and download the removal tool from there.
- Once the removal tool has been downloaded, navigate to where it has been downloaded, locate it and double-click on it to launch it.
- Follow the onscreen instructions and go through the removal tool to get rid of anything and everything left behind by the uninstalled application.
- To avoid leaving your computer vulnerable, ensure that if you uninstall a third-party security program and don’t have another as backup, your computer’s built-in security program (Windows Defender or Microsoft Security Essentials) is enabled for continuous protection.
Fix #4: Enable the Windows Services Required by Defender.
 Once you disable or remove your alternative protection software, Windows Defender’s protection feature automatically kicks on. However, sometimes this doesn’t happen for some reason and you keep getting the Error Code 0x800704EC or the Defender icon stays grayed out.
One explanation is that the Microsoft services associated with Defender have been turned off. This could be a system glitch or the handiwork of malware. Irrespective of the reason, these services need to be active, otherwise you won’t be able to use Defender.
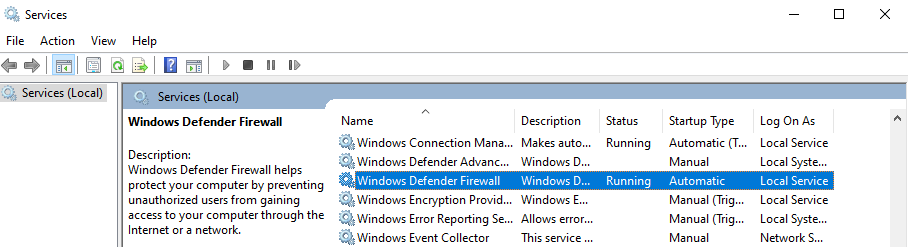
So, you need to verify whether they’re running and turn those that aren’t on. For this, you need to open the Microsoft Services window, identify the individual services and carry out the correct action on each.
Launch the Run box with Win Key+R and type “services.msc” (without quotes). Click the OK button.
In the Services window, you need to look for and check the status of the following services:
- Windows Defender Advanced Threat Protection Service
- Windows Defender Antivirus Network Inspection Service
- Windows Defender Antivirus Service
- Windows Defender Firewall
- Windows Defender Security Center Service.
If the status field for a service is blank, it isn’t running. Right-click the service and select Start. Do this for all relevant items. When you’re done, restart the PC and try to run Windows Defender once more.
If all the steps are followed accurately, the Windows Defender should activate itself, providing your system with its protective services.
Fix #5: Change Values of Windows Defender Keys
 In case the previous solutions don’t do anything and you continue to get the 0x800704EC error when you try to activate Defender, don’t worry. The Registry Editor can be used to resolve the issue. While it might seem complex, by carefully following the correct steps, most users should be able to navigate this process.
Remember to be careful when using the Registry Editor. Careless tweaks can cause irreparable damage to the OS, so tread softly.
- Open the Registry Editor. Type “regedit” without quotes into the Run dialog and hit the Enter key.
- In the Registry Editor window, navigate to the following location or copy-paste it in the search bar at the top to quickly access the Windows Defender keys:
- Computer\HKEY_LOCAL_MACHINE\SOFTWARE\Policies\Microsoft\Windows Defender
- Look for the key labeled Standard or Default in the right pane, double-click it and change the “Value data” entry to 0.
- Click OK.
- Next, look for the key labeled Disable Anti-spyware, double-click it, and change the “Value data” entry to 0.
- Click OK.
- Next, reboot your computer and verify that Windows Defender is now active.
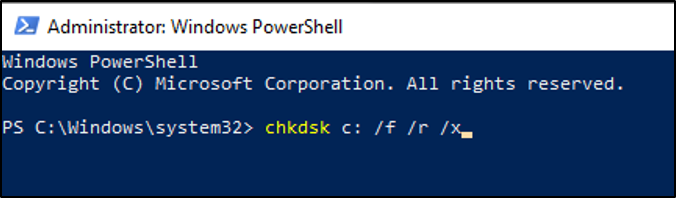
Fix #6: Clean Corrupted Files with System File Checker and DISM
Corruption of vital system files can cause issues like the 0x800704EC error in Windows Defender. There are certain common files that all core Windows applications share, and these files must remain undamaged for everything to work smoothly.
If Defender keeps returning the Error Code 0x800704EC instead of running, a System File Checker scan can help you repair what is broken within the system so that core Windows apps can start working again.
Microsoft recommends that Windows 10 users run a DISM scan alongside the SFC scan. The DISM tool helps to repair the Windows system image if it is riddled with errors.
To begin, open an elevated Command Prompt. Press the Windows and X keys at the same time and select the Command Prompt (Admin) option. Next, type the following into the CMD window and hit the Enter key:
DISM.exe /Online /Cleanup-image /Restorehealth
Running this command assumes that the Windows Update client is working normally since the DISM tool uses the service to provide the necessary replacement files if required. If the Windows Update client is unavailable, run this command instead:
DISM.exe /Online /Cleanup-Image /RestoreHealth /Source:C:\RepairSource\Windows /LimitAccess
“C:\RepairSource\Windows” signifies the location of the repair source, which can be removable media, a network share or a running Windows installation.
Now you’re ready to run the SFC scan properly. In the CMD window, type the following and hit the Enter key:
sfc /scannow
Depending on your PC, you might have to wait for a few minutes or longer for the scan to reach 100%. Upon completion, you get the scan results.
Ideally, the System File Checker informs you that it has fixed the problematic files through the following message:
Windows Resource Protection found corrupt files and successfully repaired them. Details are included in the CBS.Log %WinDir%\Logs\CBS\CBS.log.
If you get this, you should reboot your system and try to run Defender. Chances are that since the underlying cause has been resolved, the program will run without hindrance.
If, however, you receive a message that “Windows Resource Protection did not find any integrity violations”, it means that there are no corrupt Windows files and the cause of the error lies elsewhere.
Fix #7: Enable Defender with the Local Group Policy Editor.
Some users reported how after a long search for solutions, they eventually discovered that the issue lies with the Group Policy Editor. It might transpire that nothing is wrong with Defender at all; it has simply been turned off in Group Policy. This might happen if the network administrator disabled Defender for all the network clients.
You can check whether or not Defender is active in the Group Policy Editor and enable it yourself if required. However, to be able to make that kind of change, you need to be logged in to an administrator account.
- Open the Run dialog in an administrator account, type “gpedit.msc” (no quotes) and hit the Enter key.
- In the Group Policy window, select Local Computer Policy.
- Select Administrative Templates.
- Select Windows Components.
- Double-click Windows Defender.
- You will see a list of Windows Defender settings in the right pane. Double-click Turn Off Windows Defender.
- Select the Disable option.
- Click Apply.
- Click OK.
- Perform a reboot and try to activate Defender.
In most cases, you should have solved the issue that results in the Error Code 0x800704EC long before you reach the last solution above. In a situation where nothing you’ve done seems to work, you might have to either update Windows or reinstall it.
How to Fix Error Code 0x8000704EC in Windows Store
While some users get the Error Code 0x800704EC as a result of Windows Defender being blocked, for others, the error is displayed when they try to use the Windows Store. The two scenarios may share the same error code, but their solutions are vastly different.
The error appearing in Windows Store (now called Microsoft Store) is plain evidence that thef store is blocked. By what, you might wonder. It might be due to a change in the Group Policy Editor. That change prevents you from using the store to download your favorite media and install many useful apps. It is also possible that the store has somehow been deregistered. This is Windows, after all, and incredible things routinely happen.
There is no need for excessive efforts in resolving this issue. The solutions outlined below might help address the problem. Getting rid of the error entails editing the registry, registering Microsoft Store again through PowerShell, or using the Group Policy Editor to enable it. We will present each solution one by one so you can try them out at leisure.
Fix #1: Using the Registry Method
 As long as you bear in mind that doing the wrong things in the registry likely won’t have a happy ending, you’ll be fine. It’s crucial to adhere strictly to the steps outlined below, which might help restore your Microsoft Store’s functionality.
- Open the Run dialog, type “regedit” without quotes and click OK.
- When the Registry Editor window opens, navigate to the following location:
- HKEY_LOCAL_MACHINE\SOFTWARE\Policies\Microsoft\WindowsStore
- Look for the “Remove WindowsStore” key in the right pane and check its value. If the value is a number that isn’t 0, it needs to be changed to zero. Double-click the key and change the number in the “Value data” field to 0 and then click OK to save the change.
- If the WindowsStore location doesn’t exist, you must create it for this tweak to work. Go to HKEY_LOCAL_MACHINE\SOFTWARE\Policies\Microsoft\, right-click Microsoft and select New > key. Name the new key WindowsStore.
- Now, select the newly created key, right-click the empty space in the right pane, and select New > DWORD (32-bit). Change the name of the DWORD to Remove WindowsStore, double-click it, and change the value in the “Value data” field to 0. Click OK and exit the Registry Editor.
After rebooting, check if the Microsoft Store issue has been resolved.
Fix #2: Using the Group Policy Editor Method
If the Store has been turned off for a user running Windows 10 Professional or an Enterprise version of the OS, it might be possible to enable it back through the Group Policy Editor.
Running the gpedit.msc command in the Run dialog opens the Local Group Policy Editor. From that window, navigate to Computer Configuration\Administrative Templates\Windows Components\Store, or just paste that into the search bar to quickly jump there.
Search for the “Turn off the Store application” policy setting in the right pane, right-click on it and select Settings. When the feature’s settings window is displayed, change the setting to Not Configured or Disabled and click the Apply and OK buttons one after the other.
If the setting is grayed out, it means you’re not allowed to modify the option. You might have to resort to using Microsoft Store only on your home computer.
Fix #3: Using the PowerShell Method
 Microsoft PowerShell allows you to tweak many settings on Windows 10. You can re-register applications like Microsoft Store to get rid of the Error Code 0x800704EC and make the app usable once more.
- Open the Start Menu, type PowerShell, right-click the top result and select Run as Administrator. Accept the UAC confirmation prompt when it appears.
- Next, paste the following in the PowerShell window and hit the Enter key:
Get-AppXPackage -Name Microsoft.WindowsStore | Foreach {Add-AppxPackage -DisableDevelopmentMode -Register “$($_.InstallLocation)\AppXManifest.xml” -Verbose}
Once the task is completed, reboot the system.
Summary
The above steps illustrate some methods for potentially resolving the Error Code 0x8000704EC issue affecting UWP apps like Windows Defender and Microsoft Store. If you encounter this issue on Windows 10, just take note where you encountered this error and refer to the guide above. The solutions suggested here may help address the error with your Microsoft Account.
Disclamer
We’d like to inform you that the solutions provided in this article are intended as general guidance. While we strive for accuracy and effectiveness, we can’t guarantee that these methods will resolve your specific problem, as various unique factors could be at play.
It’s always advisable to seek assistance from a professional or tech-savvy contact if you’re unsure or if the problem persists. Please remember, any modifications to your system settings should be undertaken with caution, as they can occasionally lead to unexpected results.
We sincerely hope our advice proves useful in addressing your issue.