Copying files to and from your Mac can be slow, especially if you’re using external devices like USB flash drives or SD cards. If you’ve noticed a slowdown since updating to Big Sur or Monterey , read on for more information on how to troubleshoot these issues.
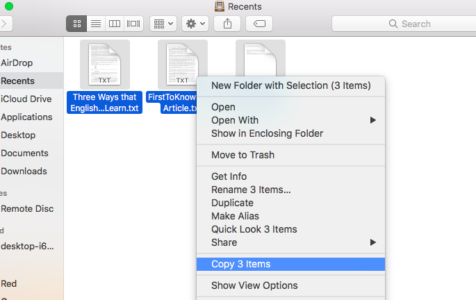
Generally, copying files on your Mac should be a breeze. Finder has been designed to make file transfers as smooth and as seamless as possible. All you need to do is drag the files that need to be copied to the destination folder and Finder will do the rest. Regular file transfers can be completed in a few seconds, while larger files might take a minute or two.
When the file transfer takes up more than 10 minutes of your time, then there is something wrong somewhere. Copying files should also not affect your Mac’s general performance. Copying files is a pretty straightforward process and it seldom causes problems with macOS.
However, a lot of users reported that Mac is slow when copying files in Monterey. This is true for users who have upgraded to the latest macOS. There are also complaints that Monterey slowed down Mac when copying files, even though there are no other apps or processes running in the background.
Pro Tip: Scan your Mac for performance issues, junk files, harmful apps, and security threats
that can cause system issues or slow performance.
Special offer. About Outbyte, uninstall instructions, EULA, Privacy Policy.
Most of the reports right now involved Monterey users, but this does not mean that the issue is unique to macOS 12. In fact, this problem has been observed in the previous versions of Mac’s operating system. Most of the time, the copying process takes more than an hour, which should only take minutes. There are also instances when the copying got stuck and macOS freezes.
This issue happens when the user is trying to copy any type of file with varying sizes. We have heard reports of this problem occurring when transferring files from an external drive or USB to your Mac. What causes this slowdown and what can you do to get it back to normal?
Why Mac is Slow When Copying Files in Monterey
It is annoying when you find that your USB drive is transferring at slow speeds. A better way to overcome the situation is by choosing an effective method to improve the transfer progress. However, this does not really fix the issue. You need to find the root of the problem and deal with it to prevent the same problem from happening in the future.
Here are some of the common reasons why Mac is slow when copying files in Monterey:
- Outdated macOS – Have you installed the latest update from Apple? If not, then you’re probably missing out on important Finder updates that affect the file transfer process on Mac.
- Corrupted files – If there are corrupted files among the ones you are copying, then a slowdown is the least of your problems. If the copying process fails in the middle or does not complete no matter what you do, then you need to check which files are corrupted.
- Thermal throttling – When data is transferred, a lot of heat is produced. As a result, using your flash drive for an extended period of time will cause it to heat up to the point where the controller must provide a cooling mechanism. This is critical for keeping the drive at a safe operating temperature. However, in order to cool down, the controller must reduce data transfer. This is known as thermal throttle or thermal accelerator.
- Sluggish storage format – Because of the way the USB is formatted, it may be slow. Crook vendors frequently format their drives, slowing down the storage format and forcing users to purchase a new one at some point. Flash drives with FAT32 and exFAT formats, for example, are generally slow. This is most noticeable when copying large files.
- Slow hard drive – When copying a file from the hard drive to your flash drive, the hard drive’s speed may degrade. This can happen if it can’t handle the speed of the flash drive. As a result, access to the file is being slowed.
- Large files – When you transfer multiple files larger than 1-2 GB, the cache fills up, resulting in a slowdown. When you transfer files, cache is the data that is temporarily stored within the drive. The flash drive controller can’t handle the extra load, and you’ll notice the file speeds dropping from MBps to KBps and forth.
- Spotlight indexing – When you plug in an SD card or an external drive, Spotlight immediately gets to work and indexes the contents of the external storage you plugged in. Since Spotlight is working while you’re copying the files, it can cause the file transfer to slow down to a crawl or freeze.
- Malware – If macOS detects even a hint of malware on your external storage, the file transfer won’t go smoothly and the system will reject the files.
How to Fix Slow Mac When Copying Files
To prevent any errors or problems when copying files on your Mac, you might consider optimizing your system first. One method for this could be using a Mac repair app, which can help identify potential issues and can also assist in freeing up some precious storage space for your new files.
Here’s what you need to do if you encounter errors when copying files on Monterey.
Method 1: Change the Adapter to a USB 3.0 Compatible Adapter.
USB slow copying speed on Mac causes significant delays in transferring data to the USB drive. One of the reasons could be because you are using a USB drive that is USB 2.0. This means that the USB drive has a maximum reading capacity of 35Mb per second. So even if you are connected to a USB 3.0 port on your Mac, the transfer speed will still be slow due to this reason. The only way you can enhance the speed is by changing the USB drive.
Method 2: Turn Off Spotlighting for the USB Flash Drive.
The other cause behind the MacBook USB slow transfer is due to Spotlight’s activities. Spotlight is an indexing tool that enables macOS to search for information in an organized manner. It figures out where everything is and enables you to find any file with ease.
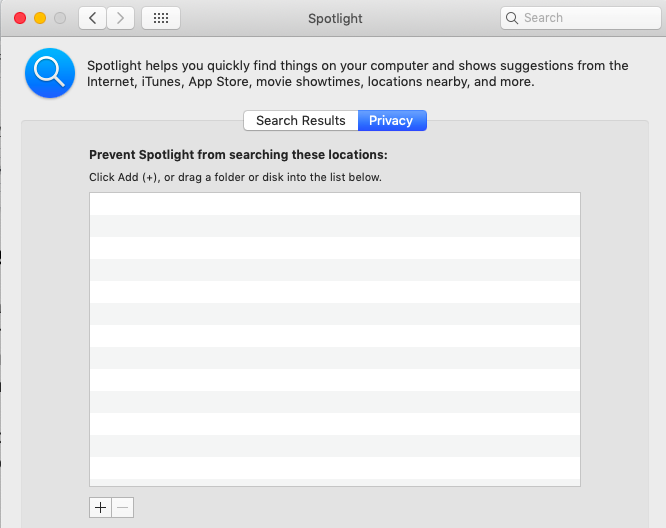
You can speed up the transfer of files on your USB drive by disabling Spotlight. Follow the steps below to do this:
- Open System Preferences and select Spotlight.
- From the window, click on the Privacy
- Click + button at the bottom to add your USB drive.
- The next time you plug your USB drive, Spotlight will ignore the storage device and you can transfer files normally.
Method 3: Convert the USB file system from FAT32 to APFS.
Sometimes the slow file transfer can be attributed to an incorrect file system. The Apple File System (APFS) has long replaced the HFS+ version. It is now preferred format on SSDs, flash drives, and encryption. The reason you need to format your drive to APFS is because it is the file system that works best with Mac operating systems. It means that your USB drive is not completely compatible with your Mac if you can also use it on a computer running on a different OS, like Windows.
Here are the steps that will help you format the drive to APFS:
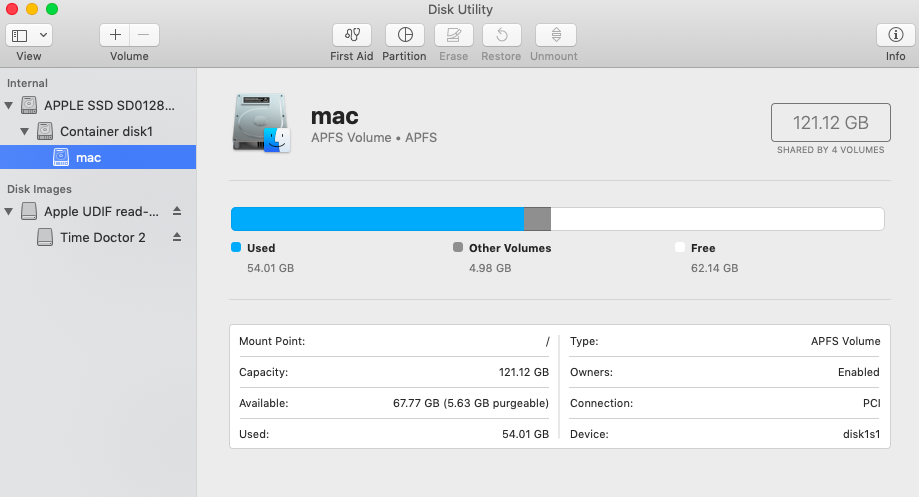
- On your Mac, open the Disk Utility. Connect your USB drive.
- Click Show All Devices under the View
- From the left pane of the window, choose your USB drive, then click Partition.
- Check that Scheme is set to GUID Partition Map.
- Now, choose Mac OS Extended (Journaled) option under the format category.
- Click the Apply
- Next, click the Partition button, and select the USB drive.
- Right-click on it and from the dropdown menu that appears, choose Convert to APFS.
- You will see a completed message after the conversion is complete.
- Click the Done button to complete the process.
Another way to convert your USB drive is to use Terminal. Here are the steps you should follow:
- Go to the Utilities folder and launch Terminal.
- Type in the command diskutil list in the Terminal window. This command will provide all the disks connected to the Mac.
- Choose the drive with the APFS file system from the list. Be careful while selecting the flash drive.
- Type in the command: diskutil apfs createContainer/dev/<identifier>. (Identifier is the letter assigned to the flash drive). The command will begin the process and notify you as soon as the disk changes to the file system.
- You must add volume to the new disk. Enter the command: diskutil apfs add Volume <identifier> APFS<newAPFS>. It will replace the identifier with a new APFS container.
After completion, you can check the changed properties of the drive.
Method 4: Delete Problematic Finder Preference Files.
In some cases, the preferences files associated with the Finder app could be corrupted or broken, causing file transfer to be slow. To fix this, the best way is to delete Finder Preferences.
To do this, follow the steps below:
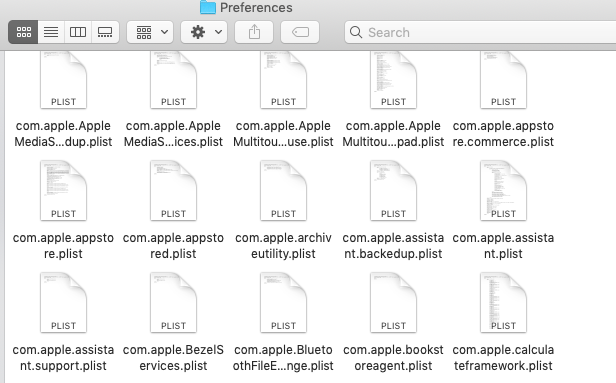
- Search for ~/Library/Preferences/ in the Spotlight bar, and click the top result to open the Preferences
- In the new window, locate this file apple.finder.plist.
- Right-click and select Move to Trash.
- Now close the folder and restart your Mac.
Note: It’s harmless to delete a .plist file because after rebooting, your Mac will regenerate the deleted preference file itself.
Method 5: Format the USB flash drive.
Before releasing the final product, Apple allows users to convert from HFS+ to APFS without erasing their data. However, if you want to test it sooner, you can do so by formatting the flash drive. You can format an SD card, USB drive, or external storage device with the APFS file system. However, you will lose all of the content, therefore, it is preferable to begin the process after you have completed a backup of the contents of the drive you wish to format.
Even after upgrading to the APFS file system, you may experience slow USB transfer rates on your MacBook Pro. It performs admirably in High Sierra but not in its predecessors. You can format the flash drive by following these steps:
- Launch “Terminal” from the “Utilities” In the window, enter the command “diskutil list.” It will show all of the disks that are connected to the Mac.
- From the list, select the disk with the APFS file system.
- Enter “diskutil apfs createContainer /dev/” as the command. (The flash drive’s identifier is the letter assigned to it.) The command will start the process and notify you as soon as the disk’s file system changes.
- Volume must be added to the new disk. Enter “diskutil apfs addVolume APFS” into the command line. It will substitute a new APFS container for the identifier.
How to Pause the File Transfer
Have you ever had to wait for hours for your Mac to finish copying and pasting a large number of files? Because it is working so hard, your Mac is likely to slow to a halt during this process, forcing you to sit and wait before you can continue working. But not anymore.
Apple added the ability to pause the copy-and-paste process without losing your progress with the release of macOS Monterey. This means you can continue using your Mac as usual and finish the copy-and-paste later. This is how it works.
Simply copy and paste to pause the copy-and-paste process. Then, from the progress window, which displays how much data is being transferred and how much time is left, simply click the Close (X) button. Don’t worry, if you’re running macOS Monterey or later, your copy progress will not be lost just yet.
After clicking Close, a translucent version of the file or folder will appear on the destination location. Simply click it when you’re ready to resume copying. You will then be given the option to either Finish Copying the item or Save the Resumable Copy and finish copying it later.
Prior to macOS Monterey, anything that caused an abrupt stop to the copy-and-paste process ruined the entire transfer, requiring you to start over. You can now pause it indefinitely until you’re in an ideal position to transfer your files.
When you stop copying files, unlike in the past, you do not have to restart copying from the beginning. You can now cancel it and resume from where you left off.
When you’re about to lose power or are copying multiple files and want to better allocate your resources, pausing the copy-and-paste process until later can be useful.
Summary
The slow copying issue on Monterey can be very annoying as we are used to quick file transfers on Mac. But the problem does happen now and then, particularly when you just upgraded your Mac to a newer macOS version. The fixes above should help you resolve the issue and get Finder functioning normally again.
Hello, if you convert the external from Mac OS Extended (Journaled) to APFS like stated above does this erase the external?