
Despite being one of the most powerful devices, the Mac is not without flaws, particularly storage issues. Its small hard drive quickly fills up with photos,emails, files, videos, and other data. Fortunately, there are numerous simple methods for clearing system storage on your Mac device.
If your Mac device frequently shows signs of slowing down, a computer’s performance is unstable, and there isn’t enough space on its hard drive, it’s time for a tune-up. This would entail removing large files, deleting email attachments, removing duplicate files, and cleaning temp files and the trash bin, among other things.
In this guide, we will learn about effective ways to reduce some of your system storage on Mac for optimal and smooth operation.
What Takes Up System Storage on Mac?
The SSD (Solid-State Drive) and non-traditional storage are used by the MacBook. In addition, unlike on hard disk-based computers, the system storage drive on MacBooks is significantly smaller. As a result, adding more storage to a Macbook can be costly.
Pro Tip: Scan your Mac for performance issues, junk files, harmful apps, and security threats
that can cause system issues or slow performance.
Special offer. About Outbyte, uninstall instructions, EULA, Privacy Policy.
As a result, if you want to avoid running out of storage space, you should clean it out on a regular basis. Apple has a new System Data tab instead of the older storage. Firstly, open your Apple menu and go to About This Mac > Storage.
You will see a box with a graph of the application leftovers, temporary files, and old cache. You’ll also find extensions, disk images, plugins, archives, and anything else that doesn’t fit into the macOS category.
Hover your mouse over the given categories to see how much space each category takes up. These classifications can be found in the system’s Category System.
Why is System Storage Consuming So Much Disk Space?
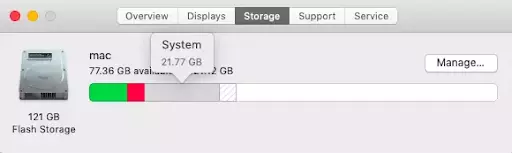
On a Mac, the system normally takes up about 10 GB. However, the system storage may occasionally be around 80 GB or more. The reasons differ from Mac to Mac.
Simply put, these are files that your Mac considers necessary and wishes to prevent you from accessing or deleting. Let’s be honest: if you looked at these files, you’d probably have no idea what many of them were and would feel compelled to delete them.
As a result, Apple stores them in a partition called “system,” which prevents you from directly accessing system storage on your Mac and accidentally deleting important files.
If your system data is large and takes up a lot of space on your Mac, you probably have a lot of applications with caches that you have never cleared. Another possibility is that you have many leftover files from previously removed applications. If you simply drag and drop applications into the trash bin, they do not completely disappear. In fact, the applications’ leftovers may remain on your Mac and occupy valuable system storage space.
If you’ve cleaned up your system storage by removing caches and other junk, but it’s still taking up a lot of space, it could be due to a system error.
When you run out of storage space, the Mac system will optimize the system storage space and clean up unnecessary Mac system files, but this does not always happen. So, what should we do if the machine does not automatically clean its system storage?
Should You Reduce System Data Storage on Mac?
Because macOS lacks a Clear System or Delete System button, you must manage your storage manually. We’ll go over how to delete each type of system file in the sections below.
While it is possible to delete the files in the System category manually, we recommend that you do so only if you are confident in your abilities. It’s easy to delete an important file by accident, only to discover later that it caused problems. If disaster strikes, try some of the methods for recovering deleted files on a Mac.
Furthermore, before removing anything, we recommend performing a full backup of your Mac’s storage so that you can restore it to its previous state if any problems arise. For more information, see How to Backup a Mac and the best Mac backup software.
Alternatively, the safer option would be to use a system clean-up app like Outbyte MacAries. This app can safely delete the files you don’t need, so you don’t have to worry about finding and identifying files that are safe to delete.
How to Reduce System Storage on Mac
You can manually locate and remove any type of item from the System Storage. We’ll go over how to reduce system data storage on Mac in the sections below.
Step 1: Delete caches.
Clearing system storage on your Mac device can also be aided by flushing the system cache. The system cache is critical in improving the processing power and loading time of your device applications.
However, it can clog your system over time, making it slow and sluggish. Apart from that, it is a major cause of memory waste and, rather than acting as a catalyst for fast performance, it can slow down your computer.
If you’re frustrated with your system’s performance and are wondering how to clear system storage on a Mac, cleaning the system cache may be a good solution.
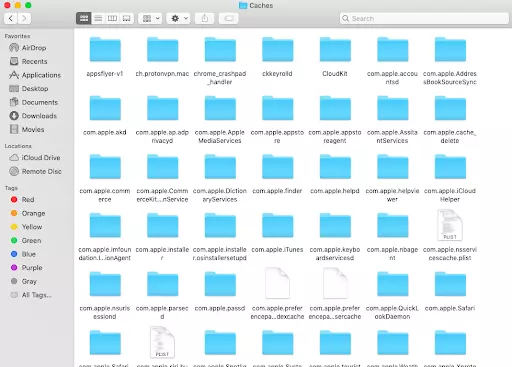
The Library folder contains both system and application caches. To access the Library and delete cache files, perform the following steps:
- Launch Finder.
- Go to the Finder menu and select Go to Folder.
- In the resulting window, type ~/Library/Caches and press Return.
- The Caches folder will be visible. Remove the subfolders containing your applications’ cache files.
- Remove any unnecessary caches from the /Library/Caches folder (without the “~”).
Step 2: Get rid of service files.
Aside from caches, your Mac contains a plethora of other service file applications. Extensions, logs, cookies, and plugins are all files that macOS recognizes as system data. Furthermore, some extensions and plugins may have a negative impact on your system, such as slowing down your Mac, and should be removed.
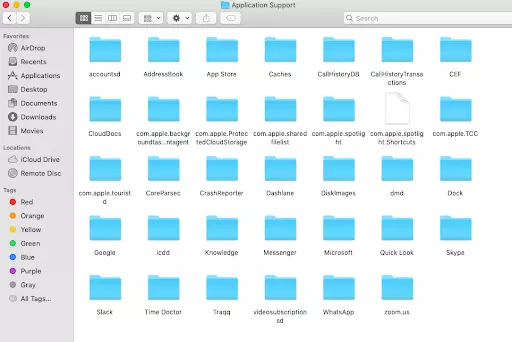
To manually remove application support files, follow these steps:
- Launch Finder.
- Go to the Finder’s menu and select Go to Folder.
- Navigate to the /Library
- Check the following folders in the Library:
- ~/Library/Application support
- /Library/Logs
- ~/Library/Containers
- /Library/Application support
- /Library/Logs
- /Library/Containers
- Select and delete all unnecessary service files.
Take care not to delete any subfolders that begin with com.apple… as this can harm your system. You can find the remaining files of previously removed applications here. Typically, the support folders for third-party applications contain the names of the applications or developers.
Step 3: Delete Time Machine backup snapshots.

It’s a good idea to back up your Mac with Time Machine. Despite the fact that your data is saved on external storage, macOS creates daily snapshots of those backups and stores them on your Mac startup disk.
These snapshots are only saved by default if there is enough free space on your disk. In addition, when new snapshots are created, the system automatically deletes old ones. This is useful when you need to restore some files, but these files take up a lot of space on your Mac.
The local snapshots created by Time Machine each day are one of the main culprits for taking up space in the system. Although you may believe that Time Machine backups are only saved to an external disk, Apple also creates local snapshots on your startup volume. According to the company, these snapshots will only be saved if there is enough free space, and old snapshots will be automatically deleted when new ones are created.
This is useful if you accidentally save incorrect changes made to a document or delete something you didn’t mean to, but it can take up space on your Mac that you’d rather not lose.
To prevent Time Machine from clogging your system storage, disable this feature, which automatically backs up snapshots. Here’s how you do it:
- Navigate to System Preferences.
- Navigate to Time Machine.
- Disable Back Up Automatically.
You can also delete old backup snapshots using the Terminal command line.
- Launch Terminal.
- Enter the following command by copying and pasting it. Then hit Return: tmutil listlocalsnapshotdates
- On your Mac, you will see a list of backups.
- To delete any of the backups, type in the following command and hit Return: tmutil deletelocalsnapshots ???
- Replace the ‘???’ part with the name of the backup snapshot file displayed in the Terminal above.
Step 4: Optimize your Mac’s storage.

If you have a cluttered storage situation, there is another solution. Apple anticipated this problem and built some features into macOS to optimize your space.
Select About This Mac from the Apple menu. Select the Storage tab and then press the Manage button. Some of the useful suggestions are displayed in the window that appears. “Store in iCloud” allows you to move all of your data to the cloud and free up some space on your Mac. The second option lets you delete the largest files, such as movies and programs.
If you forget to empty the trash can on a regular basis, turning on “Empty Bin Automatically” can be a useful option.
By clicking Review Files, you’ll be taken to the Documents section. Examine the files on your Mac, paying special attention to the Unsupported Apps category. It may contain programs that are no longer compatible with your macOS version.
Step 5: Clean up the Downloads folder.
Downloads is most likely one of the largest folders in the System Data category. We all have a Downloads folder that we rarely clean up. It eventually fills up with random items like photos, movies, PDFs, installers, and old files you downloaded a long time ago. They can increase the size of your System Data storage. Here’s how to fix them:
- Navigate to Finder > Downloads.
- Select Sort By > Size from the right-click context menu.
- The largest files will be at the top of your list; delete the ones you don’t need.
Step 6: Uninstall old and unused applications.
Obsolete, old, and unused applications can also clog your device, causing it to slow down and slug. We frequently overburden our Mac devices with software that we don’t need.
Removing unused apps and software on a regular basis will assist you in clearing system storage on your Mac. Additionally, remove any unnecessary background agents and launch apps.
However, it is important to note that simply moving the application to your trash bin will not solve the problem. In such cases, proper uninstallation is required.
Step 7: Clean up your Desktop.
Decluttering your desktop items can also aid in the clearing of system storage on your Mac. Each application icon on your desktop screen takes up a significant amount of hard disk space and can cause slow response times.
Clear out your desktop items on a regular basis if you want to enjoy fast loading times.
Step 8: Empty the Trash.
This is one of the simplest and most basic ways to declutter your Mac device. Regularly emptying your trash folder will assist you in reclaiming lost hard disk space. Experts recommend cleaning your trash can at least once a week.
If you are using the latest macOS version then you can also set it to automatic mode. When you enable this feature, your trash can will be cleaned every 30 days. To do so, simply follow the steps below.
- Select the Apple logo from the Menu
- Select Storage after clicking the About this Mac
- Select Manage and then check the Empty Trash Automatically
Step 9: Delete old iTunes library backups.
Your MacBook saves previous backups of your iTunes Library. Most of these files are rarely or never used, but they still take up a lot of storage space. This consumes more space in your iTunes Library Backups as they accumulate.
You can free up storage space by removing old iTunes Library Backups. Simply follow the steps outlined below:
- On your MacBook, control-click Finder. This is located on the screen’s dock on the far left.
- Select the Go to Folder
- Enter the path /Music/iTunes/Previous iTunes Libraries.
- You will now be able to access all of your iTunes backups. Make sure to check their creation dates and remove as needed.
- Simply control-click on the folders and select the Delete option to delete them.
Step 10: Clean up your Photo Library.

Your photo library, whether you like it or not, can take up a significant amount of space in your MacBook’s System Storage. There could be a lot of old and even unnecessary photos taking up that extra space.
First and foremost, delete duplicate images and those that you no longer feel compelled to keep. You can also move them elsewhere if your library contains a large number of images.
You can free up space on your MacBook by transferring these photos to a hard drive or USB drive.
Step 11: Update macOS.
If your Mac downloaded a new macOS update but did not yet install it, it could be consuming a significant amount of system storage on your hard disk. The simplest solution is to update your Mac to the most recent operating system, which removes any previously downloaded updates. To do so, go to System Preferences and select Software Update.
System files may also be taking up too much space on your Mac as a result of a macOS bug. Updating your Mac is also likely to resolve this issue.
Wrapping Up
Before you begin deleting files from your system storage, determine which files are taking up the most space. Caches and application leftovers can consume a lot of space in your system storage. Using these tips, you can easily delete system storage on your Mac.
Regular device cleanup, hard disk maintenance, startup item management, and the deletion of unwanted applications are a few simple ways to improve the overall performance and functionality of your device.