
A healthy Mac should respond immediately to commands without any delay.
But when your Mac starts slowing down, the reduction in speed is easily noticeable. It can get so bad such that, even when you drop just one simple picture into the trash bin, then empty the trash, it takes ‘forever’ to carry out the command.
Take note that dragging any file to the Trash does not really delete them. It’s just like moving your files to a different folder, so dragging any file to the Trash usually does not cause any problem. To completely delete your files, you need to right-click on the Trash icon on the Dock, then choose Empty Trash. That’s when your system starts purging all the files you dragged to the Trash folder.
Emptying trash usually takes just a couple of seconds, depending on how many files you need to delete. But it shouldn’t take more than five minutes or an hour, just like other Mac users are complaining of. If emptying your Trash takes a very long time or gets stuck, there must be something wrong somewhere.
If you have experienced a slow-running Mac, you have surely typed: “why emptying trash is slow on my Mac” in your Safari search bar. The confusing part is that your Mac seemingly works well. When you drop data into the trash icon to empty it, the popup box comes up normally, prompting if you are sure and you get an active option to click ‘Continue.’ But once in the trash bin, the emptying process seems to be taking forever.
Pro Tip: Scan your Mac for performance issues, junk files, harmful apps, and security threats
that can cause system issues or slow performance.
Special offer. About Outbyte, uninstall instructions, EULA, Privacy Policy.
When You Empty the Trash on a Mac, Is It Gone?
When you delete the Trash on your Mac, all the files in there will be gone. You’ll notice that the space occupied by the files on the Trash is recovered. However, the data on your physical drive is still there and could potentially be recovered when you use third-party software. It has not been deleted but has been marked for reuse by OS X or macOS. After some time, the deleted data will eventually be written over with new data.
When a file is deleted, the operating system tags its storage space as being available for use. If that particular space is needed to save new data, the old files, which were supposedly deleted, will be overwritten. But until this time, it should physically exist on your storage device. The file has been logically but not physically deleted.
How Do I Permanently Delete Trash on my Mac?
As mentioned earlier, you don’t really delete the files when you empty the Trash. The documents just disappear and they are not under the control of macOS. The storage space will be marked as occupied by the deleted files but the deleted files remain physically on your Mac hard disk as long as they have not been overwritten by new files.
If you want to permanently delete data on your Mac, you need to wipe the entire hard drive. This would ensure that all traces of your data have been deleted completely and no third-party software can recover it. This step is important if you are giving your old laptop to someone or you’re planning to sell it. You don’t want your documents and data being accessed or harvested by other people for whatever purpose they need. It also protects your personal data that could be used by hackers or marketers for their activities. Or if you want your data to be overwritten immediately, you can take advantage of Secure Empty Trash.
What Is Secure Empty Trash?
If you want to delete sensitive data and want to know that the data has been overwritten immediately upon emptying the Trash, you can perform a Secure Empty Trash. This will immediately write over the deleted data on the physical hard disk. To do this, simply Command + right-click on the Trash to toggle this feature.
However, this deletion process can take longer than your usual emptying of Trash. Sometimes it takes upwards of an hour, depending on the size of the data being deleted and overwritten. Your hard drive write speed also affects how long this process is going to take. This is because according to Apple, the command overwrites data as they are deleted using a single-pass erase so that the information is very unlikely to be recovered.
If emptying the trash seems to take too long, or you want to set Secure Empty Trash as your Mac’s default behavior, go to Finder > Preferences > Advanced Tab and check or uncheck Empty Trash Securely.
Why Is the Trash Slow to Empty?
There are several different reasons why your attempt at emptying your computer’s Trash might be too slow or even fail. One thing you need to consider is whether an item you dragged to the Trash is still being used. If the item is still open or running, you won’t be able to delete it no matter what you do. Make sure to quit all your apps before emptying your Trash just to be sure. But sometimes documents appear to be in use, even though there are no running apps. This means that the file you want to delete has been corrupted.
Another reason why your Mac is slow in emptying the Trash is when an item is locked. When you don’t have the necessary permissions, you won’t be able to delete files even if they are in the Trash. You need to unlock the file first before deleting them. It is also possible that one of the documents you want to delete includes a special character that makes your macOS or OS X think that the file is too important to delete, such as system files.
Aside from these reasons, malware is also a common culprit behind the slow emptying of the Trash. No matter what the reason is, a Mac that is slow in emptying the Trash can be extremely annoying. So, what do you then?
How to Deal with Mac’s Trash That Is Emptying Slow
You can start by checking if your OS is up-to-date and if all the latest software or drivers are correctly installed on your Mac. The fluidity of your Mac is determined by the drivers installed, their functionality, as well as their compatibility with your system.
If all these are good, you need to check whether one of the documents you want to delete is locked. Look for any file with a lock icon in the thumbnail. If you find one, drag the file out of the Trash to the Desktop. Control + click on the file and choose Get Info, then uncheck Locked.![]()
If you are deleting several GBs of data from the Trash, you might want to delete them by batches. This would also help in narrowing down any file that is causing the problem. Click on the file then drag it back to a folder outside, then delete the remaining documents. You might need to delete by several batches, depending on how much data the Trash folder contains.
Running a scan of your computer also helps. If the problem is caused by malware, deleting the infected documents using your anti-malware app should resolve the issue quickly. Reboot your Mac to apply all these changes and to refresh your system. After restarting, check if you are now able to empty your Mac’s Trash without a hitch.
If the above basic Mac repair steps don’t work, proceed to the solutions below:
Fix #1: Edit the Trash Settings.
If you’re using an older version of macOS or OS X, you need to check if the Empty Trash securely option is enabled. You can find this feature under the Finder. This is a built-in feature that overwrites the data that was saved so that they cannot be recovered after emptying the trash. This option ensures the security of the deleted data, but slows down the deletion process as a result. So, unless you are deleting a highly sensitive data, you might want to disable this feature to make the process of emptying the Trash a lot faster.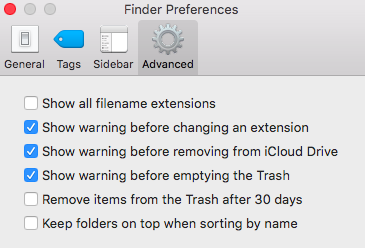
To disable this feature, follow the steps listed below:
- Launch Finder Preferences.
- Open the Advanced Preferences and look for the option to Empty Trash Securely.
- See whether or not the option is marked. If it’s marked, uncheck it.
- Move your data to the Trash icon once again and prompt to empty your bin.
This quick solution should work well and solve your problem if you had been trying to force empty the trash on your Mac. Securely emptying your Mac might be something a professional will know more about. Leave the option unchecked and you should be able to easily empty your trash without further requirements.
If you didn’t find this option on your Mac because you’re running a newer version of macOS, proceed to the other solutions below.
Fix #2: Use a Mac Cleaner App to Empty the Trash.
After doing the steps above, you expect your problems to be resolved and your Mac speed restored. Learning how to empty the trash on your Mac fast is usually that easy. But if the problem still persists, you can try the next solution.
Did you know, you can avoid all frustrations that come with outdated drivers and incompatible software by downloading and installing one app? The macAries app is your one-stop solution to all problems plaguing your Mac and this download is certified for macOS. To download and get started:
- Visit Outbyte.com to download the Mac repair tool.
- Follow the prompts to install, and then launch the app once installed.
- Let it run, macAries will scan your entire computer for leftover cache, junk files, and performance issues.
- Assess the list of detected issues and click on ‘Resolve All’ for the app to quickly fix your Mac.
This tool is designed to address common macOS performance issues and other Mac error codes. If you’re seeking a solution that requires minimal decision-making on your part, you may consider downloading and installing this tool to assist with your Mac’s maintenance.
Fix #3: Empty the Trash via Terminal.
If you’re comfortable using commands, then emptying the Trash via Terminal should be easy for you. But before you try using Terminal, delete the file first using these shortcuts:
- Right-click on the item or items that you want to delete, then choose Delete Immediately.
- Hold down the Option key while emptying Trash.
If the above shortcuts don’t do the trick, using Terminal to delete file should do the trick.
Note: The rm rf command is one of the most dangerous command lines because it is designed to force delete everything in root directory. If you’re not comfortable using commands, then skip this part.
But if you’re ok with using Terminal to delete documents, simply follow the instructions below:
- Launch Terminal by searching for it via Spotlight. You can also find it under Finder > Go > Utilities > Terminal.
- Type in the following command: sudo rm -R
- Add a space after R but don’t hit Enter yet.
- Open the Trash folder and press Command + A to select all items.
- Drag all the files to the Terminal window.
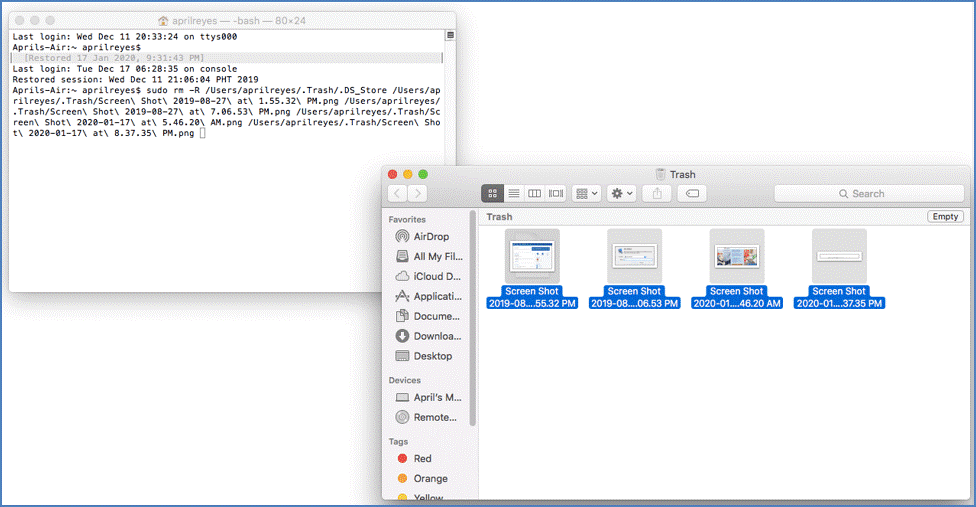
- Hit Enter, then type in your administrator password. You might not see the characters being typed but you don’t have to worry.
- Hit Enter once again to submit your password and start the deletion process.
Wait for the process to be completed, depending on how many files you need to delete. Once done, your Trash should now be sparkling clean.
How Do I Speed Up Trash to Empty on Mac?
If your Trash is too slow to empty, here are some things you can do to make the process a bit faster:
Make sure that there are no open documents.
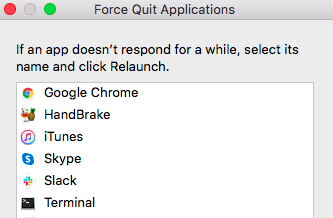 When documents or applications are open, you’ll most likely encounter issues when deleting them. So, close all applications by going to the Force Quit menu and quit everything.
Unlock documents.
Don’t make it a habit to lock documents, especially if you’re the only one using the computer. Locking is only recommended when you’re sharing the computer with other people. Locked documents can’t be deleted unless they are unlocked first. To avoid the hassle, keep your data accessible at all times.
Restart the Mac before emptying the Trash.
 A fresh start can work wonders, especially if you’re planning to clean up your Mac. If this isn’t enough, boot into Safe Mode for better results. Safe Mode allows you to perform deletions a lot faster and smoother.
Bypass the Trash altogether and delete a file immediately.
If you’re sure that you won’t need that file in the future, click on it and press Option/Alt + Command + Delete to delete it immediately.
Summary
Trash emptying should be a straightforward and quick process. But for some reason, some Macs take forever to delete the documents in that directory. It can be due to the large volume of data that needs to be deleted, an overactive security feature, or a misbehaving file that prevents the deletion process to proceed. If you are experiencing issues with Trash emptying, simply follow the guide above to resolve them.
Good Article, wish it worked for me, my OS does not have the option to unclick any option for secure deleting in the settings. The Mac version of that software you recommend is not available it seems. The link is broken and when you go to the home page they only have a PC version. and step 3 for me is not a fix because my issue is not the actual garbage emptying, my issue is when I drag items to the Trash it says Moving and stays like that for longer than it ever did before… it just hangs up and I wait and wait and wait, eventually I move on to multitask and when I look later the items usually are finally in the trash but what could be causing that kind of issue? Kinda odd. Thanks in advance for any ideas you might have. Lots of memory on my local drive and 16gb of memory and nothing new has been installed on my computer although I do notice it more when dragging items from an external drive to the trash but it has happened with files on the local drive as well. And odder still, it lets me sometimes move it right to the trash no problem. And then the next drag and drop it hangs for at least 10 minutes sometimes longer. Thanks