After several years of using the old HFS+ file system, Apple released the Apple File System or APFS for short, along with the release of macOS High Sierra. The new file system sported improvements to encryption, file integrity, and space allocation. It also added features, such as cloning and snapshots.
A file system is a mechanism for storing data on a hard disk or SSD. It keeps track of where the pieces that make up each file are located on the drive, along with the metadata about each file, including its name, size, creation, and modification dates, and other details. You can usually see all this information in the Finder.
The APFS (Apple File System) is Apple’s proprietary system designed to organize and structure data on a storage system. APFS replaced the 30-year-old HFS+ system previously in use on Macs.
HFS+ and HFS, which are the earlier versions of the Hierarchical File System, were created during the days of floppy disks, which was the primary storage medium for the Mac back when hard drives were still an expensive option offered by third parties.
Pro Tip: Scan your Mac for performance issues, junk files, harmful apps, and security threats
that can cause system issues or slow performance.
Special offer. About Outbyte, uninstall instructions, EULA, Privacy Policy.
Apple mainly designed APFS for SSD and other flash-based storage systems from the get-go. Even though APFS was created for solid-state storage, it also performs well with other modern hard drives. APFS is included in:
- macOS Catalina (10.15)
- macOS Mojave (10.14)
- macOS High Sierra (10.13)
- macOS Big Sur
- iOS 10.3 and later,
- tvOS 10.2 and later
- watchOS 3.2 and later
APFS has a number of features that set it apart from older file systems.
- Clones: Clones enable almost instantaneous file copies even without using additional space. Instead of copying a file or document one by one from one location to another, clones can reference the original file instead, sharing the blocks of data that are the same between the two files. When you make changes to one file, only the block of data that has been changed is written to the new clone. Both the original and the clone continue to share original blocks of data. This not only makes copying and saving of files exceptionally fast but also saves on storage space.
- Snapshots: APFS can generate a volume snapshot that represents a certain point in time. Snapshots allow efficient backups and enable you to go back to how things were at a specific point in time. Snapshots are read-only pointers to the original volume and its data. A new snapshot takes up no real space, other than the amount of space needed to store a pointer to the original volume. As time goes by and changes are made to the original volume, the snapshot is updated with only the changes that occur.
- Encryption: APFS supports robust full disk encryption using AES-XTS or AES-CBC modes. Both the files and the metadata are encrypted. Supported encryption methods include:
- Clear (no encryption)
- Single-key
- Multi-key, with per-file keys for both data and metadata
- Space Sharing: Space sharing puts an end to predefining partition sizes. Instead, all volumes share the underlying free space on a drive. Space sharing allows multiple volumes on a drive to grow and shrink dynamically as needed, without any need to repartition.
- Copy-On-Write: This data protection scheme allows data structures to be shared as long as no change is made. Once a change is requested (write), a new unique copy is made, ensuring the original is left intact. Only after the write is completed is the file information updated to point to the latest data.
- Atomic Safe-Save: This is similar to the idea of copy-on-write but applies to any file operation, such as renaming or moving a file or directory. Using rename as an example, the file that is about to be renamed is copied with the new data (the file name). Not until the copy process is complete is the file system updated to point to the new data. This ensures that if for any reason — such as a power failure or CPU hiccup — the write isn’t completed, the original file remains intact.
- Sparse Files: This more efficient way of allocating file space allows file space to grow only when needed. In non-sparse file systems, the file space must be reserved in advance, even when no data is ready to be stored.
Apart from the problem of APFS-formatted USB flash drives not being readable by older Macs or Windows computers, most people shouldn’t run into serious APFS errors —everything it changes is under the hood and will just result in a Mac that’s faster, more reliable, and more secure.
What is APFS Error Code 49180 on Mac?
As with any implementation of a new software or feature set, end users may run into various unexpected quirks and incompatibilities. One such quirk users ran into was trying to resize the system partition using Disk Utility to perform a partition shrink and ran into error code 49180.
The users are unable to shrink the APFS macOS partition in Disk Utility or by using diskutil. When they try with either method, they receive the APFS container resize error 49180 – unusable disk space.
In some cases, the user tried to delete the Bootcamp Partition to increase the main disk space. The user used the Disk Utility program, but unfortunately, the Macintosh HD did not get any bigger. The storage space gained just disappeared and there is now an unused space. When trying to delete the “Free” Space in the Disk Utility App to increase the other partition, but that always returns the APFS container resize error 49180 on Mac. Deleting the “Free” space and trying to create a new partition also doesn’t work.
What Causes Error Code 49180 APFS While Trying to Reclaim Free Space?
When you encounter this APFS container resize error 49180 – unusable disk space, remember the limitations of this file system:
- Macs running OS X 10.11 El Capitan and earlier cannot mount or read volumes formatted as APFS. So, don’t format external hard disks or USB flash drives as APFS if you might need to use them with older Macs. However, Macs running High Sierra from APFS-formatted drives work fine with external hard disks still formatted as HFS+.
- Although the High Sierra installer can convert a volume from HFS+ to APFS during installation, you cannot convert an APFS volume back to HFS+ without first erasing it. You’ll have to back up any data on it, format as APFS, and then restore the data.
- We recommend against using old disk repair and recovery software that hasn’t been updated for High Sierra on an APFS-formatted volume.
- Apple’s Boot Camp, which lets you run Windows on your Mac, doesn’t support read/write to APFS-formatted Mac volumes.
- Volumes formatted as APFS can’t offer share points over the network using AFP and must instead use SMB or NFS.
So, if you’re using Boot Camp to delete a partition, then you’ll most likely encounter this error because of compatibility issues.
Another thing you need to consider is the health of the drive. A damaged drive can cause a wide range of disk errors, and the APFS container resize error 49180 on Mac is just one of them.
How to Fix APFS Container Resize Error 49180 on Mac?
To fix the APFS container resize error 49168 on macOS High Sierra, we recommend that you first clean your computer with a premium utility tool, such as Mac repair app tool. This tool will scan your system for any performance-limiting issues, such as cache files and unneeded apps. It will also optimize your RAM to create room for active apps and recommend tweaks that will save energy.
After cleaning your computer, you can now proceed to fix the APFS container resize error 49180 on macOS, using the methods listed below.
But first, back up your Mac. One of the most integral precautionary measures before performing any operation is Backup. With hands-on Backup, issues like Data Recovery become easy to mitigate. But, if in case, there is no backup or available backup is not recent, no need to worry. There are secure, reliable, and powerful APFS Data Recovery software options to regain the lost, deleted, or inaccessible data under almost all scenarios except overwriting.
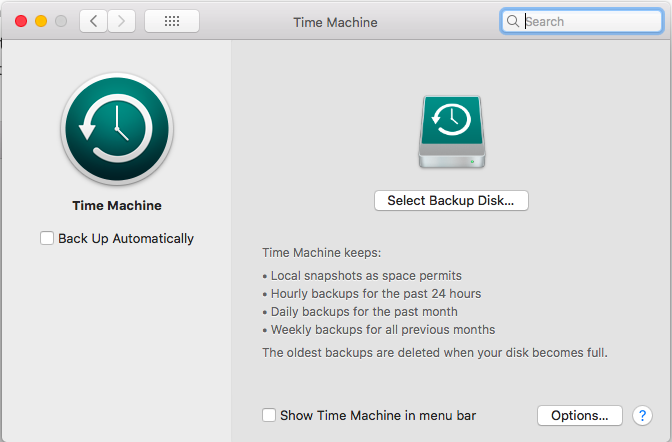 Then, switch off automatic backups by Time Machine:
- Launch System Preferences.
- Choose Time Machine.
- Remove the checkmark from Backup Automatically.
Once you’ve completed the preparatory steps above, you can proceed with the following solutions.
Fix #1. Create the Partition Using Terminal.
As mentioned earlier, the Disk Utility app is not useful in resolving the disk partition issue. For this, you will have to rely on the Terminal app. Before launching Terminal, you should back up your data, and then switch off automatic backups by Time Machine. This is how to switch off automatic backups by Time Machine:
- Launch System Preferences.
- Choose Time Machine.
- Uncheck the Backup Automatically option.
- Detecting the Location of the APFS Partition
After switching off the automatic backup option of the Time Machine, the next step is to use Terminal to find the location of the APFS partition. Take the following steps: 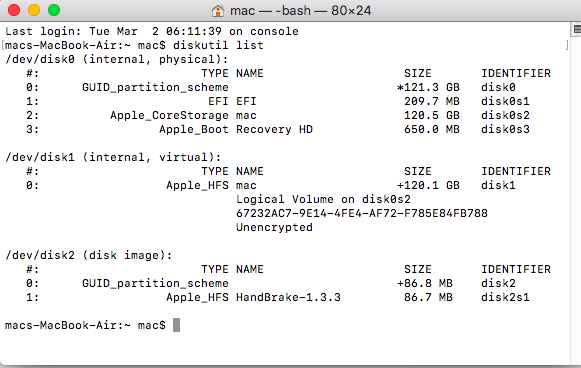
- Launch Terminal by going to Applications > Utilities > Terminal.
- In Terminal, enter the following command line: diskutil list. This will bring a list of all the disks in your APFS containers.
- Begin a new Terminal session.
- In the new Terminal session, type tmutil listlocalsnapshots / to see the Time Machine snapshots on the partition.
- Type the following command: tmutil thinlocalsnapshots / 99999999999999 to remove the time snapshots entirely.
- Type tmutil listlocalsnapshots / to see if the time snapshots are gone.
Now, try to create an APFS partition on your Mac and see if you are still getting any errors. If nothing changes, the following other methods, although a bit more complex, will help solve the problem.
Say you want to resize the APFS container to a specific size like 550 GB from a 1 TB hard drive, you will have to enter a command into Terminal indicating this. Into Terminal, type sudo diskutil apfs resizeContainer disk0s2 450g jhfs+ Extra 550g. The rest of the space will exist as HFS+ file systems.
The above technique can also be used to generate numerous partitions. A command line aimed at creating multiple partitions would look something like this: sudo diskutil apfs resizeContainer disk0s2 400g jhfs+ Media 350g FAT32 Windows 250g.
Another thing you may do is to establish the formula this way – diskutil will auto-detect the volume for the new partition: sudo diskutil apfs resizeContainer disk0s2 650g jhfs+ Media 0b.
Fix #2. Use the Disk Utility.
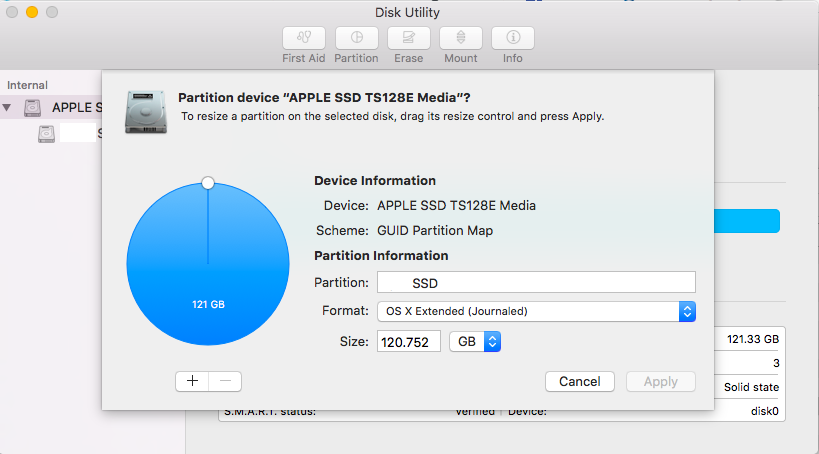 Although this article began by noting that the Disk Utility app is of little help in resolving the “unable to create new partition on Mac” issue, it can still be useful especially if you are using an older operating system. You can also use the Disk Utility app after using Terminal to run the commands noted above.
Fix #3. Use a Disk Defrag Software.
The last solution that we recommend involves the use of a reliable disk defrag software, such as Disk Defrag from Auslogics. It will make it easier for you to create new volumes and partitions on your computer.
It could also be that your disk partition is corrupted and that is why it is impossible to create an APFS partition. If this is the case, you should read this article on how to fix corrupted or deleted macOS partition.
If the problem persists and you are still getting the APFS container resize error code 49168 on your Mac whenever you try to create a new partition, you should probably go to a Mac clinic or contact Apple’s customer care. They will know what to do.
Fix #4: Shrink Your APFS Partition.
If you decide you want to reclaim that space into your APFS container, you can do that using diskutil as well. First, though, you have to delete the JHFS+ or other partition and set it as free space on your hard drive.
- This command will do the trick, assuming your volume is named disk0s3: sudo diskutil eraseVolume “Free Space” %noformat% /dev/disk0s3
- Next, resize your APFS container: diskutil apfs resizeContainer disk0s2 0
In this case, diskutil automatically claims all available free space on the physical storage device, but you can also replace 0 with a size value.
Next, you need to re-activate Time Machine. Do not forget to re-enable Time Machine once you are done with shrinking APFS partition. Switch this tool by:
- Launch System Preferences.
- Choose Time Machine.
- Put a tick next to the Backup Automatically feature.
Summary
If you encountered the error code 49180 APFS while trying to reclaim free space on your Mac, do not worry because it is not a serious error. However, make sure to back up your files to prevent data loss in case an accident happens. Then, you can try the four methods listed above to see which one would work for you. If you know of any other solutions to this error, feel free to let us know in the comments.