
How to Remove WebAssistSearch From Mac in 3 Steps
It is extremely frustrating when you open your browser to visit a website or do some search, then you’re redirected to an unknown web page full of ads. If this happens to you every time, then you probably have a browser hijacker on your computer.
Browser hijackers are also classified as adware because the end result is that you get bombarded with annoying ads. There were created to generate traffic and clicks for the clients who are paying them to deliver the sponsored content. You’ll see all kinds of pop-ups, text ads, banners, and other types of advertisements.
There are several types of adware/browser hijacker, and they are usually named after the website used for the redirection or the toolbar installed on the browser. In the case of WebAssistSearch on Mac, the extension is added on the affected computer’s browser and facilitates the operation of the potentially unwanted program.
So if you see the WebAssistSearch on your Mac, then you need to remove it immediately from your device to prevent serious privacy and security issues.
What is WebAssistSearch on Mac?
WebAssistSearch is a common threat categorized as adware, thanks to the shady commercial content it delivers and other questionable activities the malware does in the background.
WebAssistSearch is a malicious program, also known as a potentially unwanted program (PUP) or potentially unwanted application (PUA) that mainly affects macOS devices. The most obvious signs that will alert you to the presence of this malware is the frequent redirects and the unnatural number of advertising materials. So aside from being considered adware and a PUP/PUA, WebAssistSearch is also categorized as a browser hijacker because of the way it operates.
This malicious app displays intrusive sponsored materials, triggers redirects, and collects your personal data, so you will experience a drop in speed and performance. WebAssistSearch is not totally malicious or harmful for your Mac’s operating system since its operation only involves showing ads and redirecting your traffic to other websites.
Its real danger lies in its capability to send you to various URLs in a bid to generate more traffic for its clients. It might redirect you to a page with NSFW content or a website that can trigger the installation of another, more dangerous malware. So if your Mac has WebAssistSearch adware, you need to remove it from your system as soon as you can.
How WebAssistSearch on Mac Gets Distributed
Browser hijackers, such as WebAssistSearch, can be distributed through various means. One of the more popular methods of distribution is through app bundling. If you’ve recently installed a freeware, like a YouTube downloader, file manager, video converter, or other free utilities online, then that’s probably how you got the malware. These free utilities earn by including other software in their installer package, and if you’re not careful with your installations, you could easily install the malicious software, along with the freeware, on your computer.
If you don’t remember installing anything recently, then the malware should have been installed sneakily using other means. Pop up messages that prompt you to update your Flash or other software can also be carriers of this browser hijacker. When you click on the notification, it triggers the download of the malicious script that is injected into your browser’s code. WebAssistSearch can also come from clicking links or downloading mysterious attachments from spam emails without scanning them first. It is also possible that you unknowingly visited a website that hosts malvertising, and the malicious script was stealthily downloaded to your device.
No matter what method the WebAssistSearch adware used to infiltrate your Mac, it doesn’t change the fact that this malware can bring you harm and should be dealt with immediately. Let’s look at what this malware can do in the next section.
What Does WebAssistSearch on Mac Do?
WebAssistSearch mainly delivers intrusive advertising campaigns. You’ll see various pop-ups, coupons, banners, surveys, and other ads marked with Ads by WebAssistSearch. So if you see this note on the ads, then that’s a sure sign that you’ve got malware on your system. These activities severely affect the browsing experience, because they overlay webpage content, use your computer’s resources, and limit browsing speed.
Moreover, clicking these advertisements will redirect you to untrustworthy or malicious websites that execute scripts to sneakily download/install other malware. Browser hijackers, such as WebAssistSearch, also operate by setting the URL of fake web searchers as the browsers’ homepage, default search engine, and new tab or window URLs. In the case of WebAssistSearch, the homepage and new tab page are changed to safefinder.com. When you do a search query, the request is redirected first to safefinder.com before pulling up results from the Yahoo search engine. Every browser activity will be redirected to the said website.
Because of this, safefinder.com is considered a fake search engine that provides no real value to users. It is unable to provide actual search results, so it simply redirects or causes redirection chains leading to a legitimate search engine, which is Yahoo.
What is more frustrating is that it is impossible to undo the changes to the affected browser without getting rid of the browser hijacker first. No matter how many times you try to change back the homepage or reset the default search engine, everything goes back to the same URL that the malware assigned. The malware uses a script to automatically reset any changes that you make to the browser’s settings.
Most browser hijackers also have data tracking abilities that allow them to understand the user’s preferences better and deliver more targeted ads. WebAssistSearch on Mac can monitor all your browsing activities, including the websites you visited and the queries you made. It can also collect your personal data, such as your IP address, email address, geolocations, credit card information, your birthday, passwords, and other information you typed in online. Typically, the collected data is used to personalize the ads being displayed on your screen. However, it is also possible that the gathered data is shared with third parties seeking to use it for profit.
WebAssistSearch works just like other browser redirects, including My Sweeps Tab Browser Hijacker, Searchmine Browser Hijacker, GameSearch Browser Extension, and CreativeSearch Browser Hijacker.
At the end of the day, the presence of WebAssistSearch on your Mac can lead to further system infections, some serious privacy issues, financial troubles, and even identity theft. To protect your data and privacy, all malicious applications and browser extensions should be removed without delay.
How to Get Rid of WebAssistSearch on Mac
The first step in removing WebAssistSearch from your Mac is to prevent it from running in the first place. You need to disable all its processes first under Activity Monitor, otherwise, you won’t be able to do something about it. No matter how hard you try to uninstall the PUP or undo the changes to your browser, you will either run into an error or the changes will be automatically reset after a short while.
By disabling the processes related to WebAssistSearch, you’ll be able to prevent its scripts from running and you can safely proceed with the removal process below. If killing all the WebAssistSearch processes does not work, you need to boot into Safe Mode by pressing the Shift key while restarting. The Safe Mode disables all third party processes from running so removing the malware within this environment will turn up successful.
To remove WebAssistSearch from Mac, follow the instructions below:
Step 1: Uninstall the WebAssistSearch PUP.
How to Delete WebAssistSearch from macOS
macOS is more secure than Windows, but it is not impossible for malware to be present on Macs. Just like other operating systems, macOS is also vulnerable to malicious software. In fact, there have been several previous malware attacks targeting Mac users.
Deleting WebAssistSearch from a Mac is a lot easier than other OS. Here’s the complete guide:
- If you suspect a recently installed software to be malicious, uninstall it immediately from your Mac. On Finder, click the Go > Applications. You should see a list of all the apps currently installed on your Mac.
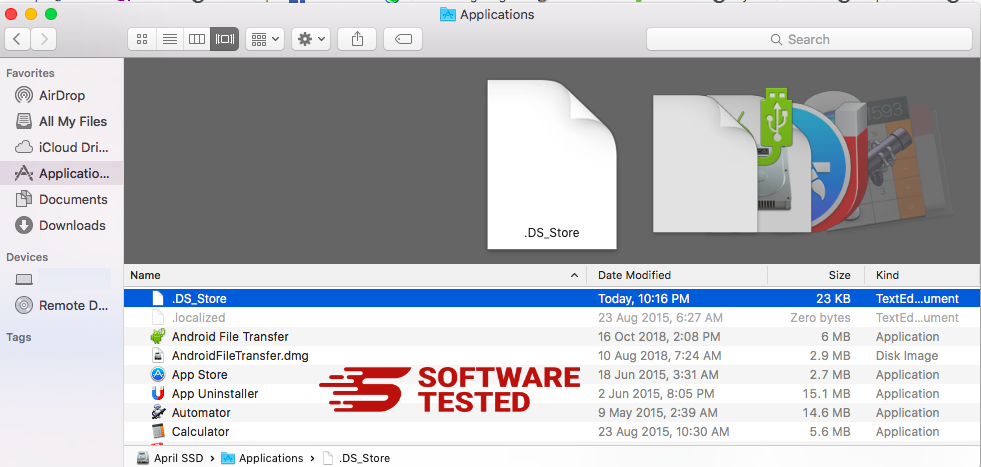
- Find the app associated with WebAssistSearch or other suspicious apps you want to delete. Right-click on the app, then choose Move to Trash.
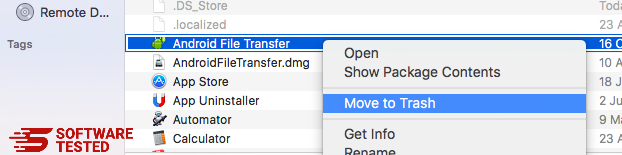
To completely get rid of WebAssistSearch, empty your Trash.
Step 2: Delete All WebAssistSearch Files.
You need to search all your Mac’s folders to get rid of all the components of the WebAssistSearch on your Mac completely. You need to look at the contents of particular folders where malware often stores its files.
- Hit the Command + Shift + G keys on your keyboard, then type in the following address: /Library/LaunchAgents.
- Look for malicious files within this folder, including:
- com.pcv.hlpramc.plist
- com.updater.mcy.plist
- com.avickUpd.plist
- com.msp.agent.plist
- Drag these files to the Trash.
- Go back to the Finder search dialog, then enter the following address: ~/Library/Application Support.
- Look for malicious files within this folder, including:
- UtilityParze
- ProgressSite
- IdeaShared
- Drag these files to the Trash.
- Next, go to /Library/LaunchDaemons this time.
- Look for malicious files within this folder, including:
- com.pplauncher.plist
- com.startup.plist
- com.ExpertModuleSearchDaemon.plist
- Drag these files to the Trash.
- Lastly, go to the ~/Library/LaunchAgents folder and drag any files that might be related to the WebAssistSearch adware to the Trash.
Step 3: Reset Your Browser Changes.
Once you have deleted all the components of the WebAssistSearch malware, you can now restore your browser settings to its default values. To do this, you need to uninstall the WebAssistSearch toolbar, change the default search engine, and edit the homepage and new tab page URL. You can do this by following the steps for each browser below:
How to Remove WebAssistSearch from Google Chrome
To completely remove WebAssistSearch from your computer, you need to reverse all of the changes on Google Chrome, uninstall suspicious extensions, plug-ins, and add-ons that were added without your permission.
Follow the instructions below to remove WebAssistSearch from Google Chrome:
1. Delete malicious plugins.
Launch the Google Chrome app, then click on the menu icon at the upper-right corner. Choose More Tools > Extensions. Look for WebAssistSearch and other malicious extensions. Highlight these extensions you want to uninstall, then click Remove to delete them.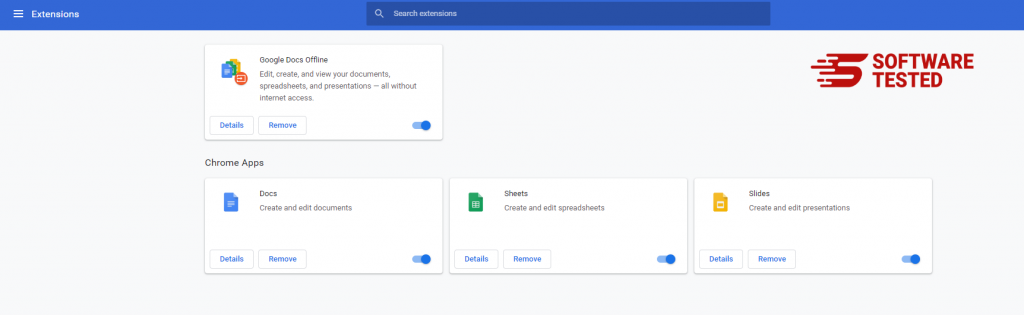
2. Revert changes to your homepage and default search engine.
Click on Chrome's menu icon and select Settings. Click On Startup, then tick off Open a specific page or set of pages. You can either set up a new page or use existing pages as your homepage.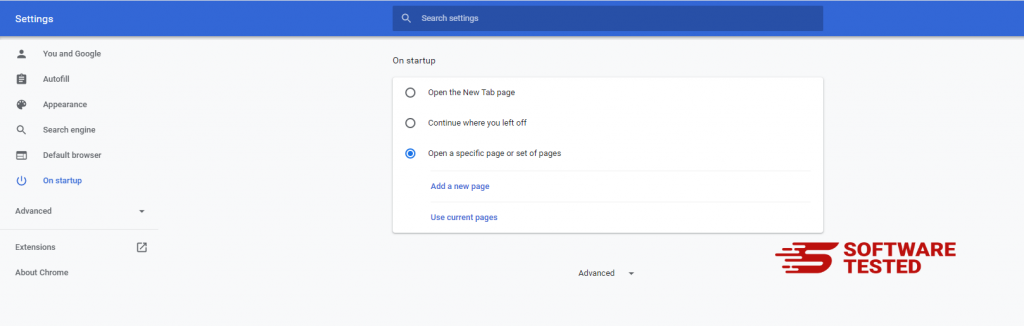
Go back to Google Chrome's menu icon and choose Settings > Search engine, then click Manage search engines. You'll see a list of default search engines that are available for Chrome. Delete any search engine that you think is suspicious. Click the three-dot menu beside the search engine and click Remove from list.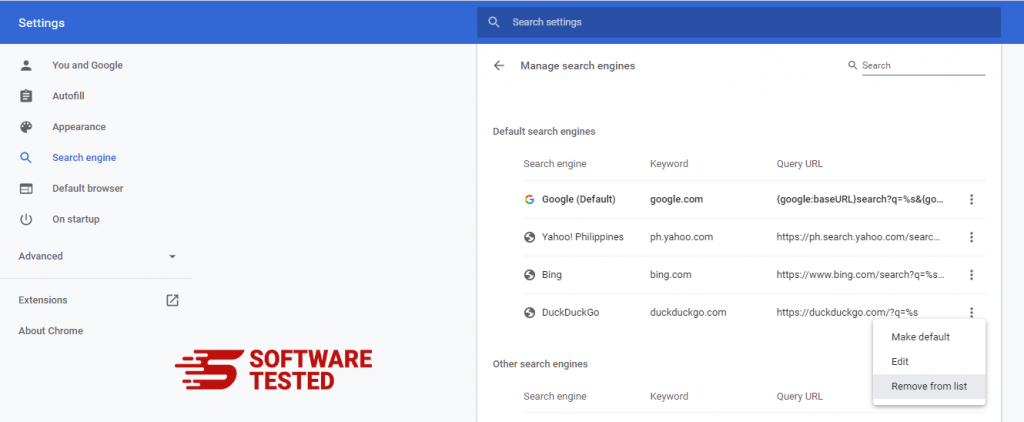
3. Reset Google Chrome.
Click on the menu icon located at the top right of your browser, and choose Settings. Scroll down to the bottom of the page, then click on Restore settings to their original defaults under Reset and clean up. Click on the Reset Settings button to confirm the action.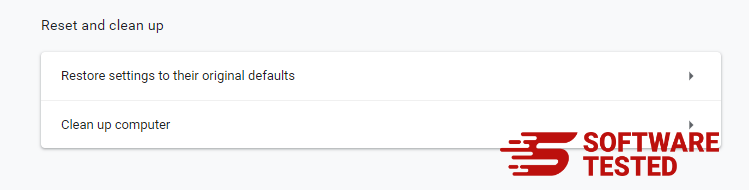
This step will reset your startup page, new tab, search engines, pinned tabs, and extensions. However, your bookmarks, browser history, and saved passwords will be saved.
How to Delete WebAssistSearch from Mozilla Firefox
Just like other browsers, malware tries to change the settings of Mozilla Firefox. You need to undo these changes to remove all traces of WebAssistSearch. Follow the steps below to completely delete WebAssistSearch from Firefox:
1. Uninstall dangerous or unfamiliar extensions.
Check Firefox for any unfamiliar extensions that you don't remember installing. There is a huge chance that these extensions were installed by the malware. To do this, launch Mozilla Firefox, click on the menu icon at the top-right corner, then select Add-ons > Extensions.
In the Extensions window, choose WebAssistSearch and other suspicious plugins. Click the three-dot menu beside the extension, then choose Remove to delete these extensions.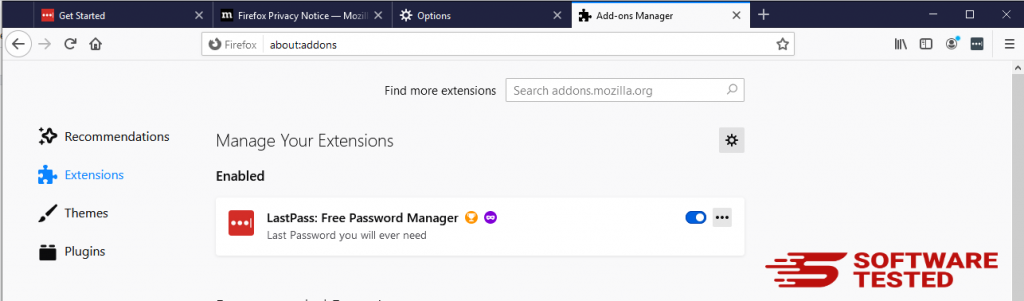
2. Change your homepage back to default if it was affected by malware.
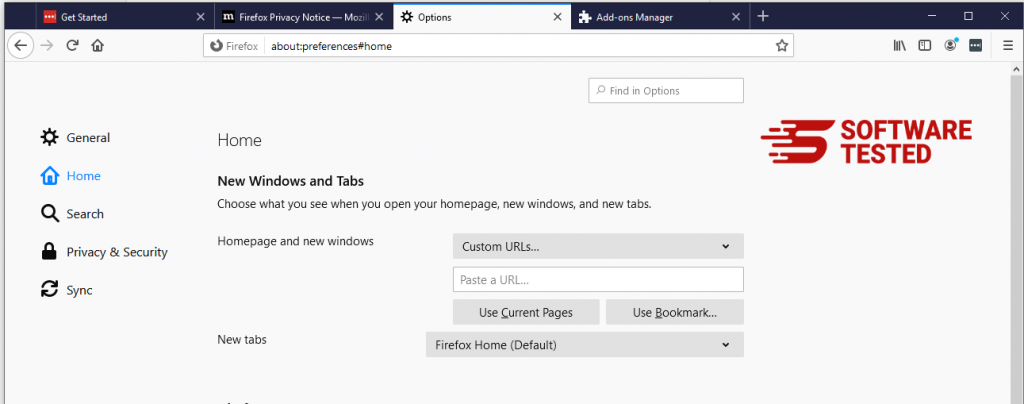
Click on the Firefox menu at the upper-right corner of the browser, then choose Options > General. Delete the malicious homepage and type in your preferred URL. Or you can click Restore to change to the default homepage. Click OK to save the new settings.
3. Reset Mozilla Firefox.
Go to the Firefox menu, then click on the question mark (Help). Choose Troubleshooting Information. Hit the Refresh Firefox button to give your browser a fresh start.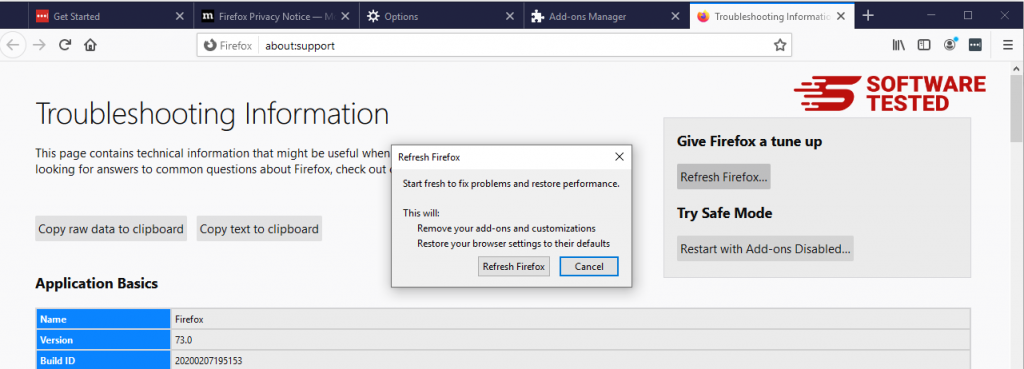
Once you’ve completed the steps above, WebAssistSearch will be completely gone from your Mozilla Firefox browser.
How to Get Rid of WebAssistSearch from Internet Explorer
To ensure that the malware that hacked your browser is completely gone and that all unauthorized changes are reversed on Internet Explorer, follow the steps provided below:
1. Get rid of dangerous add-ons.
When malware hijacks your browser, one of the obvious signs is when you see add-ons or toolbars that suddenly appear on Internet Explorer without your knowledge. To uninstall these add-ons, launch Internet Explorer, click on the gear icon at the top-right corner of the browser to open the menu, then choose Manage Add-ons.
When you see the Manage Add-ons window, look for (name of malware) and other suspicious plugins/add-ons. You can disable these plugins/add-ons by clicking Disable.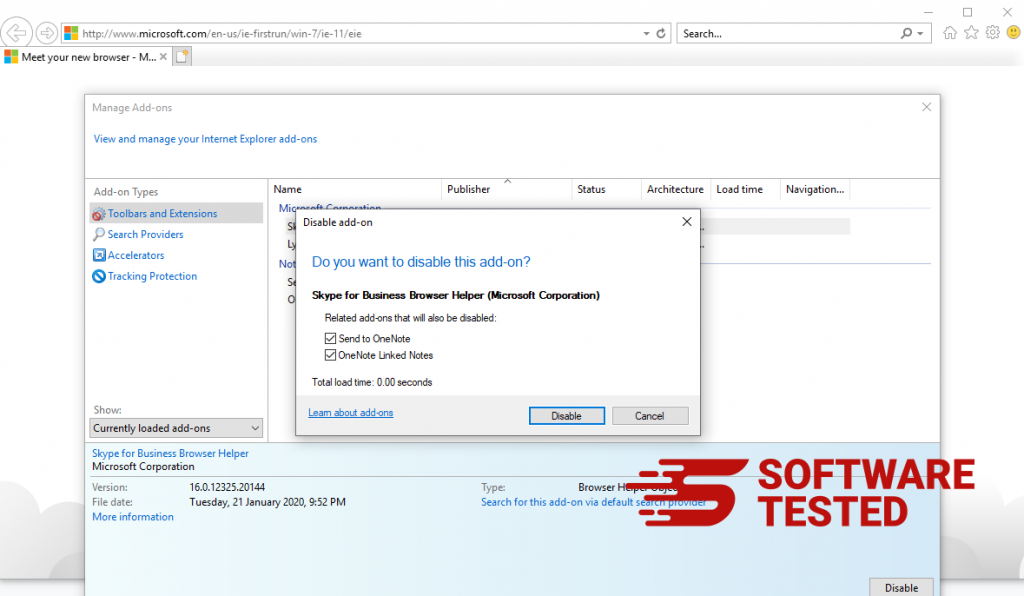
2. Reverse any changes to your homepage caused by the malware.
If you suddenly have a different start page or your default search engine has been changed, you can change it back through the Internet Explorer's settings. To do this, click on the gear icon at the upper-right corner of the browser, then choose Internet Options.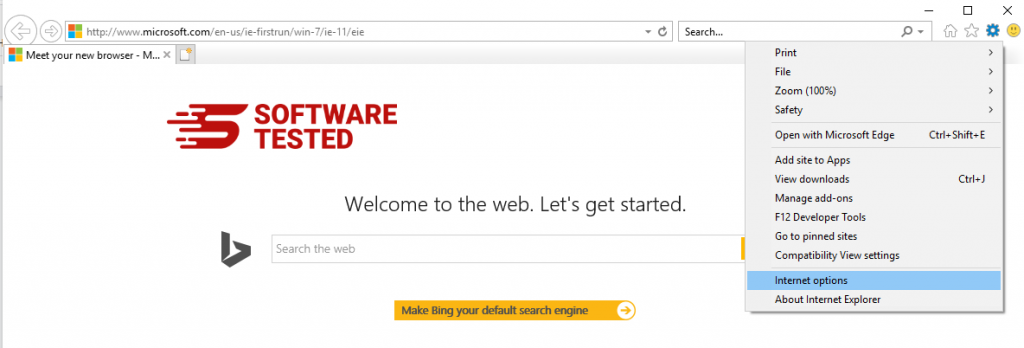
Under the General tab, delete the homepage URL and enter your preferred homepage. Click Apply to save the new settings.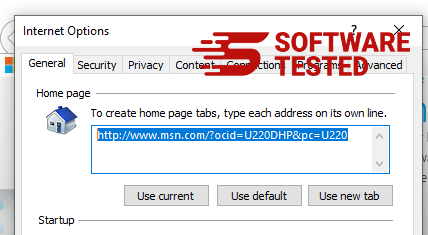
3. Reset Internet Explorer.
From the Internet Explorer menu (gear icon at the top), choose Internet Options. Click on the Advanced tab, then select Reset.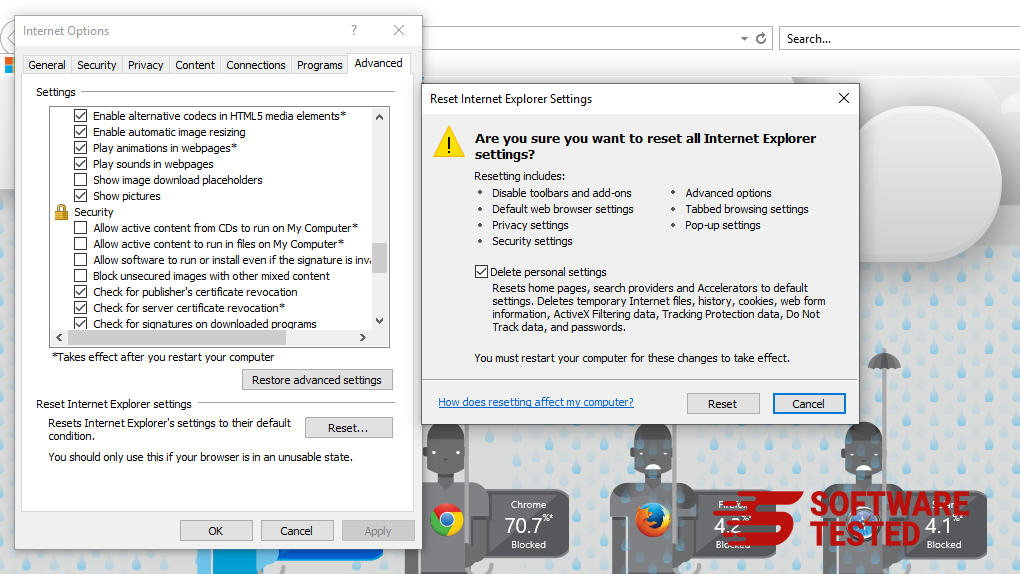
In the Reset window, tick off Delete personal settings and click the Reset button once again to confirm the action.
How to Uninstall WebAssistSearch on Microsoft Edge
If you suspect your computer to have been infected by malware and you think that your Microsoft Edge browser has been affected, the best thing to do is to reset your browser.
There are two ways to reset your Microsoft Edge settings to completely remove all the traces of malware on your computer. Refer to the instructions below for more information.
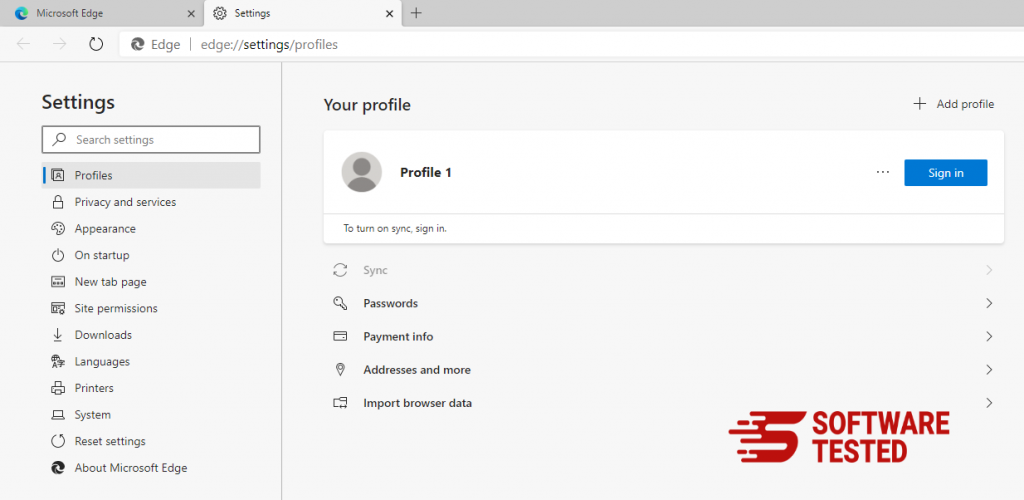
Method 1: Resetting via Edge Settings
- Open the Microsoft Edge app and click More or the three-dot menu located at the upper-right corner of the screen.
- Click Settings to reveal more options.
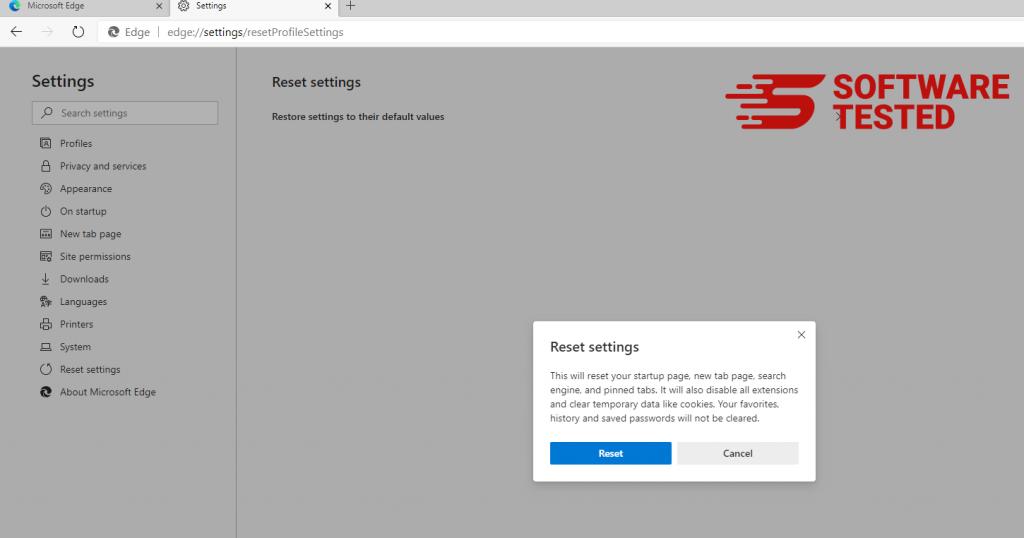
- In the Settings window, click Restore settings to their default values under Reset settings. Click the Reset button to confirm. This action will reset your browser’s startup page, the new tab page, default search engine, and pinned tabs. Your extensions will also be disabled and all temporary data like cookies will be deleted.
- Afterwards, right-click on the Start menu or the Windows logo, then select Task Manager.
- Click on the Processes tab and search for Microsoft Edge.
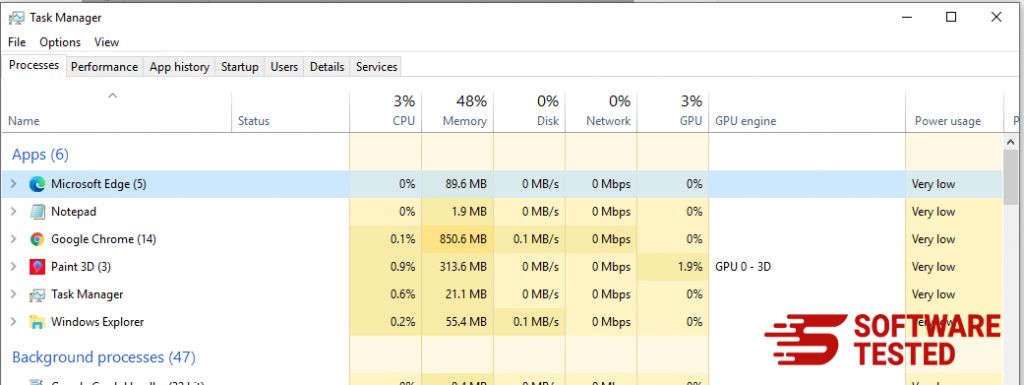
- Right-click on the Microsoft Edge process and select Go to details. If you don't see the Go to details option, click More details instead.
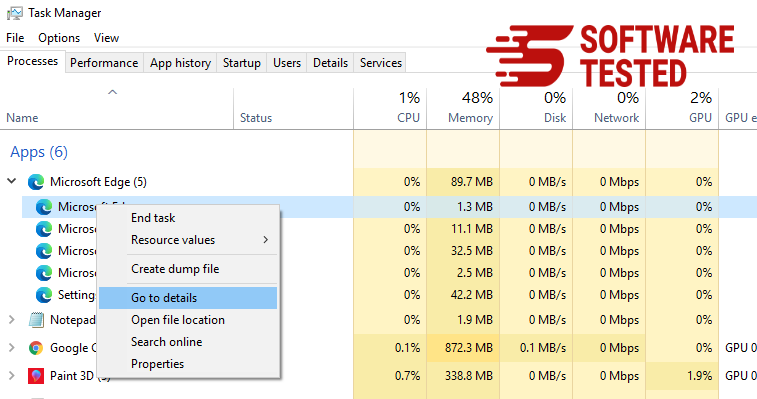
- Under the Details tab, look for all the entries with Microsoft Edge in their name. Right-click on each of these entries and choose End Task to quit those processes.
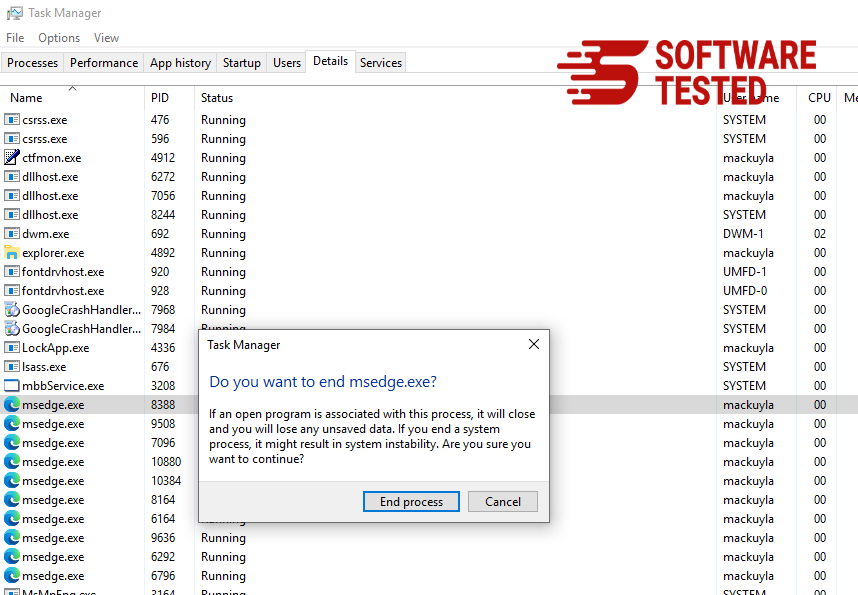
- Once you have quit all those processes, open Microsoft Edge once again and you'll notice that all the previous settings have been reset.
Method 2: Resetting via Command
Another way to reset Microsoft Edge is by using commands. This is an advanced method that is extremely useful if your Microsoft Edge app keeps crashing or won't open at all. Make sure to back up your important data before using this method.
Here are the steps to do this:
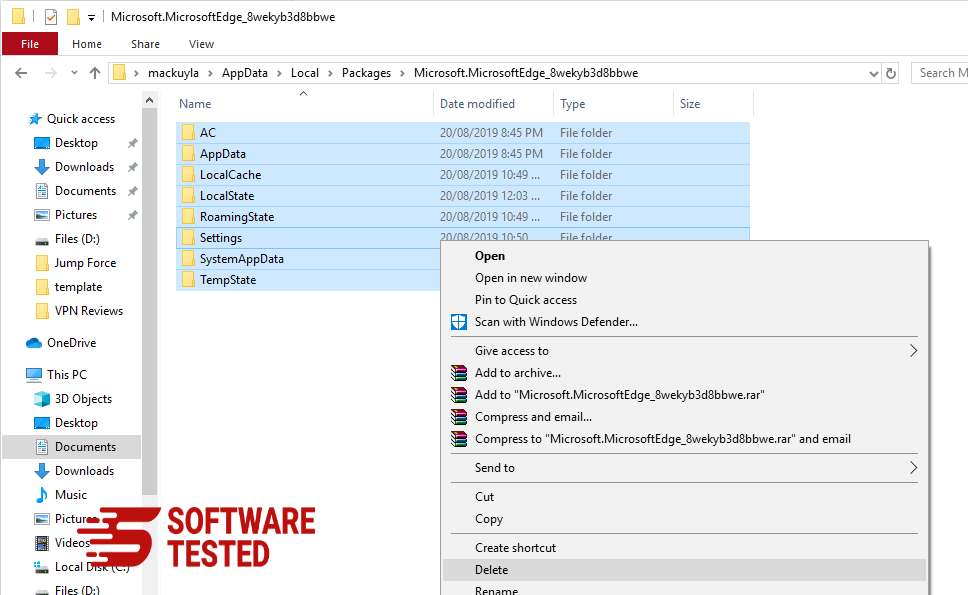
- Navigate to this folder on your computer: C:\Users\%username%\AppData\Local\Packages\Microsoft.MicrosoftEdge_8wekyb3d8bbwe.
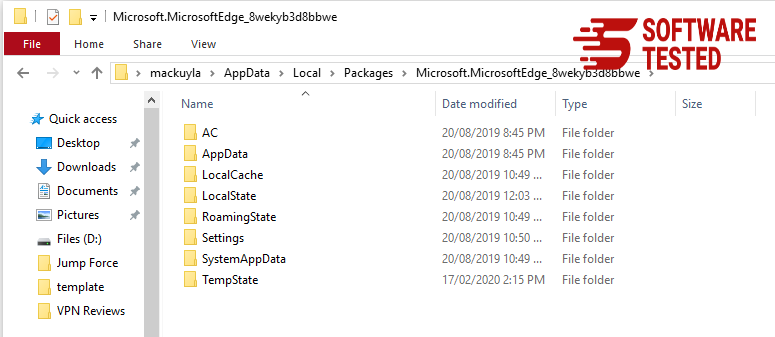
- Select everything inside the folder, right-click on the highlighted files, then click Delete from the options.
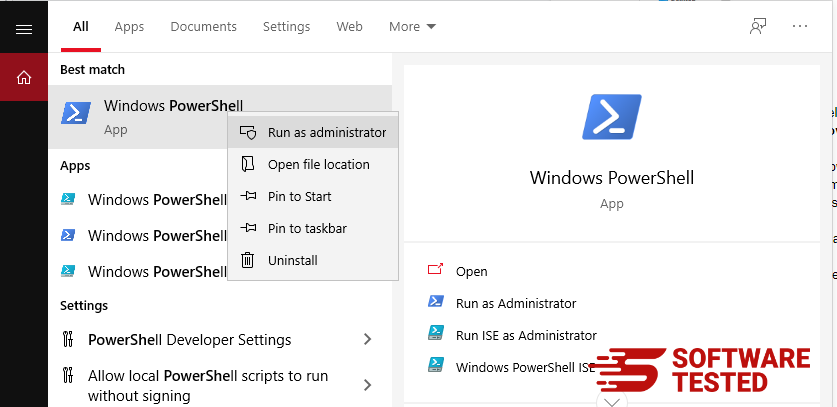
- Search for Windows PowerShell using the search box beside the Start menu.
- Right-click on the Windows PowerShell entry, then choose Run as administrator.
- In the Windows PowerShell window, type in this command:
Get-AppXPackage -AllUsers -Name Microsoft.MicrosoftEdge | Foreach {Add-AppxPackage -DisableDevelopmentMode -Register $($_.InstallLocation)\AppXManifest.xml -Verbose}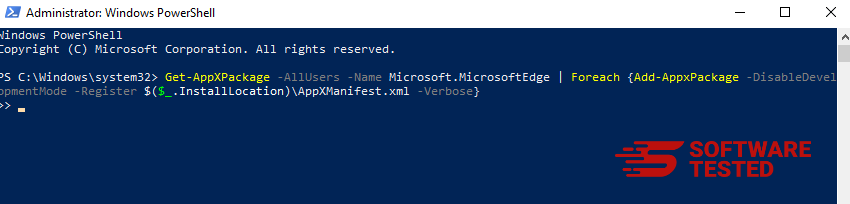
- Press Enter to execute the command.
- Once the reset process has been completed, WebAssistSearch should be completely deleted from your Microsoft Edge browser.
How to Get Rid of WebAssistSearch from Safari
The computer’s browser is one of the major targets of malware — changing settings, adding new extensions, and changing the default search engine. So if you suspect your Safari to be infected with WebAssistSearch, these are the steps you can take:
1. Delete suspicious extensions
Launch the Safari web browser and click on Safari from the top menu. Click Preferences from the drop-down menu.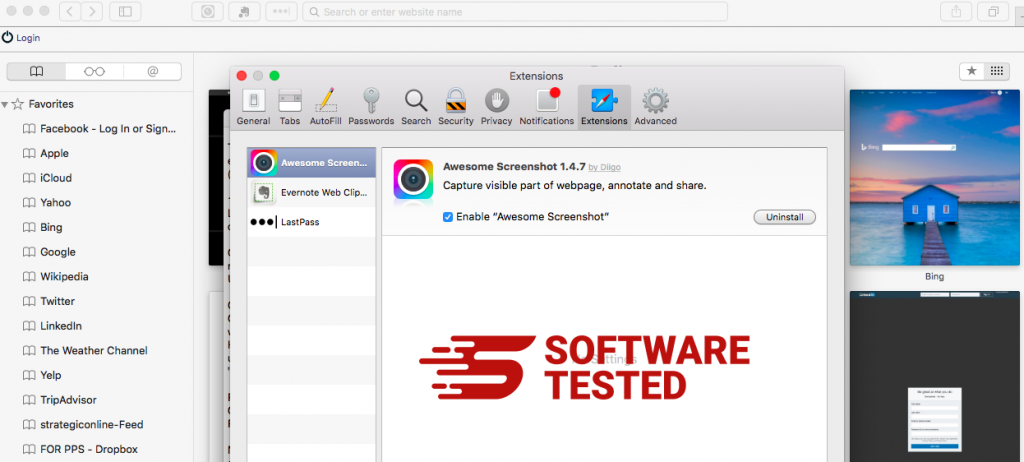
Click on the Extensions tab at the top, then view the list of currently installed extensions on the left menu. Look for WebAssistSearch or other extensions you don’t remember installing. Click the Uninstall button to remove the extension. Do this for all your suspected malicious extensions.
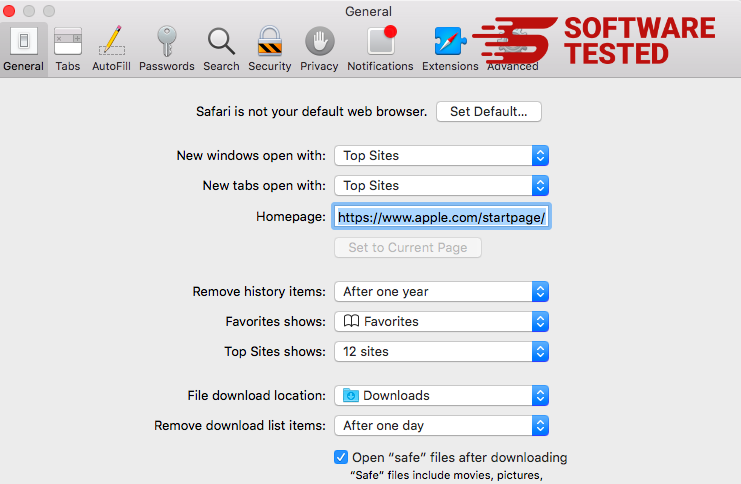
2. Revert changes to your homepage
Open Safari, then click Safari > Preferences. Click on General. Check out the Homepage field and see if this has been edited. If your homepage was changed by WebAssistSearch, delete the URL and type in the homepage you want to use. Make sure to include the http:// before the address of the webpage.
3. Reset Safari
Open the Safari app and click on Safari from the menu at the upper-left of the screen. Click on Reset Safari. A dialog window will open where you can choose which elements you want to reset. Next, click the Reset button to complete the action.
Summary
The WebAssistSearch can be more of a headache than an actual danger, but you should not underestimate the risk it poses due to it browser redirecting capabilities. If you think your Mac has WebAssistSearch adware, simply follow the removal instructions to efficiently remove it from your computer.