
If you’ve encountered backup error code 0x8100002F while trying to back up your Windows files, don’t worry. This article provides helpful solutions to resolve this error, which can occur during the copying of system files or when creating a system image. Rest assured, the issue can be easily fixed.
What exactly is the backup error code 0x8100002F and what triggers it to appear? We’ll find out more about this error code in the following sections.
What Causes the Windows Backup Error Code 0x8100002F?
The error code 0x8100002F is triggered by many different things. And in the section below, we have listed some potential culprits that commonly causes the issue.
- The backup library contains custom folders – This error may appear when you are trying to create a backup of a library that contains custom folders. In this particular scenario, the best fix is to move the library folder from the user profile path to a new location outside the current path. Alternatively, you can force the creation of a backup and simply ignore the custom folders.
- Windows Backup is unable to create a backup of the files in the Contacts, LocalLow, and Searches folders – Another possible culprit behind the error code is the Windows Backup utility forcing the creation of backup files that aren’t really existing on the computer. The best solution for this is to ignore the message or exclude the files in the folders and proceed with creating a backup via the Backup Settings menu.
- There is an existing issue within the NVIDIA USB Enhanced Host Controller Interface – If you are using the NVIDIA USB Enhanced Host Controller Interface, then you have found another potential culprit. If you suspect that this is your case, then you may uninstall the NVIDIA device driver and allow its generic equivalent driver to run.
- Hard drive errors are blocking the processes – If the drive you want to create a backup for is suffering from bad sectors, then the recommended fix is to first resolve any superficial issues.
- Malware entities are interrupting the backup process – Malware entities and viruses are notorious for causing errors in Windows computers. If a malware entity has infected your device and interfered with the backup process, then get rid of the threat to resolve the error message.
Now that we have identified the potential culprits behind the 0x8100002F error code, it’s high time to know what to do about the Windows Backup error code 0x8100002F.
Expert Tip: For smoother PC performance, consider using a PC optimization tool. It handles junk files, incorrect settings, and harmful apps. Make sure it's right for your system, and always check the EULA and Privacy Policy.
Special offer. About Outbyte, uninstall instructions, EULA, Privacy Policy.
How to Fix the Windows Backup Error Code 0x8100002F
Below are some easy fixes that might resolve the error code 0x8100002F.
Fix #1: Run the CHKDSK Utility.
CHKDSK is a handy utility that is designed to check the hard drive for bad sectors, errors, and system file issues, and resolve them. It can also be used to fix the 0x8100002F error code.
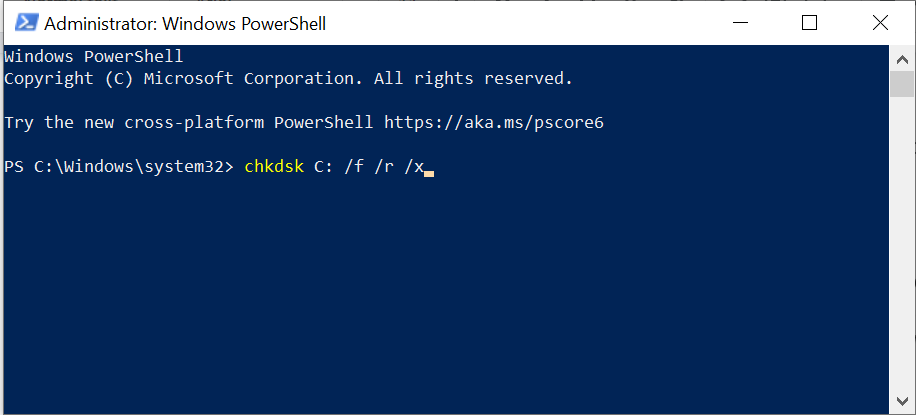 To run the CHKDSK utility, follow these steps:
- Sign in to your Windows account.
- Press the Windows key to launch the Start menu.
- Click on the Search field.
- Input cmd into the command line.
- Right-click on the most relevant search result.
- Select Run as Administrator.
- Into the command line, input the chkdsk C: /f /r /x command and hit Enter.
- Wait until the scan is complete. CHKDSK will take care of whatever issue or problem it detects.
Fix #2: Run the SFC or DISM Tool.
Aside from the CHKDSK utility, Windows 10/11 has other utilities you can use to resolve the 0x8100002F error code: the SFC and DISM tools. While the first tool is used to find damaged system files and fix them, the latter repairs corrupted Windows image files and Windows Store components.
To run the SFC utility, do the following:
- Press the Windows + X keys to launch the WinX menu.
- Select Command Prompt (Admin) to launch an elevated Command Prompt.
- Next, input the sfc /scannow command into the command line.
- Hit Enter.
- Wait for the repair process to complete.
- Once done, restart your computer.
To run a DISM scan, follow these steps:
- Press the Windows + X keys to launch the WinX menu.
- Choose Command Prompt (Admin) to open an elevated Command Prompt.
- Input the DISM /Online /Cleanup-Image /ScanHealth command and hit Enter.
- Wait for the scan to complete and restart your computer.
- Check if the error code still appears.
Fix #3: Use the Registry Editor.
It is possible that some unnecessary user profile keys exist in the Registry Editor causing the error code to appear. By removing these keys, you might just be able to resolve the 0x8100002F error code.
However, before removing these registry keys, it is wise to have a backup of your registry keys so you can easily restore them in case anything happens.
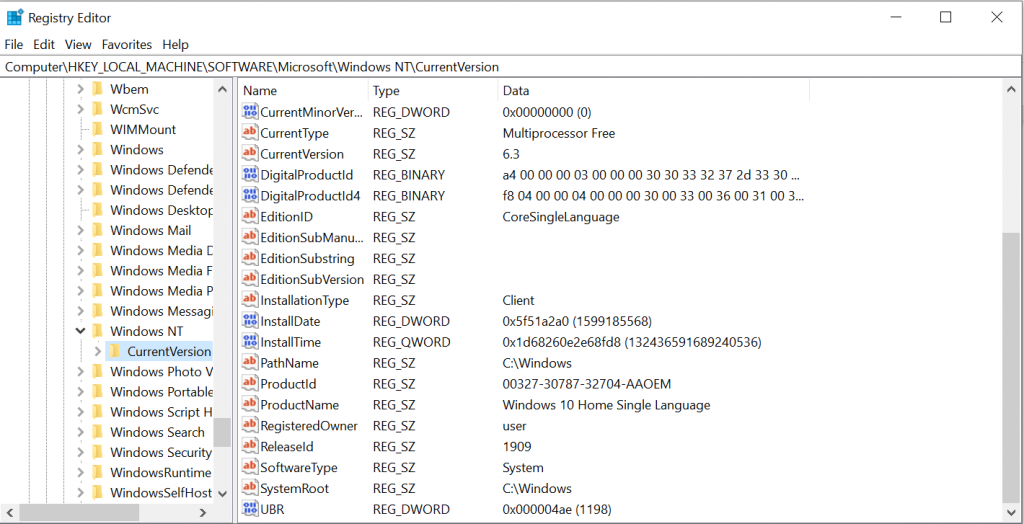 Now, to remove the unnecessary user profile keys, here’s what you should do:
- Launch the Registry Editor.
- Navigate to this path: HKEY_LOCAL_MACHINE > SOFTWARE > Microsoft > Windows NT > CurrentVersion > ProfileList.
- Click on any folder under the ProfileList key.
- Locate the ProfileImagePath String If you can’t find it, it means that the folder is okay. Otherwise, delete the entire folder.
- Repeat the above steps until you have checked all the folders under ProfileList.
Fix #4: Migrate the Folders or Files That Are Causing the Error.
There are instances when a file or folder may cause the error to appear. In fact, according to reports, some users have experienced this error while trying to copy the Contacts folder under their user profile. And to resolve this, they simply moved the problematic file or folder to another location outside the user profile.
To proceed with this solution, find the problematic folder, check its path, and then move it to another location. This fix has worked for many affected users.
For a detailed guide on how to move the problematic folder, follow these steps:
- When you see the error code, check the location that is being mentioned. This will give you an idea of the problematic folder.
- And then, open File Explorer.
- Navigate to the location and right-click on the folder in question.
- Select Cut.
- Move it to another folder outside its current folder.
- Once the folder is moved, repeat your backup attempt and check if the issue is now resolved.
Fix #5: Use an External Drive to Create a Backup.
If you are using a physical hard drive to create a backup, then it is possible that you will see the error code 0x8100002F and that the backup process won’t complete.
In this scenario, try using an external disk to create a backup. Regardless of the situation, it’s always good to have a backup in another location. This way, if your physical hard drive gets damaged or corrupted, you have another drive in handy.
Fix #6: Use a Third-Party Backup Tool.
Often times, the error code appears because of a problem with the built-in Windows Backup tool. So, use a third-party backup tool to back up your system files. Do a quick search online for reliable and effective backup tools for Windows 10/11.
Here are some recommended backup tools for Windows:
- Auslogics File Recovery
- Acronis True Image
- ShadowMaker Pro
- Paragon Backup and Recovery
Fix #7: Run a Malware Scan.
As mentioned above, a malware entity or a virus infection can trigger the error code 0x8100002F to appear as well. So, get rid of the virus to resolve the error.
You have two ways to remove malicious entities from your computer. The first method involves the use of the inbuilt Windows Defender tool. Windows Defender allows you to scan specific folders and files for any malware entities. Once threats are found, the tool will throw notifications on your desktop.
To run a malware scan using Windows Defender, do the following:
- Right-click on the folder or file you want to scan.
- Select the Scan with Microsoft Defender option.
- Once the scan is complete, a Scan Options page will open letting you know the results.
- Apply the recommended fixes.
- Restart your computer and try to back up your files again.
If you don’t feel like using the Windows Defender utility, you have the option to use a third-party security tool instead. But do practice caution when installing third-party tools. You don’t want to worsen the problem, right?
Fix #8: Exclude the Contacts, LocalLow, and Searches Folders.
If you suspect that you are seeing the error code because of problems with the Contacts, LocalLow, and Searches folders, then you may avoid it by modifying the Windows Backup tool to specifically not include those locations.
Here is a step-by-step guide on how to exclude the Contacts, LocalLow, and Searches folders from the backup attempt:
- Press the Windows + R keys to launch the Run utility.
- Into the text field, input control and hit Enter.
- Next, into the search field, input windows backup and hit Enter.
- Click on the most-relevant search result.
- Select Backup and Restore.
- Once in this field, click Set up Backup.
- When prompted by the UAC, click Yes.
- Choose a viable location where you want to store the backup.
- Hit Next.
- Tick the Let Me Choose option and hit Next to proceed.
- Expand the Data Files section and choose Your UserName Libraries.
- Go to the Additional locations menu and deselect the options associated with the Contacts, AppData, and Searches folders.
- Now, expand the Computer’s drop-down menu.
- Click on the item for your system drive.
- After that, click to select the AppData, Contact, and Searches checkboxes.
- Lastly, hit Next and Save Settings and Run Backup.
- Wait for the process to complete.
- Attempt to back up your files again
Summary
If you ever encounter the backup error code 0x8100002F on your Windows 10/11 device again, then you should already have an idea of what to do. Identify what’s causing the error to appear first, and then proceed with the most appropriate fix. Now, if you think that the fixes are too technical for you, please do not hesitate to seek help from professionals or contact Microsoft support.
What other backup error codes have you encountered before? Let us know in the comments!