
Applying Windows updates is something that we often hate because it’s a time-consuming process. However, these updates are actually necessary and of importance, especially in this digital era where threats are everywhere.
Every now and then, updates are rolled out by Microsoft to bring about security improvements and introduce new features. Other updates are released to address system bugs and issues in Windows.
And how do you install these updates? The answer is simple. Use the in-built Windows Update tool.
What Is Windows Update?
Windows Update is the free Microsoft utility that gives you access to real-time updates like patches and service packs for the Microsoft OS and other Microsoft products. It is also used to update device drivers. Using this tool, Windows users can also have access to a device’s update history.
Expert Tip: For smoother PC performance, consider using a PC optimization tool. It handles junk files, incorrect settings, and harmful apps. Make sure it's right for your system, and always check the EULA and Privacy Policy.
Special offer. About Outbyte, uninstall instructions, EULA, Privacy Policy.
Have you ever asked why it is important to install Windows updates?
As mentioned, these updates include fixes to security issues and errors. Although they do not directly address security vulnerabilities, they play a great role in an operating system’s stability.
How to Update Windows 10/11?
If you are running Windows 10/11, know that it is easy to get the latest Windows updates. Simply do the following:
- Click the Start button.
- Go to Settings and select Update and Security.
- Here, click the Windows Update button.
- Restart your computer to complete the update.
You can also schedule the update if you wish to do so. Here’s how:
- Click the Start menu.
- Navigate to Settings and click Update and Security.
- Next, click the Schedule the Restart button.
- You will now be taken to a scheduling window. Toggle on the switch next to the Schedule a Time option.
- Pick a time and day you wish to schedule the update.
Common Windows Update Errors
Now, we have to admit that Windows updates are no stranger to issues. They may also be troubled with errors.
Below are some of the most common Windows update errors that have been reported by Windows 10/11 users:
- Windows Update Error 0x800f0984
- Windows Update Error 0x80246002
- Windows Update Error 0x80070436
- Windows Update Error C8000266
- Windows Update Error 0xca020007
- Windows Update Error 0x80246013
What we’ve listed above are just six of the common Windows Update errors that you may encounter. In this article, we will delve deep into one recently reported Windows Update error: 0x800f0900.
What Is Windows Update Error 0x800f0900?
The Windows Update Error 0x800f0900 is one of the recent Windows update-related issues that have given affected users headache. According to them, this appeared after installing the April Update 1803. When this error appears, users are asked to roll back to a previous major update. If they don’t do it, they are stuck in a boot loop sequence.
Aside from the April Update 1803, there are other potential culprits that trigger the error. We’ll discuss them in the next section.
What Causes Windows Update Error 0x800f0900?
Normally, the Windows Update Error 0x800f0900 occurs because the Windows Update utility failed to search for the latest update. The reason could be any of the following:
- Problematic Cumulative Update – Some users have reported that the error appeared after installing a Cumulative Update on their devices.
- Corrupted Windows Registry – Corrupted registry entries are preventing important Windows Update processes to run properly.
- Damaged System Files – Some damaged system files are messing with the Windows Update utility.
- Unstable or Problematic Internet Access – You have an unstable internet connection. That is why the Windows Update utility cannot communicate with Microsoft’s server.
- Problem with the Windows Update Service – There is an existing problem with the Windows Update service.
- File Corruption – Some important files required for the Windows Update may be corrupted.
- Incorrect System Configuration – Your system settings may be incorrectly configured; hence the error.
- Virus, Malware, and Adware – Malware entities and viruses are keeping you from performing Windows updates.
What to Do About Windows Update Error 0x800f0900?
Resolving the Windows Update Error 0x800f0900 involves finding ways to get to its root causes. So, we have presented several guides below to fix various issues that cause the error, such as device driver problems and faulty system files. Try to go through the solutions one after the other until you find one that works for you.
Solution #1: Install the Update Manually
If you are looking for another possible way to install the update without having to find out what’s the culprit, then you may try to download and install the update manually.
To do this, you will have to use the Microsoft Update Catalog. Here’s a guide on how to use it to install the update:
- Launch your favorite browser and visit this website: https://www.catalog.update.microsoft.com/Home.aspx.
- Once you’re here, take advantage of the search function and find the update that you want to install.
- Hit Enter to begin the search.
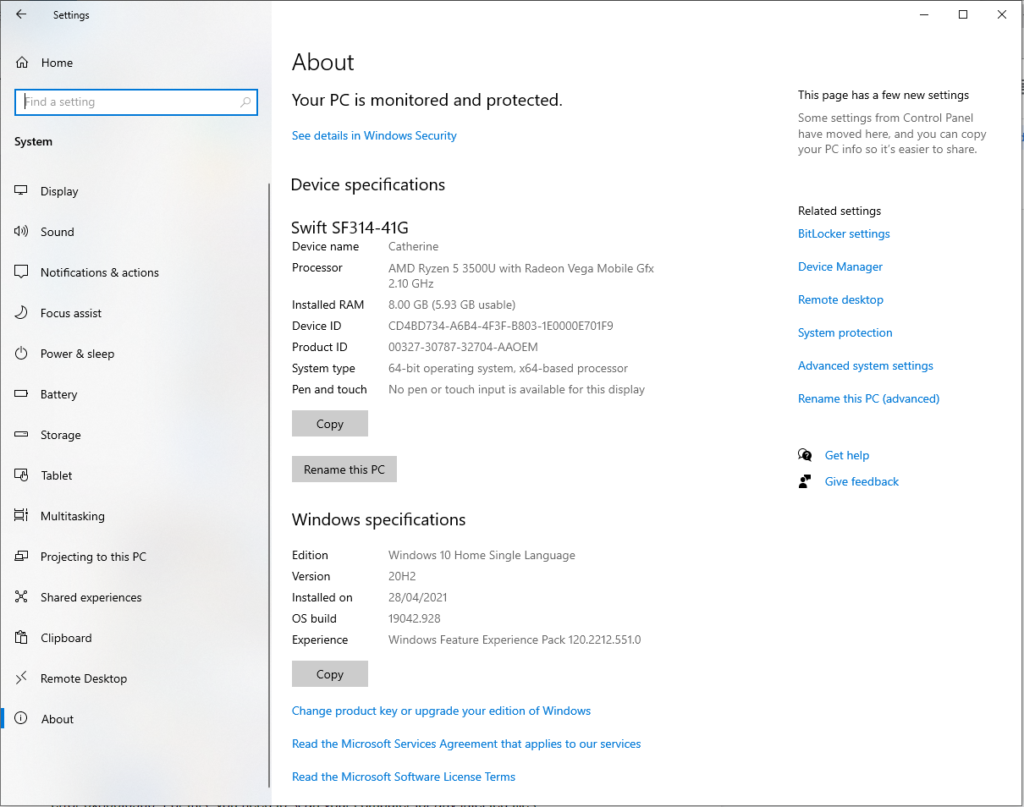
- From the search results, look for the update that is compatible with your computer’s architecture. If you don’t know your device’s architecture, right-click on This PC and select Properties. Go to System and check the System Type. It should show the bit version that your OS is currently running on.
- After identifying the version that is compatible with your device, click the Download button next to it. Wait for the download process to complete.
- Once done, go to the location where the download is stored. Locate the .inf file and right-click on it. Click the Install button that appears.
- Follow the on-screen prompts to complete the update installation.
- Restart your computer.
- Upon the next startup, the update should be installed.
Solution #2: Use the Windows Update Troubleshooter
In case you don’t know, Microsoft has created a troubleshooting utility to resolve issues that are associated with Windows updates. It is called the Windows Update Troubleshooter.
This tool will automatically scan the Windows Update component and check for any inconsistencies. After the scan, it will apply any viable fix.
Below is a detailed guide on how to run the Windows Update Troubleshooter:
- Press the Windows + R keys to launch the Run utility.
- Into the text field, input ms-settings:troubleshoot.
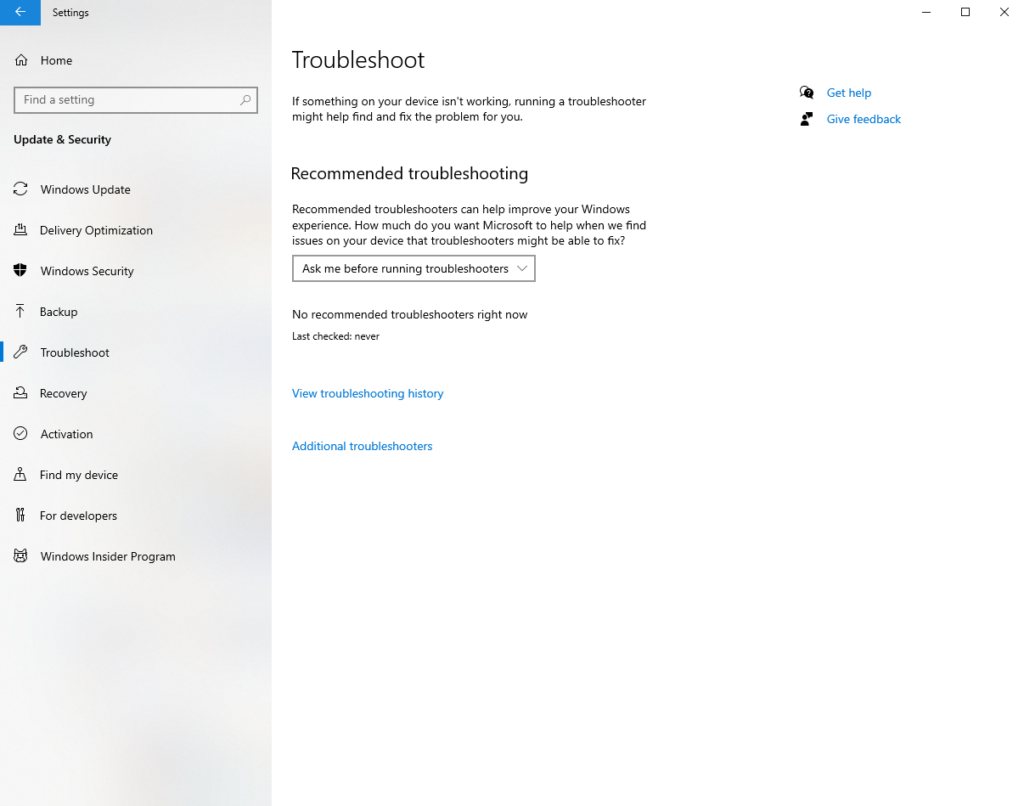
- Hit Enter. This will take you to the Troubleshooting tab of the Settings utility.
- Scroll down and go to the Get Up and Running section.
- Click the Windows Update button.
- Next, click the Run the Troubleshooter button. This will then launch the Windows Update Troubleshooter.
- After the tool finishes scanning your device, hit the Apply This Fix button.
- Close the tool and restart your machine.
- The moment your computer boots up, the Windows Update component should be fixed. You can then repeat the installation of the Windows update. Hopefully, you will no longer come across the 0x800f0900 BSOD.
Solution #3: Reset the Windows Update Component
If the troubleshooter was unable to resolve the problem for you, then it is possible that you are dealing with a corruption issue with the Windows Update component. Now, it is worth noting that this issue cannot be easily resolved using conventional methods. So, if you are not that tech-savvy, we suggest that you seek help from professionals.
When it comes to resetting a Windows Update component, you have two methods to choose from:
Use the Automated WU Reset Agent
- Launch your favorite web browser and visit this page: https://gallery.technet.microsoft.com/scriptcenter/Reset-Windows-Update-Agent-d824badc.
- Hit the Download button to download the Reset Windows Update Agent tool.
- Once the download is complete, extract all the contents of the archived file using any decompression utility of your choosing.
- Once done, double-click on the ResetWUENG.exe file and hit Yes.
- Follow the on-screen prompts to proceed.
- After that, restart your computer and check if you can install the update without any problem.
Use the Command Prompt
- Launch the Run utility by pressing the Windows + R keys.
- Into the text field, type cmd and hit CTRL + Shift + Enter. This will launch an elevated command prompt window.
- When the User Account Control prompt appears, hit Yes.
- Into the command line, type the following commands. Make sure to hit the Enter button after each one:
- net stop wuauserv
- net stop cryptSvc
- net stop bits
- net stop msiserver
- At this point, you have already disabled the Windows Update Services, Cryptographic Services, MSI installer, and BITS Services.
- After that, run the following commands to clear the folders that are responsible for holding temporary data of the Windows Update:
- ren C:\Windows\SoftwareDistribution SoftwareDistribution.old
- ren C:\Windows\System32\catroot2 Catroot2.old
- Once these folders have been cleared, run the following commands in the elevated Command Prompt window. Again, don’t forget to hit Enter after each one:
- net start wuauserv
- net start cryptSvc
- net start bits
- net start msiserver
- Finally, restart your computer and try to reinstall the update.
Solution #4: Perform a DISM and SFC Scan
If none of the above methods worked, it is likely that you are dealing with a system file corruption issue. In this case, you have nothing to worry about because your device has built-in tools that can be used to resolve file corruption problems.
First, we have the System File Checker or SFC. This tool scans for system file corruption and replaces any detected file with healthy copies, which are fetched from a local archive. To run an SFC scan, follow these steps: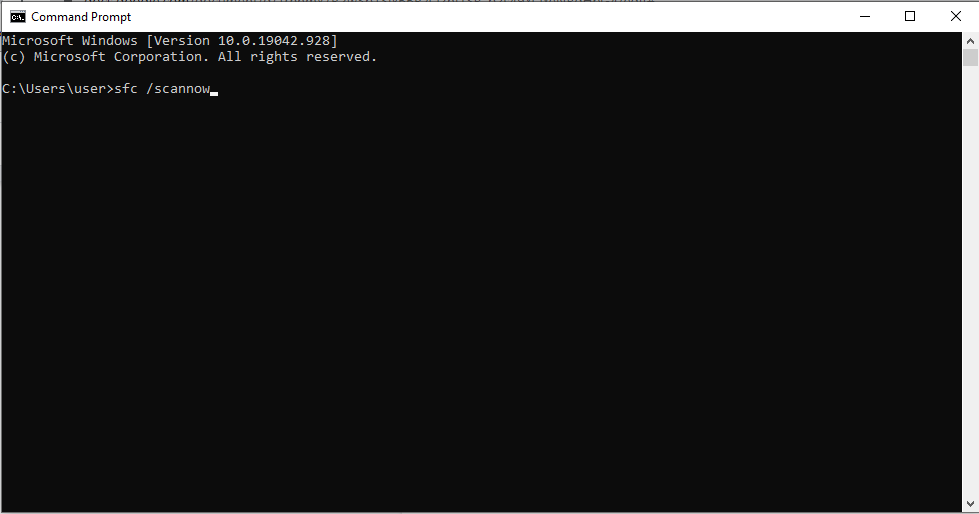
- Click the Start button and type cmd into the text field.
- Right-click on exe and click Run as Administrator.
- When prompted by the UAC, select Yes.
- The Command Prompt should open now. Into the command line, enter the sfc /scannow command and hit Enter.
- Wait for the process to complete.
- Restart your computer and check if the BSOD issue is resolved at the next startup.
Now, if the problem persists, consider performing a DISM scan. Do keep in mind that in order to use the tool properly and effectively, a stable and reliable internet connection is required. This is because the tool relies on a certain sub-component of Windows Update to find healthy equivalents for the corrupted files. To perform a DISM scan, follow these steps:
- Click the Start button.
- Into the search field, input cmd and right-click on the most relevant search result.
- Select Run as Administrator.
- Input the following command to perform an advanced DISM scan. Don’t forget to hit the Enter button after the command:
DISM /Online /Cleanup-Image /ScanHealth - Restart your computer.
Solution #5: Perform a Clean Install
If none of the solutions above has worked so far, it means that you may be having an underlying corruption issue that requires more advanced measures. And for that, you may try performing a clean install.
Before you proceed with performing a clean install, it is recommended that you have a backup of your important files and folders first. This is to avoid the chances of data loss.
To create a backup of your files via the cloud, do the following:
- Go to Settings.
- Click Update and Security.
- Select Backup.
- Navigate to the Back up files to OneDrive section.
- Hit the Back Up Files button.
- Next, click the Start Backup button.
- Once the steps above are completed, OneDrive should automatically backup your files on the Pictures, Documents, and Desktop folders.
Assuming you already have a backup of your files, the next thing you should do is ensure you have at least 4 GB of storage space on your external drive. And then, take note of your product key. After you have ticked off everything, proceed with the steps below:
- Download the Windows 10/11 media creation tool from this website: https://www.microsoft.com/en-us/software-download/windows10.
- Check the file you’ve downloaded and double-click on it.
- Select the Create installation media for another PC option.
- Go through the installation options and hit Next.
- Choose your external drive or ISO file and click Next.
- Hit the Finish button after the media creation tool is created.
- Restart your computer with the media creation tool you have created.
- Press any key to boot from it.
- Follow the on-screen prompts.
- You will be asked to provide your license key in the process. Also, agree to the license terms.
Solution #6: Fix Any Socket Errors
Winsock contains all information related to your internet connection. If any of these settings get corrupted, then there is a chance that you won’t be able to download certain data packets. Hence, the update process will fail.
Resetting the Winsock utility may resolve the issue in some cases. Here’s how:
- Launch the command prompt with administrator privilege.
- Input the netsh winsock reset command and hit Enter.
- Restart your computer.
Solution #7: Remove Any Unnecessary Files
Deleting any unnecessary files can also resolve the BSOD error. And to do this, you can use the Disk Cleanup tool or any third-party device cleaner of your choice.
To use the Windows Disk Cleanup tool, follow the instructions here:
- Press the Windows + E keys together to launch the File Explorer.
- Click This PC.
- Select your main partition and choose Properties.
- Tap the Disk Cleanup option.
- Hit OK.
- In the window that opens, click the Clean Up System Files button.
- And then, tick all the boxes, except for Download. Proceed by pressing OK.
- Wait for the tool to complete scanning any unnecessary files.
- Hit OK once again.
- Restart your PC.
Now, if you find the process above too overwhelming, you can choose to use a third-party PC repair tool. Make sure you use a reliable tool to ensure no leftovers are left behind.
Solution #8: Perform a Complete System Scan
It is likely that a malware infection has occurred in your system resulting in the Windows Update error 0x800f0900. For this, you need to scan your computer for any infected files.
To perform a complete system scan, use Windows Defender. Here’s how:
- Double-click on the shield icon in the Taskbar.
- In the wizard that appears, select Virus and Threat Protection.
- Click Scan Options.
- Tick the Full Scan radio button and proceed by pressing the Scan Now button.
- The scanning process should start right away. If it reports a malware infection, remove it right away.
- Once the malware has been removed, restart your device.
To ensure that no malware entity has slipped through Defender, you may also perform another scan using a third-party antivirus program. Once the program finishes the scan, apply the recommended actions.
Solution #9: Disconnect Any External Peripheral
Using external peripherals may also lead to the error 0x800f0900. So, to rule out this possibility, disconnect them one at a time. This includes your printer, web camera, speaker, Bluetooth headset, or secondary monitor.
It could be the case of a bad port or a corrupt system driver. And then, reconnect them one after the other and see what’s causing the issue.
Solution #10: Remove Startup Items
Removing unnecessary startup items and disabling the services that are set to run in the background can also resolve the Windows Update error 0x800f0900.
To do so, make sure you are currently using a Microsoft account with administrator rights. After that, proceed with the steps below:
- Launch the Run dialog box by pressing the Windows + R keys together.
- In the Run utility, input msconfig and hit Enter.
- Go to the General section and select the Selective Startup option.
- Untick the Load Startup Items option.
- Locate any unnecessary services and tick the Hide All Microsoft Services option.
- Hit the Disable All button to proceed.
- Restart your device and reinstall the update.
Solution #11: Disable Any Third-Party Antivirus
If you have just installed a third-party antivirus program before the error occurred, then it is possible that it’s causing the error. So, try to disable it first before installing the update again.
To temporarily turn off real-time protection, do the following:
- Press the Start button and go to Settings.
- Select Update and Security and click Windows Security.
- Go to Virus and Threat Protection and select Manage Settings.
- Switch off the Real-Time Protection option.
- Restart your computer and try to install the update once again.
Solution #12: Set the Update Services to Automatic
Sometimes, a poor services configuration can lead to this Windows update error. Thus, make sure it is set properly. Here’s what you should do:
- Launch the Command Prompt with administrator privilege by pressing the Windows + X keys.
- Select Command Prompt (Admin).
- Next, run the following commands one at a time. Press Enter after each one of them:
- SC config wuauserv start= auto
- SC config bits start= auto
- SC config cryptsvc start= auto
- SC config trustedinstaller start= auto
- net stop wuauserv
- Restart your computer and launch the Command Prompt once again. Run this command: net start wuauserv.
- Navigate to Settings and select Update and Security.
- Click the Check for Updates button.
- The Windows Update utility will then start scanning for any available updates. If it detects any, it will be installed automatically.
Solution #13: Disable Your VPN Connection or Disconnect Your Device Driver
When you are updating Windows 10/11 and you come across the Windows Update error 0x800f0900, then check your internet connection or try to disable your VPN services. But if you are still having the same problem, disconnect your device driver.
You can refer to the steps below as your guide:
- Open the Start menu and input device manager into the search field.
- Hit Enter to open the Device Manager.
- Locate the faulty device driver and disable it.
- Try to update Windows 10/11.
- Re-enable the device driver once the update has been installed.
Solution #14: Skip the Update
Lastly, it’s worth mentioning that Microsoft rolls out problematic updates at times. So, if you have done everything in your power but to no avail, you may want to skip the update. We understand the hassle that you have just gone through. But things do happen. So, we have to move on and wait. Soon, Microsoft will ship a better and more stable update.
What’s Next?
Now that you have resolved the Windows Update error 0x800f0900, what’s next? The answer is obvious. Keep your computer running at optimal levels.
Here are a few tips that we recommend:
Tip #1: Perform Monthly Clean-Ups.
One of the fastest and easiest ways to keep your computer running at an optimal level is to perform a regular clean up. During this session, delete any unnecessary files that are consuming a huge chunk of your system space.
Also, make it a habit to delete cookies and other temporary files. This will keep your computer performing faster.
Tip #2: Back-Up Files Regularly
It’s always good to have backup files in the event that something comes up in the process. With a backup file in handy, you can quickly recover from data loss.
There are plenty of backup tools available online today. However, if you prefer to take the manual route, make sure you store your backup device in a safe location.
Tip #3: Avoid Visiting Shady Websites
Do you always surf the web? Do you constantly find yourself on a website loaded with pop-ups and other unwanted ads? Then we advise that you click away. These websites are hotbeds for malware and bugs.
If you really need to visit these sites, make sure you have malware protection. Keep it up and running while surfing the web to avoid infection. It is also best that you always think before you click.
This also applies to emails. If you receive an email from an unknown source, avoid clicking on any link or downloading any attachment.
Tip #4: Install Updates
If updates are available, install them right away. These updates are rolled out for a reason after all. While they generally contain fixes to previously reported bugs, they also come with improvements in terms of security and speed.
Tip #5: Keep Background Processes to a Minimum
Unnecessary processes that are running in the background can cause your system to lag and affect your productivity. So, if you don’t need them, just shut them down.
Wrapping Up
Updating your Windows 10/11 operating system is an easy way to ensure your system runs smoothly and efficiently. Once your OS is updated, this means you have access to the latest features, error fixes, and most importantly, security patches. But if you are having problems with updating Windows 10/11 due to errors like the Windows update error 0x800f0900, then don’t fret. We have the perfect solutions for you.
Your options include installing the update manually, using the Windows Update Troubleshooter, resetting the Windows Update components, performing a DISM and SFC scan, doing a clean install, removing any unnecessary files, and performing a thorough scan. You can also disable your device drivers, disconnect external peripherals, or simply skip the update.
If you ever experience the same error in the future, feel free to go back to this article and try other fixes. If none of these solutions works, you can always ask for help from Microsoft professionals who know how to handle such a challenging error.
Once you have resolved the error, do your part to avoid encountering it again in the future. Consider the tips we have provided above to keep your computer in optimal condition and tip-top shape.
Have you encountered the same Windows Update error before? Let us know how you resolved it. Share your experience in the comments.