
Users may encounter error code 0x8024401c while installing Windows updates, causing frustration and leaving them stuck. Despite the ease of manually installing updates with a single click or letting Windows do it automatically, many users report being unable to resolve this issue even after restarting their devices.
If that sounds like your current situation, don’t stress. Like other Windows update errors you might have experienced before, this one is fixable too. Today’s article will discuss the best ways to resolve Windows 10/11 update error 0x8024401c.
What Causes Error (0x8024401c) in Windows 10/11?
The error appears when the operating system can’t connect to the Microsoft update servers to download available updates. Different factors can cause this, but the most common are:
- Poor internet connection
- Registry issues
- Malware
- Outdated device drivers
How to Solve Windows Update Error 0x8024401c
Expert Tip: For smoother PC performance, consider using a PC optimization tool. It handles junk files, incorrect settings, and harmful apps. Make sure it's right for your system, and always check the EULA and Privacy Policy.
Special offer. About Outbyte, uninstall instructions, EULA, Privacy Policy.
Below are the effective methods that solved this error for most Windows 10/11 users. Depending on the exact cause of your issue, it might be easy or complicated to eliminate it. So, we have discussed different techniques starting with the easiest to apply to the trickiest. Therefore, apply them in the presented order to avoid making unnecessary changes to your machine.
Let’s jump right in.
Unplug Peripheral Devices
Some hardware devices may contain viruses or be incompatible with your operating system, hence colliding with functions such as Windows update. Therefore, if you have recently connected any hardware devices such as USB sticks, webcams, Wi-Fi adapters, etc. to your PC, disconnect them and then restart your device. If Windows update works after this, one of the devices was the culprit. You can connect them one by one while trying to update Windows to see which one triggers the error in question. After identifying the trigger, get rid of it or replace it.
Use the Windows Update Troubleshooter
Windows has a tool that scans your computer for any issues hindering Windows update from running correctly. Here is how to use it on your Windows PC:
- Use the Windows logo key + I combination to open the Settings application.
- Go to Update & Security.
- Click on the “Troubleshoot” option on the left pane.
- Under the “Recommended troubleshooting” section, click on the “Additional troubleshooters” link.
- Select Windows Update and then click on the “Run the troubleshooter” button.
- Wait for the tool to troubleshoot for any issues.
- Follow the suggested actions to resolve the discovered problems.
- Reboot your PC. Then check if the error has been removed.
Check Your Network Settings
Since poor internet connection is a common cause of 0x8024401c, you need to check if it is the culprit. So, if you use Wi-Fi to update Windows, switch to a wired connection and see if that helps. Try Wi-Fi if you use a wired connection and see if that will work.
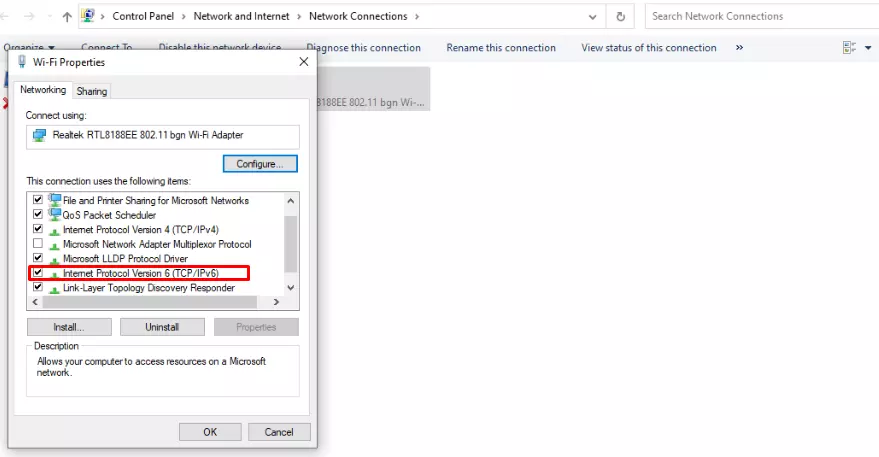
If changing your network connection doesn’t help, try disabling the IPv6 network. The IPv6 network is crucial to some programs, but it sometimes triggers Windows update errors. Therefore, you could disable it and then re-enable it after updating Windows.
Follow these steps to disable the IPv6 network:
- Press the Windows + I keyboard shortcut to bring up the Settings window.
- Open Network & Internet.
- Go to the Advanced network settings section and choose Network and Sharing Center.
- Select “Change adapter settings”.
- Right-click on your connection (Wi-Fi, Ethernet, etc.) and choose Properties.
- Uncheck the box for “Internet Protocol Version 6 (TCP/IPv6)”. Then click on the OK button.
- Reboot your computer. Then try updating Windows to see if this method worked.
Update the Network Driver
The network driver is usually responsible for ensuring all your network-related operations work smoothly. Therefore, if you are experiencing network issues, your network driver could be buggy, hence throwing up random errors. Updating it could resolve the problem.
These steps will guide you through updating your network driver:
- Press the Windows logo + R keyboard combo to summon the Run dialog box.
- Type in “devmgmt.msc” (without quotes) and then click on the OK button.
- When the Device Manager opens, expand the “Network adapters” section to see your drivers.
- Right-click on your network driver and choose “Update driver”.
- Next, select “Search automatically for drivers” and then wait for Windows to download and install the updated driver.
- Restart your machine.
- Check if the issue has been fixed.
You could also download the driver from the manufacturer’s website and install it. However, only download drivers from the official site to avoid getting an infected file that will only cause more issues on your device.
Use the System File Checker
The Windows update 0x8024401c error is also likely to hinder updates if some crucial system files are missing, broken, or corrupted. Luckily, the System File Checker (SFC) allows you to scan your PC for corrupted system files and automatically repair them.
Here is how it works:
- Use the Windows logo key + S combination to bring up the Windows search bar.
- Type in “command” and then right-click on the “Command Prompt” search result.
- Click “Run as administrator” and then choose Yes when the User Account Control (UAC) prompt appears.
- When the elevated Command Prompt opens, type in “sfc /scannow” (no quotes) and press Enter.
- Wait for the tool to finish scanning your PC.
- Once done, reboot the machine.
- Now check if the error has been eliminated.
We also recommend using a professional PC Repair Tool as it thoroughly scans your PC for malfunctions that cause annoying errors in Windows. It then lets you fix them in one click without damaging any crucial element on your machine. A great example of such software that you can trust is Outbyte PC Repair. This unique tool eliminates stubborn issues, boosts your device’s security and increases performance. Therefore, if you want to take your productivity to the next level, make sure to check it out.
Scan Your Computer for Malware
Malicious entities can easily infiltrate your system and disable vital services, causing strange errors such as 0x8024401c. Scanning your PC for malware can help identify and delete them.
Use this guide to scan your PC for malware using Windows Defender:
- Right-click the Windows logo icon in the bottom-left corner of the screen.
- Choose Settings.
- Click on Update & Security.
- Select Windows Security on the left-side menu.
- Head to the “Protection areas” section and choose “Virus & threat protection”.
- Open the “Scan options” link and select “Full scan”.
- Click on “Scan now” and then wait for the scan to complete.
- Eliminate the suspicious files and then reboot your computer.
Still, getting the error? Don’t give up. The following method might work.
Reset Windows Update
Some Windows users reported that resetting Windows update components fixed the error on their computers.
To try this technique, follow these instructions:
- Open the Run dialog box using the Windows + R keyboard shortcut.
- Type in “cmd” (without quotes).
- Press Ctrl + Shift + Enter and choose Yes when the UAC window appears.
- Run these commands one by one:
- net stop wuauserv
- net stop cryptSvc
- net stop bits
- net stop msiserver
- ren C:\Windows\SoftwareDistribution SoftwareDistribution.old
- ren C:\Windows\System32\catroot2 Catroot2.old
- net start wuauserv
- net start cryptSvc
- net start bits
- net start msiserver
- Restart your device when done.
- Check if the issue has been solved.
Rollback the Network Driver
If you recently updated your network driver, the update may have contained bugs that trigger error 0x8024401c on your machine. Roll back the update to see if that helps.
Here is how to do it:
- Press the Win + X key combo to open the Power User menu.
- Choose Device Manager.
- Expand “Network adapters” and right-click on the network driver.
- Choose Properties.
- Navigate to the Driver section at the top of the window.
- Click on the Roll Back Driver button and follow the needed instructions to finish the operation. If the button is greyed out, that means no previous driver versions are saved on your machine, meaning you can’t use this technique.
Temporarily Disable the Windows Defender
The Windows Defender blocks anything it deems suspicious. So, it might be treating some Windows updates as threats, thus triggering error code 0x8024401c. Temporarily disabling it could allow Windows updates to be installed successfully.
Here’s how:
- Type “windows defender” (without quotes) into the search bar.
- Click on the Windows Defender Firewall search result.
- On the left side of the window, select “Turn Windows Defender Firewall on or off”.
- Pick the option that says “Turn off Windows Defender Firewall (not recommended)” under both Private network settings and Public network settings sections.
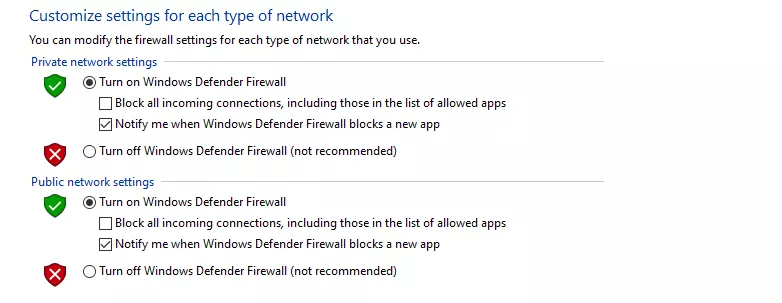
- Then click on the OK button.
- Ensure you turn on the firewall after updating Windows.
If you have a third-party antivirus on your computer, disable it as well before updating Windows.
Tweak System Registry
If you are still seeing error code 0x8024401c when updating your operating system, you may need to tweak the registry to fix it. However, messing with the registry can easily render your computer useless. Therefore, we recommend you first back up your registry before proceeding with this method. This will enable you to restore its health if anything goes wrong. Also, create a System Restore point to help correct any other affected PC functions.
Follow these steps to back up the registry:
- Open Run (Win + R) and type “regedit” into the dialog box.
- Hit Enter and select Yes on the UAC window.
- When the Registry Editor opens, click “File” at the top of the window and choose Export.
- Select where to store the backup file on your device and name it.
- Finally, click on the Save button.
To create a System Restore point, you first need to enable the feature on your machine. Use these instructions to do so:
- Click into the search bar, and then type “system restore” (no quotes).
- Choose “Create a restore point” to bring up the System Properties window.
- Head to the Protection Settings section and select your main drive (usually Local Disk C).
- Then click on the Configure button.
- Choose “Turn on system protection”.
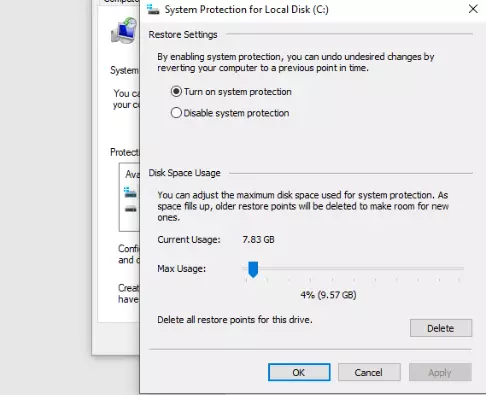
- Click on the Apply button and select OK.
Follow these steps to create a System Restore point:
- Type “system restore” into the search box and click “Open” on the right-side menu.
- Click on the “Create” button.
- Name your restore point and choose “Create”.
- Wait for the process to finish, and then click on the Close button.
- Click OK on the System Properties page.
After taking the above measures, follow these instructions to tweak the registry:
- Press the Windows logo key + R combination to open Run.
- Type in “regedit” and click OK.
- Navigate to the following location:
Computer\HKEY_LOCAL_MACHINE\SOFTWARE\Microsoft\Windows\CurrentVersion\WindowsUpdate\Auto Update
- Go to the right pane and right-click on “EnableFeaturedSoftware”. Then choose Modify.
- Change the Value data from 0 to 1.
- Then click on the OK button. If EnableFeaturedSoftware does not exist, you must create it to proceed:
- Right-click on the right pane, choose “New” and select DWORD (32-bit) Value.
- Name it “EnableFeaturedSoftware”.
- Double-click on the new file and change the Value data to 1. Then click OK.
- Next, navigate to the following path:
HKEY_LOCAL_MACHINE\SOFTWARE\Microsoft\WindowsUpdate\UX
- Double-click on it and set the Value data to 0. Then click on the OK button.
- Head to the following path:
HKEY_LOCAL_MACHINE\SOFTWARE\Microsoft\WindowsUpdate\UX\Settings
- Double click on “UxOption” and set the Value data to 0. Then select OK.
- Next, go to:
HKEY_LOCAL_MACHINE\SOFTWARE\Policies\Microsoft\SystemCertificates
- Double-click on “CopyFileBufferedSynchronousIo” and change Value data to 1. If CopyFileBufferedSynchronousIo doesn’t exist, use the previous guide to create it and set its value to 1. Then click OK.
- Close the Registry Editor once done.
- Reboot your computer.
Conclusion
If the 0x8024401c Windows update error has given you sleepless nights, we hope this article gave you some peace of mind. If you have any questions or comments regarding today’s post, drop them below. Also, remember to check out our blog for more helpful guides like this one.