
Keeping Windows up to date is crucial for data security. However, if you encounter the Microsoft Error 0x8007139f while installing updates, there are solutions available.
In this article, we are going to discuss everything you should know about the Error Code 0x8007139f.
What Is the Microsoft Error Code 0x8007139f?
The Windows Error Code 0x8007139f usually shows when some bugs interfere with the download or installation process of system updates. It may also appear when there is corrupted software or update components.
In addition, according to some users, this error has something to do with personal user accounts. It may pop up while a user tries to verify his account on the Windows Store.
Expert Tip: For smoother PC performance, consider using a PC optimization tool. It handles junk files, incorrect settings, and harmful apps. Make sure it's right for your system, and always check the EULA and Privacy Policy.
Special offer. About Outbyte, uninstall instructions, EULA, Privacy Policy.
In some cases, this error may also be associated with Windows Defender. The Windows Defender Error Code 0x8007139f shows up because the system may have encountered conflicts with other active security tools. If two antivirus suites are launched simultaneously, the protection feature fails.
Lastly, the Error Code: 0x8007139f may also appear because of damaged system files. Some malicious components have corrupted these crucial files, resulting in the issue.
Ways to Resolve the Error 0x8007139f
If you are looking for ways to resolve the Windows Defender 0x8007139f error, also known as the 0x8007139f Xbox One issue, this guide is for you. Read through each solution below and follow the steps listed.
Fix #1: Check Your Antivirus Suite
The primary culprit for the Error 0x8007139f is your antivirus suite. Yes, a reliable antivirus solution is essential. However, it can sometimes mess with the system process and prevent you from installing updates.
To get around this problem, it is recommended to temporarily disable some features of your antivirus suite. If that doesn’t work, you can disable your security program in the meantime and see if the Error 0x8007139f is gone. If worse comes to worst, your last resort is to uninstall your antivirus.
Don’t worry, though. Your Windows 10/11 device has a built-in antivirus in the form of Windows Defender. This means that even if you uninstall your antivirus, you will still enjoy some level of protection.
In case uninstalling your antivirus resolves your problem, consider using another antivirus suite. There are plenty of antivirus suites out there, and they offer maximum protection against all kinds of threats. Some don’t even interfere with system processes in any way.
Fix #2: Use the Windows Update Troubleshooter
If you want to resolve the Error 0x8007139f without having to do a lot, then consider using the Windows Update Troubleshooter. This is an in-built tool designed to help resolve system errors automatically.
To use the WU troubleshooter, follow these steps:
- Launch the Settings window by pressing the Windows + I keys on your keyboard.
- Now, the Settings window will appear. Find the Update and Security section.
- Scan through the left part of the menu and select Troubleshooter.
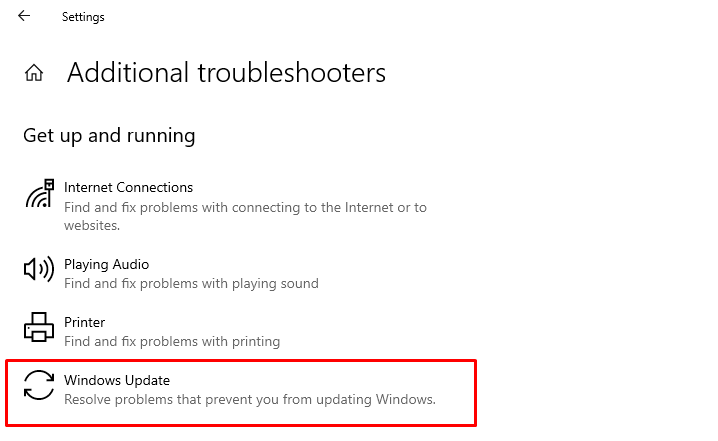
- Click Windows Update and then the Run the Troubleshooter button.
- The troubleshooting wizard will now open to guide you through the steps.
Fix #3: Use a PC Repair Tool
Often, in-built solutions don’t work in fixing these Windows errors. In that case, a third-party PC repair tool can help.
Such a program allows you to perform complete scans and system repairs without any limits. You can even remove unnecessary files and other junk that are messing with essential processes.
One of the most preferred PC repair tools today is Outbyte PC Repair. It identifies and fixes performance problems that are interfering with your computer’s processes. It can also address a vast range of issues, clean up your system drive, and boost your device’s performance.
There are other similar tools like Outbyte PC Repair, too! Feel free to look up online and find other alternatives.
Fix #4: Perform SFC and DISM Scans
SFC and DISM are two other tools that are built into your Windows device to help check system file corruption issues and fix them. By executing some commands, the tools will scan the integrity of the protected system files. Once it detects anything has been corrupted or damaged, the tools will replace them with the correct and working versions.
You can also use these tools to resolve the Error 0x8007139f. Here’s how:
- Start by opening Command Prompt with full administrator access. To do so, press the Windows + X shortcut and select Command Prompt (Admin) from the list. If it is not available, choose PowerShell (Admin) instead.
- Once the Command Prompt is up, type “sfc /scannow” (no quotes) into the blinking cursor and hit Enter. The command will now be executed.
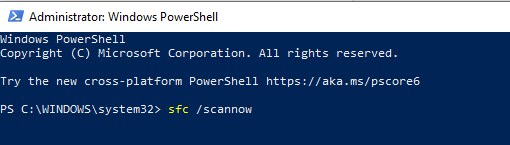
- Normally, the scan takes about 15 minutes to complete. Make sure you don’t interfere or stop it.
- Now, if the Error 0x8007139f still appears, consider doing a DISM scan. Follow the steps:
- Again, start by launching Command Prompt with complete administrator privileges. You can do so by using the Windows + X shortcut and finding the most relevant result.
- Into the blinking cursor, input “DISM /Online /Cleanup-Image /RestoreHealth” (no quotes) and press Enter.
- The DISM scan will now begin. This may take about 20 minutes to complete. Do not stop it.
Fix #5: Use a New User Account
In some cases, the Error Code 0x8007139f only appears on a certain user account. In this scenario, the best fix to try is to create a new user account.
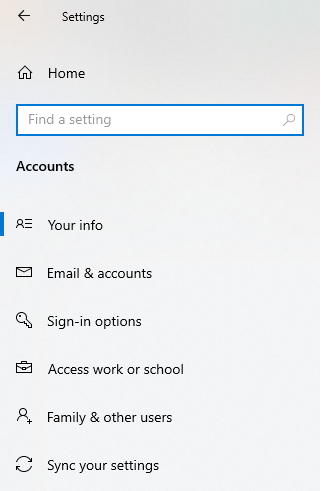
To create a new user account on Windows, here’s what you should do:
- Launch the Settings app by pressing Windows + I.
- Next, find the Accounts section and click on it.
- After, click Family and Other People and select the Add Someone Else to This PC option.
- Select the option that says you don’t have the person’s sign-in details.
- If prompted to provide your Microsoft account credentials, select to add a user without a Microsoft account.
- Now, create a username for the account and hit Next.
- Follow the instructions you see on your screen to finish creating a new user account.
- Once done, log out from your current account and switch to the account you have just created.
- Check if the Error 0x8007139f persists.
Fix #6: Reset the WU Components
Most Windows update-related issues like the Error Code 0x8007139f can be resolved by resetting the components of the Windows update utility. Relax, this isn’t really a complicated fix. Here is a detailed guide on how you should reset these Windows update components:
- Launch Command Prompt with full administrator rights.
- Once it opens, input these commands one at a time. Make sure to hit the Enter key on your keyboard after each command:
- net stop wuauserv
- net stop cryptSvc
- net stop bits
- net stop msiserver
- Ren C:WindowsSoftwareDistribution SoftwareDistribution.old
- Ren C:WindowsSystem32catroot2 Catroot2.old
- net start wuauserv
- net start cryptSvc
- net start bits
- net start msiserver
- Once done, check if the Windows Update Error 0x8007139f is still there.
Fix #7: Perform a System Restore
System Restore is a handy recovery tool designed for Windows. It allows users to reverse recent changes made to the operating system. When used, the tool returns system files, registry entries, drivers, installed applications, and more, to a specific state chosen by the user. So, it is more like an Undo button for Windows.
If strange things begin to happen to your PC after installing an update, then you might find the System Restore tool quite handy.
To use the System Restore utility, do this:
- Press the Windows + S keys to start a search.
- Type “system restore” (no quotes) into the text box and click on the most relevant result.
- The System Properties window will now show. Hit the System Restore button.
- In the new window that appears, hit Next.
- Select the Show More Restore Points option to see more restore points.
- Next, choose your desired restore point. Ideally, it should be one that was created before the error appeared.
- Hit Next and follow the on-screen instructions to restore your PC’s files and settings.
- Once your computer is completely restored, install the updates again.
Fix #8: Install the Update Manually
If you cannot install system updates because of the Update Error 0x8007139f, consider manual installation. However, before you proceed, open the Windows Update section first to know the code of the update you are trying to install.
Once you have the Windows update code, proceed with these quick steps:
- Open your preferred web browser and visit the official Microsoft Update Catalog website.
- Find the search box and input the code here.
- Hit Enter.
- You will now see a list of updates that match your search. Find the update that is compatible with your system architecture and hit the Download button next to it.
- Once the update has been downloaded, double-click on it and follow the steps on your screen.
Fix #9: Consider Doing an In-Place Upgrade
In the worst-case scenario, the only solution you have at your disposal is an in-place upgrade. This process aims to reinstall Windows and update it to the most recent version—all while ensuring your files are intact.
To perform an in-place upgrade, here’s what you should do:
- Download the Windows Media Creation Tool.
- Next, choose the Upgrade This PC Now option and hit Next.
- After, click Download and Install Updates (Recommended).
- Hit Next to continue.
- Follow the instructions on your screen.
- When you reach the Ready to install section, select Change What to Keep.
- Then, ensure to keep your personal files and apps and hit Next.
- Complete the Windows 10/11 installation process by following the wizard’s instructions.
- Once the in-place upgrade is complete, you will have the most recent Windows version installed. The error should also be gone.
Fix #10: Turn On Firewall and Windows Defender
We’ve mentioned temporarily disabling your antivirus suite above. If that doesn’t work, just keep it disabled but make sure the firewall is active. You can easily turn this on via Control Panel.
To do this, follow these steps:
- Press the Windows + S keys, the search for Control Panel.
- Once the Control Panel window is up, click Windows Defender Firewall.
- On the left pane, click Turn Windows Defender Firewall On or Off.
- Switch the firewall on for both your private and public network settings.
- Hit OK to proceed.
- After, use the search feature to access System Configuration. Do this by typing “msc” (no quotes) into the search box and right-clicking on System Configuration. Choose to run it with full administrator access.
- Next, go to the Services tab and find Windows Defender. Check if the Status column is blank. If it is, right-click on Windows Defender and choose Start.
- If nothing happens, set the startup setting to automatic and restart your PC.
Summary
The Windows Update Error 0x8007139f may manifest in many ways. It can appear while using third-party antivirus suites or Windows Defender. It can also show while playing Xbox. However, whatever is causing it, like other Windows errors, it can be resolved.
In this article, we have compiled several effective fixes that you can try even without professional guidance. You can use the in-built troubleshooter utility or run a PC repair scan. You can even use the System File Checker utility to ensure no corrupted files are messing with the update process!
Now, if you feel that you cannot fix the error yourself, reach out to Microsoft’s support team or any authorized Windows repair technician. They can give you suggested fixes that work best for you. They may even resolve the problem on your behalf via remote connection.
Let us know if we missed an important step above or you have a fix that you’d like to share. Comment on it below!