
Microsoft is known for regularly rolling out updates to its products. These updates do not only improve the product’s performance, but they also add new security features and resolves any previously known bugs.
And yes, there are times when these updates act strange. However, at the end of the day, we need them to ensure our systems stay efficient and remain secure.
Updating Windows is often very easy. In fact, you may not need to do anything at all because your system does it all for you. But sometimes, this isn’t always possible. Some users encounter Windows update problems, preventing them from installing the update.
One of these Windows update errors is the Windows 10/11 update error 0x80070422. According to affected users, this error simply says that the update failed or they encountered the Windows backup error 0x80070422.
Expert Tip: For smoother PC performance, consider using a PC optimization tool. It handles junk files, incorrect settings, and harmful apps. Make sure it's right for your system, and always check the EULA and Privacy Policy.
Special offer. About Outbyte, uninstall instructions, EULA, Privacy Policy.
What Causes Windows Update Error 0x80070422?
There are many reasons why the Windows update (0x80070422) error appears. The first one could be an overly protective security suite. If your antivirus software is too strict, it may end up disabling all the essential services required for downloading updates from the Windows server.
Another possible culprit for the Windows error 0x80070422 is an incompatible file or app that is messing with essential Windows update processes.
Also, the presence of malware entities may trigger the error code 0x80070422 to appear. As we all know, malware can cause all sorts of problems, and that includes those related to Windows updates.
Basic Troubleshooting for Windows Update 0x80070422 Error
If you find the Windows update error 0x80070422 annoying, you should try these basic troubleshooting steps before proceeding to more complex fixes.
1. Check Your Internet Connection
The first and most important thing you need to check is your internet connection. If it is slow and unstable, consider switching to a better and faster network.
2. Uninstall the Apps You Don’t Need
By uninstalling the apps you no longer need, you can make room for new updates. You can easily uninstall unnecessary apps via Control Panel.
3. Ensure There Is Enough Storage Space for Updates
Updates sometimes fail because there is simply no more space for new downloads. Try to delete junk files on your device manually or using a PC repair tool.
4. Disconnect Unnecessary Computer Peripherals
There are times when the error 0x80070422 on Windows update appears because external computer peripherals are interfering with the processes. Consider disconnecting those that you don’t use and see if the error still shows.
5. Restart Your Device
Sometimes, restarting your device does the trick. Doing this will give your PC a fresh start with more room for essential services and processes.
While it is normal for devices to encounter errors, it is important that you restart your computer before moving forward to more complicated solutions. Restarting can effectively clear temporary issues so you don’t have to waste time on a problem that is easy to fix.
10 Fixes to Try for the Error Code 0x80070422
The error code 0x80070422 on Windows Store or Windows update can be easily fixed. Some solutions include disabling IPv6, using the Windows Update troubleshooter, and fixing the Windows update service.
Fix #1: Enable or Start the Windows Update Service
The Windows Update service helps ensure that the Windows updates and other related processes are running properly. If it is disabled, it is likely that the error 0x80070422 will appear while trying to install an update. So, make sure it is running to ensure the Windows update process runs smoothly.
Follow these steps to enable the Windows update service:
- Open the Run applet using the Windows + R shortcut.
- Next, input services.msc into the text field and hit Enter.
- The Services window will now open. Here, find the Windows Update section and double-click on it.
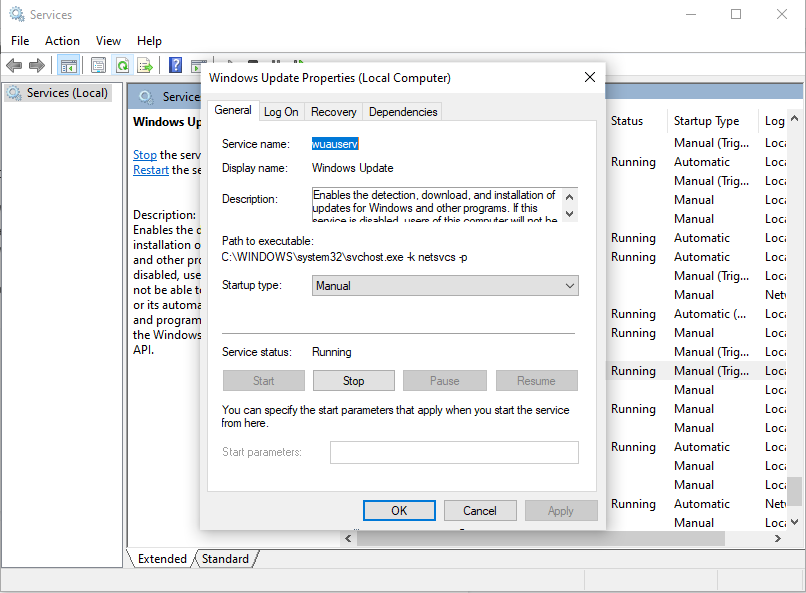
- Another window will appear. Click the drop-down arrow beside the Startup Type option.
- Choose Automatic.
- Then click Start under the Service Status part.
- Hit Apply then the OK button to save the changes.
- Right-click on Windows Update and choose Restart.
Fix #2: Run an SFC and DISM Scan
The error 0x80070422 may also appear because of corrupt system files. These corrupt system files can be easily repaired using the built-in Windows utility that allows users to scan your system for any corrupted system files and restore them using a cached version.
See below for a guide on how to use the SFC tool for fixing the error:
- Open the main Windows menu and input command prompt into the search field. Right-click on the top result.
- Run it with administrator access.
- Into the blinking command lline, enter the sfc /scannow command.
- The tool will now start scanning your system and find any damaged files.
- Depending on the number of files you have on your device, the process can take up to 15 minutes to complete.
- Once the scan is completed, we can proceed with a DISM scan. Do this by typing the DISM /Onine /Cleanup-Image /RestoreHealth command.
- Hit Enter.
- Once the command has been completely executed, proceed by restarting the essential Windows update services. Simply enter these commands:
- net stop wuauserv
- net stop cryptSvc
- net stop bits
- net stop msiserver
- Ren C:\Windows\SoftwareDistribution SoftwareDistribution.old
- Ren C:\Windows\System32\catroot2 Catroot2.old
- net start wuauserv
- net start cryptSvc
- net start bits
- net start msiserver
- Make sure you press Enter after every command.
- Exit Command Prompt and restart your computer.
Fix #3: Enable All Required Services
Aside from the Windows update service itself, it is essential to ensure that all related services are up and running itself. Many users said that the error had been resolved by doing this.
Go through the steps below to set up and enable all the related services:
- Use the Windows + R shortcut to launch the Run applet.
- Input services.msc into the text box.
- Find Network List Service in the window and right-click on it.
- Hit the Restart button.
- Now, check if these services are up and running. If not, right-click on each one of them and hit the Start button:
- Networking Connections
- BitLocker Drive Encryption Services
- DCOM Server Process Launcher
- Windows Firewall
- Windows Event Log
- Windows Event Collector
- After starting these services, check if the error is resolved.
Fix #4: Run the Windows Update Reset Script
If the automatic method of installing Windows updates doesn’t work, then run the Windows update reset script instead.
Here’s a guide on how to run the reset script:
- Go to this page: https://answers.microsoft.com/en-us/windows/forum/windows_10-update/how-toreset-windows-update-components-in-windows/14b86efd-1420-4916-9832-829125b1e8a3?auth=1.
- Scroll down the page until you find the section that lets you download the Windows update script for Windows 10/11 computers.
- Download the reset script.
- Once the script is downloaded, click on the file and select Show in Folder.
- Right-click on the downloaded file and choose Extract All.
- Hit the Extract button.
- Once the extraction process is done, open the Wureset Windows 10/11 folder.
- Find the WuReset file and right-click on it.
- Select to run as administrator.
- Hit Yes to grant access.
- Continue by pressing any key.
- This will take some time to complete.
- Once done, the Command Prompt window will close.
- Restart your computer and reinstall the available update.
Fix #5: Disable IPv6
We know that the Windows update utility needs a stable internet connection. So, any problems with your internet may cause this error to arise.
Some users have reported that disabling IPv6 helped fix the error 0x80070422. Here’s what they did:
- Use the Windows + R shortcut to access the Run applet.
- Input ncpa.cpl into the blank field and hit Enter.
- Right-click on your current internet connection. After that, select Properties.
- Go to the This connection uses the following items part and click Internet Protocol Version 6 option. Untick the box next to it.
- After that, restart your computer and see if the error is gone.
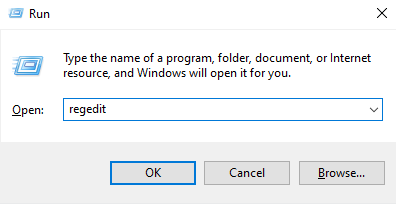
Alternatively, you can disable IPv6 via the Registry Editor. Here’s how:
- Go to the Cortana search field and type regedit.
- Select Registry Editor.
- Navigate to this location: HKEY_LOCAL_MACHINE\SYSTEM\Current\Control\SetServices\TCPIP6\Parameters
- Right-click on Parameters and select New.
- Choose DWORD (32-bit) value.
- Rename it to Disabled Components.
- Right-click on it and choose Modify.
- Input ffffffff into the Value field and hit OK to let the changes take effect.
- Exit the Registry Editor and reboot your Windows PC.
Fix #6: Enable or Disable the Network List Service
Many users said that enabling and disabling the Network List Service has resolved the error once and for all. This service is responsible for identifying what network is connected to your system. It also collects data and saves its properties.
Here’s how to do this:
- Open the Run applet using the Windows + R shortcut.
- Input services.msc into the blank field and hit Enter.
- Find the Network List Service and double-click on it to launch the Network List Service Properties window.
- Click the arrow next to the Startup Type dropdown and select Automatic.
- Choose Start if the service is disabled. Otherwise, select Disabled.
- Once done, hit Apply, then OK to save your changes.
Fix #7: Create a .BAT File to Download Updates
You can also create a .BAT file so you can download and install Windows updates on your device. Here’s how to create a .BAT file for this function:
- Open the Run applet and input notepad.
- Hit Enter to launch Notepad.
- Next, copy and paste this text:
- Notepad:sc config wuauserv start= auto
- sc config bits start= auto
- sc config DcomLaunch start= auto
- net stop wuauserv
- net start wuauserv
- net stop bits
- net start bits
- net start DcomLaunch
- Save your work by using the CTRL + S shortcut. Next, save the text as file. Name the file repair.bat.
- Select a folder or location where you wish to save the .BAT file. Click Save.
- Now, open the .BAT file’s location and right-click on it.
- Choose the Run as Administrator option.
- This will trigger an elevated Command Prompt to open.
- Hit Yes to begin executing the commands.
Fix #8: Check Your Registry Entries
Another fix you can try is to check the Registry entries and make sure they are correct. However, be extra careful when playing with the registry because one wrong move will cause irreversible damage to your system. If possible, prepare a backup file before making changes to the registry.
Once you have a backup file, follow these steps:
- Launch the Run applet and type regedit into the text field.
- Go to this location: HKEY_LOCAL_MACHINE > SOFTWARE > Microsoft > Windows > CurrentVersion > Windows Update > Auto Update.
- Then double-click on the file named Default. Change its value to 1.
- If you can’t find that location, try this instead: HKEY_LOCAL_MACHINE\SYSTEM\CurrentControlSet\Services\AppXSvc.
- Next, check its value. If it is any value other than 3, change it to 3.
- Restart your system.
Fix #9: Run the Windows Update Troubleshooter
Windows 10/11 has a built-in troubleshooting tool that can be used to resolve issues with the Windows update service. To run this troubleshooting tool, refer to the guide below:
- Click the Windows icon and input windows update into the search field.
- Then choose Windows Update Settings from the search.
- Next, go to Update and Security and select Troubleshoot.
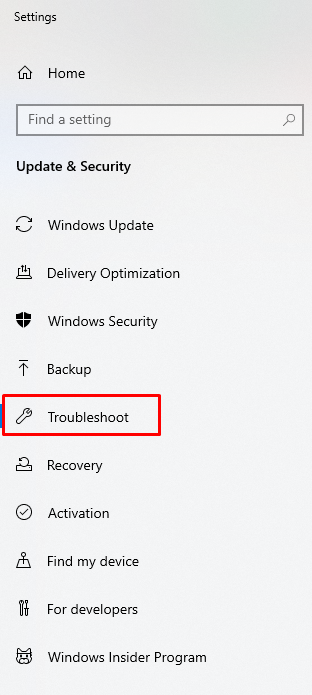
- Choose Additional Troubleshooters and then Windows Update.
- Hit the Run the Troubleshooter button.
- At this point, the tool will scan your device for any problems and serve you with possible solutions if needed.
- Once done, exit the Troubleshooter and see if the error is resolved.
Fix #10: Perform a Repair Upgrade Using a Media Creation Tool
Before you scroll down for more fixes, know that this method will reinstall your OS without affecting your programs and files. It will only replace files that are corrupted.
Here’s how to proceed:
- Visit the official Microsoft Store and download the Media Creation Tool.
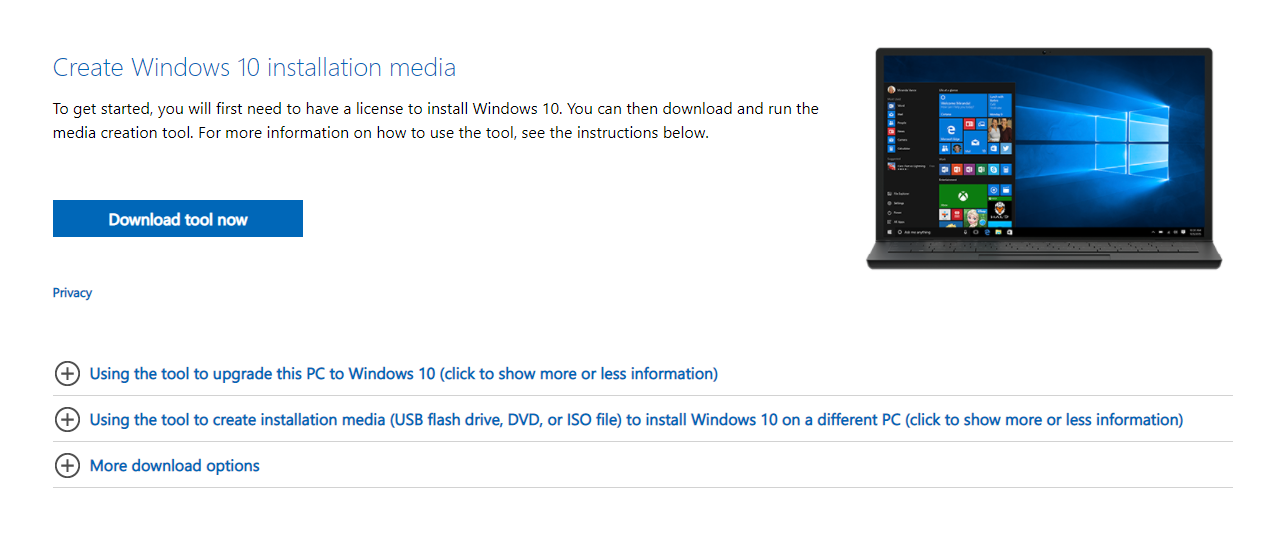
- Once the download is completed, run it.
- Next, click the Upgrade This PC Now link.
- Keep your personal files and apps if you don’t want to lose them.
- Lastly, try to reinstall the pending update.
Conclusion
We have listed some ways to resolve error 0x80070422 above. Hopefully, one of them has solved your problem. If none has worked, consider doing an in-place reinstallation of Windows. You can even seek help from Microsoft’s support team.
Do you have other suggestions to resolve this error? Let us know in the comments!