
When using Outlook, you might encounter error code 0x8004210b while trying to send emails. This code indicates a temporary mail delivery failure, causing frustration when it occurs repeatedly. Whether you’re a new or experienced Outlook user, it’s important to address this issue for smooth email communication.
There are lots of possible solutions that may fix this problem, and we will share some of them here. We will also list some of the most common causes so that you can get back to sending emails in no time!
What Is Outlook?

Before we delve deep into the technicalities, allow us to give you a brief introduction to Outlook.
Expert Tip: For smoother PC performance, consider using a PC optimization tool. It handles junk files, incorrect settings, and harmful apps. Make sure it's right for your system, and always check the EULA and Privacy Policy.
Special offer. About Outbyte, uninstall instructions, EULA, Privacy Policy.
Microsoft Outlook is a program that is mainly used as an email platform and a scheduling tool. It has been available since 1993, and because of its powerful tools, it has grown in popularity over time. As with most computer programs, glitches can happen frequently. While they aren’t necessarily hard to fix, they can be a hassle if you don’t know-how.
The 0x8004210b error code is not only one of these glitches, but it is also one of those that people commonly ask about online. Fortunately, there are ways you can fix it without any professional help or purchasing a special software.
What Is the Outlook Error 0x8004210b?
You will most likely receive the error 0x8004210b if you try to send an email from your Office 365, Exchange 2016 or 2013, or Exchange Online. The e rror 0x8004210b occurs when a user tries to send an email. The error message states that access was denied due to mailbox moves, and Microsoft Exchange couldn’t deliver your message.
It may also show when the computer tries to connect to an email server, but cannot do so because of an unknown reason. It happens most commonly with Microsoft Outlook and Gmail accounts, but can occur with other email providers as well.
What Causes the Outlook Error 0x8004210b?
The most common cause of the error code 0x8004210b is a corrupt or damaged folder or file that belongs to Microsoft Outlook. When Microsoft Outlook is unable to access an item that it needs, it will generate the error code 0x8004210b. This can be a result of some scenarios, including a virus attack, malware infection, hard drive failure, corruption in Windows registry files, or other critical issues.
Here are other known causes of the Outlook error 0x8004210b :
- Corrupted Outlook Profile – It is likely that you are seeing the SMTP 0x8004210b error because of a corrupted Outlook email account. Once your Outlook profile’s files become corrupted, Outlook cannot establish a connection with the server. In such a case, re-adding the email account through the Mail window will resolve the issue. When you do this, Outlook is forced to create a new profile.
- Incomplete Outlook Installation – The error can appear if you failed to install the Outlook app properly or if you installed a corrupt version of the app.
- Corrupt Windows Registry – If you made any recent changes in your operating system prior to the error, it is possible that the changes have triggered the Windows registry to become corrupt. As a result, you are seeing the error.
- Your Email Is Stuck in the Outbox – Another possible scenario why you are seeing the Outlook error 0x8004210b is when the operation timed out because of a large or corrupted attachment. If this is applicable to your situation, the best fix is to set Outlook in offline mode and delete the email that is in your Outbox.
- Stuck Read Receipt – If you are using an older Outlook version, then this scenario may apply to you. You may see the error 0x8004210b because of a stuck Read Receipt. These receipts are generally invisible in Outlook, and there is no way to delete them manually. To fix this, you need an external tool to access your data and delete the stuck Read Receipt.
- Third-Party Tools – An overprotective antivirus program can also block Outlook from communicating with the email server. To ensure this doesn’t happen, uninstall the third-party antivirus suite and find a less intrusive option.
It’s relieving to know that the error 0x8004210b can be resolved easily by following simple steps to repair and restore important folders and files that are part of Microsoft Outlook. In fact, not only advanced users can fix problems related to the error code 0x8004210b as it requires little effort.
How to Resolve the Microsoft Outlook Error 0x8004210b
Below is a compilation of troubleshooting methods that can resolve the error 0x8004210b in Outlook. Many affected users found success in using these methods, so you may try them in any order.
And if you wish to prevent more complicated issues along the way, we suggest that you stick to the order of solutions we sorted them in. Here you go!
Fix #1: Check Your Internet Connection
The first step you should take is to check your internet connection. If you’re using a Wi-Fi connection, turn off your Wi-Fi and see if it’s better. If you’re connected via Ethernet cable, check and make sure it’s plugged in properly.
Also, make sure that other devices are connected to the internet and working (for example, a tablet or a smartphone). If they don’t work either, contact your ISP and ask for help; often they can fix connection issues right away through remote access tools.
Lastly, try restarting your router. Check if all cables are connected tightly and all ports are closed.
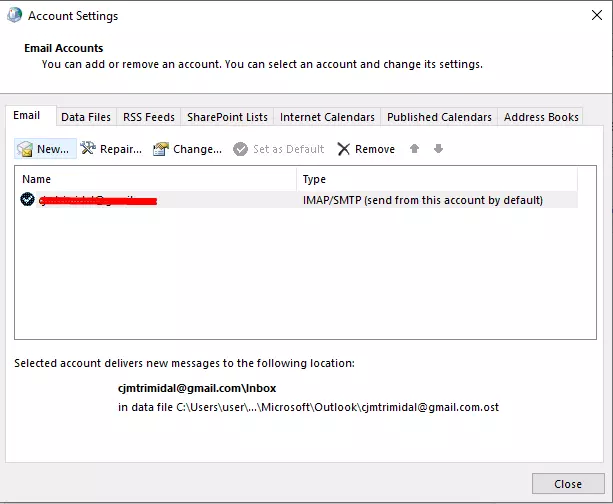
Fix #2: Re-add Your Outlook Email Account
If you are an Office 365 user and you have had a similar issue with email not working in Microsoft Outlook, then try re-adding your email account.
Log into your Office 365 account using a web browser, and click on your app in the top left corner of your screen. Clicking on your app will open a drop-down menu that allows you to choose any of your installed Office 365 apps, so select Microsoft Outlook. From here scroll down until you see Email Settings, select it by clicking or tapping and then follow these steps:
- Select Add Account.
- Select Exchange ActiveSync.
- Enter your email address.
- Enter your password.
- Select Next and choose how often you want Outlook to check for new messages.
- Click Finish.
- Once finished, close all windows and launch Microsoft Outlook.
- In order for emails to start syncing back into your inbox, close out of all windows 10 times (this is necessary because, sometimes, when setting up a new email account in Outlook, there can be issues that need time to resolve themselves).
- Restart Outlook once done.
Fix #3: Re-create the Email Account via Control Panel
A corrupted Outlook email account can also trigger the error to show. This can be fixed by recreating the corrupted account via Control Panel. Here’s how:
- Press the Windows + R keys simultaneously to launch the Run applet. Input control and hit Enter to access the Control Panel window.
- Once the Control Panel window opens, search for mail using the search feature.
- Click on the most relevant result in the list.
- Go to the Accounts Settings section and navigate to the Email tab.
- Choose New.
- Here, find the Add Account section and add your name, email address, and password. Hit Next to proceed with adding the account.
- Wait until the process is complete. Depending on the email client that you are using, you may be asked to set up your account manually.
- Once this new account has been properly configured, go back to Account Settings and select Email. Now, delete the old account by selecting it and choosing Remove.
- Then, select the newly created email account and choose Set as Default.
Fix #4: Delete the Stuck Email
For those using a new Outlook version, the most common cause of the error 0x8004210b is a stuck email that contains a large or corrupted attachment. It will usually throw the error message “The operation timed out waiting for a response from the sending (SMTP/POP3) server.”
In this situation, the best fix is to switch Outlook to Work Offline mode to remove the email that is stuck in your Outbox. Here’s a quick guide on how to delete a stuck email in your Outlook account:
- Open MS Outlook and go to the Send/Receive tab.
- Scan the sub-options and select Work Offline. This will disconnect your Outlook app from the internet.
- Next, go to the email message you are having problems with. Right-click on it and select Delete to remove it from your email client.
- Then restart Outlook and disable the Work Mode.
- You can now re-send the email and see if the issue is gone.
Fix #5: Delete the Stuck Read Receipt
Another culprit behind the error 0x8004210b is a stuck read receipt. But since these receipts are invisible in Outlook, it can be challenging to delete them.
However, some Windows users claimed that they were able to fix the problem by using a Microsoft support tool called MFCMAPI. This tool was initially designed to provide low-level support for developers, granting them access to Outlook data stores. But eventually, many discovered that it can be a handy tool for other users looking for advanced troubleshooting methods.
To use the MFCMAPI tool to delete the stuck read receipt, follow these steps:
- Go to this GitHub link: https://github.com/stephenegriffin/mfcmapi/releases. Find and download the most recent MFCMAPI version that is compatible with your device.
- Once the download is complete, use an extraction tool like WinRar or WinZip to extract the EXE file.
- Double-click on the EXE file to launch the MFCMAPI application.
- At this point, the app should open. Go to Session and select Logon.
- Next, click on the Outlook profile you want to modify and hit OK.
- Then double-click on the database with a Default Store value of True.
- You will now be taken to the Root Mailbox. Here, right-click on the top-most folder and select the Open contents table.
- Find the item with a subject prefixed with Read.
- Choose Read Instance and click Actions.
- Hit Submit then Abort Submit.
- After this, ensure that the same entry is still highlighted. Then choose Actions and hit Delete Message.
- Now, choose the Permanent delete passing DELETE_HARD_DELETE option and hit OK to save your changes.
- Close all active windows and restart your computer.
- Re-launch Outlook and see if the 0x8004210b error has been resolved.
Fix #6: Uninstall Your Third-Party Antivirus
According to some users, the error 0x8004210b in Outlook can also be caused by an overprotective antivirus suite that is blocking Outlook from establishing a connection with the email server. Among the most notorious antivirus suites that cause this error are McAfee and Kaspersky.
To resolve the 0x8004210b error in Outlook, try to uninstall your third-party antivirus and make sure no remnant files are left. For a detailed guide on how to do this, see the steps below:
- Launch the Run applet by using the Windows + R shortcut keys.
- Once the applet opens, input appwiz.cpl and hit Enter. This will open the Programs and Features menu of the Control Panel.
- Then scroll down the list and find the antivirus suite you want to uninstall.
- Right-click on it and click the Uninstall button from the context menu.
- After that, check if the error 0x8004210b is gone.
Don’t worry if you have uninstalled your antivirus. You still have the built-in antivirus suite of Microsoft: Windows Defender. It does a great job at keeping threats and viruses at bay.
Fix #7: Install Any Pending Windows Update
Is your Windows version outdated? It may be causing the error message to show. Make sure that Windows is up to date to prevent problems like this.
Here’s how to install any pending Windows update:
- Go to the Windows Start menu and select Update and Security.
- Select Windows Update.
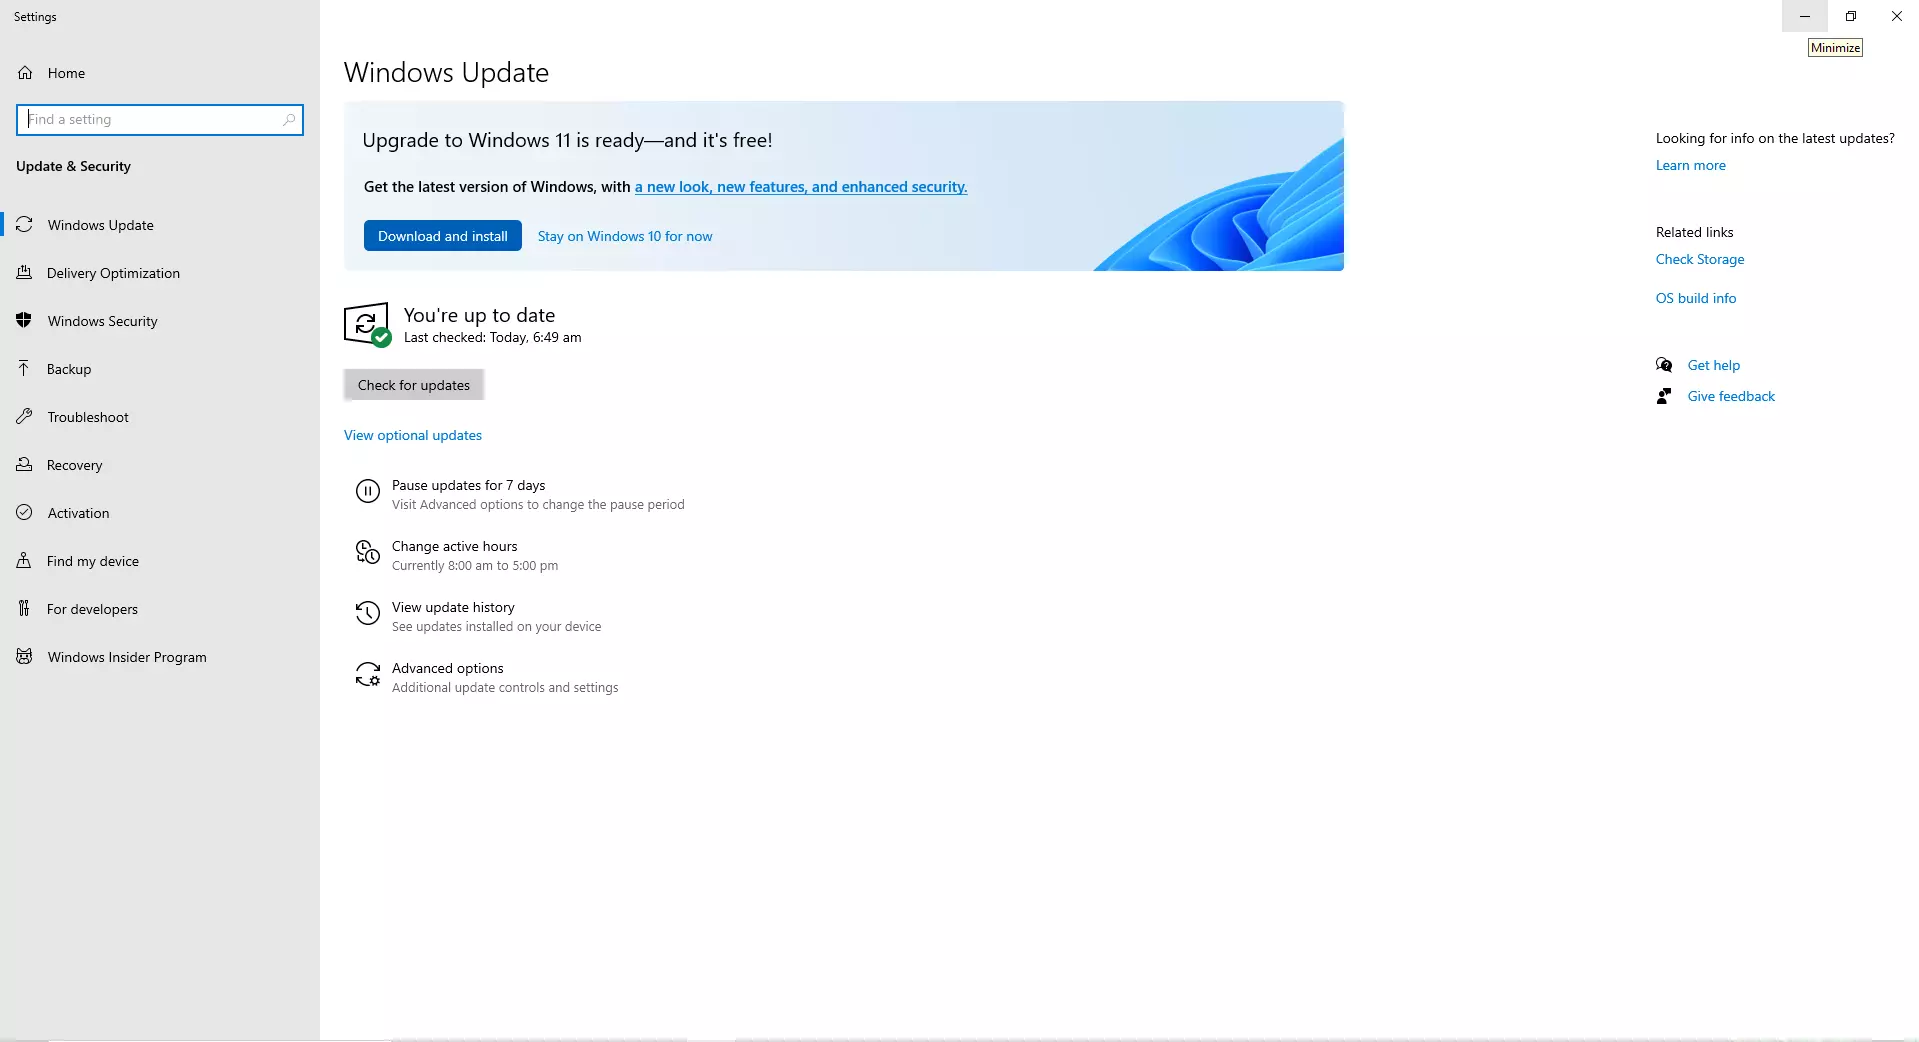
- Windows will now check for any available updates. If an update is pending, it will be automatically installed.
Fix #8: Remove Junk and Unnecessary Files
Junk and unwanted files will only consume a huge chunk of your disk space, and you don’t want that to happen as they will only consume resources that could have been allocated for more essential processes. So, free up significant disk space with a PC repair tool.
With a PC repair tool, you don’t need to delete files manually. The tool will do everything for you so you don’t have to!
Wrapping Up
You don’t have to be a code-wizard – or any kind of expert – to understand why or how the 0x8004210b error code occurs. Even if you’re not particularly technical, you can still fix the issue by looking at our guide. By having some background information about this issue and what could possibly cause it, you’ll have all you need to come up with a remedy for the problem.
Let us know what fix worked for you. Comment below!