Users report issues updating PCs, encountering Error Code 0x80040154, which blocks updates. This can arise when update components malfunction or third-party apps interfere with the process.
Other users encounter the error when attempting to launch specific Windows apps on their computers, such as Mail, Outlook, Calendar, Cortana, MS Edge browser, and others. In some cases, people are unable to launch Microsoft Store at all.
Regardless of the scenario, we’ll show you how to resolve the error code in this article, so just keep reading.
What Is the Error 0x80040154 All About?
The Error Code 0x80040154 is generated by the Windows system when a computer user attempts to register and run 32-bit Windows applications (with DLL files) from a 64-bit version.
Expert Tip: For smoother PC performance, consider using a PC optimization tool. It handles junk files, incorrect settings, and harmful apps. Make sure it's right for your system, and always check the EULA and Privacy Policy.
Special offer. About Outbyte, uninstall instructions, EULA, Privacy Policy.
Some Windows 10/11 users have recently reported bug reports regarding the Mail app. When this application is unable to receive or send email messages, the Error 0x80040154 may occur.
Many users have encountered this issue while using the Mail app. However, it may also appear on your computer screen at any time while using other applications such as Windows Hello, Skype, Calendar, and other Windows programs. Third-party antivirus software installed on your computer may also occasionally conflict with Microsoft Security Essentials and trigger this error.
Since this issue involves various apps, the error warnings are also different each time. Here are some of the error messages you might encounter along with this problem:
- Something went wrong…
We’re sorry, but we weren’t able to do that.
Error code: 0x80040154
- Runtime.InteropServices.COMException (0x80040154): Class not registered (Exception from HRESULT: 0x80040154 (REGDB_E_CLASSNOTREG))
- Error Code 3: 0x80040154 – An error occurred while checking for the update. Update Check Failed To Start Error Code 3: 0x80040154 — System Level Is Still Not Solved.
- Failed to create the VirtualBoxClient COM object.
The application will now terminate.
Callee RC: REGDB_E_CLASSNOTREG (0x80040154)
In this guide, we will look at the Microsoft Store Error Code 0x80040154, the causes of its occurrence, and the possible solutions to this problem. Normally, when this bug occurs, you are unable to install or upgrade Microsoft and its apps.
What Causes the Error 0x80040154?
The Error Code 0x80040154 is frequently caused by incorrectly configured system settings or irregularities in the Windows registry. It’s also possible that some incompatible software is causing the problem.
In addition, the system could be following an invalid input command path, or there could be damaged and/or corrupted DLL files. Error 0x80040154 can occur when some COM items are not correctly registered or when there are issues with Windows ActiveX, so it is critical to know and see which DLL files are used by the programs on the PC.
Other common causes include incorrect user input, missing files that were inadvertently deleted from the registry, and system failures. Keeping track of when and where your error occurred is an important piece of information for troubleshooting.
Make sure to run a PC Repair Tool like Outbyte PC Repair to get rid of bugs and junk files that might be causing this error. Plus, it optimizes your system and makes troubleshooting a lot easier.
General Fixes for the 0x80040154 Error
If you receive the Error Code 0x80040154 when launching Windows Store or downloading apps from it, try the workarounds listed below.
Method 1: Run the Windows Store Troubleshooter.
Troubleshooting Microsoft Store is the best way to resolve any issues that arise when you open it or download apps from it. The entire procedure is very simple and easy. Here’s how to troubleshoot the Error Code 0x80040154 on your computer –
- To open the Settings app, press Win + I.
- Select Update & Security > Troubleshoot from the menu.
- Navigate to the right and select the link – Additional troubleshooters.
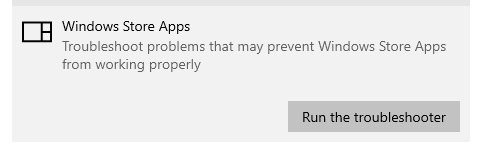
- Scroll down to Windows Store Apps on the following screen (you may find it at the bottom end).
- Tap once on Windows Store Apps and then press the button – Run the troubleshooter.
- If you follow the instructions in the troubleshooter window, the problem will be resolved automatically.
If it does not resolve the problem, you will be given a set of instructions to follow in order to resolve it.
Method 2: Reset the Windows Store Cache
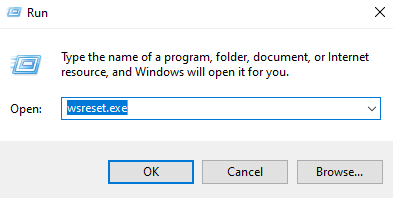
If troubleshooting fails, the Error 0x80040154 could be caused by a cached file within the Store app. Microsoft’s wsreset tool is a useful tool for restoring Windows Store to its default state. Run this command-line program and see if it helps you solve your problem.
- Launch Command Prompt with administrator privileges.
- Enter “wsreset.exe” (no quotes) into the search box.
Note: This code will be executed next and will clear all cache associated with your Microsoft Store.
- Close all open windows and restart your computer.
- Sign back into your PC and see if it helped to resolve the root cause.
Method 3: Clear the Contents of the DataStore Folder
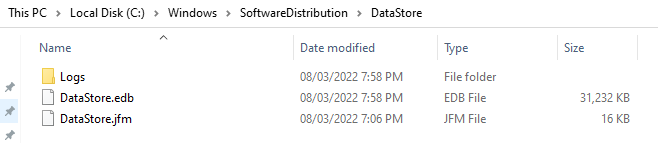
On Windows 10/11, the DataStore folder stores temporary and log files related to current and past system updates.
Stop the Windows Update service by opening Windows Services Manager. Then, proceed as follows:
- Using the Win+E hotkey, launch File Explorer.
- In the address bar, paste the following command:
%windir%\SoftwareDistribution\DataStore
- To open the DataStore folder, press Enter.
- Select all of the files and folders in the DataStore folder.
- Delete all of them.
- Now, using Windows Services Manager, restart the Windows Update service and check if the problem has gone away.
Method 4: Repair the Microsoft Store App
If you are still unable to install or update apps from the Microsoft Store, the issue could be with the Store app itself. Microsoft does not provide a way to uninstall its store app by default. However, you can do so legally using Windows PowerShell. Here’s how to complete this task –
- To access the Power Menu, press Winkey + X. Next, select Windows PowerShell (Admin).
- When the UAC prompts you, click Yes to allow PowerShell to run as administrator.
- Copy/paste the following codes and run them separately –
- Get-AppxPackage *windowsstore* | Remove-AppxPackage
- Get-AppXPackage *WindowsStore* -AllUsers | Foreach {Add-AppxPackage -DisableDevelopmentMode -Register “$($_.InstallLocation)\AppXManifest.xml”}
That’s all there is to it; the Windows Store App has been reset to its default settings.
How to Fix the Windows Update Error 0x80040154
If you’re getting the Error 0x80040154 when installing updates on your computer, these additional steps should be part of your troubleshooting process:
Method 1: Run the Windows Update Troubleshooter
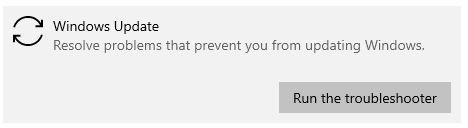
When you encounter the error code in question, the first thing you should do is launch the Windows update troubleshooter. As it turns out, Windows includes a slew of built-in tools for troubleshooting various issues that you may encounter. One of these troubleshooters is dedicated to searching for issues with Windows updates.
As a result, you can run the update troubleshooter to see if it can detect and resolve the problem. To accomplish this, follow the steps outlined below:
To begin, launch the Windows Settings app by pressing the Windows key + I on your keyboard.
- Scroll down to the System tab and select the Troubleshoot option.
- Then, on the Troubleshoot screen, select Other troubleshooters.
- There will be a list of the various troubleshooters available to you.
- Locate Windows Update and press the Run button.
Wait for the troubleshooter to complete the work before checking to see if the problem has been resolved.
Method 2: Reset all Windows Update Components
As it turns out, Windows makes use of a number of services in order to download and install Windows updates on your computer. If even one of these components responsible for updating your system is not functioning properly, the updates will not be installed. As a result, an error code will appear.
In such a case, you will need to reset the update components on your system. This will essentially restart the services. So, if any of them were not working properly before, they should now. To reset the update components, follow the instructions listed below:
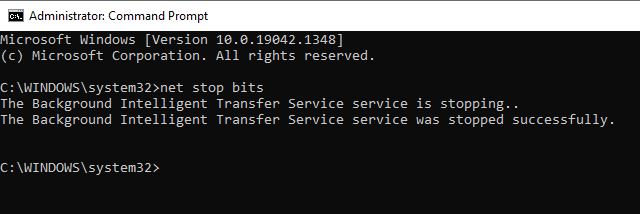
- To begin, open the Start Menu and type “cmd” (no quotes) into the search box. Right-click on the displayed result and select the Run as administrator option from the drop-down menu.
- The Command Prompt will be launched as an administrator.
- After that, enter the following commands one at a time:
- net stop bits
- net stop wuauserv
- net stop appidsvc
- net stop cryptsvc
Note: These commands will quit all Windows Update services.
- Following that, you must delete all qmgr*.dat files created by the BITS service. In the command prompt window, type the following command:
Del “%ALLUSERSPROFILE%\Application Data\Microsoft\Network\Downloader\*.*”
- On the next prompt, type Y and then press Enter.
- After you’ve done that, we’ll rename some of the folders where the downloaded updates are stored. Enter the following commands one by one to accomplish this:
- Ren C:\Windows\SoftwareDistribution SoftwareDistribution.old
- Ren C:\Windows\System32\catroot2 Catroot2.old
- Finally, after all of that, it is time to restart all of the services. To do so, enter the following commands one at a time:
- net start wuauserv
- net start cryptSvc
- net start bits
- net start msiserver
- Once the services are restored, try updating your system again to see if the problem persists.
Method 3: Clear the BITS Queue
Remove any current jobs from the BITS queue. To do so, open an elevated CMD and enter the following command:
bitsadmin.exe /reset /allusers
Method 4: Download the Stand-Alone Installer
Search for the Windows Update patch using the Update KB number on the Microsoft Update Catalog website, and then download the stand-alone installer. Manually apply the patch now. Don’t include KB in your search; just the number.
How to Fix Error Code 3: 0x80040154 on Chrome
If you attempted to update Google Chrome on your PC and received the following error: An error occurred while checking for updates. Error code 3: 0x80040154 – system level: update check failed to start, simply try these methods one at a time.
Method 1: Restart Google Chrome and Your PC
When a Chrome update fails and throws out the Error Code 3 0x80040154, restarting is the simplest way to troubleshoot. To do this:
- Click on the three vertical dots in the upper right corner.
- This time, select Exit from the drop-down menu.
- Your Google Chrome browser should immediately close. You can now go back and relaunch it.
- You can also close Google Chrome by directly clicking on the X button in the upper right corner.
If it doesn’t work, press the power button on your computer and select Restart.
Method 2: Enable Google Update Services
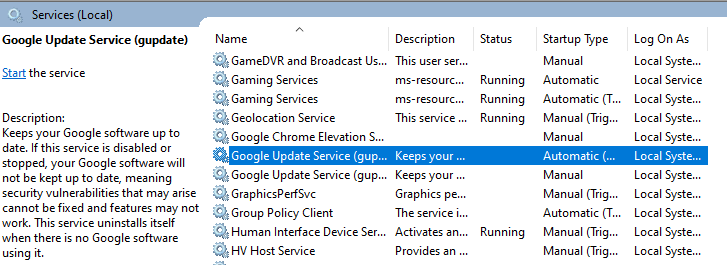
- To access the Win + X menu, right-click on the Windows button.
- Select Run from the menu.
- Enter the command “services.msc” (no quotes).
- Locate and double-click the Google Update Service (gupdate).
- Choose between Automatic or Automatic (Delayed Start) in the Startup type.
- At the bottom, click Apply and OK.
- Locate and double-click the Google Update Service (gupdatem).
- Choose Manual as the Startup type.
- At the bottom, click Apply and OK.
- Restart your computer and attempt to update Chrome once more.
Method 3: Enable Chrome Update in Windows Registry
- To enter Regedit, open the Run dialog box and type regedit. Then press the Enter key.
- Expand HKEY LOCAL MACHINE> SOFTWARE > POLICIES > Google.
- From the left pane, choose Update.
- Right-click Updatedefault in the right pane and select Modify.
- Set the Value data to 1 and press the OK button.
- Go to HKEY_LOCAL_MACHINE\SOFTWARE\Wow6432Node\Google\Update.
- Change the Value data to 1 by double-clicking on Updatedefault.
- Restart your computer after closing Registry Editor. Then, try updating Chrome again.
How to Fix the HResult 0x80040154 Error
The class not registered (0x80040154) error is a VirtualBox issue that happens when the user tries to update or reinstall the VirtualBox app. Here are several ways to fix this issue:
Method 1: Run VirtualBox in Compatibility Mode
- Navigate to your Start Menu or wherever you installed VirtualBox.
- In there, look for the Oracle VirtualBox application.
- Right-click on it and select Properties.
- Under the Compatibility tab, there is a checkbox option to run the program in compatibility mode.
- Check that box if it isn’t already checked, and you’ll be given options for which Windows version to make it compatible with.
- Choose one by one, from the most recent (Windows 10/11) to the oldest, and you will most likely find that the VirtualBox you are using is compatible with Windows 7 or Vista.
- Apply and save your changes, then launch VirtualBox.
Method 2: Update VirtualBox
Install the new release from VirtualBox, which you can download here. Make sure to install all pending Windows updates as well.
Method 3: Re-Register the VirtualBox Components
Run Command Prompt with admin privileges and change the current directory ‘cd’ to the directory where VirtualBox is installed (usually “C:/Program Files/Oracle/VirtualBox”). Then, run the following commands:
- exe /ReRegServer
- exe VBoxC.dll
You might also need to reinstall the VirtualBox driver if it is stuck or not responding. To do this, use the sc start vboxdrv command in Command Prompt. If it fails, look for C:\Program Files\Oracle\VirtualBox\drivers\vboxdrv\VBoxDrv.inf, right-click on it and select Install.
Method 4: Reinstall VirtualBox
Uninstall the application and delete all folders associated with it. Make sure to delete the previous version of Virtualbox folder and the C:\Users\”user”\.VirtualBox folder. Next, download the latest version of VirtualBox and install it on your PC.
Summary
The 0x80040154 issue is a complicated Windows error since it involves different apps. We hope that this guide was able to shed more light on what the different types of 0x80040154 errors are and how to deal with them.