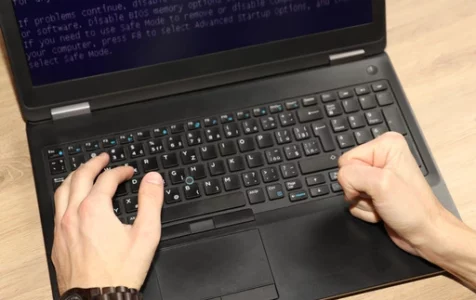
Blue Screens of Death (BSoD) on Windows computers can be very annoying because they are virtual omens of digital death or other critical errors. A Windows PC can display over hundreds of BSoDs, and no one can predict when they will appear on your screen.
It can be quite frustrating when it appears on your computer on a regular basis. In this article, we will be discussing what the error PAGE_FAULT_IN_NONPAGED_AREA is and how to prevent it from appearing on your computer.
Windows 10/11 PAGE_FAULT_IN_NONPAGED_AREA is a blue screen error that occurs when Windows attempts to locate a critical piece of data in the system’s memory but is unable to locate it; as a result, it reboots your computer to protect it from further damage. The data it’s looking for is now stored in a page file, which can be either in your system’s RAM or on the hard disk space used by your system as RAM (called page file). In this guide, we will go over both options.
Typically, this error is attributed to a problem with your RAM’s connection to the motherboard or with the RAM itself, but there are other methods to try before we open up your system. This error has also been linked to antivirus software.
Expert Tip: For smoother PC performance, consider using a PC optimization tool. It handles junk files, incorrect settings, and harmful apps. Make sure it's right for your system, and always check the EULA and Privacy Policy.
Special offer. About Outbyte, uninstall instructions, EULA, Privacy Policy.
When Windows 10/11 error PAGE_FAULT_IN_NONPAGED_AREA occurs, the PC will inevitably stop and the background screen will turn blue. Sometimes the error disappears on its own, but then reappears on a regular basis, causing serious problems with your computer. So, if this BSoD is bugging you and you’re looking for an effective PAGE_FAULT_IN_NONPAGED_AREA Windows 10/11 fix, you’ve come to the right page.
What Is the Windows Stop Code PAGE_FAULT_IN_NONPAGED_AREA?
The NONPAGED area of RAM memory is where your computer’s Windows Operating System (OS) is stored. CPU memory components are frequently exchanged between RAM and the page file. When Windows is unable to detect this data through RAM, the PAGE_FAULT_IN_NONPAGED_AREA Blue Screen of Death errors occur.
When you see a blue screen with the stop code PAGE_FAULT_IN_NONPAGED_AREA Invalid memory reference written on it, it means your system is under a lot of stress and an invalid system memory has been used as a reference. This could also indicate a faulty memory address.
The system requests data from your Random Access Memory (RAM). If the OS is unable to detect this data, a fault is generated. This error is a trigger for the system to look for data in the RAM’s paging file.
If this data cannot be found, an error message is displayed indicating that the missing information is available in a section of RAM that could not be paged out to the hard disk. This information may or may not be recoverable.
The steps that follow are not for recovering this data, but for avoiding this error in the future. If the PAGE_FAULT_IN_NONPAGED_AREA error appears once on your computer, it can occur again.
Factors That Trigger Stop Code PAGE_FAULT_IN_NONPAGED_AREA
The PAGE_FAULT_IN_NONPAGED_AREA error can occur on your computer spontaneously. These are some of following possible causes of this BSoD on your Windows 10/11 computer.
- Windows is unable to detect data that should exist in the nonpaged area.
- Antiviruses preventing the operating system from detecting data in the nonpaged area.
- An incorrect Windows service running on the PC.
- In the system, incorrect driver codes can be detected.
- Corrupt or faulty hardware components, particularly faulty RAM, can cause the requested data to be lost.
- Corrupted NTFS volume in the system.
- The memory address directs the request to previously freed memory.
Troubleshooting Windows 10/11 Blue Screen PAGE_FAULT_IN_NONPAGED_AREA
If you’re wondering how to fix PAGE_FAULT_IN_NONPAGED_AREA on Windows 10/11, the first thing you should try is to reboot your computer and pray that it goes away. If you can’t boot normally or you’re stuck in a boot loop, you can boot into Safe Mode by interrupting the startup three times. Now, you can proceed with the solutions below:
Fix #1: Create a new page file.
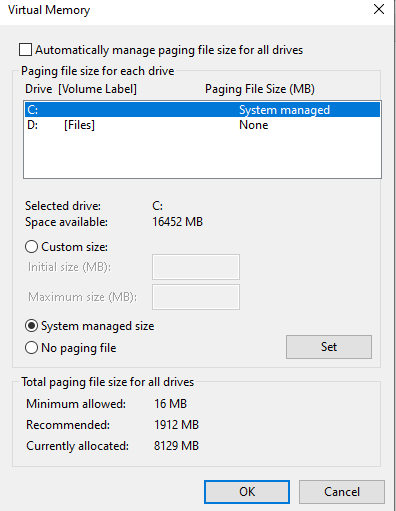
Windows uses disk space on your hard disk to speed up your system. It creates a page file for this purpose, which it refers to for quick access to your frequently used programs. Disabling the page file may assist in resolving the problem. To do so, follow these steps:
- Hold down the Windows key and press R.
- In the run dialog, type SystemPropertiesAdvanced.exe and press Enter to launch it.
- In System Properties, go to the Advanced tab, then navigate to Performance > Settings.
- In the new dialog that appears, select Advanced and uncheck the box beside Automatically manage paging file size for all drives.
- Choose No paging file.
- Hit Set and confirm any warning messages that pop up.
- To close all windows, click OK three times and restart your computer.
- After restarting, return to the Virtual Memory window and choose System managed size instead.
- Press Set.
- At the top, tick off the Automatically manage paging file size for all drives checkbox.
- Close all windows and restart your system.
Any corrupt chunks in the page file should now be removed completely. If the BSoD persists, proceed to the next solution.
Fix #2: Check your RAM.
The CPU memory, or RAM, is the most important factor in this problem. It is critical to ensure that the RAM is secure within the CPU cabinet. Because the RAM sticks protrude from the motherboard, they are vulnerable to damage. A broken memory stick cannot be detected by your operating system, let alone used to request data from.
If the RAM is loose, push it in and ensure that it is securely locked in place. If the RAM is damaged, you must replace it and reinstall it on your motherboard. The RAM must be compatible with the motherboard’s slot. If your motherboard supports DDR5 RAM, we recommend installing it.
Here are some other tips:
- If you have two RAM sticks, try swapping the slots.
- Remove any dust that has accumulated if you are using a single RAM chip.
- If you have any extra RAM modules lying around, try replacing the RAM and rebooting the computer. If the error does not appear, the RAM is defective.
- Try only using one RAM slot.
Fix #3: Perform a chkdsk.
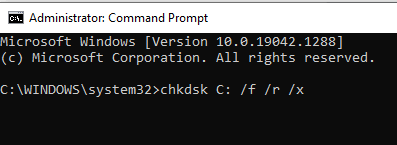
Chkdsk is a disk checking utility in Windows that is used to search for and repair file system errors. This step is particularly useful for the PAGE_FAULT_IN_NONPAGED_AREA NTFS SYS error.
Here’s how to perform the scan:
- Run the Command Prompt tool with administrative privileges. To make significant changes to your computer, you must be an administrator.
- Enter the CHKDSK script line and press the Enter key to run it: chkdsk f/ r/ x/
When you run this command, it will detect problems and, if prompted by a parameter, fix them on your computer. It will take some time for this process to scan all of the files and repair disk errors.
After running a chkdsk, scan your system with a reliable PC Repair Tool like Outbyte PC Repair to make sure that your system is optimized.
Fix #4: Resolve system file corruption.
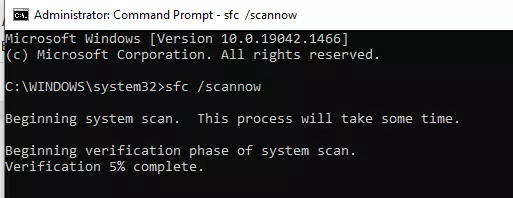
If the chkdsk did not find any problems with your disk, your next is to check for corrupted files that might be causing the Windows error PAGE_FAULT_IN_NONPAGED_AREA. The Check Disk scan is used to test a specific hard drive partition, repair corrupted system files, and identify corruption. SFC scans all system files for corrupt ones and replaces them with a newer file so that the system’s operation is not disrupted.
These are the steps to run SFC:
- Type cmd into the Start menu search bar and then right-click on Command Prompt > Run as administrator.
- Enter SFC /scannow into the console and press Enter.
- Allow Windows to scan and repair the errors.
- Start your computer again.
Fix #5: Disable Third-Party Software.
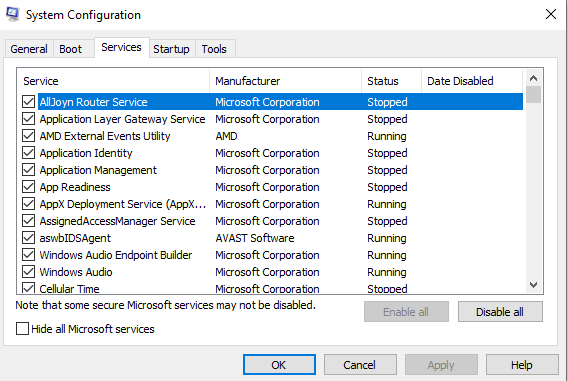
Third-party software frequently interferes with system functionality and can result in blue screen errors such as PAGE_FAULT_IN_NONPAGED_AREA. Users should perform a clean boot, in this case, to rule out third-party applications as the source of the error.
- Open the Run command console by pressing Windows Key + R.
- Enter the command msconfig.
- Navigate to the Service tab in the System Configuration window.
- At the bottom, select the Hide all Microsoft services option.
- Select all services from the list in the center and press the Disable all button.
- Save and exit.
- Now launch Task Manager. This can be accomplished by pressing CTRL + Shift + ESC.
- Click on each program under the Startup tab, then click Disable.
- Exit the program and restart your computer.
If the error is fixed, it means that the problem was caused by a third-party application. To prevent this from happening in the future, uninstall any recently installed applications.
Fix #6: Update or roll back device drivers.
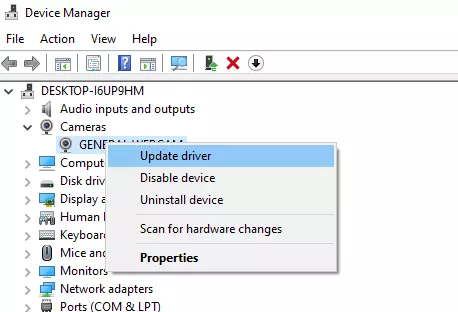
Driver errors can wreak havoc on your computer. That is why it is critical to keep your drivers up to date. These updates can be unstable at times, wreaking havoc on your computer. In such cases, it is preferable to revert to a previous version.
The Device Manager is by far the most efficient method of keeping your system drivers up to date.
In the case of a Page Fault in Nonpaged Area BSOD, the graphics or chipset drivers are usually to blame. The graphics drivers are found in the Device Manager under Display adapters, and the chipset drivers are found under System devices.
Here’s how to keep your drivers updated via Device Manager:
- Open the Run command console by pressing Windows Key + R.
- Enter the command devmgmt.msc.
- Look for the drivers you want to update in the Device Manager window and expand the menu.
- Then right-click and select Update Driver option.
- In the next window, select Automatically search for updated driver software.
- Windows will download and install the most recent drivers for you.
In some cases, new drivers may be unstable. Using the Device Manager, you can undo recent updates as follows:
- Open the Run command console by pressing Windows Key + R.
- Enter the command devmgmt.msc.
- Look for the drivers you want to update in the Device Manager window and expand the menu.
- Then right-click and select Properties option.
- Click Roll back driver in the Driver tab.
Fix #7: Run the Windows Memory Diagnostics tool.
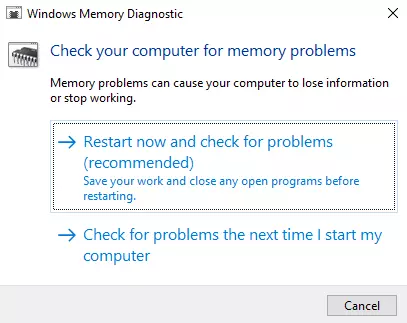
RAM is the primary component used for paging. Such errors can also be caused by a faulty RAM. Hold down the Windows key and press the R key at the same time. Enter mdsched.exe into the run dialog box. A dialog box will appear asking you whether you want to reboot and check your RAM now or later. Choose the option that best fits your needs.
When you reboot, the RAM check will begin. If there are no errors, your RAM is in good condition. If there are errors, try common methods for inspecting RAM. If you don’t get the error with one RAM, the other RAM is definitely faulty. If the results are consistent across all conditions, the issue may be with the motherboard itself. It is best to send the laptop/desktop to a service center or other repair location for hardware repair and diagnostics.
Fix #8: Run System Restore.
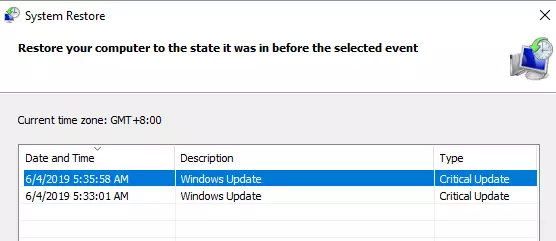
Attempt to restore your computer to a previous stable state. You can always start using this feature if you’ve never used it before. This tool has proven to be a very dependable fix whenever you are troubleshooting various system issues.
To do a System Restore, follow this guide:
- Open the Run command console by pressing Windows Key + R.
- Enter the command rstrui.exe.
- The default option is Recommended Restore.
- However, what you need to look at is the date/time of the restore point when the system was working properly; this can be a month or days old; to view more restore points, check the box next to Show More Restore Points. If no restore points are available skip this solution.
- Next, select Finish.
- Then, to complete your system restore, follow the on-screen instructions.
Conclusion
The Windows 10/11 PAGE_FAULT_IN_NONPAGED_AREA can be harmful to your computer and can cause more complicated errors. We hope that these steps helped you to resolve the PAGE_FAULT_IN_NONPAGED_AREA Windows 10/11 error on your device and you are now able to use your computer without any further issues.
