
If you are getting an error 0x8000000a on your Windows 10/11 device, this blog post will show you how to fix the problem. However, to know what fix works for your case, it’s important to understand what error code 0x8000000a is and why it may appear. So, read on.
Error code 0x8000000a can be caused by a number of issues, such as missing system files or corrupted registry keys. The key thing to keep in mind with error code 0x8000000a is that there should not be any data loss from fixing the problem. With that said, let’s begin with the basics.
What Is Error Code 0x8000000a on Windows 10/11?
Windows 10/11 is one of the most popular operating systems in the world, and it has been around for a few years now. With that said, there are bound to be some issues as time goes on. One of these issues may be error code 0x8000000a which may appear at random times.
So, what causes error code 0x8000000a on Windows 10/11?
Expert Tip: For smoother PC performance, consider using a PC optimization tool. It handles junk files, incorrect settings, and harmful apps. Make sure it's right for your system, and always check the EULA and Privacy Policy.
Special offer. About Outbyte, uninstall instructions, EULA, Privacy Policy.
If you are seeing this error on your device, then it only means one thing: something is wrong with your system. Generally, it is triggered by an incorrect or failed installation of a program, software, or operating system that has caused invalid entries in your system.
But there are cases when this error is a result of a power failure or the accidental deletion of a system file or a registry entry.
Ways to Fix Error Code 0x8000000a on Windows 10/11
To resolve this error, you can always try manually editing or modifying your system elements. But that can be quite risky, especially if you are not an expert. Manipulating important Windows elements carry a risk of rendering the OS unbootable or cause more serious damage that is beyond repair.
However, should you insist on resolving the issue on your own, make sure you carefully follow the steps in each fix.
Basic Troubleshooting: Perform a Quick Restart
This is the first step that you should be taking. Restart your machine first to close all active applications and programs. Once your system boots up again, there will be no to minimal applications that will be sharing with your resources.
You can actually end unnecessary tasks via the Task Manager. However, it can be time-consuming, not to mention, risky, because one wrong move and your computer may suffer more damages.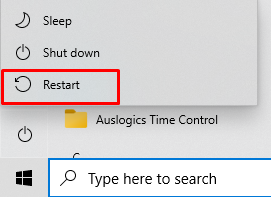
A restart is way quicker and more efficient. And all you have to do is press the Windows key, click the Power menu, select the Restart option, and wait for the reboot process to complete. It’s that easy!
Fix #1: Uninstall Any Security Program
Windows 10/11 may be one of the most popular operating systems on the market today. A lot of people are going for it, but unfortunately, it also comes with vulnerabilities and security risks that other operating systems like macOS or Linux don’t have to deal with. That is why security programs exist.
Windows security programs have become the norm for everyday use. With so many options, it can be hard to decipher which is best for you. Usually, when choosing a security program, the first thing to consider is what type of computer you’re using. For example, if your computer runs on Windows 7 or earlier, then Microsoft Security Essentials might be your best bet as long as you don’t need any advanced features like parental controls, real-time protection (which blocks malware before installation), or automatic updates (which installs new virus definitions automatically).
If your computer uses Windows 8 or newer, Bitdefender 2016 would be an excellent option. Now, while these security programs play a vital role in securing your device, they sometimes trigger errors to appear. One is the error code 0x8000000a.
Assuming that a security program is causing the error on your device, uninstalling it will resolve the problem. Here’s how to uninstall your security program temporarily: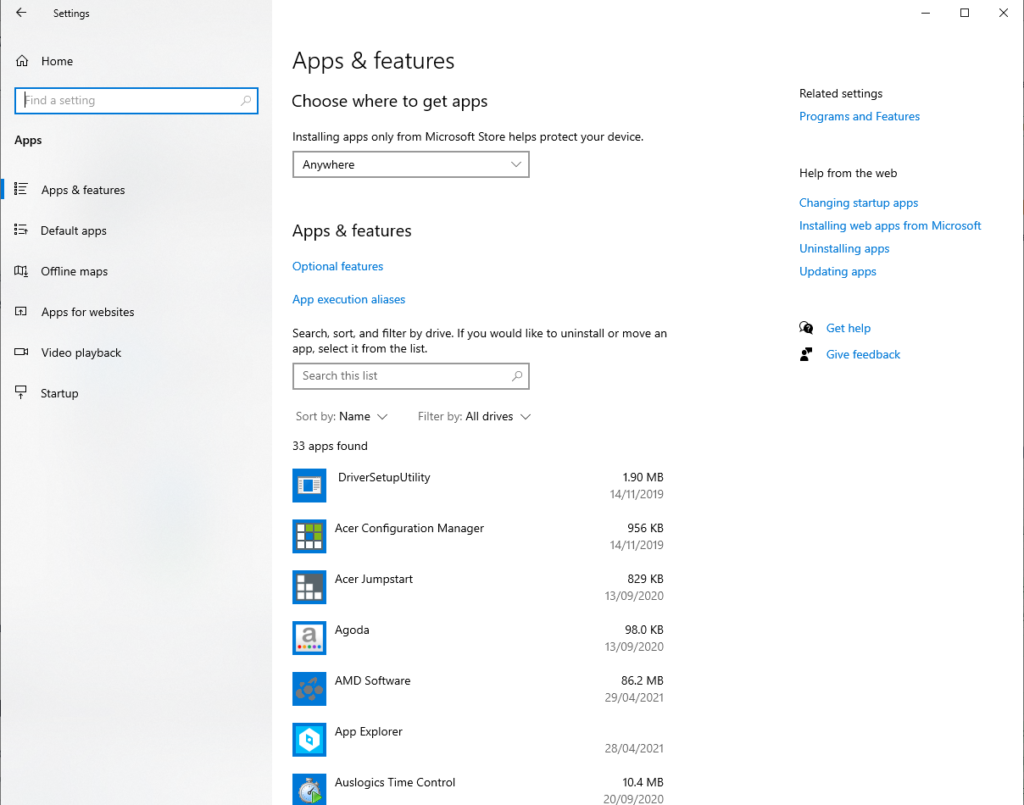
- Click the Start menu and go to Settings.
- Tap the System icon and go to Apps.
- Locate the security program you want to uninstall. Right-click on it and hit the Uninstall button.
- Follow the uninstallation wizard to complete the process.
Fix #2: Perform a Clean Boot
Another way to resolve the error code 0x8000000a is by performing a clean boot. A clean boot is a term that refers to the process of restarting your computer with only basic drivers and applications. This prevents any services or other software from starting up that might be slowing down the system, causing it to crash, or interfering with an installed application’s performance.
Clean booting makes it easier for you to identify what service or program is preventing your computer from running as expected and troubleshoot accordingly.
To perform a clean boot, simply follow the instructions below. Take note that the steps may seem complicated at first glance. But as long as you follow them step-by-step, there should be no problem.
- Log in to your computer using an administrator account.
- Into the search field, type msconfig and select System Configuration.
- And then, navigate to the Services tab.
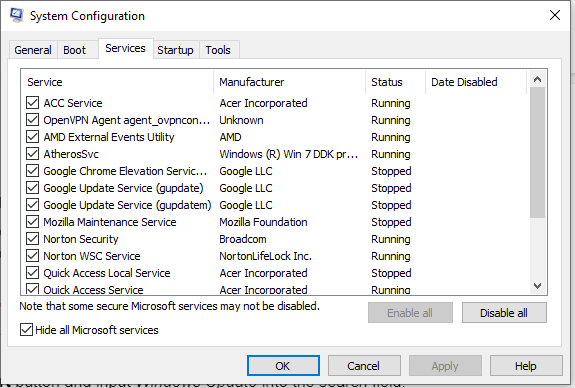
- Select the Hide All Microsoft Services option and choose Disable All.
- Now, go to the Startup tab and choose Open Task Manager.
- For each startup item, select it and click Disable.
- Exit the Task Manager.
- Now, go back to the System Configuration window and navigate to the Startup tab.
- Hit the OK button.
- The next time you restart your computer, it should be in a clean boot mode. In that mode, follow the troubleshooting steps to install or uninstall applications.
- Once you have identified the problem, restart your computer.
Fix #3: Disconnect Any External Peripheral
It is possible that your problem is associated with any PC-attached peripheral, such as your keyboard, webcam, or mouse. The good news is that fixing this problem is simple. You can click the Start button to launch the Hardware and Devices Troubleshooter. From there, select Troubleshooting. Your Windows device will then take care of resolving the problem on your behalf.
If your system cannot find what’s causing the problem, it is likely that there is a problem with the connection. The cables may be damaged or the USB port you are using may not be getting power. Try to disconnect the external peripherals and reconnect them again one at a time to find out what’s causing the problem.
Fix #4: Make Sure You Have Enough Free Space
Aside from regular PC maintenance, cleaning your computer’s hard drive is one of the most important tasks you can perform regularly to keep it running smoothly. Over time, as files are created and deleted, they become densely packed together on a disk surface with a limited amount of free space. This causes them to compete for that free space – which slows down access to all files on the disk.
Here’s how you should clean your hard drive: First, use Disk Cleanup in Windows 10/11 or 8 or 7; then delete temporary internet files from your browser; then delete unused programs and apps (including downloaded ones) in Programs and Features; finally, empty junk folders like Downloads folder and Recycle Bin.
You may also free up significant system space by uninstalling any unnecessary apps and programs. Get rid of any outdated app you are no longer using. Here’s how:
- Hit the Start button and select Apps.
- Go to Apps and Features.
- Sort the list of programs by size to know which of them are consuming a huge chunk of your system space.
- Delete the app by clicking the program and hitting Uninstall.
You may also use third-party PC repair tools that are designed to remove unwanted junk files on your behalf. The use of such tools is recommended because they’re safer and they can do the task for you in just a few clicks without having to worry about accidentally deleting important files.
After removing unnecessary programs and files, consider storing important files in the cloud. Not only will it free up space on your hard disk, but you will also be protected in the event that your drive fails. As long as you have access to a stable internet service, consider investing in a cloud storage service. It is without a doubt a trustworthy and lifesaving option.
Fix #5: Check If Your BIOS Is Up to Date
BIOS is a software program that runs when you start your computer. It’s responsible for making sure all the hardware in your PC works correctly and also sets up the running environment on your machine, including which programs load first.
BIOS stands for Basic Input Output System (BIOS) and it was originally created to make sure there were no compatibility issues between different pieces of hardware from various manufacturers.
These days, most PCs come with a more advanced operating system installed on them so they don’t need this type of protection anymore but it still has important functions like setting power management settings, configuring boot order, and ensuring that no errors arise while using your device.
To ensure your BIOS is up to date, do the following:
First, find your new BIOS version. Do this by typing msinfo into the search field and hitting OK. In the window that launches, you should see your BIOS version. It is usually under your processor speed. Take note of it and compare it to the latest version available. If it is outdated, then proceed to the next steps: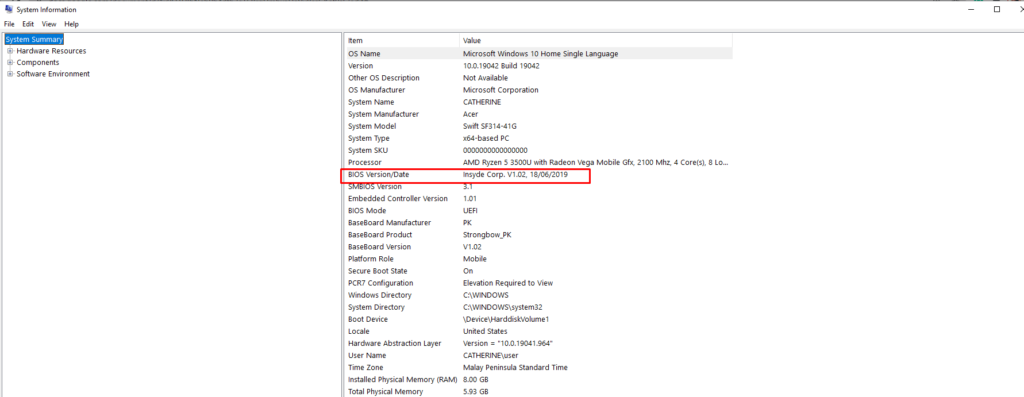
- Boot up your PC. You should see a text informing you what button to press to enter the UEFI BIOS mode. Press it.
- Next, go to the UEFI Control Panel.
- Find the latest BIOS Update version from your motherboard’s official website.
- Download and unzip the BIOS update file.
- Transfer the file onto an external drive.
- Reboot your computer into the UEFI control panel.
- Connect the external drive to your PC.
- Launch the firmware update tool.
- Back up your PC’s existing firmware.
- Use the same backup utility to run the new firmware image you just saved.
- Wait for the process to complete. It should take a couple of minutes. Be sure you don’t interrupt the process because it is critical.
- Once done, restart your computer.
Fix #6: Scan Your Disk for Bad Sectors
A malfunctioning hard disk can result in unproductivity and frustration. Also, it can lead to various error messages popping out at random. So, make sure you check your hard disk for bad sectors on a regular basis. This allows you to resolve issues before they can cause file corruption.
Here’s how to scan your hard disk:
- Press the Windows + E keys simultaneously.
- Right-click on the hard disk you want to scan and select Properties.
- Go to the Tools tab.
- Click the Check button to start the scan.
- Once the scan is complete, your computer will display a message indicating whether your hard disk has bad sectors.
- To perform a scan again, click the Scan Drive button or hit the Repair Drive button to repair the errors.
- If you want to see the details of the scan, hit the Show Details button.
Fix #7: Run the Chkdsk Command
The CHKDSK utility is a command-line tool that has been used to verify the integrity of files on Microsoft Windows since 1984. The name comes from the word “check disk.” It has been designed to scan for and correct hard drive errors, including data corruption caused by software problems or power interruptions. It can also be used with other utilities in order to perform various computer maintenance tasks such as updating file system drivers, checking for new hardware, and correcting system registry entries.
Although there are many third-party tools available that offer similar functionality, it is still important for tech enthusiasts to understand what this utility does as well as how it works.
To use this utility and hopefully resolve the error code 0x8000000a that you’re seeing, follow these steps:
Initial Check
Do this before running the CHKDSK command. This way, you will have an idea of whether or not to pursue the CHKDSK scan.
- Press the Windows + E keys simultaneously and select This PC.
- Right-click on the disk that you want to scan.
- Choose Properties.
- In the Properties window, go to the Tools tab and hit the Check button.
- If your system detects that everything is running smoothly, a window will show telling you that you need not scan your drive anymore.
Performing the Scan
Once you have confirmed the need to perform the CHKDSK scan, proceed with these steps:
- Click the Start button and select Run. Alternatively, you may press the Windows + R keys.
- Type cmd into the text field and hit OK.
- Right-click on the top-most result and choose Run as Administrator.
- Input the chkdsk command and hit Enter.
- Wait for the process to complete.
Fix #8: Update Windows
Windows is one of the most important software programs on your computer. It’s often necessary to update it in order to run newer software and have a more secure operating system.
Here are some steps you can take when updating Windows 10/11:
- First, make sure that your PC has at least 20GB of free space for the installation process. If it doesn’t, then back up any files or folders you want to keep before continuing. You should also create a backup plan in case something goes wrong during the installation process by saving copies of all your personal data like photos and videos onto an external hard drive or flash drive (or both).
- Next, start the download process from Microsoft’s website by clicking Get started under “Upgrade today”.
- Follow the on-screen prompts to complete the update installation process.
Another way to update Windows is by selecting the Start button and clicking Settings. And then, go to Update and Security and select Windows Update. Check if there is an available update by clicking the Check for Updates button. If an update is available, it should be automatically downloaded and installed.
Fix #9: Stop the Windows Update Service
The Windows update service is a critical part of Microsoft’s operating system that updates the software as needed. Updates are typically released for bugs, security flaws, and other issues found in programs and features. This ensures that your computer will be running at optimal performance levels without any unnecessary risk to its stability or safety.
In order to keep your computer safe from viruses or other malicious downloads and to keep your device free of error messages, it is important to make sure you have the latest version of the windows update service installed on your device so you can stay up-to-date with all of the newest fixes available for Microsoft products.
Unfortunately, there are times when this crucial service becomes the root of issues such as the error code 0x8000000a. So, to fix this, stop the service temporarily. You can do this by following these steps:
- Press the Windows + R keys.
- Type services.msc and hit OK.
- A new window should open displaying a list of all services that are running on your system.
- Find Windows Update.
- Right-click on it and select Stop.
- If the error is resolved, go back to the Windows Services window.
- Find the Windows Update service.
- Right-click on it, but this time, select Start.
Fix #10: Modify the Decimal Separator Configuration
Although this fix seems complicated, it’s actually not. Here’s how to change the decimal separator configuration on your Windows 10/11 device:
- Go to the Start menu and type control panel.
- Click on the most relevant search result.
- Select Region Settings.
- Navigate to the Formats tab and select Additional Settings.
- Hit the Reset button to restore the system settings to their defaults.
- Click OK.
Fix #11: Run the System File Checker
Windows operating systems are prone to many errors and crashes. Thankfully, the System File Checker utility exists. It is a diagnostic tool that can help you troubleshoot any issues related to the Windows operating system.
The System File Checker (SFC) is an essential Windows utility that checks your computer’s critical system files against a known good copy in order to identify any corruption or damage. The sfc command scans all protected operating system files and replaces incorrect versions with correct Microsoft versions if necessary. It also checks the Windows registry for any corrupted entries and fixes them as well, ensuring optimum performance of your PC.
If you are experiencing problems like slow boot-up time, application errors or crashes, blue screens, black screens, freezes, shutdowns during startup/shutdown processes, or error code 0x8000000a, then the sfc command may just save your day. Here’s how to use it:
- Type cmd into the search field.
- Right-click on the top-most result and choose Run as Administrator.
- Into the command line, type the sfc /scannow command and hit Enter.
- Wait until the scan is complete.
Fix #12: Update Your Device Drivers
Device drivers are a type of software programs that are designed to allow the computer to communicate with hardware devices. They can be installed on personal computers, servers, smartphones and other digital devices. These types of programs have been around since the early 1990s and were originally created for DOS-based operating systems.
Nowadays, device drivers are used for Windows 2000 or higher, Mac OS X 10.2 or higher and Linux 2.4 or higher versions as well as many more operating systems such as Android 4.0 Ice Cream Sandwich and iOS 5+.
A functional device driver will provide users with an easy way to connect their hardware device to the computer so they can do things like transfer data from one location to another, print documents, listen to music, and a lot more. If it has problems or is outdated, then it will likely trigger error messages like the 0x8000000a.
To update device drivers, follow these steps:
- Press the Windows + R keys altogether to launch the Run utility.
- Type devmgmt.msc into the text field.
- Hit the Enter button to open the Device Manager.
- Double-click on the Display Adapters section and right-click on the display adapter option.
- Select the Update Driver option.
- Choose Search Automatically for Driver Software.
- Repeat the above steps on the drivers that have an exclamation point next to them.
Fix #13: Clean the Windows Update Temporary Cache Folder
Windows has a cache folder that stores updates that it downloads and installs. It can be accessed by pressing Windows + R keys, typing %temp% into the dialog box, and then hitting the Enter key. This is also known as your Temporary Files folder on Macs.
The temporary files folder will contain the latest Windows update when it downloads and installs successfully. Keep an eye out for this folder to see if there are any new updates available to install.
Sometimes, cleaning this folder is key to resolving errors like the 0x8000000a error code. Here’s how to do so:
- Press and hold the Windows + R This will launch the Run utility.
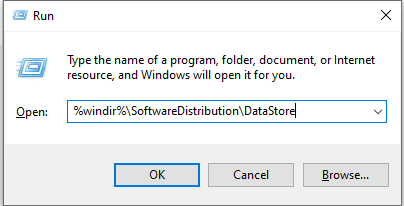
- Type the %windir%\SoftwareDistribution\DataStore command into the text field and hit OK.
- The Windows Explorer window will now open.
- Delete everything in this folder. You can use the Ctrl + A shortcut and hit the Delete button.
- Restart your computer and check if the issue has been fixed.
Fix #14: Tweak Your Registry Settings
The Windows registry is one of the most important components on your PC. It stores all the settings, options and configurations for system hardware, software and other features that you use every day. Because it’s an important part of your PC, you should be careful when editing it.
- Press and hold the Windows + R keys to launch the Run utility.
- Type regedit into the text field and hit Enter.
- Navigate to this location: HKEY_LOCAL_MACHINE\SOFTWARE\Policies\Microsoft\Windows\WindowsUpdate
- Once you’re in the location, find the WUServer and WIStatusServer entries.
- If they are not listed here, it is impossible to download the path. Otherwise, delete both entries.
- Restart your computer.
After making changes to your registry settings, try to clean it to fix and avoid stability issues. Use a reliable PC Registry Cleaner tool that gives you full control and deletes uninstall software leftovers on your behalf. Be sure that you download from a reputable source to avoid causing more damage to your PC.
Conclusion
While this error message may be frustrating, it is not a hard one to fix. The steps above will walk you through the process of fixing this annoying error message so you can get back on track with everyday life.
The next time you encounter the error 0x8000000a on your device, relax. The first thing you should do is to identify what’s causing the issue. The most notorious causes include a problematic Windows Registry, a faulty registry entry, file corruption, or a setting misconfiguration.
So, what should you do? First, restart your computer. For some users, this simple fix has done the trick. If it doesn’t resolve the error, you can proceed with other fixes, such as uninstall any security programs you have just installed, performing a clean boot, disconnecting any external peripheral, making sure your disk has enough space, checking if your BIOS is up to date, scanning your disk for bad sectors, running the CHKDSK command, and a lot more.
If any of the fixes don’t work for you, contact us or visit Microsoft Support online for more help. Feel free to share this article to anyone you know who is facing the 0x8000000a error, too!