
Windows 10/11 offers the User Account Control (UAC), a powerful feature that enables users to manage administrative functions and restrict access for specific accounts, including administrators. UAC acts as a safeguard against malware entities and viruses, providing an extra layer of protection for your computer.
So, how does this work?
When a user tries to uninstall or install a program, elevated access may be required. And even if an account has admin access, it is likely that this feature will throw the error message, “You do not have sufficient access to uninstall.”
Even that is the case, there’s no reason to panic. In the succeeding sections, we’ll share workarounds that worked for other affected users. We’ll also discuss what causes the error message to appear.
Expert Tip: For smoother PC performance, consider using a PC optimization tool. It handles junk files, incorrect settings, and harmful apps. Make sure it's right for your system, and always check the EULA and Privacy Policy.
Special offer. About Outbyte, uninstall instructions, EULA, Privacy Policy.
What Causes the “You Do Not Have Sufficient Access to Uninstall a Program” Error in Windows 10/11?
Although the error message is pretty straightforward, indicating that the user does not have sufficient access to uninstall a program, there are rare and random cases when this error message is triggered. One is when a malware entity has infected a device. Another possible cause is a corrupt or damaged registry key.
Regardless of what’s causing the error to appear, know that the solutions are quick and easy.
How to Fix “You Do Not Have Sufficient Access to Uninstall a Program” Error
So, what to do about the “You Do Not Have Sufficient Access to Uninstall a Program” error? In this section, we list down a few possible fixes that are worth considering. Try them in the recommended order to achieve best results.
Fix #1: Repair Damaged Registry Keys.
The Windows registry serves as a database for data that is required for the optimal functioning of the Windows operating system as well as the applications and programs that run on it. Technically, this data is structured in a tree format with nodes. Every node is referred to as a key.
Now, each application on a computer has a registry entry. When the application is launched, Windows looks for the corresponding key so it can run with reference to it.
Once these keys get corrupt, they can trigger error messages like the “You Do Not Have Sufficient Access to Uninstall a Program” to appear. Plus, it can render the entire uninstallation process useless.
But lucky for Windows users because Microsoft has created a tool to solve issues with corrupt and damaged registry keys. To use it, follow the steps below:
- Download the troubleshooter from Microsoft’s official website. Make sure to save it in an accessible location.
- Next, run the troubleshooter by double-clicking on it.
- Follow the on-screen prompts.
- Once the troubleshooter has scanned your system and resolved any registry issues, restart your PC.
- And then, check if the error got solved.
Fix #2: Disable User Account Control Temporarily.
Obviously, the error occurs because the User Account Control is restricting a user’s activity to protect him/her from potential damage. In this case, disabling the UAC feature temporarily can resolve the problem.
To disable UAC and check if solves the error, follow the steps below:
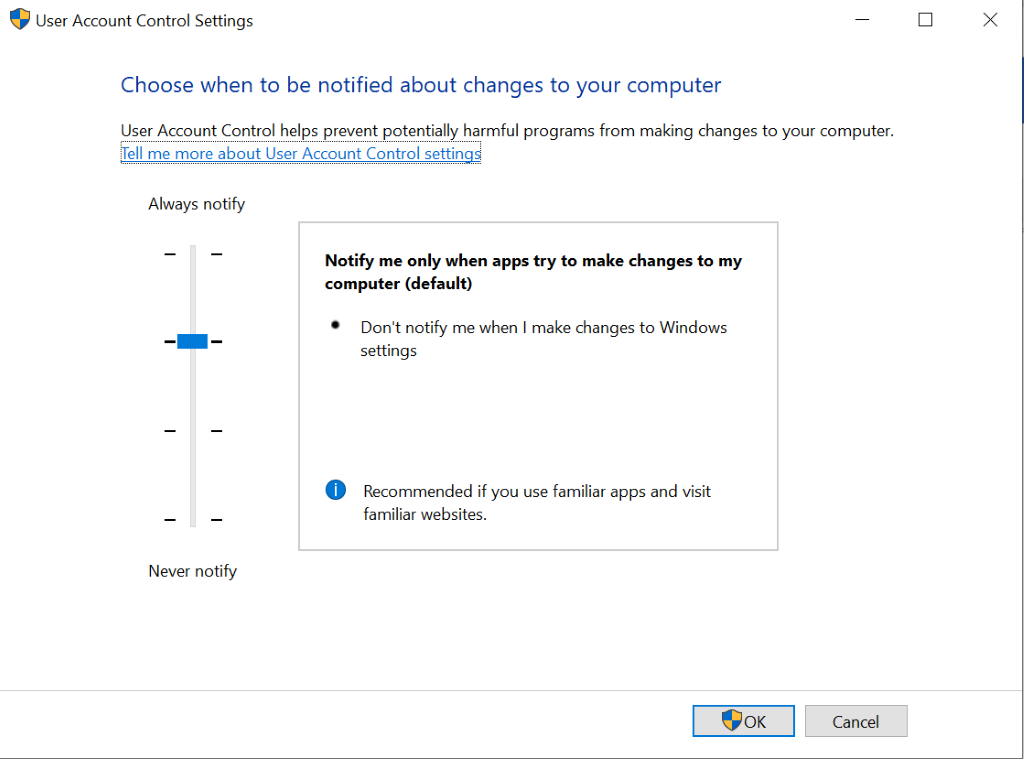
- Press the Windows + S keys to launch the Search function.
- Into the text box, input user control and hit Enter. This will launch the Settings utility.
- Move the slider to the Never Notify section and hit OK. Take note that you may need administrator access to complete this step.
- Restart your computer and check if the problem is solved. If not, you can always revert the changes you’ve made.
Fix #3: Uninstall the Problematic Program Using an Elevated Command Prompt.
If you really need to uninstall the program, you may use an elevated Command Prompt instead. But again, you will need administrator access to execute this fix.
To use an elevated Command Prompt to uninstall a problematic program, do the following:
- Press the Windows + R keys to launch the Run dialog box.
- Into the text box, input regedit and hit Enter.
- Next, go to this path: HKEY_LOCAL_MACHINE\SOFTWARE\Microsoft\Windows\CurrentVersion\Uninstall.
- Find the application you want to uninstall. And then, double-click the key called UninstallString.
- A dialog box should now open. Press the Ctrl + C keys to copy the displayed string.
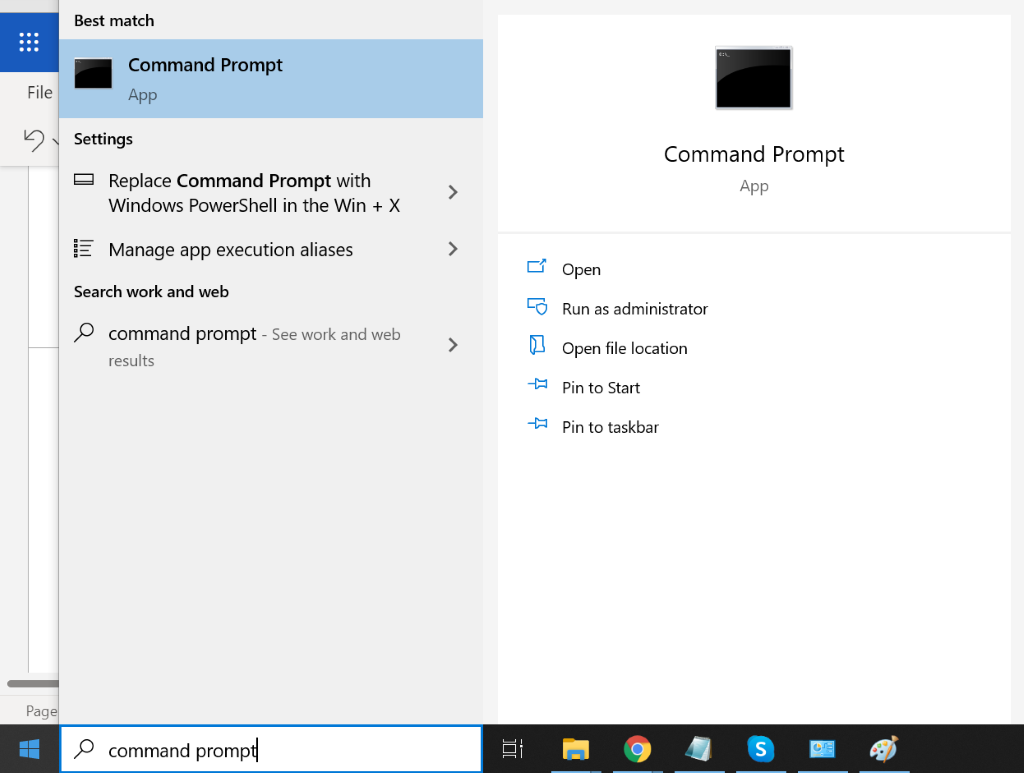
- Press the Windows + S keys to open the Search utility.
- Type command prompt into the text box and right-click on the most relevant search result.
- Select Run as Administrator.
- Into the command line, paste the command you’ve copied earlier.
- Hit Enter to effectively uninstall the problematic application.
- Restart your PC and check if the error persists.
Fix #4: Uninstall the Program in Safe Mode.
This is another solution worth trying. You can uninstall the program while in Safe Mode. In this mode, there is no UAC. This means you can use it to uninstall applications without restrictions.
It is worth noting, though, that the Windows Installer is disabled by default in Safe Mode. While not all applications use this utility for uninstallation purposes, those that need it cannot be uninstalled successfully. And in this case, the registry editor will be used and Windows Installer should be enabled in Safe Mode.
For a step-by-step guide on what to do, refer to the steps below:
- Press the Windows + R keys to launch the Run dialog box.
- Into the text box, type regedit and Hit Enter. This will open the Registry Editor.
- Next, go to this path: HKEY_LOCAL_MACHINE\SYSTEM\ControlSet001\Control\SafeBoot\Minimal.
- Once you reach this location, right-click on Minimal and go to New > Key.
- Name the key MSIServer.
- Double-click on the Default section and set its value data to Service.
- Hit Enter to save your changes.
- Exit the Registry Editor.
- Now, we will reboot your PC into Safe Mode. Go to the Start menu and hit the Power button.
- Press the Shift key while clicking on the Restart option.
- Select Troubleshoot from the list of options.
- You will then be taken to another screen. Click Advanced Options.
- Choose Startup Settings and restart your PC.
- Once your PC has rebooted, you will see a number of options to choose from. To make a choice, you will use the F1 to F9 Depending on what’s shown on your screen, choose the key that corresponds to Safe Mode.
- Your PC will now boot in Safe Mode. While in this mode, open an elevated Command Prompt.
- Copy and paste the commands below one at a time and hit Enter after each command.
- REG ADD “HKLM\SYSTEM\CurrentControlSet\Control\SafeBoot\Minimal\MSIServer” /VE /T REG_SZ /F /D “Service”
- REG ADD “HKLM\SYSTEM\CurrentControlSet\Control\SafeBoot\Network\MSIServer” /VE /T REG_SZ /F /D “Service”
- net start msiserver
- Close the Command Prompt.
- Into the search box, input Control Panel and click on the most relevant search result.
- Go to Programs and select Programs and Features.
- Right-click on the program you want to uninstall and click the Uninstall button.
- Follow the onscreen instructions.
- Restart your computer and check if the error message still shows.
Fix #5: Edit the Permissions of the Uninstallation File.
In case you didn’t know, each file has its set of permissions that instruct an application on how it will be used and which specific user groups can modify it. You can change these permissions and check if it resolves the problem. Again, you will need administrator access to perform this fix.
Here’s a guide on what to do:
- Find the directory where the application is saved.
- Right-click on the EXE file and choose Properties.
- Select Security From and take ownership of the file so you can proceed with the uninstallation.
- Once you have taken complete ownership, try to launch the uninstaller and see if it makes any difference.
Fix #6: Delete or Uninstall the Files.
If the first five solutions didn’t resolve your problems, you have no choice but to forcefully remove the files. Before you do so, prepare a backup of your files because there is no guarantee that this will allow you to uninstall the application properly.
Should you wish to proceed with this fix, follow these instructions:
- Go to the directory where the file is installed.
- Select the whole directory and press the Shift + Delete. This will permanently delete the file’s data.
- At this point, data will be removed but the application’s entries will still be present on your device.
- Now, press the Windows + R keys to launch the Run dialog.
- Input appwiz.cpl and hit Enter.
- A window with all the installed applications will be displayed. Right-click on the application you want to remove and hit Uninstall.
- Restart your device after the uninstallation and check if it solves the problem.
Fix #7: Perform an Antivirus Scan.
Sometimes, viruses and malware entities corrupt and damaged registry files and affect system processes, which often result in problems like the “You do not have sufficient access to uninstall” error message. Should this be the case, performing a virus scan will do the trick.
There are two ways to perform an antivirus scan: manual and automatic. However, this does not mean you have to choose from both. You can always perform both for better results.
Should you wish to go for the latter option, you will only need to install a trusted anti-malware software. Once you have it, perform a complete system scan. After which, leave it running in the background for real-time protection.
If you prefer the manual method, you will need to use the in-built security software on Windows 10/11 devices: Windows Defender. And then, follow these three easy steps:
- Right-click on a specific file or folder. Select Scan with Microsoft Defender.
- Once the scan is done, you will be taken to a new window that displays the results of the scan. Apply the recommended actions.
- Restart your computer.
For added protection, you can use other Windows security tools, too.
Summary
The User Account Control is a powerful tool that can be used to boost your device’s security. However, like other tools, it is vulnerable to problems and issues. But with the fixes enumerated above, hopefully, you can fix issues associated with the UAC.
Let us know your thoughts about this article. Comment down below.