To safeguard your computer against system crashes, many users opt to create a system image using Windows’ built-in Backup and Restore feature. In the event of an OS failure, you can rely on the image file to restore Windows to its previous state.
When restoring your computer to an earlier state from the system image you have created, the system image restore failed error message may appear in Windows 10/11/8/7 along with the error code 0x81000036 .
What Is Windows System Image Backup?
If you use Windows 10/11, you have many different methods to create a backup. For example, you can use third-party solutions to backup the entire system or copy files to an external drive manually or upload them to a cloud storage service like OneDrive. However, if you do not want to use manual methods or third-party tools, you can always create a full backup using the legacy built-in System Image Backup tool.
A system image is another way to say “full backup,” as it contains a copy of everything on the computer, including the installation, settings, apps, and files. Usually, you will find this tool better suited to restore the entire system from critical hardware or software problems, such as hard drive failure or when trying to roll back to a previous version of Windows 10/11.
Expert Tip: For smoother PC performance, consider using a PC optimization tool. It handles junk files, incorrect settings, and harmful apps. Make sure it's right for your system, and always check the EULA and Privacy Policy.
Special offer. About Outbyte, uninstall instructions, EULA, Privacy Policy.
A Windows System Image backup contains all the system files and personal files on your system partition at a point of time. It allows you to perform a full system restore when your computer stops working, so you do not need to reinstall all Windows or programs again.
How to create a backup with system image tool on Windows 10/11
The system image tool allows you to create a full backup to an external drive or network shared folder. However, it is best to use removable storage, which you can then disconnect and store in a different physical location.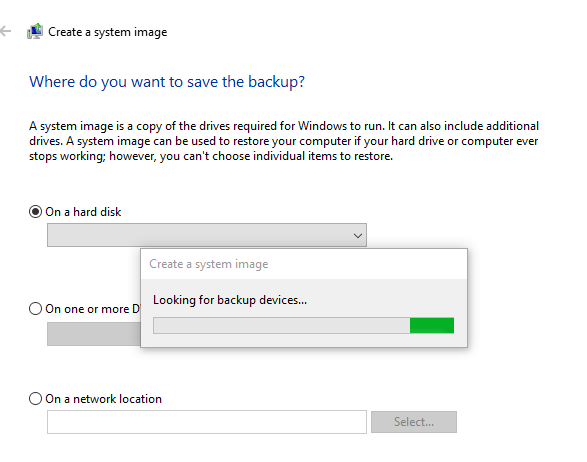
To create a full backup of Windows 10/11 with the system image tool, use these steps:
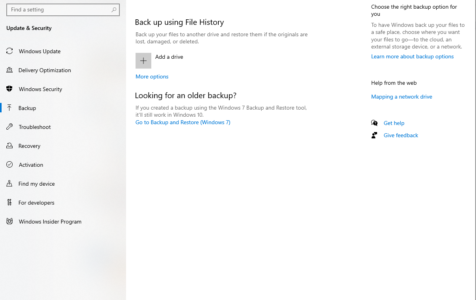
- Open Settings.
- Click on Update & Security.
- Click on Backup.
- Under the “Looking for an older backup?” section, click the Go to Backup and Restore (Windows 7) option.
- Click the Create a system image option from the left pane.
- Select the On a hard disk option.
- Use the “On a hard disk” drop-down menu and select the location to export the Windows 10/11 full backup.
- Click the Next button.
- Select any additional hard drives to include them in the backup.
- Click the Next button.
- Click the Start backup button.
- Click the No button.
Quick note: You’ll also receive a prompt to create a system repair disc, but because most devices no longer include an optical drive, you can skip it. If you have to restore the machine, you can use a USB installation media to access the recovery environment.
Once you complete the steps, the tool will create an image of the entire system that includes everything on the primary hard drive and other drives you may have selected.
While the backup is in progress, you can continue working on the device since it uses the “Shadow Copy” feature to backup files even if files are open and apps are running.
After the process is complete, you can disconnect and store the external drive in a safe place. If you have valuable data, you may want to consider keeping the backup in a different physical location.
How to restore a backup with system image tool on Windows 10/11
If you need to replace the hard drive or hardware failure occurs, you can use one of the backups to recover the device and files.
To restore a backup on Windows 10/11, use these steps:
- Connect the drive with the full backup to the device.
- Connect the Windows 10/11 USB bootable drive to the computer.
- Start the computer.
- On the USB bootable drive startup prompt, press any key to continue.
- If the device does not start in the Windows Setup wizard, you will need to access the Basic Input/Output System (BIOS) or Unified Extensible Firmware Interface (UEFI) to change the boot order settings. You can use this guide to access the BIOS/UEFI, but the steps are usually different per manufacturer and device model. It is recommended to check your manufacturer support website for more specific details.
- On the “Windows Setup” page, click the Next button.
- Click the Repair your computer option from the bottom-left corner of the screen.
- Click the Troubleshoot option.
- Click the System Image Recovery option.
- Select the Windows 10/11 option as the target OS.
- On the “Re-image your computer” page, select the Use the latest available system image option.
- Quick tip: You can use the “Select a system image” option if you have multiple backups and you are trying to restore an older version of the system and files.
- Click the Next button.
- (Optional) Carefully select the Format and repartition disks option before restoring the backup (if you are restoring the backup on a new drive).
- Quick tip: If you choose this option, use the Exclude disks option to prevent formatting secondary drives that may contain data.
- Check the** Only restore system drivers** option (if the backup contains a copy of multiple drives and you only want to restore the OS).
- Click the Next button.
- Click the Finish button.
- Click the Yes button.
After you complete the steps, the recovery process will start on the computer. The time to finish the restoration will depend on the amount of data and hardware configuration.
If you are about to restore a device, do not interrupt the process as it can cause the backup to fail, making the device unbootable. It is always recommended to have the laptop connected to a power source and a desktop computer to an uninterruptible power supply (UPS) to avoid problems.
Once the backup has been restored, open Settings > Update & Security > Windows Update, and click the Check for Updates button to quickly install any missing security updates.
Many users have the habit of creating system image backup in case of unexpected system issues or data loss. However, due to some causes, system image backup may fail and trigger the error 0x81000036. This article should help you find the corresponding solution to your problem.
What Causes Error 0x81000036 When Using Windows Backup
Some Windows users are always encountering the 0x81000036 error when attempting to restore the OS state to a previous point in time using Windows Backup. This particular issue seems to be specific to Windows 10/11.
Here are some of the underlying causes that might be triggering this issue:
- Windows Sandbox issue – According to a lot of affected users, the most common culprit that is known to cause this error code is a conflict between the Windows Sandbox environment and the Windows Backup process. In this case, you can get the issue resolved by accessing the Windows Features menu and temporarily disabling Windows Sandbox before attempting to use the Windows Backup once again.
- Hyper-V conflict – Another potential culprit that could be responsible for this type of Windows Backup error code is hyper-V. If you are seeing this error while attempting to mount a previously created Windows Backup, you should precede this by disabling the Hyper-V functionality from the Windows Features screen.
- Corrupted WindowsImageBackup folder – If the data in this folder is corrupted, you won’t be able to create a new Windows Image file for your backup.
- Disk errors – If the hard disk you are using for the backup does not have the correct format or does not have sufficient storage space, you will most likely run into error 0x81000036.
How to Fix Error 0x81000036 When Using Windows Backup
Now that you are familiar with every potential reason that will trigger the 0x81000036 error code, here’s a list of verified fixes that other affected users have successfully used to get to the bottom of this issue.
But before you do so, try these basic Windows Backup troubleshooting steps to see if they would help.
Format your external hard drive.
Open This PC and locate your external hard drive. Right-click it and choose Format. When the Format window opens, check the Quick Format option and click Start button. This process might take a minute or two, so be patient. This is a prerequisite before creating a system backup image on an external hard drive. Also, before formatting your external hard drive make sure to move any files from it to a safe location. After your external hard drive has been formatted, try creating the system backup on it again.
Change the Disk Space Usage.
- Open System Protection.
- Select the volume you’re using for the system image and click Configure.
- Make sure that protection is turned on.
- In the Disk Space Usage section move the Max Usage slider to the left to about 10-15%. Few users report that Max usage was set to 100% on their computer by default and that was the main culprit for system backup failure.
- After you’ve changed Max Usage value click Apply and OK to save changes.
- Restart your computer and check if the problem is resolved.
Use CHKDSK Command.
- Press Windows Key + X and choose Command Prompt (Admin) from the menu.
- command-prompt-admin
- When Command Prompt opens you need to type chkdsk /r X: (remember to replace X with the correct letter that represents your hard drive partition) and press Enter to run it.
- chkdsk-cmd
- Wait for the process to complete and repeat the same process for all hard drive partitions.
- Press Y (Yes) and restart your computer in order to scan and check drive C.
If your hard drive contains corrupted files, a system backup will fail. This is why using the chkdsk command should repair them.
Disable any unnecessary disk tools.
Certain disk tools can cause problems with system backup, therefore if you’re using any disk optimizers or disk cleaning tools make sure to disable them before trying to create a system backup.
Use a USB 3.0 Hub.
Using USB 3.0 external hard drives can cause problems due to USB 3.0 drivers. In order to avoid these issues, it’s advised to use a USB 3.0 hub in order to connect your external drive. This is just a potential solution, but few users had success with it, so maybe you could try it out.
If the above steps did not work for you, then it is time to check out the main solutions below.
Solutions for Error 0x81000036 When Using Windows Backup
Solution 1: Disable Windows Sandbox.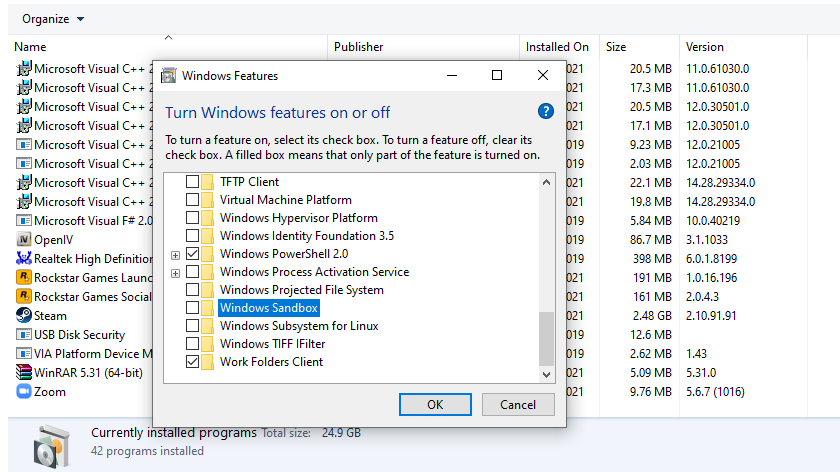
As it turns out, one of the most common scenarios that will cause the 0x81000036 error to occur is a conflict between Windows Backup and the Windows Sandbox functionality.
Windows Sandbox serves as a lightweight environment that allows Windows users to safely run applications in complete isolation. Due to the way this environment remains ‘sandboxed’, you can expect a backup procedure to conflict with this infrastructure.
Several affected users have reported that they managed to prevent the 0x81000036 error from occurring again during the mounting of a backup by accessing the Windows Features screen and temporarily disabling the Windows Sandbox environment.
If you haven’t tried this fix yet, follow the instructions below to disable the Windows Sandbox from the Control Panel menu before attempting to create the system image once again:
- Press Windows key + R to open up a Run dialog box. Next, type ‘appwiz.cpl’ and press Enter to open up the Programs and Features menu. If you are prompted by the UAC (User Account Control), click Yes to grant admin access.
- Once you’re inside the Programs and Features screen, click on Turn Windows features on or off from the left-hand section.
- Once you’re inside the Windows Features screen, scroll down through the list of native features and ensure that the checkbox associated with Windows Sandbox is disabled.
- Once you attempt to disable Windows Update, you will be prompted to confirm the operation. Do so by clicking Yes and wait for the Sandbox environment to be disabled.
- Return to your Windows Backup utility and repeat the action that was previously triggering the 0x81000036 error.
If the problem is still not fixed, move down to the next potential fix below.
Solution 2: Disable Hyper-V.
As it turns out, it turns out that you can also expect to encounter this error due to a conflict between the main Windows Backup restore process and the main Hyper-V service that’s enabled by default on Windows 10/11.
Hyper-V is Microsoft’s hardware virtualization product. It lets you create and run a software version of a computer, called a virtual machine. Each virtual machine acts like a complete computer, running an operating system and programs. When you need computing resources, virtual machines give you more flexibility, help save time and money, and are a more efficient way to use hardware than just running one operating system on physical hardware.
Hyper-V runs each virtual machine in its own isolated space, which means you can run more than one virtual machine on the same hardware at the same time. You might want to do this to avoid problems such as a crash affecting the other workloads, or to give different people, groups or services access to different systems.
Some users that were also encountering this problem have reported that they finally managed to fix the 0x81000036 error by temporarily disabling Hyper-V and all associated services before attempting to restore the previously created backup once again.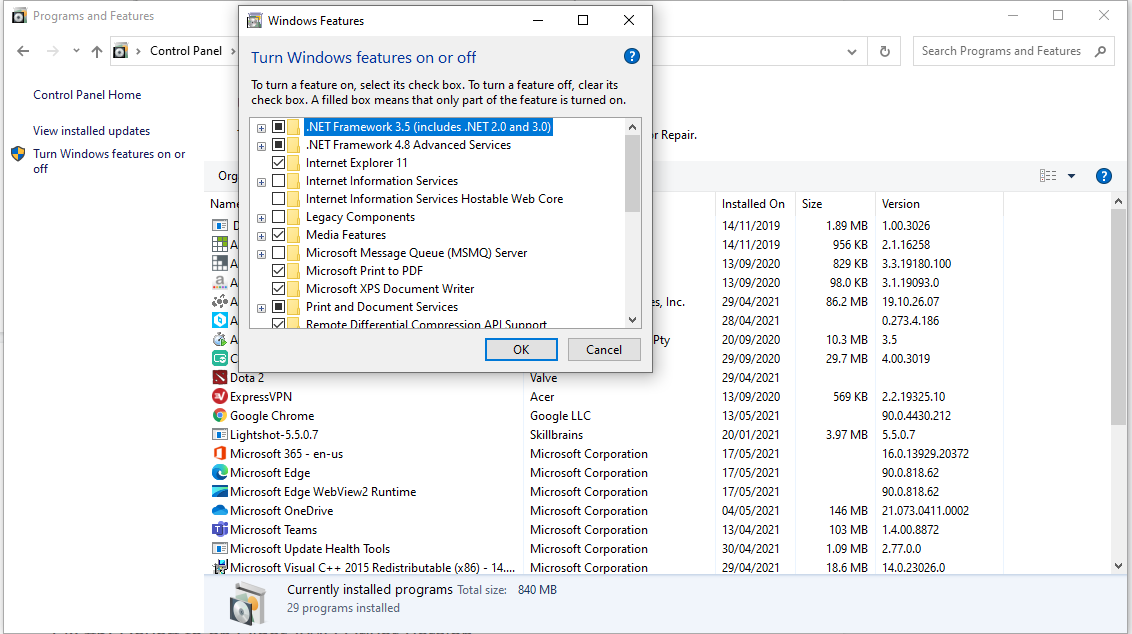
If you suspect this scenario might apply to your current situation, follow the instructions below to disable Hyper-V from the Windows Features menu:
- Start by pressing Windows key + R to open up a Run dialog box. Inside the text box, type ‘appwiz.cpl’ and press Enter to open up the Programs and Features menu. If you are prompted by the UAC (User Account Control), click Yes to grant admin access.
- Once you get to the Programs and Features menu, use the menu on the left to click on Turn Windows features on or off. At the User Account Control prompt, click Yes to grant admin access.
- Inside the Windows Features screen, scroll down through the list of Windows Features and uncheck the box associated with Hyper-V. Next, click on Ok to save the changes.
- After the Hyper-V functionality is completely disabled, reboot your computer and see if the problem is fixed by attempting to enforce the Windows Backup once again.
Solution 3: Delete the WindowsImageBackup folder.
Sometimes you won’t be able to create system backup due to previous backup files, and in order to fix this problem, you need to delete those files.
To do that, locate and delete the WindowsImageBackup folder. If you want to save your previous backups, you can also move them from WindowsImageBackup to a different folder.
As for the location of WindowsImageBackup folder, it should be located in the hidden folder
C:/System Volume Information
Solution 4: Delete EFI System Partition and Recovery Partition.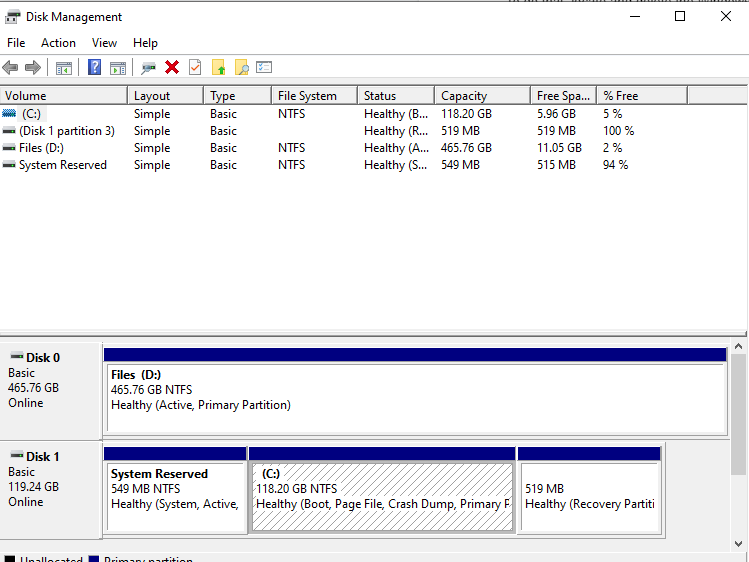
In some cases, when you upgrade to Windows 10/11 or install it on a new hard drive, certain partitions from previous versions of Windows might still be present on your computer causing System Backup to fail.
In order to fix this, it’s advised that you remove the EFI System Partition and Recovery Partition. To do that, follow these steps:
- Press Windows Key + X and select Disk Management from the menu.
- When Disk Management opens, locate the hard drive on which you wish to store your system backup.
- You should see EFI System Partition and Recovery Partition for that hard drive in Disk Manager. Delete them both.
After deleting these two partitions, you should be able to successfully create system backup on that hard drive.
Solution 5: Turn on System Protection
Some users claim that in order to create System Backup, System Protection must be enabled on your PC. To do this:
- Press Windows Key + S and type System. Choose System from the list of options.
- When the System window opens, click on System protection on the left.
- Locate Windows 10/11 System Image and click Configure.
- Select Turn on system protection and click Apply and OK to save changes.
Solution 6: Turn off System Protection and delete restore points.
There are times when turning on System Protection does not work, so you should try the opposite. To do this:
- Open System Protection. You can do that by following the steps from the previous solution.
- Locate your hard drive and click on Configure.
- Make sure to select Disable system protection.
- disable-system-protection
- Next, click on the Delete button to delete previous restore points.
- Repeat these steps for all your hard drivers.
- After you’ve disabled system protection and deleted previous restore points you should be able to create a system backup.
Solution 7: Use diskpart to remove the EFI partition.
If you install an additional hard drive and install new Windows on it, your previous EFI partition from the old hard disk can remain on your old hard drive and cause you problems with system restore.
We advise you to be extremely careful while using this method because you can permanently delete your important files.
- Press Windows Key + X and choose Command Prompt (Admin).
- When Command Prompt opens, type diskpart and press Enter.
- Type list disk and press Enter. You should see several hard drives available.
- Find your old hard drive on the list and type select Disk 1 (warning: we used select Disk 1 in our example, but make sure that you use the correct number that matches your hard drive in diskpart).
- Now type list partition and press Enter.
- Locate the system partition and type select Partition 1 (again select Partition 1 is just an example, therefore, make sure that the number matches the System partition from diskpart).
- Backup all files from that partition because they will get deleted.
- Type del partition override and press Enter. This will delete the partition and all files on it.
- Optional: Add the newly created free space to any other disk partition by using the Disk Management tool.
- Once again, be extremely careful while doing this because you can permanently delete your system files if you’re not careful. Use this solution at your own risk.
Solution 8: Ensure Same Partition Style for the Destination Disk and the Source System Disk
If the system disk that you have created a system image is an MBR disk, the target disk that you want to restore the image to should be an MBR disk, and vice versa. If it is not, please convert it to MBR or GPT. In a word, both the source system disk and target disk should have the same partition style.
To convert the disk to MBR/GPT, you can use the professional partition manager, MiniTool Partition Wizard Professional Edition since it offers you the Bootable Media feature, enabling you to boot the PC and enter WinPE to perform the conversion when you cannot restore a system image in Windows 10/11/8/7.
Solution 9: Use the Same Boot Mode.
Windows doesn’t allow you to restore the system from BIOS computer to UEFI based computer, and vice versa. If your backup was created on a UEFI PC, please enable UEFI mode in another PC. If the backup was created on a BIOS computer, change the boot mode to the Legacy.
To change the firmware mode, please boot your computer to the boot menu by pressing a specific key (this is based on the specific PC) during the bootup. Then, select UEFI or Legacy.
After trying these two ways, system image restore failed because of EFI/BIOS issue won’t happen.
Solution 10: Use a third-party backup tool.
For a hassle-free backup process (and further use of the backup image), we recommend using a third-party tool. The best backup software makes it easy to reliably backup your data in a way that’s easy to use and manage, and allows for more advanced options than free software.
Luckily, there are a number of backup software solutions that aim to do exactly this, by allowing you to easily and automatically set up different backups as and when you need to. In some instances it’s simply a case of new files being copied across as soon as they are saved, and for others it’s a case of having regular backups carried out at specific times. Here are some of the best third-party backup software for Windows 10/11:
1. Acronis True Image
Acronis True Image is a full featured backup solution that promises to “never lose another file.”
This backup software simultaneously sends data to both a local drive, and a cloud solution. It can also do cloning and mirror imaging duties for your rig’s system drive, in just two easy clicks.
Acronis True Image has an anti-ransomware feature that detects, and can even reverse the unauthorized encryption of a hard drive to keep data safe from this increasingly prevalent type of attack. It also offers support for mobile device backup. The downside is that all this backing up does use some system resources, and can even lengthen boot times.
A one-year subscription offers ransomware protection built in. For cloud-backups, you’ll need to upgrade to the Advanced plan. A Premium plan offers 5TB of storage and electronic signatures.
2. EaseUS Todo Backup
EaseUS ToDo Backup is a solution that has been around for over a decade, with packages for businesses, home users and even service providers. It offers software for both Windows (XP and higher) and Mac platforms.
In the Home and Home Office tier, it can handle an incremental or full backup for up to 16TB of data, including coping with multiple partitions, hardware RAID, and it also supports cloud backups.
While there is a free tier, the single paid Home tier offers more features for those really concerned with managing their backups on a regular basis. The Home edition is available for a one-time fee, or alternatively you can subscribe on a yearly basis, or a charge every two years.
The Business options for a single Workstation has additional options for servers and technicians which offer an even more rich range of features.
3. Paragon Backup & Recovery
Paragon Backup & Recovery offers a flexible solution to simplify complex backup solutions. With the Create Backup Job wizard, guidance is provided to what will be backed up, and where the data will be stored.
This software covers all the usual backup processes, and can easily create complex routines, including automated backup. A standout feature is the WinPE recovery media, which in the worst case scenario comes to the rescue when your PC refuses to even boot. Via a bootable USB stick, users can rescue files, fix boot problems, and even perform a restoration to get up and running again in a jiffy.
A home plan is charged for a single home user license. For business users you will need to contact Paragon for a quote.
4. NovaBackup
NovaBackup is a solid backup solution available as a subscription, and ideal for the essential backup task of making a copy of your computer’s hard drive on local media. For modest users this will suffice, but it falls short when it comes to the interface, support for platforms other than Windows and Linux, and more advanced tasks.
However, it does at least include any upgrades to the program, and also supports backup to cloud providers (including OneDrive and Dropbox).
The standout feature of NovaBackup PC is the security offered, as the software runs locally to send the data to a local media drive, and does not connect to the internet. Also, the backup can be performed with AES 256-bit encryption for extra security.
Home users are charged for an annual subscription for a single PC, which offers protection against data loss, ransomware, and hardware failure. There’s also a server edition available which offers optional support for virtual machines, SQL, and Microsoft Exchange, as well as being HIPAA compliant.
5. Genie9 Timeline
Genie Backup Manager promises “effortless protection for all your files,” and can be configured in three steps. There is a trial available for Windows XP and higher, although not for other platforms.
This software is focused on traditional drive backup to a media drive, and the developer offers separate solutions for other situations including Android backup and cloud backup needs, keeping Genie Backup Manager from being a more comprehensive application.
The app sits in the Windows system tray as an icon, quietly going about its business. Notable features include the option to have the backup run at full speed via Turbo Mode, or to run in Smart Mode which intelligently adjusts itself based on the available system resources.
For those who hate interruptions, this software has a Game/Movie mode which automatically stifles any annoying pop-ups, to make sure that your gaming or viewing experience isn’t compromised. There’s a mobile app for iOS, but not for the more popular Android platform.
Wrapping Up
The System Image Backup tool is a great solution to create a full backup of the entire system and files. For instance, when you are about to upgrade to a new version of Windows 10/11, you can use the built-in tool to create a temporary full backup in case you need to rollback. Or when you are about to replace the main hard drive, or you need a quick way to transfer the installation and files without the need for reinstallation. It is also always recommended to periodically backup your computer if the unexpected happens, and you need to recover from system or hardware failure, malware, ransomware, or hacker attacks.
However, the Windows Backup doesn’t always work as expected 100% of the time. There are instances when errors occur, such as the 0x81000036 issue. When this happens, the above solutions should help a lot when you’re getting error 0x81000036 when using Windows Backup.