Time Machine is a great tool that automatically makes backups of your Mac using an external hard drive. But what’s great about this tool is that it is built into macOS itself, so every Mac is equipped with it automatically. It’s very simple to set up. After that, you don’t even have to worry about it. You also have the option to customize your Time Machine experience according to your particular needs.
To set up a Time Machine backup, you are going to need an external storage device where your backups will be saved. Just connect the hard drive to your Mac and set it up as your Time Machine backup disk. Time Machine will then begin creating regular backups without needing any further actions from you. You can even create a backup manually using the Time Machine menu bar. So convenient, right?
What Is Time Machine?
Time Machine is a service from Apple to backup your Mac. It creates a simple “image” or “snapshot” of your Mac, which simply means a compressed file containing everything on your Mac at the time of the backup that you can revert to when needed. Time Machine backups can also be used when you need to boot a new device, or refresh your Mac after returning it to factory settings.
Apple’s Time Machine is meant to run in the background, offering a simple, straightforward way to back your Mac up. When activated, it will periodically back your Mac up, keeping the last few versions in case you need to revert to a backup from a few weeks ago.
Pro Tip: Scan your Mac for performance issues, junk files, harmful apps, and security threats
that can cause system issues or slow performance.
Special offer. About Outbyte, uninstall instructions, EULA, Privacy Policy.
Time Machine is a backup system software for Macs that run on Mac OS X Leopard or later. It makes regular periodic backups in the following intervals:
- Hourly backups for the past 24 hours
- Daily backups for the past month
- Weekly backups for previous months
Since the scheduled backups don’t replace previously saved files and only save the changes you’ve made to a file, you don’t have to worry about storage space running out fast.
Most will use Time Machine when booting new Macs. On startup, a new Mac asks if you want to start fresh, or boot from a backup. Using Time Machine backups will make you feel like you picked up where you left off. Like most services Apple creates, Time Machine is in both your System Preferences menu and is available as an app for the Mac.
How to Set Up Time Machine
As explained by Apple support, you can use any of the following backup methods:
- External drive connected to your Mac, such as a USB or Thunderbolt drive
- Network-attached storage (NAS) device that supports Time Machine over SMB
- Mac shared as a Time Machine backup destination
- AirPort Time Capsule, or external drive connected to an AirPort Time capsule or AirPort Extreme Base Station (802.11ac)
Follow these instructions to begin using Time Machine for backup purposes on your Mac.
Setting Time Machine up is really simple. Here’s how:
- From your Mac’s menu bar, select the Apple logo on the left side
- Select “System Preferences” from the drop-down menu
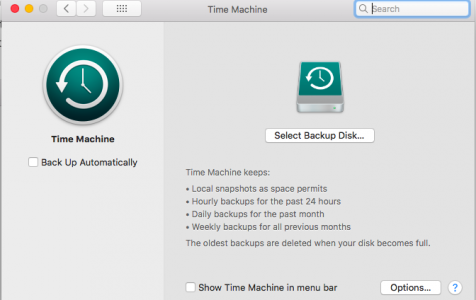
- Select “Time Machine”
- Select “Automatic Backups” on the left side of the Time Machine window
- Choose the disk you want to use to store your backups
That’s all you need to do. Once you complete these steps. Time Machine will begin creating a backup to the disk you’ve designated on a schedule. Unfortunately, you’re unable to manage this schedule yourself.
Using Time Machine with an Apple AirPort Time Capsule
Apple used to make routers, and one of their best was the AirPort Time Capsule. You can still find Time Capsules for sale, and if you can source one, we highly recommend it. Not only are they excellent routers, the AirPort Time Capsule works perfectly with Time Machine.
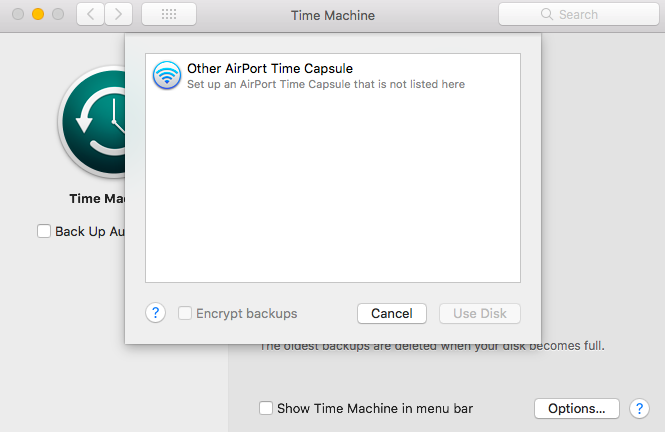
Knowing how to use Time Machine with an AirPort Time Capsule is the same as knowing how to use Time Machine with an external hard drive. The Time Capsule has a one or two terabyte hard drive inside it, making it both a router and external drive for Time Machine backups. As you see in the screenshot above, our Time Machine is backing up to a Time Capsule!
All you have to do is set up your AirPort Time Capsule as the main router for your network and make sure your Mac is connecting to the network the AirPort is on. Then, choose the AirPort Time Capsule as the external drive you want to save backups to.
That’s it! The best part about using this method is when you reconnect a Mac reset to factory settings or buy a new Mac, and log into the same network, you know your backups are available.
How to Restore Mac from Time Machine
Restoring a Mac from a Time Machine backup is straightforward, but not always the best option. Having done it, we can attest it can take days for your Mac to get back up and running when restoring from a backup. Consider whether or not you have time to devote to that process. We should also note since Apple has stopped making the AirPort Time Capsule there’s little chance Time Machine will improve in this area.
Consider why you’re trying to restore your Mac from a Time Machine backup, too. Sometimes we restore to a backup because we believe we’ve lost a file that was crucial. If we go back in time, the file will be there, right? Maybe, but the process is time consuming, and not always accurate.
A better option may be Disk Drill. It recovers lost files with relative ease – or at least files you think you’d lost. With Disk Drill, you may be able to find those lost files without the trouble of diving through Time Machine backups and wasting hours (or days!) restoring your Mac for one file.
How to Restore from Time Machine to a New Mac
Ready to use Time Machine on new Mac computers? We’ve got you covered. Here’s how it’s done:
- Make sure your backup disk is connected to your new Mac (Note: if you’re using a Time Capsule, make sure your router is set up and your computer connects to the same network. This will automatically “connect” your backup disk to your Mac.)
- When signing into your new Mac, select “From a Mac, Time Machine backup, or startup disk” when asked how you’d like to transfer your information
- On the next screen, select your backup disk from the available options
- Select “Continue”
- Choose the data you’d like to transfer, and select “Continue”
- That’s all you need to do. Your Mac will begin the process of transferring your data from the Time Machine backup.
Restore Your Mac From a Backup
Here’s how to restore your Mac from a Time Machine backup:
- Make sure your backup disk is connected to your new Mac (Note: if you’re using a Time Capsule, make sure your router is setup and your computer connects to the same network. This will automatically “connect” your backup disk to your Mac.)
- Open the Migration Assistant app on your Mac
- Select “From a Mac, Time Machine backup, or startup disk” when asked how you’d like to transfer your information
- On the next screen, select your backup disk from the available options
- Select “Continue”
- Choose the data you’d like to transfer, and select “Continue”
This is Apple’s method for restoring from the most recent backup. If you need an earlier backup to restore, simply open the Time Machine app and choose the backup you want to boot from. You can scroll through a list, and the right side of the screen has a timeline feature in the event you’re trying to reboot to a more narrow timeframe.
A failing of Time Machine is you lack granular control. There’s no way to really define the files or folders you want to back up, and you can’t define a backup schedule that works for you.
What is Time Machine error -1073741275
What Is Time Machine Error -1073741275?
Time Machine usually works well most of the time. But there are times when it encounters hiccups, preventing users from successfully making backups of their files. For instance, Time Machine might stop creating backups because there is not enough storage space or it couldn’t complete the backup process.
In this article, we will discuss a not-so-common Time Machine error that happens when the user tries to connect an external drive to be used as Time Machine backup. It also occurs when attempting to reconnect a drive that was previously used by Time Machine. The drive was working perfectly well with Time Machine and there were no issues in creating backups, but when it was reconnected, the Time Machine error:- The operation couldn’t be completed. (OSStatus error -1073741275.) notification appears.
Here’s another version of the error message:
“Time Machine can’t connect to the backup disk. (OSStatus error -1073741275.)
The problem has occurred not only for MacBook Pro, but iMacs and Mac Minis as well. It is also not limited to a single macOS version because we have reports of Catalina, High Sierra, Mojave, and Sierra users that were affected. The original problem was Time Machine not deleting older backups to make room for a new one.
This error prevents users from being able to use the external drive as a backup drive for Time Machine. In cases where the error happens to the drive being reconnected to Time Machine, the user is not able to access the previous backups saved on the drive.
What Causes Time Machine OSStatus error -1073741275?
When Time Machine gets the Time Machine error:- The operation couldn’t be completed. (OSStatus error -1073741275.) error, it could be due to one of these scenarios:
- Incompatible drive — If it is your first time to set up the drive as your Time Machine backup, then it is possible that the drive is not compatible with your Mac. Check the format to make sure that macOS is able to work with it.
- Security issues – Since Time Machine works in the background, it is possible that security software on your Mac considers it as malicious, therefore stopping its activity.
- Corrupted Time Machine preferences – All Time Machine settings are stored in a .plist file. When this file gets corrupted, Time Machine won’t be able to function properly.
- Hard disk problems – When your hard disk is damaged, Time Machine won’t be able to use it to save backups.
- Incorrect network settings – If your Time Capsule is wirelessly connected to your Mac, incorrect network settings might interfere with the backup creation process.
To fix this Time Machine issue, you need to address these possible causes one by one until you find the root cause.
How to Fix Time Machine OSStatus Error -1073741275
Here are a few checks you need to perform before moving to the troubleshooting steps.
- Ensure that your Mac software is updated
- Reboot Mac and check if the Time Machine error is gone.
- In case you are using an Airport Time Capsule, update the firmware on the Airport Time Capsule.
- Check if your Mac is connected to the same network as the backup drive. For instance, if you are trying to backup data using the AirPort Time Capsule or the server, make sure you are connected to the specific device network.
- If your drive is connected to a port on your Mac or AirPort Extreme Base Station, make sure that the drive is switched on.
- Connect the drive directly to your Mac or base station, if you are using a USB hub.
- If you’re backing up to an external third-party drive, make sure the drive’s firmware is up to date or contact the drive manufacturer for assistance.
If the above basic troubleshooting steps did not work, then you should proceed with the solutions below.
1. Reset SMC and NVRAM on Your Mac
Sometimes Time Machine won’t back up because of issues with System Management Controller (SMC) or settings stored in PRAM or NVRAM (non-volatile random-access memory). To resolve the issue, reset both SMC and NVRAM. This fix has worked for some Mac users.
SMC Reset
Before you reset SMC, try to reboot your Mac through any of the following options:
- Hit Command + Option + Escape to force-quit the stalled backup process.
- Restart the Mac by going to the Apple menu > Restart.
- Shut down the Mac via Apple menu > Shut Down. After that, turn on the Mac by pressing the power button.
- Press the power button and hold it down until the Mac shuts down, then turn it on by pressing the power button. You may lose unsaved work.
If the above tips don’t resolve the issue, follow these instructions to reset SMC:
- Shut down the Mac.
- Disconnect the power cable and remove the battery (if it is removable).
- Press and hold the power button for some few seconds (5 – 10 seconds).
- Reinstall the battery, and then press the power button to start the Mac.
- If your battery is not removable, shut down the Mac by choosing Apple menu > Shut Down. Once it has shut down, press Shift + Control + Option and the power button, and then hold them for about 10 seconds.
- Release the keys and turn on the Mac.
NVRAM Reset
Follow these steps to reset NVRAM:
- Shut down your Mac.
- Press the power button to turn on the Mac, then press Command + Option + P + R immediately and hold them for about 20 seconds.
- You can release the keys when you hear the second startup sound or when the Apple logo appears (for Mac computers with AppleT2 Security Chip).
2. Reset Time Machine
If the issue persists, perform these steps:
- Select the Apple menu, then choose System Preferences > Time Machine.
- Turn off Time Machine.
- Go to Macintosh HD, then select Library > Preferences folder.
- Erase: ‘com.apple.TimeMachine.plist’.
- Open Time Machine from System Preferences.
- Add your external drive as the backup destination for Time Machine.
- Create a backup on that drive.
3. Check If FileVault Encryption or Decryption Is Complete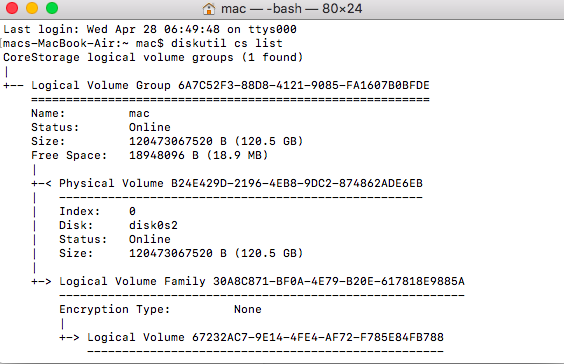
Assume FileVault is enabled, and it is encrypting a disk, or the feature is turned off, and the disk is now being decrypted. You can check the FileVault encryption progress from the command line. To check the progress, please follow these steps:
- Go to Applications > Utilities and look for the Terminal app.
- Open the app and enter this string: diskutil cs list.
- The command output will show you ‘Conversion Progress’, where you will check the encryption status (or decryption progress if the disk is being decrypted).
In most cases, the progress is indicated as a percentage, but sometimes you may get a message that says, “Encrypting” or “Decrypting” depending on whether the disk is being encrypted or decrypted. The progress will help you know if you need to wait for the process to complete. If it is complete, then there could be other things causing the problem.
4. Turn Off Your Security Features Temporarily.
Sometimes macOS can be overprotective to the point that some legitimate processes are throttled or stopped. Turn off your antivirus and Firewall temporarily to see if it makes any difference. Force-quit your antivirus software if it’s running.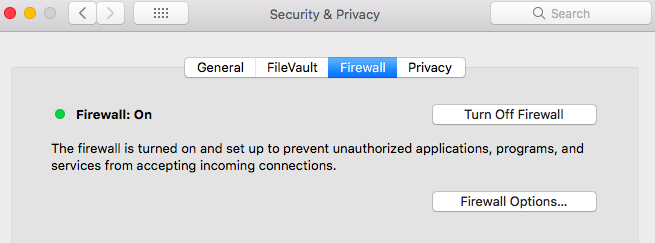
To turn off your Firewall:
- Click System Preferences from the Apple menu.
- Click Security & Privacy, then select the Firewall tab in the toolbar.
- Click the lock icon at the bottom of the window, then type in your admin password to be able to make changes.
- Click the Turn Off Firewall button.
Once you’ve turned off these features, try to manually create a backup using Time Machine to see if this method works. If not, turn these features back on and proceed to the next step.
5. Reset Time Machine Preferences.
The .plist file, where the preferences for certain apps and features are stored, can get corrupted or damaged over time. When an app or feature starts misbehaving, resetting the preferences by deleting the .plist file is one of the most common fixes.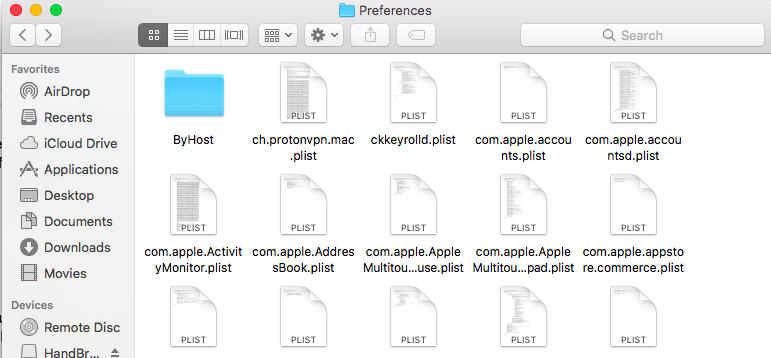
To reset the .plist file associated with Time Machine, follow these instructions:
- In the Finder menu, click Go.
- Press and hold the Option key to reveal the Library folder, then click on it.
- Look for the Preferences folder, then double-click to open it.
- Search for the .plist file or files with TimeMachine in their filenames. You can use the search feature at the upper-right corner of the window to easily find the Time Machine .plist files.
- Move these .plist files to the Trash and close the folder.
- When you relaunch Time Machine, a new set of .plist files will be generated, which will hopefully fix this issue.
6. Check Hard Drive for Errors.
If your backup drive has bad sectors, Time Machine won’t be able to write new data on it. To check your hard drive’s health: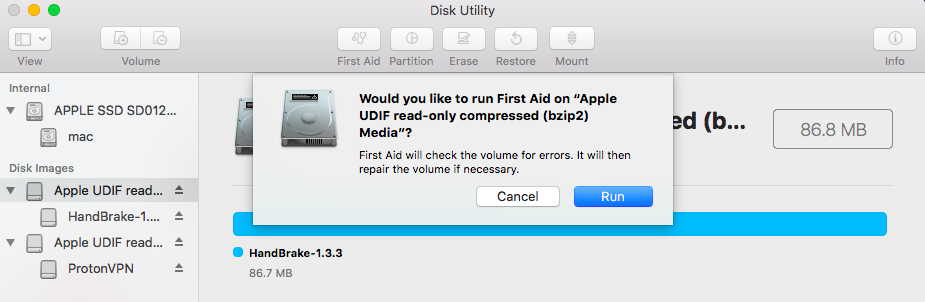
- Navigate to Finder > Go > Utilities.
- Click on Disk Utility.
- On the left-side menu, choose your backup drive from the list.
- Click on First Aid at the top menu.
- Click the Verify Disk button at the bottom right corner to start the diagnostics.
Let the process run its course and wait for the results. When you see the message The partition map appears to be OK, it means that your hard drive is in good condition. Items in red, however, indicate hard drive errors that need to be fixed.
If you see a line that says, Error: This disk needs to be repaired, you can click the Repair Disk button to attempt to fix it. If the button is not clickable, then you might need to replace your hard drive.
Time Machine Alternatives for Mac
If the fixes above did not resolve the The operation couldn’t be completed. (OSStatus error -1073741275.) error and your Time Machine still won’t connect with the drive, then you should consider other third-party backup solutions. Here are some of the options you can try that work the same or even better than Time Machine.
Carbon Copy Cloner
Like Time Machine, Carbon Copy Cloner relies on an external hard drive to make an exact copy of your Mac files. For further customization, you can select individual folders and files. Unlike Time Machine, Carbon Copy Cloner lets you set a backup schedule by the hour, day, week, month, or manually. You can use the backup as a bootable clone, as needed.
Backblaze
One of the most popular Time Machine alternatives on the market, Backblaze offers personal and business options starting at $6/month per computer. Once your account is activated, Backblaze will automatically back up your Mac to a secure off-site.
Taking a no-hassle approach, Backblaze automatically backs up your Mac’s documents, photos, movies, and music. With Backblaze, older versions of files are kept for 30 days. For an additional $2/month, you can increase this to a year.
Carbonite
Nearly identical to Backblaze, the cloud-based Carbonite service security backs up data from your Mac using encryption. Old data is kept for up to 30 days for easy restoration. Out of the digital box, Carbonite backs up photos, documents, settings, emails, music, and videos. You can try Carbonite free for 15 days.
iDrive
Unlike Backblaze and Carbonite, iDrive doesn’t price its subscriptions on a per device basis. Instead, you purchase cloud storage. A free account gives you 5GB of storage. One important reason to consider iDrive is that it allows you to backup PCs, Macs, iPhones, iPads, and Android devices through a single account. That’s an important point to consider if you have a lot of devices.
Acronis True Image
Offering a “complete personal cyber protection solution,” Acronis True Image 2021 offers three levels of protection starting at $50/year. You get local or NAS backups; a $90/year subscription adds cloud-based backup. There’s also malware protection and other goodies that make Acronis True Image worth considering. It comes with a 30-day free trial.
Chronosync
Geared towards photographers, video editors, filmmakers, and other professionals, ChronoSync provides file synchronization across different computers, backups, bootable backups, and cloud storage. It’s $50 per computer, and that includes free updates and zero monthly fees. You can start using ChronoSync free for 15 days.
SuperDuper!
Here’s another software solution that complements the Time Machine program. With SuperDuper!, you can create a bootable backup on an external hard drive and schedule regular backups. If you’re looking for a simple, careful solution, you can’t get much easier thanks to SuperDuper! It’s priced at $28 and doesn’t require a monthly subscription. You can download a free trial from the company website.
Dropbox
Dropbox may not be like your traditional backup software, but it is a great place to save your important files, nonetheless. You can also continue working on your files after you have uploaded them to Dropbox. All you need to do is sign up for a Dropbox account and you get to enjoy 2GB of free storage. This is more than enough to save your important files and data. But if you need more storage, you can upgrade to the paid version, which costs $9.99 per month, to get 1TB of space.
Google One
Formerly known as Google Drive, Google One works exactly the same way Dropbox does. It may not be as powerful as your traditional backup programs for Mac, but it offers a safe way of storing your files online and making them accessible wherever and whenever you need them.
Summary
The Time Machine error:- The operation couldn’t be completed. (OSStatus error -1073741275.) error is something that Mac users are not quite familiar with since it is an uncommon Time Machine error. There are very few references to this problem online, making it difficult for users who encounter this to troubleshoot. Fortunately, this guide should address this problem and hopefully fix the error for you.