
Have you ever noticed that your Mac’s fan starts to make noise when you are doing nothing? And the longer it runs, the louder the noise gets? Sometimes, the kernel_task process takes up more than 80% of CPU usage, making your computer run slowly and causing other applications to freeze up. So, how can you fix this high CPU usage bug?
In this post, we discuss what kernel_task is and share several ways to help lower your Mac’s kernel_task high CPU usage to make it run smoothly again. We will also show you how to detect and fix this bug with ease so that you can stop worrying about kernel_task high CPU usage problems on your Mac!
What Is Kernel_Task on Mac?
“What is kernel_task on Macbook Pro?” That is a question that macOS users ask.
The kernel_task simply is responsible for running all of your computer’s hardware and software. It’s kind of like a conductor that keeps all of your system’s components in sync.
Pro Tip: Scan your Mac for performance issues, junk files, harmful apps, and security threats
that can cause system issues or slow performance.
Special offer. About Outbyte, uninstall instructions, EULA, Privacy Policy.
Because it runs so many processes simultaneously, it has a tendency to make frequent use of your processor, which can generate extra heat inside your computer and damage your hardware. It might also slow down performance overall.
But what is kernel_task in Activity Monitor, and what is it doing?
What Does Kernel_Task Do?
Most people don’t realize it, but every time they double-click an application icon on their Mac’s desktop, they are actually running a certain program. And this program is exactly what you are thinking: kernel_task.
It may not be a big deal — in fact, most people probably haven’t even noticed their kernel_task using up more than one percent of their computer’s processor power.
But if you have noticed that your computer has been slow lately, or if your Activity Monitor has indicated that kernel_task is consuming way too much processor time for some reason, you might have a problem. When left unchecked, kernel_task can drain your battery power or spike your electricity bill by making your processor work overtime to complete trivial tasks.
Luckily, there are some simple steps you can take to fix kernel_task on Mac errors without having to rely on costly professional repairs or lengthy waits for Apple service technicians.
How Much Memory Should Kernel_Task Use?
Before you go into panic mode because you are seeing a high memory usage for kernel_task, do you know how much memory usage is considered safe?
A kernel_task is a program running in kernel mode. It can be associated with a hardware driver or hardware interrupt handler. By default, most operating systems allow kernel tasks to use 100% of the memory available to prevent errors related to memory address alignment and page table updates due to virtual memory fragmentation.
So, if you have one very large application that utilizes more than 50% of your total system resources, there is no reason for it not to utilize all available RAM, even if it doesn’t need 100%.
Many modern Macs and computers are bundled with 8GB+ of RAM and 2-4 cores at 4GHz+. Applications can take advantage of these multi-core processors and huge amounts of RAM by utilizing all available resources. The only problem that could occur is when an application goes over its allocated amount of RAM and starts using swap space on a disk.
The way to fix this problem would be to limit how much RAM each process uses, by limiting their assigned memory priority setting. For example, if an app requires 512MBs of RAM and never exceeds that limit, you could set its priority to low so it would only use 512MBs of physical memory.
Why Is Kernel_Task Hogging Memory?
We have already established the safe amount of memory a kernel_task can use. Now, why does kernel_task use so much memory?
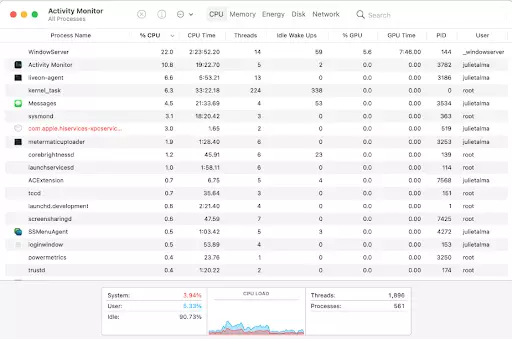
The kernel_task process shows up in your Activity Monitor list when there is a lot of kernel processing going on, either because you have misbehaving software that is doing extra work or because something has gone wrong.
Kernel_task will use your system resources (memory and processor time) as it works to run things in its queue. If it continues running high for long periods of time, then you should take action, including restarting your computer.
However, a high kernel_task usage is normal for any OS X user at some point. It’s nothing to be worried about unless it’s happening often or stays high over long periods of time.
Before you can properly diagnose and troubleshoot a system resource issue, you first need to understand what is actually causing it. In many cases, an out-of-control kernel process is just a symptom of another underlying problem.
Memory Fragmentation
The most common reason for seeing high kernel memory usage is memory fragmentation. Memory fragmentation occurs when small blocks of physical memory are allocated and freed so frequently that they never have a chance to have coalesced into larger free blocks.
The repeated allocation and release of these tiny blocks affect performance by requiring hard drive reads on each allocation instead of large contiguous memory reads. System resources like the file cache and page tables become fragmented as well, leading to additional inefficiencies.
Since this type of fragmentation has a negative impact on both the user experience and system performance, we recommend addressing the underlying cause with a few different approaches:
- Rebuild your macOS installation using Apple’s Disk Utility or third-party tools like MemToolkit or iDefrag.
- Use Trim Enabler to improve your SSD’s lifespan by fixing any unnecessary data loss.
- Free up more space on your boot volume with Storage Space Manager or similar apps.
- Perform routine maintenance with Activity Monitor’s Purgeable State feature or any system cache cleaner app.
How to Fix Kernel_Task CPU Usage Problem
The high kernel_task CPU problem may happen to almost every single person who owns a Mac. A few months after you buy your device, your kernel_task starts hogging all of your computer’s available power and you have no idea why. But fret not because there are easy fixes for the problem. Read on:
Fix #1: Boot into Safe Mode
When your Mac encounters the kernel_task CPU usage issue, you can reboot into safe mode by holding down Shift on your keyboard while you click Restart. This will disable most third-party software and allow you to easily fix any problems that have caused your system to become unstable.
To boot back into normal mode, restart without holding Shift. Once your machine is stable again, start by removing any unnecessary programs. Also, you can use a Mac optimization software program like Outbyte MacAries to scan your Mac for other performance issues and free up storage space.
Fix #2: Delete Local Time Machine Snapshots
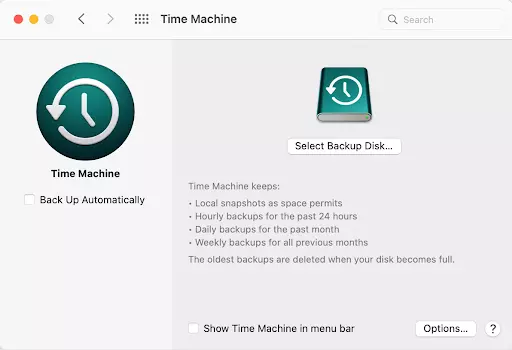
Time Machine is a built-in backup tool for macOS that allows you to back up your system to an external hard drive or Time Capsule. It periodically creates snapshots of your system, letting you return to a previous version of your computer from when it was last backed up.
Deleting local Time Machine snapshots might speed up your computer and resolve issues with high CPU usage. These snapshots contain saved versions of all files, so deleting them can somehow free up some disk space on your computer as well.
However, deleting time machine backups is not recommended if you plan on restoring any deleted data in the future. Thus, make sure to create a new backup before proceeding with any deletion.
To delete Time Machine snapshots:
- Start by opening Applications and finding Time Machine under Utilities on macOS Sierra and earlier versions. On newer versions, such as El Capitan and later, head over to System Preferences > iCloud > Backup > Time Machine.
- Select Time Machine under Destination Disk at the top left corner.
- Under Backups, click Select All and then Delete (or select specific snapshots).
- Once they’re deleted, check if this has fixed the issue. If yes, great! If not, go ahead and try out other fixes mentioned above.
Fix #3: Delete Application Log Files
MacOS retains log files for all applications. These logs can grow large over time and eventually cause serious performance issues. Deleting these files has helped many users who were experiencing high kernel usage on their MacBooks and iMacs.
To clear out application logs:
- First, launch Finder and click Go.
- Select Go to Folder.
- Then input ~/Library/Logs/ and hit Enter.
- Now, find any oversized log files and delete them. To make the process easier, consider switching to the List view and choosing the Size view to sort the log files by size.
Fix #4: Delete Connection Log Files
Every time you open a connection, it creates a log file in ~/Library/Logs/Apple/com.apple.ncprefsd.log which contains network information, among other things. You can then see if any connection is having problems and troubleshoot that connection.
But if you have hundreds of them, it’s hard to figure out which one is having issues when looking at logs on a daily basis (especially when searching for issues).
Deleting old logs helps make more room for new ones, which in turn keeps your Mac from wasting valuable resources on creating those files. This also takes up processing power. Remember that log files can only be deleted after a restart because they are locked until then.
To delete connection log files on your Mac:
- Go to Finder and choose Go. Then click Go to Folder.
- After that, input this folder path: ~/Library/Containers/com.apple.mail/Data/Library/Logs/Mail.
- Hit Enter and delete the connection log files in this directory.
Fix #5: Clear System and Application Cache
In most cases, macOS caches data from applications and system processes. When these cache files build up over time, your computer slows down as it tries to store temporary information before discarding it.
To fix high CPU usage caused by application cache files, you can delete those cache files at any time without rebooting your computer into safe mode. Here’s how:
- Access Finder and click Go. Then choose Go to Folder.
- Next, input ~/Library/Caches/ and hit Enter to launch the application cache.
- Now, switch to the List view to make it easier to sort files and folders.
- Then delete any oversized files in the folder.
- Restart your Mac if needed.
Fix #6: Rebuild Spotlight Index
Every 30 days or so, your Spotlight indexes every file on your computer.
To check if you’re indexing:
- Go to spotlight > status. It should say indexing enabled at the bottom.
- If not, simply rebuild it by going to spotlight > rebuild.
- That will take a while though, so you should do this when you know you won’t be using your Mac for a while.
Fix #7: Reset the NVRAM
The NVRAM is your computer’s short-term memory. It keeps track of many important details, such as how much RAM you have and what IP address to use when you connect to a network. If you need to reset it, make sure that all your data is backed up before doing so.
To reset your NVRAM, shut down your computer and unplug it from its power source. Disconnect any cables or ethernet cords going into it. Then flip over your computer and look for a button with two diagonal arrows pointing in opposite directions (like /). Hold that button down while pressing down on the power button to turn on your Mac again; you’ll hear three chimes and see a rainbow screen appear.
Fix #8: Reinstall macOS
Sometimes, you just need a fresh start. If your Mac has gotten really slow, or it’s crashed on you and refuses to start up, then this fix may work for you.
Reinstalling macOS is probably going to be your last resort because it involves completely wiping your hard drive and losing everything that’s on it. However, if none of these fixes works for you, and your computer is so slow that all you can do is watch your cursor blink in impatience while all other processes are crawling along at less than a few frames per second, reinstalling macOS may be your only option.
Wrapping Up
Hopefully, we were able to answer your questions about what is kernel_task on Mac and why is kernel_task so high. If you are having problems with kernel_task, feel free to try our recommended fixes above. They worked for many Mac users, so it’s worth trying on your end, too!
Do you know other ways to get rid of the kernel_task problem on Macs? Please share them below!