When Apple launched Big Sur, the seventeenth macOS version, many celebrated. People waiting long for the Catalina successor to be launched. It was initially planned to be rolled out last June 2020. But it officially came out on November 12, 2020.
Big Sur was designed to bring major changes to the operating system with updates to the user interface, improvements to security, support for ARM64-based processors, and so much more. And knowing that Catalina has caused problems for many users, it’s not surprising why the world anticipated and hoped that Big Sur would end all of them.
- Problems with Apple’s Server – You can encounter this problem if Apple’s server is currently down or having issues with the Software Update delivery infrastructure. In this case, the best thing you can do is to confirm whether there is an ongoing server issue and wait for the tech giant to fix it on their end.
- Network Glitch – Any network glitch can also trigger problems with installing the latest macOS version on your Apple computer. If you suspect that problem is caused by an IP or TCP data inconsistency, resetting or restarting your router can fix the problem.
- Third-Party Extension Software Conflict – Some third-party tools can cause the error message to appear, especially those that are designed to interact with your kernel. To prevent this issue, uninstall the software tool before installing the macOS version. CPU Gadget and Little Snitch are two kernel extension software programs that are known to cause the error.
- Corrupted Software Update Catalog – macOS Catalina and other older macOS versions may experience issues due to a glitch that affects the Software Update Catalog. This glitch actually convinces and tells your system that it doesn’t need the pending update. So, to fix this, you have to clear the software updates catalog before reinstalling the available update.
- Problems with the PRAM and NVRAM Caches – Another possible reason that causes the error message to show and prevents you from installing an update is that there is a problem with your PRAM and NVRAM Affected users were able to resolve the problem by resetting the caches of both components.
- Corrupted OS-Related Temporary Files – Any corrupted remnant from the previous installations can interfere with your recent attempts at installing Big Sur. To fix this, clear the caches folder first.
- Corrupted iTunes Entry in the Host File – Although it rarely happens, your Host file can become futile due to a corrupted iTunes entry. And as a result, you cannot proceed with installing Big Sur. If this scenario is applicable, fix the Host file problem first, then remove the problematic iTunes entry manually.
10 Ways to Fix the “An Error Occurred While Installing the Selected Updates” Error
In the section below, we offer some solutions to the “error occurred while installing the selected updates” error. You don’t have to test each fix, though. We suggest you go through the fixes first and try the best one that applies to your situation.
Fix #1: Wait a Bit.
Some affected users may encounter the “an error occurred while installing the selected updates” error when the servers of Apple become overloaded. And in this case, extending your patience may be helpful. This fix is practical and relevant if the software update has just been rolled out, such as a major system update release.
Pro Tip: Scan your Mac for performance issues, junk files, harmful apps, and security threats
that can cause system issues or slow performance.
Special offer. About Outbyte, uninstall instructions, EULA, Privacy Policy.
Luckily, it is easy to check if Apple is currently having issues with its server or macOS Software Update component. Just go to Apple’s System Status page and see if there is an ongoing outage or issue with the macOS Software Update component.
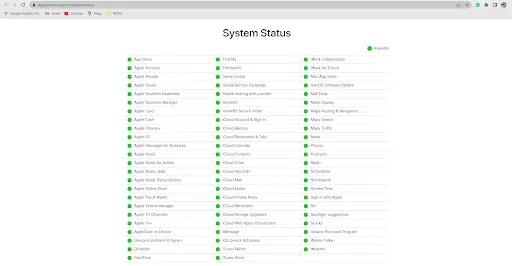
If an issue is discovered, simply wait for Apple’s engineers and technicians to fix the problem on their server. Otherwise, you may conclude that the error message is not caused by any server-related problem.
Fix #2: Reboot Your Mac.
Sometimes, rebooting your Mac is all you need to do to resolve the error. A quick reboot gives your Mac a fresh start, meaning there’ll be no unnecessary processes that run in the background and consume your available resources for nothing.
Fix #3: Check If Your Mac Is Connected to the Internet.
Other users found that the “an error occurred while installing the selected updates” error occurs due to a failed internet connection or a DNS problem.
To resolve this, check if your Mac is connected online. Start by launching Safari and visiting a website of your choice. Ensure it loads the page correctly.
Now, if you are experiencing DNS problems, you may want to verify whether the custom DNS setting has been enabled or if your ISP’s DNS servers are online. If any of those servers are offline, you may encounter problems with downloading patches and software updates.
If you suspect your DNS server is the culprit, consider using a common DNS such as Google’s 8.8.8.8 OR OpenDNS’s 1.1.1.1.
Fix #4: Reset or Restart Your Router.
If you keep on seeing the error message whenever you try to download any available update, it is likely that you are dealing with a network glitch. And in that case, you may keep on seeing the updated failed error message.
If this situation applies to you, simply perform a router reset or restart.
Restarting Your Router
Restarting your router allows you to clear any cached IP or TCP data. To restart it, find the Power button. It’s often located at the back of the router. Press it once to disable the power source. Once the power is cut from the router, disconnect the cable from the power source and wait for at least one minute before plugging it back in. This will give the capacitors enough time to drain. After that, restart your route and try to install the failed update. See if the error message is no longer there.
Resetting Your Router
If restarting your router does not fix the error, the next practical step is to reset its configuration. This is to ensure that there is no network-related configuration or cached data that is preventing your system from updating. To reset your router, find the built-in reset button. However, take note that you can only reach it using a sharp object like a needle. Press and hold it for at least 15 seconds until all the LEDs flash together. Your reset should be successfully reset by now.
Fix #5: Be Sure Your macOS Is Not Enrolled in Any Beta Update.
If you are downloading a final macOS version, and it is failing, then it is likely that you might be enrolled in the beta program. According to some affected users, they have experienced the “an error occurred while installing the selected updates” error since they are enrolled in the beta updates.
Unenrolling from these updates can fix the error in such a case. To do this, go to the Software Update System Preference section, select Details, and click Restore Defaults. This will unenroll your Mac from receiving any beta updates.
Fix #6: Download the macOS Installer Directly.
This fix is more of an alternative because it bypasses the software update process of Macs. What you will do is simply download the macOS installer through the App Store or using a direct download link. You can also download the complete macOS installer application via the command line or other third-party apps.
Once you have the installer with you, it will be easier to launch it without experiencing the “installation failed” error.
Fix #7: Delete the Kernel Extension Software.
As mentioned above, kernel extension software programs like CPU Gadget, Little Snitch, and Parallels are common culprits that trigger the installation failed error. If any of these programs are installed on your Mac, uninstall them temporarily before proceeding with the installation of the macOS version.
Here’s how:
- Launch Finder from the Launchbar.
- Then go to the Applications tab and find the kernel extension software at fault.
- Right-click on it and select the Move to Trash option.
- If prompted, input your username and password to give the necessary permissions to the application uninstallation.
- Once complete, restart your device and wait for the next startup to finish.
- Install the update again.
Fix #8: Reset the PRAM and NVRAM Caches.
If none of the above fixes worked, another possible culprit you are dealing with is a PRAM or NVRAM issue. It can prevent your system from dealing with any temp files. And in this scenario, resetting the PRAM or NVRAM can do the trick.
Here’s how to reset the PRAM and NVRAM caches:
- Shut down your Mac.
- Once it is completely turned off, switch it on and press and hold these keys immediately: Option + CMD + P + R
- Press the keys for about 20 seconds or more.
- When your Mac prompts you to do a restart, do not let go of the keys yet.
- Wait for 2 startup tones before you release the keys.
- Once the next startup is done, install the pending update and see if the error message is gone.
Fix #9: Remove the iTunes Entries from the Hosts File.
Some users said that the error message could be a result of a bad Hosts file, which may be interrupting the entire update process. In dealing with the issue, they accessed the Hosts file and removed the problematic entries.
Here’s a guide on how they did it:
- Use the Launchpad to find the Finder app.
- When the Finder app is open, go to the Applications tab and find the Terminal app. Click on it to open it.
- Inside the app, input this command and hit Enter: sudo nano /etc/hosts.
- Enter your password if prompted.
- Once the /Hosts file is open, scroll through the list and find this entry: 127.0.0.1 osxapps.itunes.apple.com.
- Then delete the line from the /Hosts file to completely remove it.
- Next, press the Ctrl + O keys to save the changes.
- Exit the Nano Editor app and restart your Mac.
Fix #10: Use Outbyte MacAries.
Sometimes, all you need to do is to optimize your Mac to ensure the pending update is installed. And for that, you need a trustworthy and reliable software program like Outbyte MacAries.
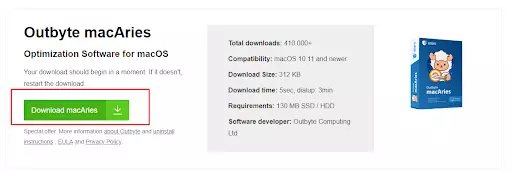
To use it, download the software first. Then open the installer. You should get a .pkg file. Then double-click on the installer to start the installation process. Once it is installed, you can then start optimizing your Mac and get rid of junk files that affect your system’s performance.
Wrapping Up
There you have it! We hope that this article has helped you get rid of the “an error occurred while installing the selected updates” message that is preventing you from installing macOS updates.
Now, if the error still keeps on popping after trying the fixes above, we suggest that you reach out to Apple’s support team. You can also take your device to the nearest Apple Center and have a certified Apple technician perform a complete check.
If you have other fixes in mind, please share them in the comments!