Screenshots are a great way to show something that words can’t describe. They can be used to show a specific image, key combinations, or an unusual occurrence on your computer. Screenshots can also be used to demonstrate an issue or to share a gaming achievement.
There are different ways to take a screenshot using your Windows computers. For example, computers running Windows 8 or 10 can take a screenshot using a keyboard shortcut. Other users use the Print Screen button and Snipping Tool to take screenshots, which let you take either full-screen screenshots or custom screenshots on your Windows computer. This article will show you how to screenshot on windows and how to save the images when they don’t automatically save.
How to Take Full-Screen Screenshots on Windows 8 and 10
Taking screenshots using a computer running Windows 8 and 10 is very easy. To do this:
- Go to the screen or the application that you want to take a screenshot of and make sure that there are no elements on the screen that you don’t want to be included. This could be other open windows or programs not related to the subject of your screenshot.
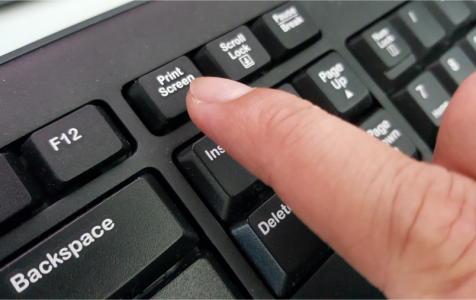
- Look for the Print Screen button on your keyboard. It is usually found on the upper right side of the keyboard. If you have a small keyboard, you’ll probably have to look for the abbreviation, PrtScr.
- Press the Windows + PrtScr keys at the same time to take a screenshot of your current screen. You will notice a slight dimming of the screen as the shot is taken. If your screen did not dim down, don’t worry because it’s probably because some of your display settings have been disabled or because you’re using an old Windows computer which has been upgraded to Windows 10/11.
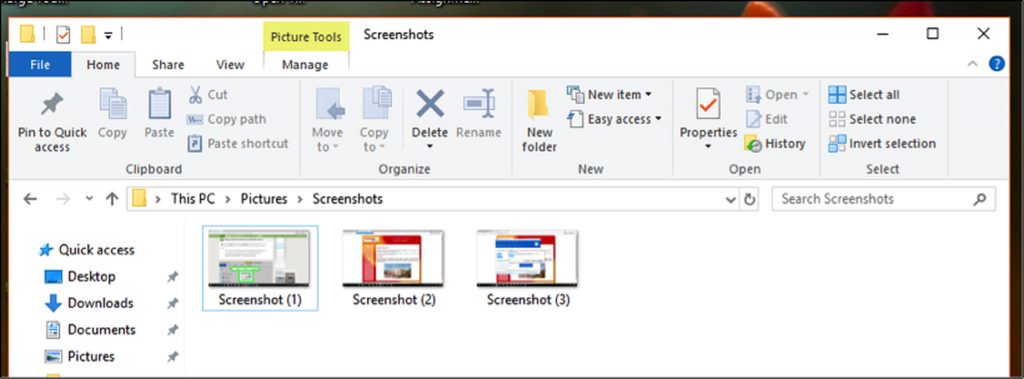
- All screenshots are usually saved in the Screenshots folder, which is inside the Pictures folder. All the screenshots will be named Screenshot+(number) which tells you the sequence with which these images were taken. For example, you’ll see Screenshot(1), Screenshot(2), Screenshot(3), etc.
Expert Tip: For smoother PC performance, consider using a PC optimization tool. It handles junk files, incorrect settings, and harmful apps. Make sure it's right for your system, and always check the EULA and Privacy Policy.
Special offer. About Outbyte, uninstall instructions, EULA, Privacy Policy.
- If you can’t find where your screenshot was saved to, try pressing Ctrl + Windows + PrtScr or Fn + Windows + PrtScr.
Since the shots taken using these keyboard shortcuts are full-screen, you can edit them or crop the screenshots using Paint or other photo-editing tools.
How to Take Screenshots Using Any Windows Computer
- Go to the app or window that you want to take a screenshot of and make sure there are no distractions, such as another open app or program.
- Hit the Print Screen button located at the upper-right portion of the keyboard. Sometimes the key is labeled as PrtScr because of space limitations. If your keyboard has a Function key (Fn), you might need to press this together with the Print Screen button to take the screenshot.
- Open Paint, a built-in simple photo editing tool that comes pre-installed on all Windows computers. To launch Paint, click Start and then click the search bar below the Start menu. Type in paint to search for the Paint application. When you see the Paint app at the top of the search results, click it to open the app. If you’re using a computer running Windows XP, you need to click Start > Programs > Accessories > Paint.
- Once the Paint program is open, you’ll see a blank canvass where you can do your editing. Click Paste at the upper-left corner of the window or hit Ctrl + V to paste your screenshot.
- Edit the screenshot by cropping the part of the screen that you need.
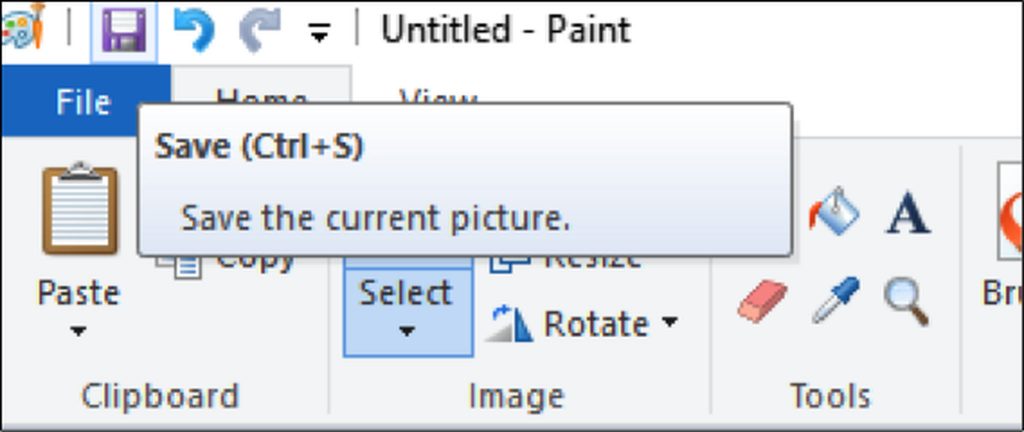
- Save the screenshot by clicking the floppy disk icon at the top-left corner or by hitting Ctrl + S.
- Type in a name for your image and select the folder where you want to save the screenshot to. Then, click Save. If you’re going to change the file type of your saved image, choose Save as type from the dropdown box at the bottom of the Save window, then select the format you want to save it in. You can choose to save it as a PNG, JPEG, Bitmap, TIFF, or GIF. However, the recommended format is PNG because of its high quality and small file size.
How to Take a One-Window Screenshot
A one-window screenshot means taking a picture of the active window on your screen. To do this:
- Click on the active window you want to capture an image of. It should be in front of all the other open windows on your screen.
- Hold down Alt and then press PrtScr to capture that active window. The image will be copied to your clipboard. There is no indication that a screenshot has been taken — no shutter click, dimming down of the screen, or other signs that a shot has been made. Press the Alt + PrtScr keyboard shortcut several times just to be sure.
- Launch Paint by going to the Accessories folder or searching the Paint app by using the search bar in the Start menu. Paste the screenshot by clicking the Paste button at the top of the window or press Ctrl + V.
- You can also directly paste the screenshot into other programs like Microsoft Word, the body of your email, notes, etc. Just open the program you want to copy and press Ctrl + V.
- If you pasted the screenshot on Paint, you could save a copy of the image by clicking the floppy disk icon on the top-most menu. Similarly, you can press Ctrl + S to save the screenshot. Type in the name you want for the file and choose the Save format. To save as a different format, click the Save as type drop-down menu and choose from the options there. The most common file types are PNG and JPEG, but you can also save screenshots as Bitmap, TIFF, or GIF.
How to Screenshot on Windows Using Snipping Tool
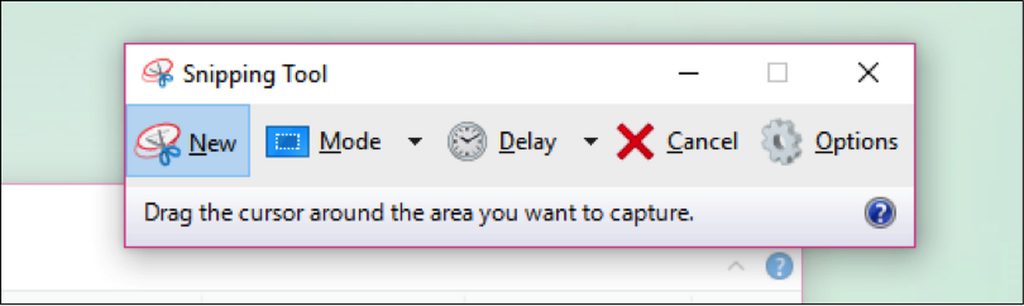
The snipping tool is a built-in screenshot tool that comes with computers running Windows Vista and later. It is a very versatile tool because it can take rectangular snips, free-form snips, full-screen snips or one-window snips. The best thing about the Snipping tool is its delay feature. You can delay the screenshot for one up to five seconds using its delay timer, pretty much like the timer on cameras. To use the snipping tool, follow these steps:
- For computers running Windows Vista and 7, navigate to Start > All Programs > Accessories. Next, choose the Snipping Tool from the list of accessories.
- If you’re using Windows 8, just type in snipping tool on the Start screen and select the Snipping Tool from the search results.
- For Windows 10/11 users, click Start and type in snipping tool in the search bar, then choose the Snipping Tool app from the search results.
- Choose the type of snip you want to make. The rectangular snip is chosen by default, but you can select a different type of snip from the mode selection. Just click the Mode button to change the shape of the snip.
- Free-form snip lets you choose any shape using your cursor. Just hold down the mouse to draw your preferred form. The area inside of the shape you’ve outlined will be snipped.
- Rectangular snip lets you draw a rectangular area, wherein the area inside the rectangle will be snipped.
Window snip lets you select which open window you want to snip. - Full-screen snip captures the whole screen, including all the windows open, except for the Snipping Tool window.
- Once you’ve decided what type of snip you want to make, click New.
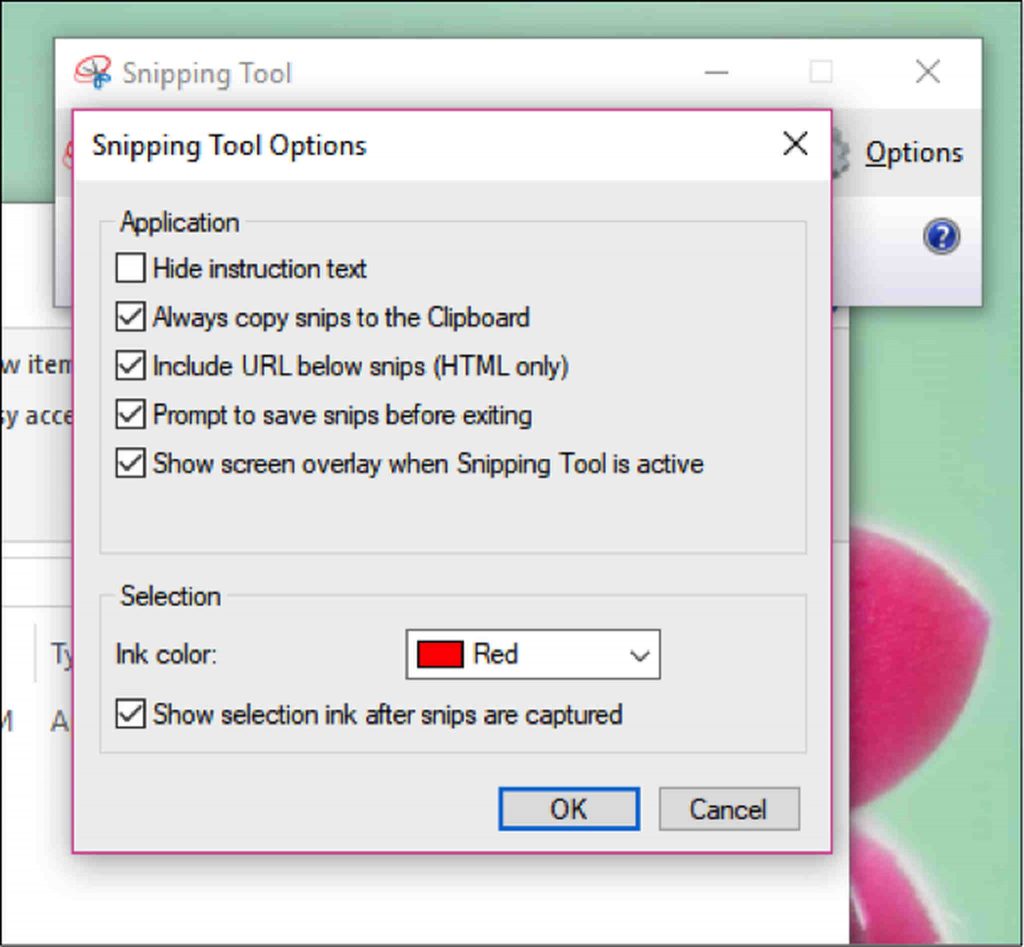
- All snips have a red border around it by default. If you want to change the color of the border, go to Options and choose a different color. If you don’t want your screenshot to have any border at all, uncheck the box for Show selection ink after snips area captured. This will remove any border from all your future snips.
- When you create a new snip, the screen will fade into white and the only window left clickable is that of the Snipping Tool. Draw your snip area by holding down the mouse and dragging the cursor to create a shape. You can also select the window you want to snip if you’re going to do a window snip. Release the mouse to complete the area selection. If you’re making a full-screen snip, you don’t have to worry about drawing your area because the whole screen will be automatically selected.
- Once you have created the snip, it will open in a new window where you can use the pen tool to draw on it and write notes. You can also use the Highlight to emphasize certain parts of the image. The erase tool, on the other hand, helps delete annotations or edits you’ve made to the screenshot. However, it does not allow you to erase parts of the original screenshot itself.
- To save the snip, click the floppy drive icon or press Ctrl + S to open the save dialog. Type in the name you want for the screenshot and choose the file type if you need to. You can save it as PNG, JPEG, Bitmap, GIF, or TIFF. Just click the Save as type field to choose your format. PNG is the default save format of Windows 7 and 8 because PNG files have very high quality despite the small file size. For Windows Vista, the default file type is JPG or JPEG. This is an inferior quality format because the image looks blocky and the colors are not 100% accurate. The JPEG file type may be ideal for photographs, but not for screenshots, because these types of photos may need finer details.
- Technically, the snip has been copied to your clipboard the moment it was created. This means that you can directly paste it to other programs such as email, Microsoft Office Word or Paint. You can use Paint to do more edits on the screenshot image. To paste the snip, just open the program you want to add it to and press Ctrl + V.
How to Screenshot on Windows Using the Snipping Tool Shortcut
The Snipping Tool is a convenient feature that is very to use. However, to access the tool, you need to find first the Accessories folder. Fortunately, there’s a not-so-popular keyboard shortcut to help you quickly locate the Snipping Tool. To take a screenshot using the Snipping Tool shortcut, do the following:
- Open the window, page, or program you want to take a picture of. Make sure that no items are getting in the way or you don’t want to include.
- Press Windows + Shift + S to launch the Snipping Tool. Your screen will fade into white, and your mouse cursor will become a crosshair icon. However, you will not see the Snipping Tool window.
- Select the area you want to screenshot by clicking and dragging the mouse cursor (crosshair symbol, +) to define the area you want to screenshot.
- Release the mouse button to take a screenshot of the selected area and save the image to the clipboard. Now you can paste the screenshot to another program that allows pasted photos.
- Open the program you want to paste the screenshot and hit Ctrl + V. To save your screenshot, press Ctrl + S, then type in the name you want for the file. Next, choose the save location and save format, then click Save.
How to Take a Screenshot of Several Windows in a Row
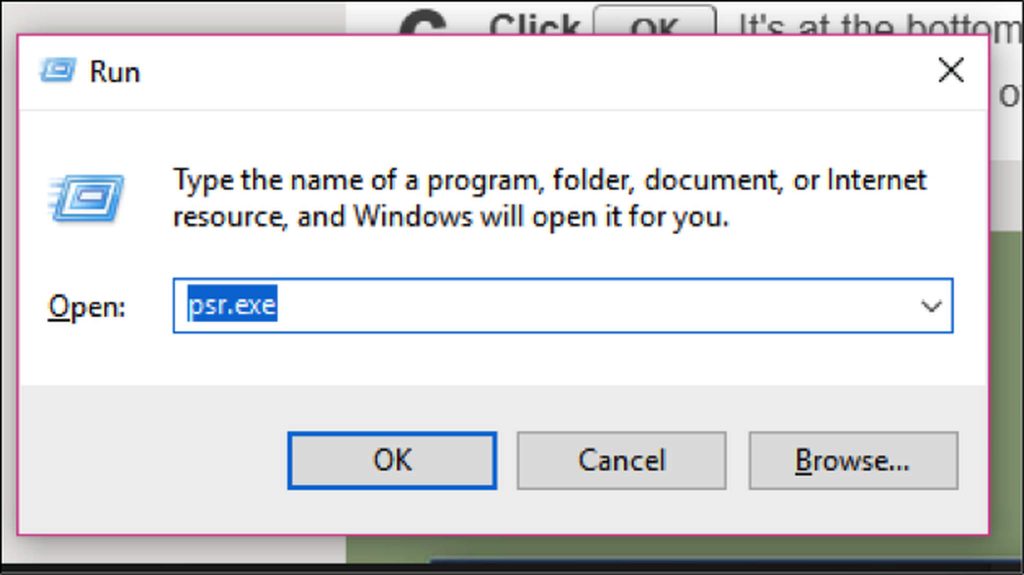
Sometimes, a screenshot is not enough to explain what you want to say. This is true for tutorials and walkthroughs. You need a series of screenshots to explain the whole process, especially if it is a complicated one. To create multiple screenshots of several windows in a particular sequence, you can use Windows’ built-in feature called PSR.exe. PSR or Problem Steps Recorder is a secret executable tool that lets you create a series of screenshots. This feature came with Windows 7 and was designed to capture step-by-step actions to screenshot PC problems or a solution to a problem. PSR.exe allows you to record up to 100 screenshots and combine them all in one document. To use PSR.exe to document a problem or a process, follow these steps:
- Go to the first of the pages you want to record. The first page should be the active window.
- Click Start and type in run in the search bar below.
- Click Run from the search results.
- Type in psr.exe in the dialog that opens.
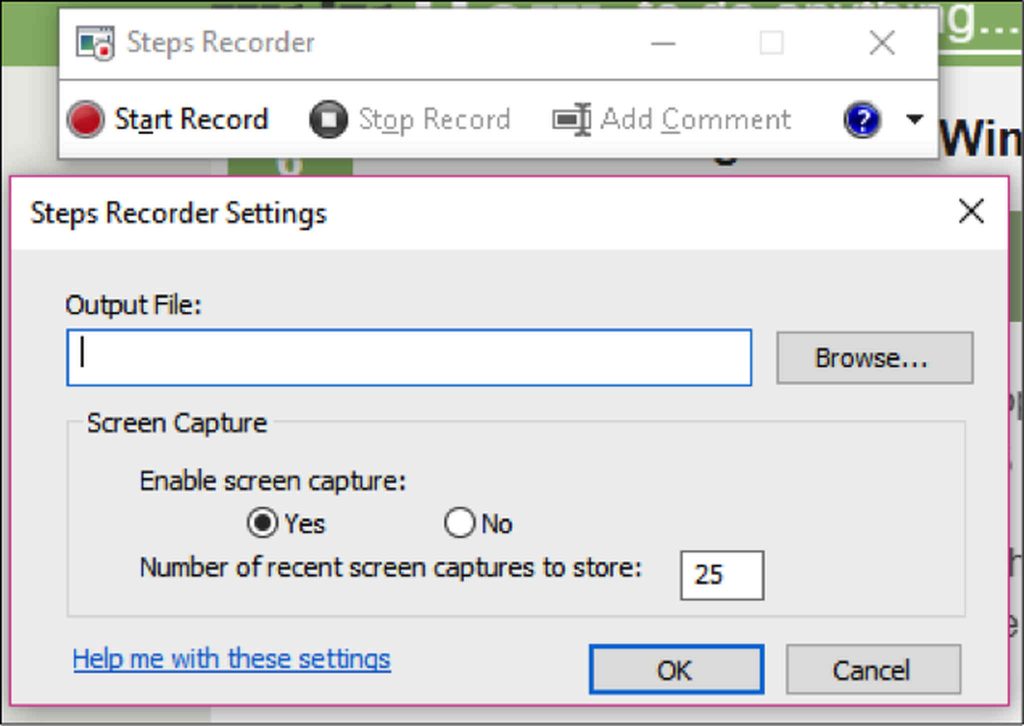
- A small rectangular tool will appear after. Click Start Record to document the next 25 screen changes. If 25 screenshots are not enough, click the down arrow button in the right-most part of the toolbar, then click Settings. You can change the number of screenshots here by typing in your preferred number beside Number of recent screen captures to store.
- Click through your screens so that the PSR can screenshot the changes. Simply moving your cursor is not enough, you need to have actual screen changes for the tool to capture it.
- After you’re done with the process, click Stop Record at the top of the toolbar. This stops the program from recording the changes on your screen and opens the results pane.
- You can scroll through the screenshots to make sure that all processes were captured completely.
- If you’re happy with the recording, you save all your screenshots in a ZIP folder. Just click Save, type in the file name, then select the preferred save location, and then click Save.
- The screenshots will be saved as an HTML file that you can open using a web browser.
How to Screenshot on Windows Tablets
Taking screenshots using your tablet is more straightforward than using a computer. To capture your tablet’s screen, do the following:
- Open the app, program, file or whatever you want to take a picture of and make sure there are no distractions on the screen. You can turn on Airplane mode while you’re taking screenshots to avoid calls, messages, and notifications from coming in.
- Press and hold the Windows logo or power button. This depends on the tablet that you have. If you see a Windows logo on the bezel of the tablet, then press and hold it. If you don’t see any, then use the power button instead.
- Next, press the Volume Down if you’re using the Windows logo or the Volume Up if you’re using the power button. You will notice that the screen will dim down for a second, which indicates that a screenshot has been taken.
- Your screenshot is automatically saved to the Pictures > Screenshots folder on your device.
Conclusion
There are so many ways to take screenshots on your computer or tablet, and you can choose which is more convenient for you. However, you need to remember that these screenshots will accumulate in the long run, which might affect your computer’s performance. Clean up your PC with an app like Outbyte PC Repair to get rid of junk files and optimize your computer’s performance. Aside from cleaning out unnecessary files, this app also scans your computer for potential risks so you can resolve potential issues before they happen.