
Windows PCs suddenly reset and restart when a stop code or blue screen error appears. The operating system does that to prevent permanent damage and data loss. One of these Blue Screen of Death (BSOD) errors is the WHEA_UNCORRECTABLE_ERROR.
The issue usually clears after the restart. However, if its underlying cause persists, the blue screen will continue to show up.
If you’re experiencing the Windows Stop Code WHEA_UNCORRECTABLE_ERROR on Windows 10/11, this article will show you how to get rid of it.
What Causes the Stop Code WHEA_UNCORRECTABLE_ERROR?
The MSDN bugcheck WHEA_UNCORRECTABLE_ERROR is an indication that there’s been a fatal hardware error. That’s why it often shows up after installing or uninstalling a piece of hardware.
Expert Tip: For smoother PC performance, consider using a PC optimization tool. It handles junk files, incorrect settings, and harmful apps. Make sure it's right for your system, and always check the EULA and Privacy Policy.
Special offer. About Outbyte, uninstall instructions, EULA, Privacy Policy.
However, faulty drivers and outdated software components could also trigger the stop code.
How to Fix WHEA_UNCORRECTABLE_ERROR on Windows 10/11
There’s no one WHEA_UNCORRECTABLE_ERROR Windows 10/11 fix since the problem has various causes. So, you’ll have to employ different troubleshooting methods until you get rid of the issue.
Follow the methods below, one after the other.
Method 1: Restore Your Computer
Sometimes, it’s challenging to track down the changes triggering the error. The good thing is that you can reverse these modifications using Windows’ System Restore utility. The client allows you to take the OS back to a working state.
Windows usually sets restore points automatically when you make significant changes to your system, such as installing a new device driver or major Windows Update. However, you can also set restore points manually in situations like these.
Once you return to a restore date where the issue didn’t occur, the blue screen should be gone for good.
These steps will show you how to restore your PC:
- Launch the search menu using the Windows + S shortcut.
- Type “system restore” (no quotes).
- Click on Create a Restore Point when the search results appear.
- You should now see the System Protection tab of the System Properties dialog box.
- Click on the System Restore button.
- A recommended restore point should show up when the System Restore wizard appears. Click on it. If you don’t see such an option, click on the Next button.
- Choose a restore point on the page that follows. Make sure the restore point falls in a period where the blue screen didn’t occur.
- Click on Next and confirm your restore point.
- Allow Windows to complete the process and restart your computer.
Method 2: Disconnect Recently Installed Hardware Devices
Faulty hardware devices are among the chief causes of the WHEA_UNCORRECTABLE_ERROR. If you installed a piece of hardware right before the error started showing up, disconnect it and check for the problem.
If you installed multiple devices at once before turning on your computer, consider removing them one after the other and checking for the error.
Chances are, one device is triggering the blue screen. So, you can disconnect all the devices you installed first and then check for the problem. If the error doesn’t show up, start plugging the devices one after another. Once you connect a device, turn on your system to check for the issue. The piece of hardware that trigger the error again is the defective one.
Method 3: Update Windows
Microsoft releases regular Windows updates to keep the OS secure and improve performance. Some of these updates fine-tune how the operating system interacts with hardware devices. In some cases, the blue screen error could show up because you’ve not installed updates for a long time.
If that’s the case, open the Windows Update client and install every pending update.
- Tap Windows + I on your keyboard to launch Settings.
- Click on Update & Security when the first page of Settings appears.
- Select the Check for Updates button if the Windows Update utility does not automatically search for updates.
- Once the client finds updates for your system, allow it to download them. You can also download feature and quality updates, which might be optional.
- Restart your system to install the updates after the utility downloads them.
Method 4: Update Your Device Drivers
Drivers are among the most critical software components of the Windows operating system. They help the OS communicate with hardware devices by acting as interpreters.
The WHEA_UNCORRECTABLE_ERROR often shows up when computers are plagued with driver problems. Outdated and corrupt drivers can break down communication between the operating system and hardware devices, causing the OS to crash and produce the stop code.
You can fix the problem by resolving every driver issue on your PC.
Faulty drivers are usually indicated in the Device Manager, although this isn’t always the case. In addition, the client does not flag outdated drivers, which could also trigger the error.
So, the best thing to do is check your original equipment manufacturer’s website for outdated drivers for your PC. If you installed a new hardware device, go to its manufacturer’s website to download and install its latest driver.
There are other ways to update your drivers. Some OEMs and device manufacturers provide driver-updating tools. For example, you can install Intel’s Update Assistant to update Intel drivers on your system.
That said, the best way to go about updating drivers is using a trusted third-party driver-updating tool that can help you automatically detect outdated drivers and update them.
Method 5: Automatically Repair Errors
Sometimes, system-level issues you can’t detect might be triggering the BSOD. In such a case, some leftover registry keys and entries could be clashing with specific system processes. Unfortunately, you can’t go on to start piecing together the faulty key involved. Doing that would even be almost impossible for an advanced PC technician.
Thankfully, you can use the Outbyte PC Repair to find such problems and remove them. Once you download and install the tool, it’ll be set up to run regular maintenance so that you won’t have to experience problems like this again.
Method 6: Run the CHKDSK Tool
The CHKDSK tool, short for Check Disk, is a command-line tool used to scan a disk for damages. It recovers and repairs data on the disk and marks defective sectors as “bad.” Then, it tells the OS to stop writing data to those sectors.
You can use it in this case to fix the blue screen error. Important software info could be stored on malfunctioning sectors, and the problem could be showing up whenever the OS attempts to read that data.
These steps will show you how to run the tool:
Going through File Explorer:
- Launch a File Explorer window using the Win + E shortcut.
- Go to the left pane once File Explorer opens and expand This PC.
- Right-click on your hard drive under This PC and select Properties.
- Once the Properties dialog pops up, switch to the Tools tab.
- Under the Tools tab, go to Error Checking and choose Check.
- After that, a dialog box should show up, saying that there’s no need to scan the drive.
- Click on Scan drive.
- The utility will now be forced to scan your hard drive for problems.
- It will ask you to resolve any problem it finds and restart your computer.
Here’s how to go through the Command Prompt:
- Use the Win + S keyboard shortcut to launch Windows search.
- After the search box shows up, type “CMD” (no quotes).
- Right-click on Command Prompt’s search results entry and click on Run as Administrator.
- Select the Yes option when you see the User Account Control box.
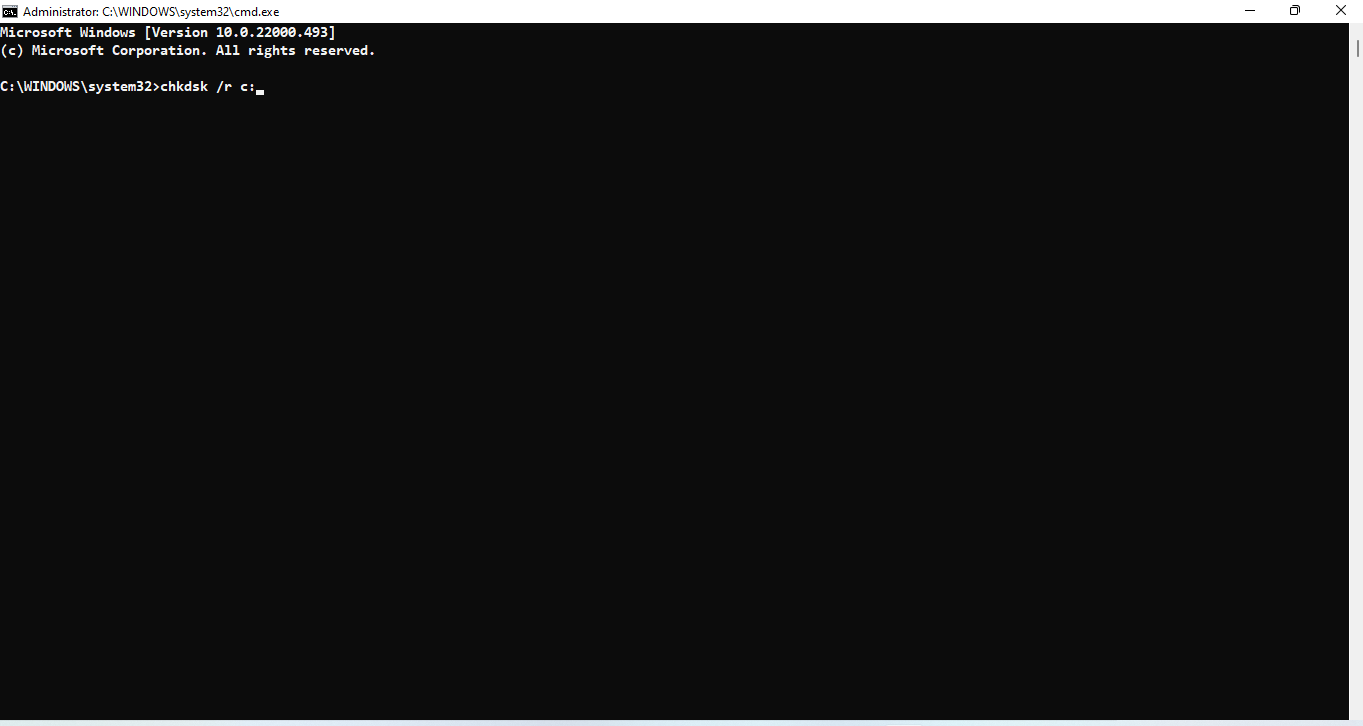
- After the Command Prompt window opens, type the following line
chkdsk /r c:
Make sure you change the letter “c” to your hard drive’s assigned letter.
You should get a message saying you should reschedule the check for the next reboot. Select Y to restart your system.
- The tool will now check for logical errors and bad sectors and repair them.
Method 7: Check for Faulty RAM
Another cause of the Windows 10/11 Whea Uncorrectable Error is faulty RAM. If one or more RAM sticks malfunction, the blue screen will repeatedly pop up. Thankfully, you can confirm whether your RAM is defective using the Windows Memory Diagnostic tool.
Here’s how:
- Press Windows + R to launch the Run dialog window.
- Once the Run window shows up, type “mdsched.exe” (no quotes) and click OK.
- After the Windows Memory Diagnostic window pops up, select “Restart now and check for problems (recommended).”
- Your computer will reboot, and the Windows Memory Diagnostic tool will start checking your RAM sticks. The process might take several hours to complete, depending on your system’s speed and RAM size.
- After the program completes the test, your system will restart automatically, and Windows Memory Diagnostics will display the test results of the scan.
You can also go through the Event Viewer to check the details of the scan. Here’s how:
- Tap the Windows and X simultaneously or right-click the Start button.
- Select Event Viewer once the Power User menu shows up.
- After the Event Viewer opens, head to the left side of the window and expand Windows Logs.
- Click on System.
- Next, go to the middle pane, where you’ll find different event entries.
- Switch to the right side of the window and click on the Find option.
- Once the Find box opens, type “Windows memory diagnostics” (no quotes) and click on Find Next.
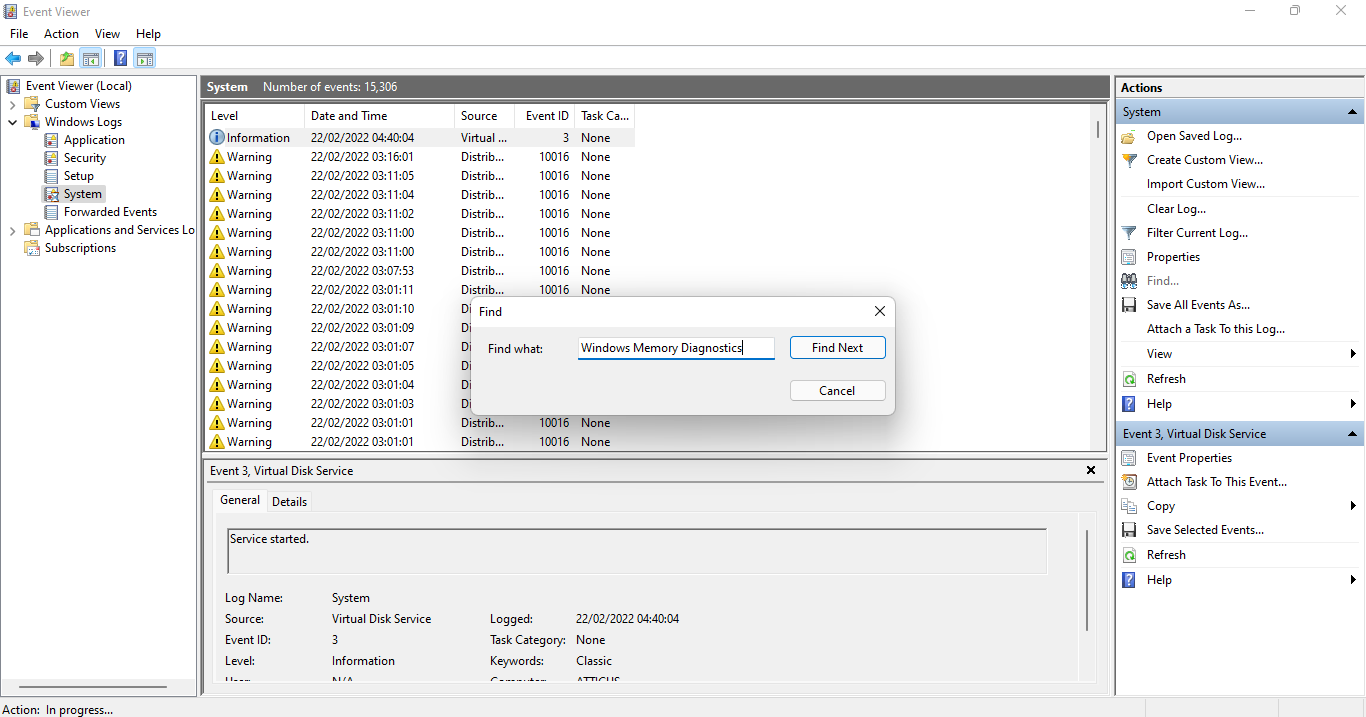
- The memory scan result will appear under General.
- It should be an Information event whose timestamp corresponds with the time the Windows Memory Diagnostic completed its scan.
If you find out that your RAM is defective, you have to replace it. That said, you need to know if one RAM stick is the problem or both (if your system has two). To do that, remove one stick and run the test or check for the BSOD.
Method 8: Disable Overclocking
Overclocking your PC for performance gains comes with consequences. These repercussions include overheating, stability problems, and blue screens of death like the WHEA Uncorrectable Error.
You can resolve the problem by resetting your overclocking settings in your BIOS or the software program you used to tweak your CPU speed.
These steps will show you how to open your BIOS and disable overclocking.
Opening your BIOS:
- Hit the Windows and I keyboard keys together to launch Settings.
- Click on Update & Security.
- After the Update & Security interface opens, scroll down in the left pane and click on Recovery.
- Go to the right side of the screen and click on Restart Now under Advanced Startup.
- After your PC restarts to the Choose an Option screen, select Troubleshoot and click on Advanced options.
- Select UEFI Firmware Settings on the Advanced Options screen.
Disabling Overclocking:
- Once your computer reboots to the BIOS environment, head to the Advanced tab.
- Go to Performance and search for Overclocking or a related setting.
- Disable the Overclocking option, save your changes, and exit the BIOS.
Conclusion
That’s how to get rid of the error WHEA_UNCORRECTABLE_ERROR on Windows 10/11. If the problem persists, you’re left with the option of resetting your operating system. You can choose to keep your files, but we recommend you back them up before proceeding.