
Resolving the Windows Update 0x8024401F error on Windows 10/11 might seem challenging, but it’s manageable with proper guidance. This guide will provide you with an efficient and time-saving solution to fix this specific Windows Update error on your system.
DISCLAMER: This guide provides step-by-step instructions for troubleshooting and resolving a specific Windows Update error. While these instructions are intended to be comprehensive, users should always exercise caution when modifying system files or implementing fixes. We strongly recommend backing up important data before making any changes.
What Causes Windows Update Error 0x8024401f?
The Windows Update 0x8024401f is one of the most common errors that you can encounter while updating your operating system. It usually comes with the “Windows server 2016 update status 0x8024401f” error message and occurs when there is some kind of problem with the update installation process.
There are a few reasons that might cause this error code, and you should always try to identify the source before attempting any fixes. For example, if you have a third-party antivirus or firewall installed on your computer, then one of these programs may be blocking the update process. You will need to temporarily disable these security programs or set them in inactive mode for a time period during which you can perform this update installation procedure.
Expert Tip: For smoother PC performance, consider using a PC optimization tool. It handles junk files, incorrect settings, and harmful apps. Make sure it's right for your system, and always check the EULA and Privacy Policy.
Special offer. About Outbyte, uninstall instructions, EULA, Privacy Policy.
If you don’t know how to do that, just consult the program’s user guide. Additionally, ensure that you have enough disk space available on your C drive (usually around 20 GB). If not, delete some unused files and folders from the drive or transfer them to an external storage device like an SD card.
If all else fails, then you’ll need to contact Microsoft directly by opening an online chat session with their support team and asking for steps to resolve the Windows 10/11 update error 0x8024401f.
Below is a list of the most common culprits behind this error:
- Security Interference – Security Interference – Occasionally, an overactive antivirus suite can contribute to this error. If you suspect that your antivirus might be causing this issue, consider temporarily disabling it or uninstalling it.
- Problematic Windows Update – There are times when the Windows update itself is the problem. And fortunately, Microsoft acts quickly in such scenarios. They usually release a hotfix for the problem. To get it, run the Windows Update troubleshooter and apply the recommended fix.
- Corrupted Cache – If you see this error while using an application, it is likely that your Windows Store cache is corrupted. To resolve this, reset the Windows Store cache using the CMD prompt.
- VPN Connection – If your system finds your connection unsafe or suspicious, it may throw error messages like the Windows Update error code 0x8024401F. To resolve this, uninstall your VPN client or proxy server.
Preliminary Troubleshooting Steps
There are a few ways you can try to fix this error. Follow the steps below and see if any of them work for you.
- Restart your device.
- Make sure your network is connected properly, and restart your device.
- Close any antivirus programs that might be running in the background and restart your device.
- Ensure your Windows operating system is up-to-date by checking for any available updates through your system settings or Microsoft’s official website. Restart your computer after any updates have been installed.
- Restart your computer in safe mode (with networking), then restart again normally, which may solve the issue without needing to reinstall anything or update anything else.
If none of these steps works, proceed with the solutions below.
Solution 1 – Reset the Windows Update Components
Windows Update is an integral component of Windows 10 because it allows you to download and install the latest updates with the most recent drivers, security patches, and bug fixes. However, it is not without a flaw. This mechanism may not always function accordingly and throw the Windows update error code 0x8024401F.
In such a case, the first solution to try is to reset the components of Windows Update. The easiest way to do this is by using the Command Prompt.
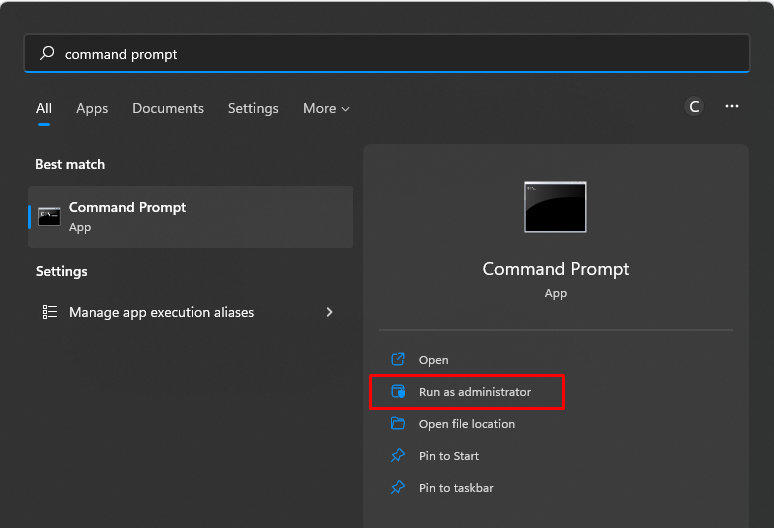
- To access the Command Prompt in Windows 10, search for Command Prompt in the Start menu and then right-click it and select Run as administrator. However, in order to do so, you need to be logged into your computer with an administrator account.
- Then type the following commands and press Enter.
- net stop bits
- net stop wuauserv
- net stop appidsvc
- net stop cryptsvc
- Next, input this command: Del “%ALLUSERSPROFILE%\ApplicationData\Microsoft\Network\Downloader\*.*”
- Then type this command: Del “%ALLUSERSPROFILE%\Application Data\Microsoft\Network\Downloader\*.*”
- Now, clear the Windows Update cache by entering these commands:
- rmdir %systemroot%\SoftwareDistribution /S /Q
- rmdir %systemroot%\system32\catroot2 /S /Q
- We will then reset the services we stopped by using this command:
- exe sdset bits D:(A;;CCLCSWRPWPDTLOCRRC;;;SY)(A;;CCDCLCSWRPWPDTLOCRSDRCWDWO;;;BA)(A;;CCLCSWLOCRRC;;;AU)(A;;CCLCSWRPWPDTLOCRRC;;;PU)
- exe sdset wuauserv D:(A;;CCLCSWRPWPDTLOCRRC;;;SY)(A;;CCDCLCSWRPWPDTLOCRSDRCWDWO;;;BA)(A;;CCLCSWLOCRRC;;;AU)(A;;CCLCSWRPWPDTLOCRRC;;;PU)
- Go to the System32 folder by typing: cd /d %windir%\system32.
- Then register all the necessary DLL files on the registry by entering:
- exe /s atl.dll
- exe /s urlmon.dll
- exe /s mshtml.dll
- exe /s shdocvw.dll
- exe /s browseui.dll
- exe /s jscript.dll
- exe /s vbscript.dll
- exe /s scrrun.dll
- exe /s msxml.dll
- exe /s msxml3.dll
- exe /s msxml6.dll
- exe /s actxprxy.dll
- exe /s softpub.dll
- exe /s wintrust.dll
- exe /s dssenh.dll
- exe /s rsaenh.dll
- exe /s gpkcsp.dll
- exe /s sccbase.dll
- exe /s slbcsp.dll
- exe /s cryptdlg.dll
- exe /s oleaut32.dll
- exe /s ole32.dll
- exe /s shell32.dll
- exe /s initpki.dll
- exe /s wuapi.dll
- exe /s wuaueng.dll
- exe /s wuaueng1.dll
- exe /s wucltui.dll
- exe /s wups.dll
- exe /s wups2.dll
- exe /s wuweb.dll
- exe /s qmgr.dll
- exe /s qmgrprxy.dll
- exe /s wucltux.dll
- exe /s muweb.dll
- exe /s wuwebv.dll
- After that, reset network configurations by typing:
- netsh winsock reset
- netsh winsock reset proxy
- Finally, restart the services you stopped earlier. Enter this:
- net start bits
- net start wuauserv
- net start appidsvc
- net start cryptsvc
- After doing that, restart your computer and run Windows Update again.
Solution 2 – Perform a Clean Boot
A clean boot is a troubleshooting step that is sometimes used as a last resort. A clean boot will help you identify if any third-party apps or startup items are interfering with the installation of your updates. To perform a clean boot on Windows 10, follow these steps:
- Right-click the Windows menu or Start button.
- Click Search and type ‘msconfig’. Hit Enter.
- Next, click Services, and tick the Hide all Microsoft services checkbox.
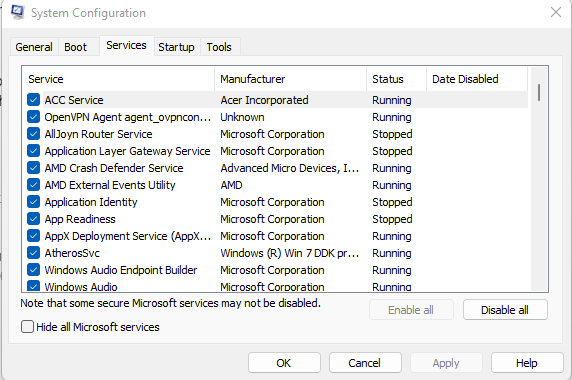
- Click Disable all and choose Startup.
- Then click Open Task Manager.
- Have a closer look at the list and click any startup program you suspect might be interfering. Then click Disable. Repeat this for all suspicious Startup programs.
- Click the X to close Task Manager.
- Click OK in the System Configuration window.
- Restart the system.
Solution 3 – Update Your Device Drivers
Many users have reported that updating their device drivers is the way to go when encountering this error code. To do so, open Device Manager and look for any yellow exclamation points. If you find one, right-click and select Update Driver Software. Make sure you select the option that is appropriate for your computer. Once finished, restart your computer and see if the problem persists.
Alternatively, you can use a driver updater tool to update your device drivers. Using a driver updater tool can automatically update outdated and missing drivers on your device to prevent them from causing this error. There are many options for how to use driver updater tools, with many of them being free or only a few dollars a month.
To ensure that device drivers don’t cause Windows update errors, experts suggest regularly scanning for any new updates or downloaded drivers that you may not have been aware of and downloading them before you try to install anything. This way, you won’t have to download the driver separately while your computer is frozen, and it could actually help fix the problem if it’s just an outdated driver.
Solution 4 – Use a PC Repair Tool
PC repair tools are utilities designed to scan your computer for known issues and automatically fix them. They can be particularly helpful when troubleshooting systems that aren’t functioning as expected. A lot of times, these programs will fix the issue with no user input required. Other times, they may require you to choose between two or three potential solutions. The best part about these types of tools is that they can be used for free!
One example of such a tool is the Outbyte PC Repair Tool. This utility provides a user-friendly interface and a range of features, including junk file cleanup, hard drive optimization, memory card defragmentation, and virus or malware removal. Please remember that while these tools can be very helpful, it’s still crucial to ensure you’re using a trusted and reputable tool to avoid potential file damage.
To use it, you need to install the Outbyte PC Repair Tool first. The installation process is pretty standard; just click Next until it’s done, then follow any prompts if you want to run a quick scan before starting for real. Note that although running a quick scan is not required, we do recommend doing so in order to find any files or programs that may be causing issues with your system.
Solution 5 – Reset the Windows Store Cache
If you encounter the 0x8024401f error while updating the Universal Windows Platform app through Windows Store, it is possible that the update process may be interrupted by some corrupted system files.
In order to fix this, some users had to reset the Windows Store cache and its components. And to reset the Windows Store cache, you have two available options: via CMD or the Windows GUI.
via the CMD Prompt
- Press the Windows + R buttons on your keyboard to launch the Run applet. Then input cmd into the text field. After that, press the Ctrl + Shift + Enter buttons simultaneously. When prompted, hit Yes to grant administrator rights.
- Into the command line, input the wsreset.exe command and hit Enter. This will reset the Windows Store app and its dependencies.
- Lastly, restart your Windows 10/11 computer to see if the error is gone.
via the Settings App
- Launch the Run applet by pressing the Windows + R keys simultaneously. And then, input the ms-settings:appsfeatures command.
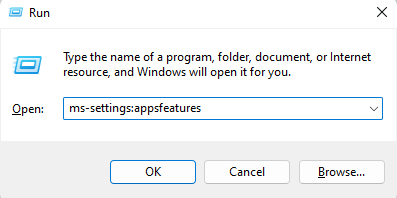
- Press Enter to launch and open the Apps and Features section of the Settings app.
- Scroll down the list of installed applications and find Microsoft Store.
- Once you find it, select Advanced Options.
- Then find the Reset tab and click the Reset button here. This will start the cache clearing process.
- Wait for the cache clearing process to complete, then restart your Windows 10/11 device.
Solution 6 – Disable the Proxy Server
A proxy server is a computer server that acts as an intermediary between an endpoint device, such as a personal computer, and another server from which a user or program may obtain resources. Proxy servers are commonly used to increase security and anonymity on the Internet.
To disable your Windows device’s proxy server, follow these easy steps:
- Open the Settings window and navigate to Network & Internet.
- Click Internet Options.
- Navigate to the Connections tab and select LAN settings.
- Find Use a proxy server for your LAN option and set it to No by unchecking it.
- Change Automatic configuration script (PAC) file to off in Automatic Configuration Scripts (PAC) file field and click Apply.
- You will be prompted with a warning message – please read carefully before proceeding.
- Click Yes.
- Reboot your Windows 10/11 PC.
Solution 7 – Seek Help from Certified Windows Technicians
Some of the most common causes for this error code are faulty hardware components, software programs, and network connectivity. So, if you are not familiar with these things or are not confident with your technical skills, do not hesitate to seek help from certified and authorized Windows technicians. They will analyze the problem and provide suitable solutions that can fix the issue in an effective manner.
However, many people opt to handle these issues themselves instead of seeking professional help due to cost concerns. Considering all the benefits associated with hiring a qualified technician and their abilities to diagnose and solve problems efficiently, it’s better to spend some money now instead of spending even more later.
You should only resort to solving the problem by yourself when you have time at hand, plenty of patience and know what you are doing. If any task seems too complicated for you or appears like a risk, then immediately hire professionals who will resolve all your queries at once!
Fix Error 0x8024401F in No Time!
Getting Windows Update error code 0x8024401F on your Windows 10 or Windows 11 computer can be an annoyance, but it doesn’t have to be a problem that you can’t fix quickly and easily. Follow these simple solutions to get rid of the error code and get back to updating your computer without any issues!