
After installing the latest Windows 10/11 update, you might encounter an error message indicating that the Windows update client failed to detect with error 0x80244010. This error occurs during the Windows Update process, leading the system to roll back or restore to the previous date and time.
The Windows Update error 0x80244010 can be quite frustrating, especially if you are using your computer frequently on a daily basis. In this article, we will discuss the problem, troubleshooting steps, solutions and all to make sure that your OS gets up-to-date with the latest security patches and various features/improvements from Microsoft. So, follow the simple methods below in order to fix problems installing updates in Windows 10/11 0x80244010.
What Is the Windows Update 0x80244010 Error?
Windows Updates are an important part of keeping your Windows PC or laptop up to date, but it’s not uncommon for things to go wrong and end up with errors such as 0x80244010.
According to affected Windows users, the problem installing updates Windows 10/11 0x80244010 error usually occurs after installing a new WSUS server in the network.Most of the time, they simply could not receive and install Windows updates. However, for some of them, the problem is accompanied by the error 0x80244010 code.
Expert Tip: For smoother PC performance, consider using a PC optimization tool. It handles junk files, incorrect settings, and harmful apps. Make sure it's right for your system, and always check the EULA and Privacy Policy.
Special offer. About Outbyte, uninstall instructions, EULA, Privacy Policy.
But what causes the error 0x80244010 on Windows Update? Here are some of the most common error 0x80244010 culprits:
- System Glitch – This usually occurs on Windows endpoint machines. And if a system glitch is a culprit, the good news is that Microsoft has built-in repair suggestions that can be deployed anytime. Users can just apply the recommended fixes to resolve the issue.
- Corrupted Files in the WU Temp Folder – Sometimes, corrupted files in the WU Temp folder can trigger the 0x80244010 error. Files in this folder may get corrupted after installing a faulty update or after running an antivirus scan. To fix this, users need to run several commands to reset WU components, including those in the Temp folder.
- Problems with Conventional Update Methods – At times, the WU component itself does not work automatically because the WU function has been blocked. To resolve this, you may use the System Update Readiness tool. This allows you to install updates that fail to install via conventional methods.
- Disabled Detection Frequency Policy – The WSUS server only allows a certain number of requests. When your requests exceed the limit, you can no longer install the Windows update. And as a result, you encounter the error message. In this case, you may use the Local Group Policy Editor to grant access to the Automatic Update detection policy and set a certain global update interval.
- Corrupted System Files – In the event that the Windows Update troubleshooter cannot resolve the 0x80244010 error automatically, it is possible that there is an underlying system file corruption issue. The usual fix for this situation is to refresh all Windows components via a Clean Install.
- Unstable Internet Connection – Windows updates and system files may get corrupted and cause the error 0x80244010 because of an unstable internet connection. The easiest way to fix this is just to try installing the error again and again or run a particular command via the Command Prompt window.
- Unsynchronized Updates – If updates are not synchronized, the error 0x80244010 may surface. To synchronize Windows updates, you may set the Windows Update detection policy frequency to automatic.
Ways Fix the Windows Update 0x80244010 Error Code on Windows 10/11
If you are facing the error code 0x80244010 on your Windows computer, then these fixes will help you resolve it without wasting anytime.
Fix #1: Restarting Your Computer
Windows updates are essential not only for your operating system but also for the security of your computer. If you’re receiving a 0x80244010 error code, it might be because you’re using a previous version of Windows while trying to upgrade.
To fix this problem, restart your computer and enter Safe Mode with Networking from the Power User Menu. Once there, type ms-settings:windowsupdate in Cortana and click Scan for Updates to complete that process. Hopefully, this resolves the 0x80244010 error.
Fix #2: Run the Windows Update Troubleshooter
This error is not as mysterious as it seems and can often be resolved by running the Windows Update Troubleshooter. The troubleshooter can help you repair update installation problems or other related errors with the Windows update process.
To run the troubleshooter, follow these steps:
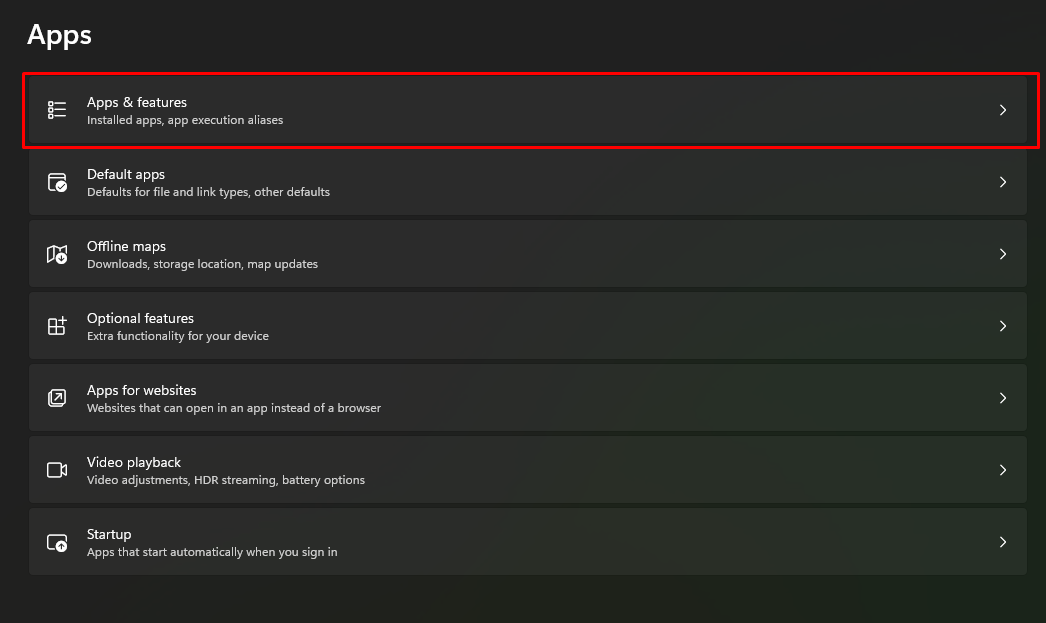
- Go to Settings, then Apps & features.
- Select Manage Optional Features.
- Turn on Use my sign-in info to automatically finish setting up your device after a Windows update or restart.
- Open Start Menu and enter Troubleshooting.
- Choose Troubleshooting Tools.
- Select Windows Update.
- When the troubleshooter opens, click Next.
- Click Scan Now. If there are any updates that need to be installed, your computer will start downloading them automatically for you.
Fix #3: Reset the Windows Update Components
When you get the Windows update error code 0x80244010, your Windows Update components may not be properly configured to sync updates.
To fix this problem, reset your components to default values. Here’s how:
- In order to reset your Windows Update components, first, uninstall the Microsoft Security Essentials program and any other third-party antivirus software that you may have installed.
- Next, open an Administrator Command Prompt window as an administrator by typing cmd in Search and pressing Enter or using the keyboard shortcut CTRL+SHIFT+ENTER (right-click and select Command Prompt (Admin)).
- Type or copy/paste the following commands one at a time and press Enter after each command:
- netshwinsock reset catalog
- netsh int ipv4 reset catalog
- netsh int ipv6 reset catalog
- netshwinsock set global mtu=9000 store=active
These commands will restore Windows Update components to their default values.
Fix #4: Use the System Update Readiness Tool
If you are running an old version of Windows, try using the System Update Readiness Tool from Microsoft. The tool scans your PC for missing, damaged, or out-of-date system files and provides online help for correcting them. This may solve your problem by installing Windows Updates that failed previously due to a virus or other corruption.
- Launch an elevated Command Prompt window by pressing the Start menu and typing cmd into the text field.
- Right-click on the top-most result and choose Command Prompt. Choose Run as Administrator.
- If asked for a password, input it and choose Allow.
- Input this command and hit Enter: DISM.exe /Online /Cleanup-image /Restorehealth.
Fix #5: Run System File Checker
Running the System File Checker utility sometimes works to resolve the error. Here’s how to use it:
- Press Win+R or hold down the Windows key and press R on your keyboard.
- Type cmd in and press Enter.
- Right-click on Command Prompt and select Run as Administrator from the list of options that appears.
- In the new window type sfc /scannow then hit Enter. The tool will start scanning for any corrupted files, let it finish its work before shutting down and restarting your PC.
- After the process is completed, you should notice a popup window confirming that no errors were found. If the system file checker finds a problem with a file (or set of files), it might ask you if you want to repair them; this process may take some time, depending on how much space is required to fix everything. Otherwise, just wait until your computer has fully booted up again, and everything is back to normal!
Fix #6: Reset TCP/IP Settings
Resetting TCP/IP Settings is a process in which you will change your computer’s IP address and default gateway back to their default values. Doing this should allow your computer to connect with Microsoft’s servers and receive updates once again. This can be done through Command Prompt or by following these steps:
- Click on Start in the bottom left-hand corner of your screen.
- Type command into the search bar in order to open up a Command Prompt window.
- Enter ipconfig /release at the prompt.
- Close out of the Command Prompt window when it says Successfully released all reserved local addresses.
- Open up another Command Prompt Window.
- Enter ipconfig /renew at the prompt.
- Close out of that Command Prompt Window when it says Successfully renewed DHCP lease.
- Restart your Windows 10/11 computer when prompted to do so.
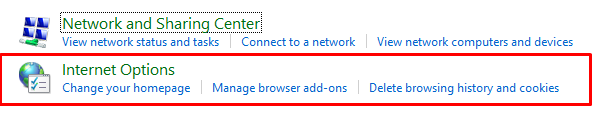
Fix #7: Disable Proxy Server in Internet Options
Disabling your proxy server can also fix the 0x80244010 error.
First, you’ll need to open your Internet Options in your Control Panel. To do this, type Internet Options into your search bar, click Settings, and then click the tab that says Connections.
After you’re in Connections, there will be a button called LAN Settings which allows you to disable Proxy Server for connections that don’t go through the proxy server first. Make sure it’s unchecked and hit OK. Then restart your Windows 10/11 computer and try updating it again!
Fix #8: Uninstall and Reinstall the Network Adapter Driver
Uninstalling and reinstalling the network adapter driver has worked and resolved the error for some affected users. Hence, it’s something you may want to try as well.
To do this:
- Open Device Manager (Right-click This PC, Properties, and select Device Manager) and search for your Network Adapter driver.
- Right-click the found driver and select Uninstall.
- Restart your computer if you’re prompted. Wait for a minute or two until it has completely restarted and has gone back to normal (on Desktop).
- If the issue persists, right-click This PC again and choose Properties.
- In the window that pops up, go to Advanced System Settings>Hardware tab.
- Click on Device Installation Settings.
- Click the very first setting in this list: No, let me choose what is best for my computer. You should be taken to a list of drivers installed on your machine; find all associated devices connected via Ethernet and check any boxes before clicking OK.
Fix #9: Use a PC Repair Tool
You can also download a PC repair tool to fix your PC as if you were an expert! In most cases, this error is caused by third-party applications or viruses that have been partially removed from your computer. With this program, you can scan the entire computer, pinpoint all the infected files, delete them without worries, and then optimize your PC performance again.
Fix #10: Disable Firewall or Antivirus while Updating Windows OS
The Firewall or Antivirus could be your culprit. If you have one of these installed, they may be interrupting the installation process, causing you to see the error message.
Try disabling these temporarily while updating your system. When you restart your PC again, it should fix any errors related to starting up with Firewall or Antivirus installed. You can re-enable the protection when all updates are completed.
If you still see a failure with the same error code after trying this step, uninstall your antivirus or firewall completely before continuing.
Fix #11: Perform a Clean Install
This means reinstalling your operating system and drivers but keeping your files, apps, and settings. Doing this might not work for some people, so it’s always a good idea to make a backup before attempting a repair or reinstallation.
In order for this technique to work, you’ll need an external hard drive or USB stick that has enough free space so you can transfer your data from the computer. Once you’ve backed up your files, then do the following:
- Go to Settings > Update & Security > Recovery and click Restart Now.
- If prompted with Choose an option, select Troubleshoot.
- Select Advanced Options > Startup Settings.
- Press 5 to Enter Safe Mode and press Enter.
- Press F8 while in Safe Mode and boot into the Command Prompt.
- Type chkdsk without quotes and hit Enter.
- Type exit without quotes to exit the Command Prompt, type exit again without quotes, and press Enter one more time.
- Restart your computer as normal by clicking Restart Now.
Fix #12: Clear the Windows Update Temporary Cache
Lastly, try clearing your cache to fix the error. Here’s how:
Start by deleting temporary files manually. Click on Start at the bottom left of your screen and type Disk Cleanup into search. Then click on the icon that says Disk Cleanup.
- You will see a box pop up, saying Disk Cleanup Tool has found over XX gigabytes of junk files that can safely be deleted. Do you want to delete these files now?
- Select Yes!
- Select all three boxes and hit OK.
- Next, go to C:\Windows\SoftwareDistribution\Download where you will find a folder called Cache.
- Delete everything inside this folder.
- Now, go back to the Disk Cleanup window where we just cleared our cache, but this time select Temporary Files and Cookies (leave the other checkboxes unchecked).
- Hit OK.
- Restart your computer to make sure everything gets reset properly before we move on.
In Summary
When you are having a problem with downloading and installing new updates for your computer, there are a few things you can do to try and fix this problem. This includes what we have enumerated above, including restarting your computer to check for any new updates, checking your firewall to see if it’s blocking updates, or resetting Windows update components.
Restarting your computer should always be the first step in any update process because this clears up bugs and slows that are occurring in the background. Checking your firewall is also important because, many times, it will block the installation of a downloaded update due to security reasons. The next thing to do is reset Windows update components which could fix a broken component in windows update, including program files, windows services and more. If all else fails, you can always seek guidance from a licensed Windows technician.