The blue-screen error stop 0x00000116 is a common issue in Windows that appears when there is a problem with hardware or software. It is part of the Blue Screen of Death (BSOD)Blue Screen of Death (BSOD) errors that contain codes to help identify the issue.
What Is Bug Check 0x00000116?
What exactly is 0x00000116? The value of the VIDEO_TDR_FAILURE bug check is 0x00000116. This means that an attempt to reset the display driver and recover from a timeout was unsuccessful. This bug check indicates that the graphics card driver attempted to reset the graphics card but failed to do so within the time interval specified, resulting in a timeout with the Stop Code 0x116. There are several potential causes of this, including a faulty graphic card, a corrupted driver, out-of-date drivers, and other issues.
You might get the following error message or any version of it:
The computer has rebooted from a bugcheck. The bugcheck was: 0x00000116.
Expert Tip: For smoother PC performance, consider using a PC optimization tool. It handles junk files, incorrect settings, and harmful apps. Make sure it's right for your system, and always check the EULA and Privacy Policy.
Special offer. About Outbyte, uninstall instructions, EULA, Privacy Policy.
What Causes Bug Check 0x00000116?
A common graphics stability issue occurs when the system appears to be completely frozen or hung while processing an end-user command or operation. During gameplay, the GPU is usually busy processing intensive graphics operations. There are no screen updates, and users believe their system is frozen. Users typically wait a few seconds before restarting the system by pressing the power button. Windows tries to detect these problematic hang situations and recover a responsive desktop dynamically.
This detection and recovery procedure is known as Timeout Detection and Recovery (TDR). The timeout is set to 2 seconds by default. The operating system’s GPU scheduler calls the display miniport driver’s DxgkDdiResetFromTimeout function to reinitialize the driver and reset the GPU during the TDR process for video cards.
During this process, the operating system instructs the driver not to access hardware or memory and gives it a short time to complete any currently running threads. If the threads do not finish within the timeout, the system checks for bugs with 0x116 VIDEO TDR FAILURE. See Thread Synchronization and TDR for more information.
If a large number of TDR events occur in a short period of time, meaning more than five TDRs in one minute, the system can perform a bug check with VIDEO TDR FAILURE.
If the recovery process is successful, a message indicating that the “Display driver stopped responding and has recovered” will be displayed.
When you get this error, it means that the GPU is taking longer than allowed to display graphics on your monitor. This behavior may occur as a result of one or more of the following factors:
You may need to install the most recent updates to your display driver in order for it to properly support the TDR process.
Hardware issues that affect the video card’s ability to function properly include:
- Components that have been overclocked, such as the motherboard
- Incorrect component compatibility and configuration (especially memory configuration and timings)
- Inadequate system cooling
- Inadequate system power
- Parts that are defective (memory modules, motherboards, etc.)
- Visual effects or having too many programs running in the background may be slowing down your PC to the point where the video card is unable to respond as needed.
How to Resolve The bugcheck was: 0x00000116 Error
Do you have the 0x00000116 blue-screen error? It could be extremely aggravating, especially if it occurs while you are playing a video game. But don’t be alarmed. You won’t have to put up with it indefinitely. We’ll walk you through the process step by step.
When you get this error, the first thing you need to try is to relaunch the app or game you are playing when the issue occurred. Restarting your PC also helps a lot in getting rid of glitches that might have caused the BSOD.
Running a scan using a PC Repair Tool like Outbyte PC Repair optimizes your computer and prevents errors like stop 0x00000116 from happening. If these basic troubleshooting steps did not help, proceed to the solutions below:
Fix #1: Launch another game.

The game you are playing may be the primary cause of BSOD. For example, if you are running Minecraft and Windows stops working due to BSOD 0x16, you should try running another game, such as World of Warcraft, and see if Windows continues to work normally or if you get a BSOD. If Windows stops working due to a BSOD, the problem is not with the game and you must focus on other methods, which may include troubleshooting hardware or software issues.
However, if you can play another game, such as World of Warcraft, the problem is not with your graphics card or driver, but with the first game, Minecraft. You should uninstall the game, restart your computer, and then reinstall the most recent version of your favorite game. We’ll demonstrate how to uninstall Minecraft in this guide. The procedure for uninstalling games is the same for operating systems ranging from Windows XP to Windows 10/11.
- Hold down the Windows logo and press R.
- Enter appwiz.cpl into the address bar.
- Choose your game, in this case, Minecraft.
- Uninstall Minecraft by right-clicking it.
- Wait until Windows has completed the procedure.
- Restart your computer.
- Install the most recent version of your game.
- Download and install the game.
- Restart your computer.
- Play the game.
If you experience issues while playing the problematic game again, it is likely that there are some conflicts between your game installation, driver installation, and operating system.
Fix #2: Rollback previously installed drivers.
If you updated your graphic card and now you can’t play games due to stop error 0x00000116, you’ll need to roll back your graphic driver. We’ll walk you through the process using Device Manager. The procedure for reverting drivers to a previous version is the same for operating systems ranging from Windows XP to Windows 10/11.
- Hold down the Windows logo and press R.
- Enter devmgmt.msc into the search box.
- Display adapters should be expanded.
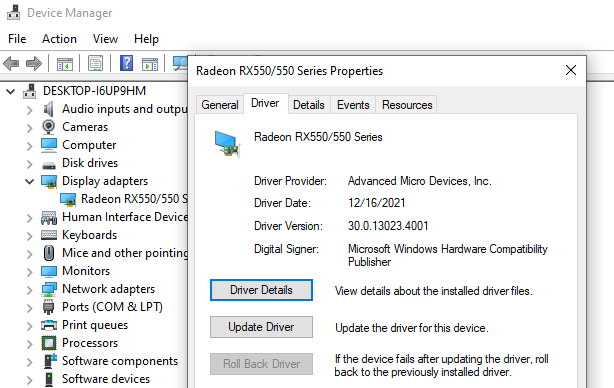
- Right-click your graphics card and select Properties.
- Select the Driver tab.
- Hit the Roll Back Driver button. If you haven’t updated your card to a new driver, this option won’t be available.
- Wait until Windows has completed rolling back the driver to the previous version.
- Restart your computer and play the game.
Fix #3: Update your graphics card driver.
If the first set of methods did not solve your problem, the next step will be to update your graphics driver. In this guide, we will show you how to uninstall the NVIDIA graphics card which is one of the most commonly used GPUs for Windows. The first step will be to uninstall the graphics device, followed by the installation of the latest driver for the graphics device. For operating systems ranging from Windows XP to Windows 10/11, the procedure for updating graphics drivers is the same.
- Hold down the Windows logo and press R.
- Enter devmgmt.msc into the search box.
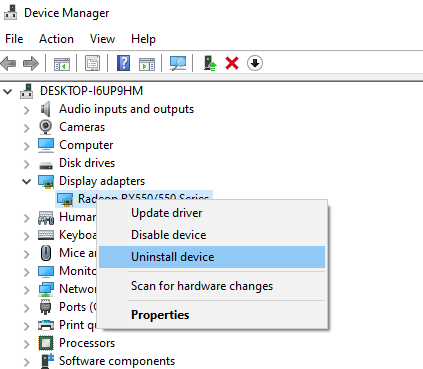
- Display adapters should be expanded.
- Uninstall the driver for the NVIDIA graphics card by right-clicking on it.
- Select Delete the driver software for this device and then click Uninstall.
- Wait until Windows has completed the uninstallation of the graphic card.
- Restart your computer.
If you don’t want to go the manual route, you can also choose third-party driver updaters to automatically keep your system updated at all times. Check out our recommendations here.
Fix #4: Disable ATI Catalyst Gaming Overclocking.
If you have an ATI Radeon graphics card and have installed the ATI Catalyst software, you must disable Gaming Overclocking or Graphic OverDrive. We’ll show you how:
- Enter ATI Catalyst Control Center in the Start menu.
- Select the Performance tab, then ADM Overdrive.
- Uncheck the Enable Graphics OverDrive box.
- Click the Apply button.
- Restart your computer and play the game.
Fix #5: Lower the temperature of the video card.
It’s possible that the whole reason is insufficient cooling inside your unit. It is simple to check according to this norm: at rest, the temperature should be around 35-45 degrees Celsius, and while working, it should be around 70-80 degrees Celsius. If the temperature is higher than normal, it is a good idea to buy thermal paste. If nothing has changed after using it, you should get a new reinforced cooling system.
Fix #6: Check the RAM for damage.
If the previous methods did not work for you, then the situation is much more serious. Before deciding it’s a lost cause, it’s a good idea to check your RAM. Unscrew the block and inspect it for scratches, torn contacts, cracks, and other serious damage. Another tip: if you have multiple RAM modules, try leaving only one connected and restarting the computer.
Fix #7: Disable your monitor’s sleep function.
According to other Windows users’ reports, you may occasionally encounter the 0x00000116 blue-screen error while your monitor’s sleep function is enabled. You can try disabling your monitor’s sleep function to see if that helps.
See how to do it here:
- Press the Windows logo key on your keyboard.
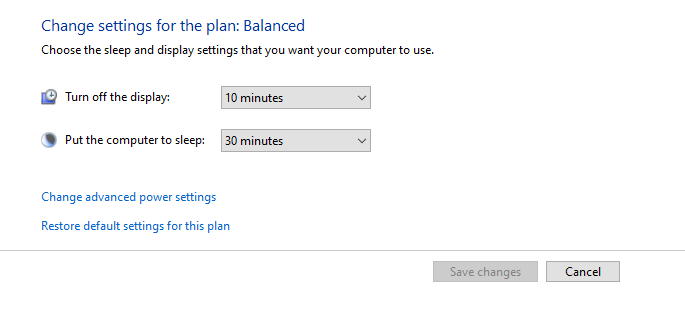
- Enter power into the search box and then click Choose a power plan.
- Select Choose when to turn off the display.
- Change the setting for Turn off the display to Never.
- Restart your computer and check to see if the blue-screen error has gone away.
Fix #8: Repair the Windows Image using DISM.
This method will necessitate the use of a tool known as DISM (Deployment Image Servicing and Management). The DISM command-line tool allows you to mount a Windows image file (install.wim) and perform image servicing tasks such as installing, uninstalling, configuring, and updating Windows. DISM is a component of the Windows ADK (Windows Assessment and Deployment Kit), which you can obtain from the Microsoft website by following this link. The process of repairing a Windows image is the same for operating systems ranging from Windows 7 to Windows 10/11.
- Launch your web browser (Google Chrome, Mozilla Firefox, Edge or other) and download the Windows ADK by going to the link above.
- Launch Windows ADK.
- Select DISM (Deployment Image Servicing and Management) and then press the Install button.
- Type in DISM in the Start menu.
- Run as Administrator by right-clicking Deployment Image Servicing and Management.
- Allow DISM to run as administrator by clicking Yes.
- Enter Dism /Online /Cleanup-Image /RestoreHealth into the search box.
- Restart your computer and continue playing your game.
Fix #9: Switch off virtualization.
Virtualization is a technology that enables you to run multiple operating systems on a single physical computer or notebook. There are also various types of virtualization, such as server virtualization, network virtualization, storage virtualization, application virtualization, and others. To run Hyper-V or VMware, for example, you must enable virtualization support in your BIOS or UEFI. We will demonstrate how to disable Intel Virtualization Technology via BIOS and UEFI. The procedure for disabling virtualization differs depending on the motherboard. Please refer to the Virtualization section of your motherboard’s technical documentation.
- Restart or switch on your computer.
- During the boot process, press F2 or Delete to gain access to the BIOS or UEFI.
- To enter Advanced mode, press F7.
- To confirm access to Advanced mode, click OK.
- Select the Advanced tab.
- Choose CPU Configuration.
- Go to Intel Virtualization Technology to learn more.
- Turn off Intel Virtualization Technology.
- Hit Exit, save your settings and restart your computer.
Fix #10: Use a single monitor.
If you have two monitors, we recommend that you unplug one of them from your graphics card. Try to play the game with only one monitor connected to your computer. If you can play the game without any issues, unplug the current monitor from the graphics card and reconnect the disconnected monitor to it. If you can play your game with only one monitor, your graphics card is most likely faulty, and you will need to replace it.
Fix #11: Update your BIOS or UEFI.
When your computer or notebook has a BSOD code problem, one solution is to update the BIOS or UEFI firmware. To begin, you must be aware of the current version of BIOS or UEFI. The procedure for updating BIOS or UEFI differs depending on the motherboard. Please refer to your motherboard’s technical documentation, specifically the BIOS or UEFI section.
Fix #12: Reinstall your OS.
After attempting all methods and failing to resolve the problem with error code 0x00000116, we recommend that you perform a clean installation of Windows, and install the most recent drivers and the most recent version of the game you wish to play. Then, run and play the game. If this method did not solve your problem, move on to the next one.
Fix #13: Change your graphics card.
The final option is to replace the graphics card. If you are using a computer, we recommend that you purchase a graphics card that is compatible with it. You have the option of using NVIDIA or AMD graphics cards. Please read the technical documentation for your motherboard to ensure that the graphics card you are considering is compatible with your computer. If you have a laptop, we recommend that you have it repaired by a PC repair service.
Summary
The 0x00000116 error is common, but it is not difficult to resolve. Users can fix the error and reduce the risk of its recurrence by understanding its possible causes and learning the fleshed-out methods described in this article.
Have you ever fixed the blue-screen error 0x00000116? Which method did you use? Please share your own experiences in the comments section below.