The Windows Feature Update 1903 was a much-anticipated update for the operating system. The update included several cool features, such as Windows Sandbox, enhanced search mode, and numerous other enhancements. It is also said to fix a variety of bugs and issues.
The “Feature Updates” in Windows 10 are delivered twice a year, and they are in fact new versions of Windows that bring new features and improvements to the operating system. As a result, feature updates are larger in size than quality updates (also known as “Cumulative updates”), which are delivered more frequently (twice a month) and, in some cases, have problems installing because the operating system is reinstalled.
Despite its popularity and significance, many users encountered a variety of problems during the update process. This was primarily due to a number of issues with operating system components as well as user configuration. In this article, we will go over all of the possible causes of the error code 0x80070005 when updating.
What Is the Feature Update to Windows 10, Version 1903 – Error 0x80070005?
When there is a problem installing Windows updates, Windows will display the error code 0x80070005. You may also encounter the error if Windows cannot activate or run specific Office applications, especially after a Windows update. The error code basically tells you that Windows lacks the necessary file or registry permissions to perform an operation.
Expert Tip: For smoother PC performance, consider using a PC optimization tool. It handles junk files, incorrect settings, and harmful apps. Make sure it's right for your system, and always check the EULA and Privacy Policy.
Special offer. About Outbyte, uninstall instructions, EULA, Privacy Policy.
To Windows users, the error code 0x80070005 is a generic error code. It occurs in a variety of situations, including system updates, Windows Store app installation, Microsoft Office activation, and data access.
The error message says:
“There were some problems installing updates, but we’ll try again later. Feature update to Windows 10, version 1903 – Error 0x80070005”
This problem can be caused by a variety of factors, including administrator account permission, bad update components, interference with your antivirus software, a third-party program, and incorrect computer time and date settings. The recommended troubleshooting steps to resolve the error code 0x80070005 are is listed below.
What triggers the Windows Update Error 0x80070005 when installing the Feature Update 1903?
When users fail to install certain Windows updates, the error code 0x80070005 may appear. Windows update is an important task for computers, and the operating system is configured by default to detect available updates automatically on a regular basis and then download and install updates as needed. Users can also manually check for and install potential updates. The installation of Windows updates helps to protect the computer from system vulnerabilities, allowing the computer to operate in a secure mode.
While the Windows update process is fairly basic for most users, you may encounter the error code 0x80070005 while installing Windows updates. Most users who encounter this problem appear perplexed as to how to resolve Error Code 0x80070005. Here are some of the possible culprits behind this error:
- The Windows Update service is not running: This is the primary process that downloads and installs updates on your computer. If this update service is not set to a running state, it may interfere with the updating process.
- Insufficient administrator privileges: The computer, like all other major Windows updates, requires that you grant administrator access to the entire event. If you do not have this access, you may receive an error message.
- Corrupted or missing update components: We discovered that some users had corrupted or missing update components, causing the update process to halt in some cases. Here, we can use the Windows Update Troubleshooter to figure out what’s wrong.
- Old Windows Update files: If your computer has old redundant update files, they may conflict with the new ones Windows is attempting to download and install. Usually, deleting these resolves the problem.
- Overactive antivirus software: In many cases, you will receive an error message if you have antivirus software running on your computer that is interfering with the update process by granting it permission. You will not be able to install the update in any way.
- PC in an error state: Although this is often overlooked, it was also the reason why users were unable to update to 1903. Power cycling comes in handy here.
- Missing executable files: If your system is missing some critical executables required to complete the update process, you may become stuck. Replacing these components may aid in the resolution of the problem.
- Conflicting third-party applications: There may be third-party applications that interfere with the update process. Stopping each of them and updating them appears to solve the problem.
If none of the above causes apply to your situation, it is likely that your Windows installation is corrupt. After backing up your data, you can perform a clean install version and update to the latest version 1903.
How to Resolve Error Code 0x80070005
It is best to restart your computer before attempting any of the recommended troubleshooting steps listed below. This action will refresh the operating system and remove any corrupt temporary data that may be causing the issue.
Before you begin, ensure that you are logged in as an administrator account.
- Type Control Panel into the search bar on your Windows 10 computer.
- Check that View by is set to Category.
- Select User Accounts.
- Click Change Account Type in the User Accounts window.
- Choose the Administrator option.
It also helps to run a PC optimizer first before doing any troubleshooting to avoid complications. Outbyte PC Repair is one of your best options because it is thorough and easy to use. Once you’ve cleaned up your system, you can proceed to the solutions below:
Fix #1: Run the Windows Update Troubleshooter.
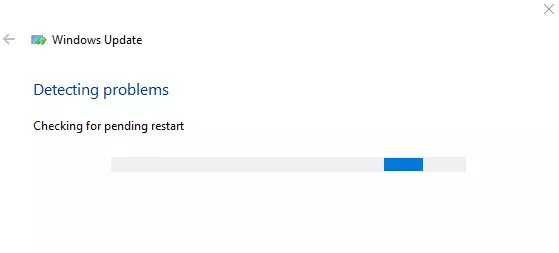
Your operating system includes a tool for automatically detecting and repairing system errors. If a file is corrupted, the troubleshooter will also download a new copy. As a first step, we’ll run the update troubleshooter to see if it can detect and resolve any issues with the update process.
- To open the start menu’s search bar, press Windows + S. Enter “troubleshoot” into the dialogue box and select the first result.
- Select “Windows Update” and then click the “Run the troubleshooter” button once in the troubleshooting menu.
- Windows will now begin the troubleshooting process, looking for any discrepancies. You may be prompted that the troubleshooter requires administrator access to check for system problems. Select “Try troubleshooting as an administrator.”
- Restart your computer after the fixes have been applied to see if the problem has been resolved.
For best results, this solution requires an active internet connection. Also, instead of only trying once, run the troubleshooter several times.
Fix #2: Power cycle your computer.
Before we proceed to more technical workarounds, we should not dismiss the possibility of the computer being in an error state. If any of the computer’s modules aren’t working and need to be restarted, we can fix them by power cycling. Power cycling is the act of completely restarting your computer so that all temporary configurations are erased. They will be automatically initialized as default values when we restart the computer.
- Turn off both your computer and your router. Remove the main power supply and press and hold the power button for approximately 2-3 minutes.
- Wait 5-8 minutes before plugging in the power supply and turning on your devices. Now, reconnect to the network after it has begun transmitting to see if the problem has been resolved and you can connect to Windows Update without issue.
If power cycling does not work and you are still unable to connect properly, proceed to the next step of checking the internet.
Fix #3: Scan for malware.
Malware and viruses frequently delete system files and registry keys required to run specific programs and install Windows updates. Scan your PC for malware and viruses using third-party software, or enable real-time protection in the Windows Security app.
Toggle on Real-time protection in Settings > Privacy & security > Windows Security > Open Windows Security > Virus & threat protection > Manage settings.
Turn on Real-time protection in Windows 10 by going to Settings > Update & Security > Windows Security > Virus & threat protection > Manage settings.
Fix #4: Remove peripherals.
Another issue that we noticed was that extra devices (if connected) would cause several issues with the update mechanism. This is a common scenario with various Windows iterations. As a result, it is recommended that you disconnect all extra devices connected to your computer, such as webcams and consoles.
In some rare cases, removing (disconnecting) non-primary hard drives from the computer can be extremely beneficial. It appears that the update mechanism is having difficulty deciding which drive to install. Before removing the drives, make sure your computer is turned off. If this does not work, you can always reconnect them.
Fix #5: Turn off your antivirus.
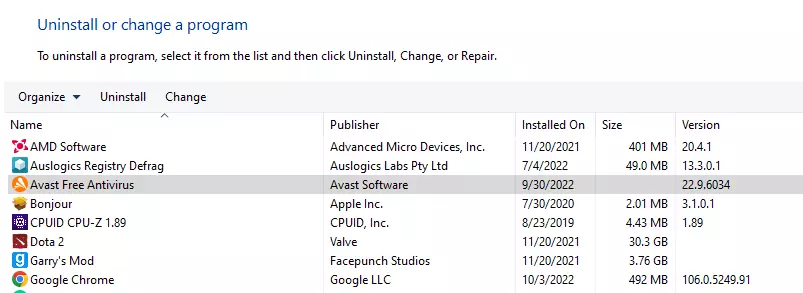
Antivirus software is constantly monitoring the services, processes, and downloads that take place on your computer. When the update mechanism begins to function, your antivirus software may block it even if there is no evidence of malware.
In this case, you should uninstall your antivirus software rather than simply disabling it, because even if you disable the software, some dependencies in your registry may remain.
The method for uninstalling software from your computer is as follows:
- Press Windows + R, then enter “appwiz.cpl” in the dialogue box.
- Look for the Antivirus software in the application manager.
- Uninstall it by right-clicking on it.
Restart your computer after uninstalling, and begin updating again. Check to see if the problem has been resolved.
Fix #6: Restart the update service.
It is also possible that the update 1903 files downloaded on your computer are either incomplete or corrupt. This could be due to a variety of factors ranging from poor internet connection to module corruption.
The workaround will be to disable the update service, delete all previously downloaded content, and then restart it. This will restart the update process and download new components from scratch. Before proceeding, ensure that you are logged in as an administrator.
To disable the service, follow these steps:
- To open the Run application, press Windows + R. Enter “msc” in the dialogue box. This will display all of the services that are currently running on your computer.
- Search the list until you find a service called “Windows Update.” Right-click the service and choose Properties.
- Under the Service Status sub-heading, select Stop. We can now proceed because your Windows Update service has been terminated.
Next, delete the downloaded files using these instructions:
- Go to the Windows Update directory and delete any existing update files. Follow the steps by opening your file explorer or My Computer.
- Go to the address listed below. You can also use the Run application and copy and paste the address to get there quickly: C:\Windows\SoftwareDistribution
- Delete everything contained within the Software Distribution folder (you can also cut and paste them to another location in case you want to place them back again).
The last step is to turn the update service back on. The Update Manager may take a few minutes to compute details and prepare a manifest for the download at first. Be patient and let the process run its course.
- As we did earlier in the guide, navigate to the Services tab. Navigate to Windows Update and click the Properties button.
- Restart the service and open your update manager.
Fix #7: RunDo an SFC scan.
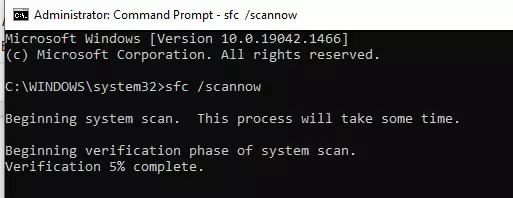
The System File Checker (SFC) is a command-line utility that scans Windows for corrupt, damaged, and missing system files. If any are found, the tool replaces them with a new copy.
If you’re receiving the 0x80070005 error because a critical system file is missing or damaged, running SFC is your best bet for resolving the issue. Connect your computer to the internet and proceed with the instructions below.
- In the Windows Search bar, type command prompt and then choose Run as administrator.
- Before running the System File Checker on a PC running Windows 8 or later, Microsoft recommends running the Deployment Image Servicing and Management (DISM) tool.
- In the terminal, type or paste DISM.exe /Online /Cleanup-image /Restorehealth and press Enter.
- When you see the message “The restore operation was successful,” run the System File Checker.
- In the terminal, type or paste sfc /scannow and press Enter.
- Wait for a success message, then close the Command Prompt window and restart the app/OS to clear the 0x80070005 error. You may need to restart your computer to complete any outstanding repair tasks.
So, when running the System File Checker, pay attention to the on-screen messages.
Fix #8: Check your firewall.
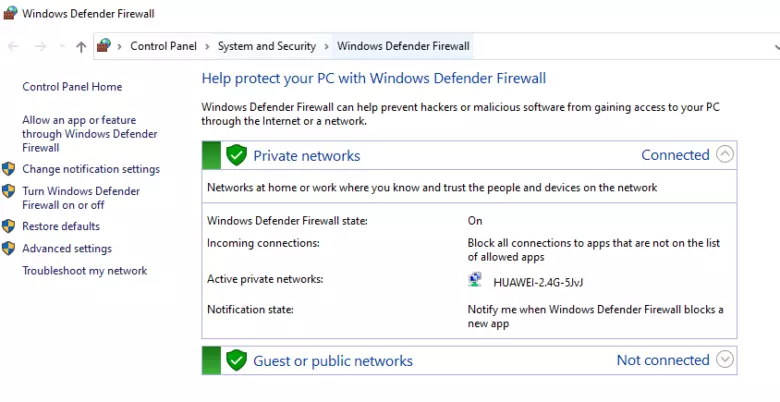
You can bypass your firewall settings by configuring the SVCHOST (the host process for Windows services) to bypass the 0x80070005 error.
- In the Windows Search bar, type firewall and then select Firewall & network protection from the results page.
- Select Allow an app through firewall at the bottom of the page.
- This will open the Windows Defender Firewall window in the Control Panel.
- Choose Change settings > Allow another app.
- Choose Browse.
- Select svchost and then click the Open button.
- To proceed, click Add.
- Make sure the “Private” and “Public” columns for the Host Process for Windows Services are checked.
- Select OK and restart your computer.
Fix #9: Perform a Clean Boot.
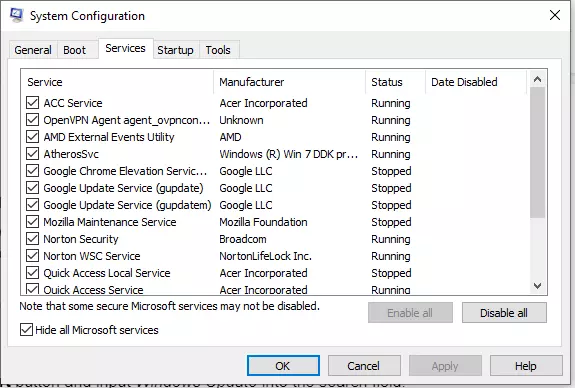
A clean boot in Windows can aid in the diagnosis of startup errors, frequent app crashes, and Windows Update issues. When you perform a clean boot, your computer disables non-essential services for a short period of time. This will assist in isolating and diagnosing the software conflict that is causing the error code 0x80070005 when updating Windows or running Office apps.
Before performing a clean boot, ensure that you are logged in to your computer with an administrator account.
- In the Windows Search box, type msconfig and select System Configuration as an administrator.
- Go to the Services tab, check the Hide all Microsoft services box, and then disable everything.
- Then, on the Start-up tab, select Open Task Manager.
- Disable a program by right-clicking it in the list. This should be done for all apps in the Startup tab.
To boot into a “clean” environment, exit Task Manager and restart your computer. If the 0x80070005 error does not appear after the clean boot process, it is likely that one of the disabled apps is to blame.
Fix #10: Set Services as Automatic.
If the above method fails, we will try running some commands and manually restarting the update module. Before proceeding, ensure that you are logged in as an administrator.
- To access your start menu’s search bar, press Windows + S. Enter command prompt, then right-click on the first result and select “Run as administrator.”
- Once in the command prompt, run the following commands one by one, making sure that each one is completed before moving on to the next.
- SC config wuauserv start=auto
- SC config bits start=auto
- SC config cryptsvc start=auto
- SC config trustedinstaller start=auto
- We set all of the services to automatic using these commands. The setting will be changed if they were on a manual prompt.
Restart your computer after exiting the command prompt. Check to see if the update can be installed again.
Bottomline
The error code 0x80070005 can appear in a variety of scenarios, interfering with normal computer operation. Follow the solutions discussed above to safely and easily resolve the error code. If you still can’t install Windows updates or run Office apps because of the 0x80070005 error, reset Windows to factory settings.
