
DLL issues can be frustrating and cause errors when launching programs. The msvcp120 DLL is missing error is a common example. It prevents the affected app from running until the issue is fixed. This article provides solutions to resolve the issue.
What Is Msvcp120 DLL?
Msvcp120.DLL is a special utility that’s part of Microsoft Visual C++. It is used to run programs developed with Visual C++. This DLL file contains vital instructions that some video games and other software need to perform specific tasks.
What Is Msvcp120.DLL Is Missing?
As the error suggests, the error appears because the needed msvcp120 DLL file is missing. However, if the file is present but faulty or corrupted, you are also likely to run into the error.
Other main factors that cause this error include:
Expert Tip: For smoother PC performance, consider using a PC optimization tool. It handles junk files, incorrect settings, and harmful apps. Make sure it's right for your system, and always check the EULA and Privacy Policy.
Special offer. About Outbyte, uninstall instructions, EULA, Privacy Policy.
- Application leftovers
- Malware attacks
- Registry issues
- An outdated operating system
The msvcp120.DLL missing error can appear on your screen in any of these forms:
- “msvcp120.DLL Not Found”’
- “The file msvcp120.DLL is missing”
- “File msvcp120.DLL not found”
- “The program can’t start because MSVCP120.DLL is missing from your computer. Try reinstalling the program to fix this problem”
If you have been asking yourself, “what is msvcp120.DLL” we hope you now know. The following section will discuss how to eliminate this error for good.
How to Fix Missing Msvcp120.DLL
Some users were able to fix this error using simple methods, while others had to apply more complex techniques. We will discuss both simple and complex solutions, so make sure to try them all until your problem is fixed.
-
Update Windows
Outdated operating systems are usually vulnerable to bugs that trigger constant issues on a Windows PC. Therefore, if you are using an outdated OS, your system may contain bugs that are causing the “msvcp120 DLL is missing” error. Updating Windows could eliminate the problem.
These steps will guide you through updating your operating system:
- Use the Windows logo key + I combination to open the Settings application.
- Go to Update & Security.
- Under Windows Update, click on the “Check for updates” button.
- Wait for Windows to check for available updates and automatically download them.
- Once done, reboot your machine.
- Try running the affected program to see if the error has been solved.
-
Manually Download the Missing Msvcp120 DLL File
Downloading the file could help the affected program locate it easily and run error-free. However, make sure to download the msvcp120 DLL from a reliable site. Getting it from a random site risks infecting your computer with nasty viruses.
Here is how to reinstall msvcp120.DLL:
- Download the DLL file.
- Navigate to the downloaded file and copy it.
- Go to your desktop and right-click on the affected app’s icon.
- Choose “Open file location”.
- Paste the downloaded file there.
- Restart your PC and check if the problem has been fixed.
If you use a 64-bit system, go to “C:\Windows\SysWow64”. You could also copy the DLL file from another trusted working machine and see if that helps.
If the issue reappears, continue with these instructions:
- Copy the downloaded file.
- Press the Windows + E keyboard shortcut to open the File Explorer.
- Select This PC on the left menu pane and then go to Local Disk (C:).
- Open the Windows folder.
- Next, head to System 32.
- Paste the file into this folder.
- Then restart your computer.
If the “msvcp120 DLL is missing” error is still bothering you, don’t give up. The following methods might work for your PC.
-
Update Drivers
Your system drivers enable the operating system to communicate efficiently with the hardware devices. Therefore, if they are outdated, you will likely face some issues when using your PC.
Luckily, you can update your drivers by following this quick guide:
- Use the Windows logo + S keyboard combo to open the Windows search box.
- Type in “device manager” (without quotes).
- Select the “Device Manager” search result.
- To update a driver, expand its section and right-click on it.
- Choose “Update driver” and then click on “Search automatically for drivers”.
- Wait for the driver to be automatically updated and repeat the same steps for other drivers.
Updating drivers one by one can be pretty tedious. So, consider using an automatic driver updater that can scan your PC for outdated drivers and update them in one click.
-
Update the Faulty Application
If the affected program is outdated, it is possibly buggy hence throwing up the “the program can’t start because msvcp120.DLL is missing from your computer” error. Updating the software could resolve the issue. It might also fix any compatibility problem that could be triggering the error. Therefore, visit the app’s website and check for any recent versions and install it.
-
Use the System File Checker
The System File Checker (SFC) is a powerful tool that allows you to scan your computer for corrupted system files and replace them with functioning copies. So, it might help the broken or corrupted DLL file causing the error in question.
Here is how to go about it:
- Go to the search bar in the bottom left corner of your screen and type in “command prompt” (no quotes).
- Right-click “Command Prompt”, then pick “Run as administrator”.
- Click the Yes button when the User Account Control prompt appears.
- Type in “sfc /scannow” (without quotes).
- Hit Enter and wait until the process is 100% complete.
- Reboot your device and check if the program is working.
-
Scan for Malware
Still getting the msvcp120 DLL not found error? Then your PC is probably malware-infected. Malware can infiltrate your device and disguise itself as a DLL file, hence causing random errors. Luckily, scanning for malware can help find these malicious entities and delete them.
Use this guide to scan your machine for malware using Windows defender:
- Right-click on the Windows icon in the bottom-left corner of your screen and choose Settings.
- When the settings window opens, select Update & Security.
- Go to Windows Security on the left menu pane.
- Click on the Open Windows Security button on the right pane.
- Choose “Virus & threat protection”.
- Click on the “Scan options” link under the Current threats section.
- Choose the “Full scan” option. Then select “Scan now”.
- Wait for the scan to complete, and then review the results. Make sure to eliminate any discovered suspicious files.
You could also use a professional malware removal tool to help catch elusive viruses that Windows Defender may fail to catch.
-
Reinstall Visual C++ Redistributable Packages
The msvcp120 DLL file is a crucial part of the Visual C++ pack of Visual Studio 2013. Therefore, if the Visual C++ pack was poorly installed or is corrupted, this might cause the msvcp120 DLL missing Windows 10/11 error. Reinstalling these packages could allow the affected app to run smoothly. Remember to download the file pack from the Microsoft website to avoid getting malware-infected files.
- Visit the official Microsoft website.
- Click the dropdown box under the “Visual C++ Redistributable Packages for Visual Studio 2013” section.
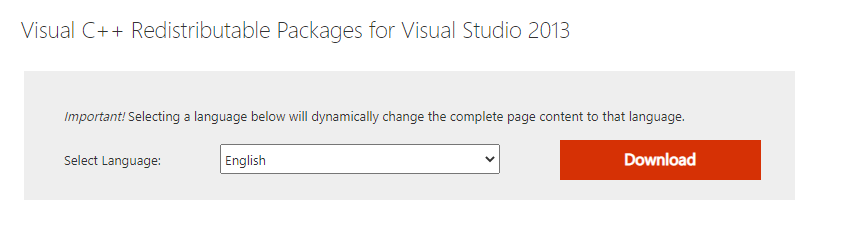
- Then click on the Download button.
- Here, you will need to choose a file based on your system type (32-bit or 64-bit). To confirm your system type, type “cmd” (no quotes) into the search box and choose Command Prompt. Type in “systeminfo” (without quotes) and press Enter. Then go to the System Type section to see your system type.
- Go back to the download page and select the checkbox for your suitable file type.
- Click on the Next button.
- Wait for the download to finish and open the downloaded file.
- Follow the installation instructions to complete the process.
- Once done, reboot the machine and check if the msvcp120.DLL missing error has been removed from your computer.
-
Reinstall the Application
The “The program can’t start because MSVCP120.DLL is missing from your computer. Try reinstalling the program to fix this problem.” error message suggests that reinstalling the problem could fix the issue. Therefore, try doing so and see if that helps.
Follow these instructions:
- Press the Win key + I combo to summon the Settings app.
- Select Apps.
- Scroll down the Apps & features section to find the faulty program.
- Select it and then click on the Uninstall button.
- Finish any other needed steps to completely uninstall the app.
- Reboot your computer and then download the app from its official developer website.
- Launch it to check if the issue reoccurs.
-
Use a Professional Repair Tool
Many Windows errors are caused by different factors, making it hard to find the specific culprit. Fortunately, using a professional repair tool such as Outbyte PC Repair lets you scan your system for different issues that may cause errors. This makes it easier to automatically resolve them, making random errors a thing of the past.
Outbyte PC Repair scans your device for system malfunctions, invalid redirects, and shared DLL files and automatically fixes them, boosting your computer’s performance and stability. This software also helps you fix vulnerabilities in the system that can be easily exploited by malware to infiltrate the system and cause problems.
To use this software, follow steps below:
- Download the PC Repair Tool and then open the downloaded file.
- Select Yes when the UAC window appears.
- Choose any of the listed features. Then go to “Click to install”.
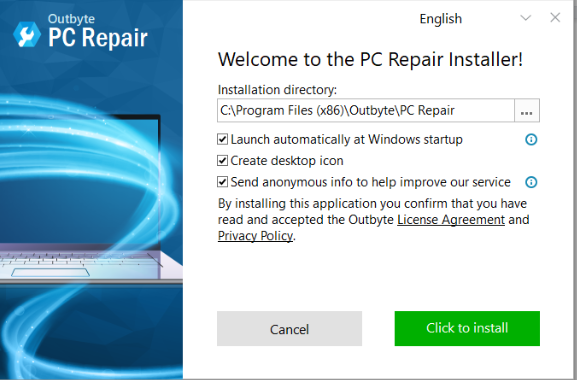
- Let the program finish installing.
- Select “Launch PC Repair and scan PC”.
- Click on the Finish button. The scan might take a few minutes, so wait until it completes.
- Review the discovered issues on the right pane and then automatically fix them.
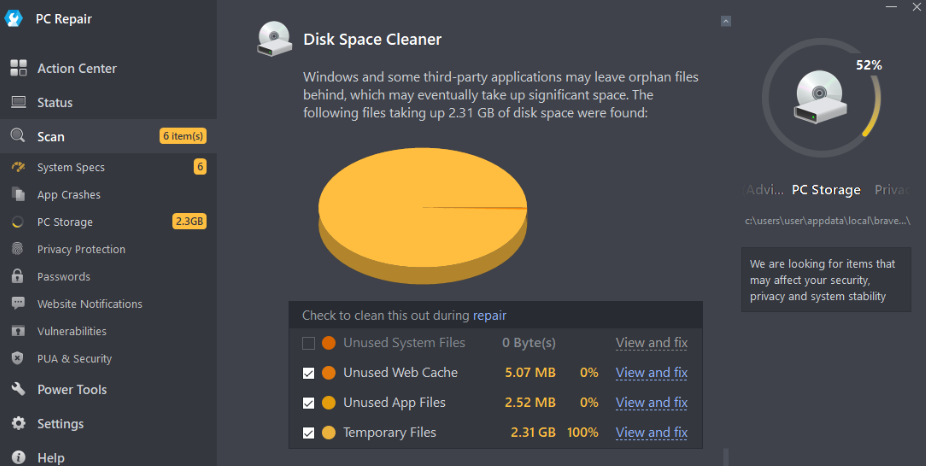
- Reboot your computer.
-
Perform a Clean Windows Installation
If none of the above methods has helped you fix the msvcp120 DLL not found error, you might be looking at a more severe issue. Therefore, you may need to do a clean Windows installation to eliminate the error.
Conclusion
The msvcp120 DLL missing error can be quite frustrating as it can appear randomly when launching your favorite video games and programs. Luckily, you now know how to deal with it effectively. We hope at least one of the above solutions fixed the issue on your machine. If you used other methods to successfully resolve the “msvcp120 DLL is missing” error and boost performance, kindly share them with us in the comments section below.