
Windows update errors are common; the majority of updates contain errors.
Windows update errors occur during the download, installation, or updating of the Windows operating system.
Another Windows 10 update error 0x80244018 will be discussed in this article. This error code can be seen in two situations:
- The first occurs during the installation of the Windows 10 update.
- The second is to download apps from the Windows Store.
If you receive the error code 0x80244018 while downloading an update or using the Windows App Store, try the solutions listed below in order.
Expert Tip: For smoother PC performance, consider using a PC optimization tool. It handles junk files, incorrect settings, and harmful apps. Make sure it's right for your system, and always check the EULA and Privacy Policy.
Special offer. About Outbyte, uninstall instructions, EULA, Privacy Policy.
This tutorial will go over various tricks and tips for dealing with the error code 0x80244018 and keeping your system error-free.
What Is Windows Update Error 0x80244018?
The 0x80244018 Windows Update Error is comparable to the HTTP status 403 error. This stop code indicates that the server has received the request but has been unable to process and transmit the files. This problem frequently happens during the installation of an update or a feature upgrade.
When trying to download and install the latest updates on Windows 10/11 64-bit, some users have reported getting the error code 0x80244018. It may be aggravating, but there are a variety of reasons why your Windows update failed to install after being downloaded from Microsoft’s servers.
It is one of the problems that rolled out with the standard Windows Update KB4038788. It’s possible that the upgrade messed up Internet settings or caused trouble with Windows or Store app updates. However, this does not rule out the possibility of other factors causing the error code to appear.
According to reports, the error happens on Windows Store and, while it does not stop the Store from running, it prevents users from downloading and installing apps, which is a significant issue. The error message reads as follows:
Something happened and this app couldn’t be installed. Please try again. Error code: 0x80244018
Other versions of this error include:
- Feature update to windows 10, version 1903 – error 0x80244018
- Feature update to windows 10, version 1803 – error 0x80244018
- Windows 10/11, version 1903 – error 0x80244018
Because the Windows Store provides both Windows apps and Windows Updates, the 0x80244018 problem may persist, resulting in an outdated Windows OS.
What Causes Windows 10/11 Error 0x80244018?
Your machine failed to install the latest Windows updates, as indicated by the error number 0x80244018. It’s critical to keep your computer up to date if you want to take advantage of the latest features and keep attackers at bay. Wait a few minutes, restart your computer, and try again if you get the error code 0x80244018. Perhaps the update servers are overburdened and unable to execute your request. Here are the common reasons why this download error – 0x80244018 occurs.
- A third-party application is interfering with the process — This is the most common reason for the issue. The error message is usually caused by overprotective security software or other programs that monitor or filter your Internet traffic.
- VPN or proxy blocking the update — If you’re using a VPN or proxy service, you can run into this problem. When a machine is using an anonymity service, the WU (Windows Update) component is known to malfunction.
- BITS (Background Intelligent Transfer Service) is deactivated – BITS is a critical Windows component that allows your operating system to get new updates. If the service is not running, this error may occur.
- Component services are malfunctioning — The issue could be caused by any of the Windows Update Services, MSI Installer, or Cryptographic services.
- The error is caused by system file corruption – corrupted system files might also cause the problem if they come in the way of the updating component.
Other possible reasons and causes for the problem 0x80244018 when updating your Windows 10/11 PC or installing Microsoft Store apps should be considered. Identifying the cause will allow you to concentrate your efforts on resolving it so that you can continue with the upgrade. But before you proceed with the troubleshooting methods, it is best to run a PC Repair Tool first to get rid of any other issues that might complicate the problem, including junk files and bugs.
Different Methods to Deal with Error Code 0x80244018
If you have such an error on your computer, this article will assist you in resolving it. We’ll show you how to fix this error code with some practical solutions.
Solution #1: Run the Windows Update Troubleshooter.

Let’s begin by ensuring that your operating system is not capable of automatically resolving this problem. Despite the fact that the Windows Update troubleshooter does not have the highest success rate, some customers have been able to resolve the error by using it.
This built-in software will analyze your system for any irregularities with the update component and execute a variety of repair procedures aimed at resolving the problem. Here’s how to run the Windows Update troubleshooter quickly:
- To launch the Run dialog box, press Windows key + R.
- To open the Troubleshooting tab of the Settings app, type ms-settings:troubleshoot and click Enter.
- After that, go to the Get up and running page, select Windows Update, and then Run the Troubleshooter.
- Note: If you’re having trouble installing or opening a Store app, try using the Troubleshooter for Windows Store Apps instead.
- Wait until the initial scan is completed. If any inconsistencies are discovered, select Apply this fix to attempt to resolve the problem using the specified repair technique.
When the process is complete, restart your computer to see if the 0x80244018 error code is resolved on the next startup. If the error message persists, proceed to the next method below.
Solution #2: Get rid of 3rd party apps that might be interfering.
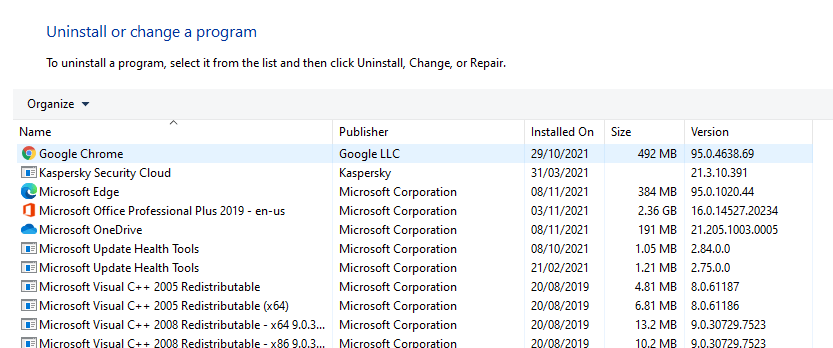
Third-party interference is the most common cause of the 0x80244018 error code’s appearance. Third-party antivirus software and network monitoring tools may obstruct or prevent Windows from upgrading.
There are undoubtedly other overprotective software that could be obstructing the update, but Avira Security Suite and AVG are the most usually reported culprits.
If you’re using a third-party antivirus, follow the steps below to completely remove it from your computer.
- Type Control Panel into the Windows search box and select the best result.
- Then go to the Control Panel‘s primary interface.
- Under the Programs section of the pop-up window, select Uninstall a program.
- Select the third-party antivirus program in the pop-up box and right-click it. To proceed, select Uninstall.
When the process is complete, the third-party antivirus software will be uninstalled. Then restart your computer and run Windows Update to see whether the error 0x80244018 has been resolved.
Solution #3: Force-start BITS
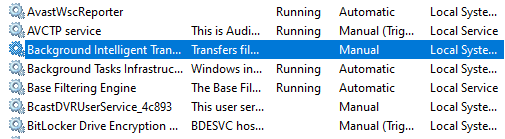
BITS (Background Intelligent Transfer Service) is in charge of keeping your client up to date. BITS may have been manually halted or disabled by a third-party application, resulting in the 0x80244018 error code.
Several users have been able to resolve the problem by manually launching BITS from the Services menu. Here’s a step-by-step guide on how to accomplish it:
- To launch the Run dialog box, press Windows key + R.
- Then, to open the Services panel, type services.msc and hit Enter.
- When you’re in the Services panel, use the right-hand menu to browse down through the services until you find the Background Intelligent Transfer Service. Double-click it once you’ve done so.
- If the Startup type is set to something other than Automatic (Delayed Start), go to the next screen and change it to Automatic (Delayed Start). Then, under Service status, press the Start button to force the service to start.
- Return to the WU screen and try if you can install the update without encountering the 0x80244018 error.
If the issue occurs again, or if BITS has already been enabled, continue with the next solution.
Solution #4: Switch off Proxy server or VPN service.
VPN and proxy servers are also possible culprits, because Windows servers are wary of delivering sensitive data to devices that filter the network connection through another server. Several individuals who were experiencing the 0x80244018 error stated that the problem was resolved once they turned off their VPN or proxy server.
If you’re using a VPN, temporarily disable it to see if it’s the source of the problem. Retry the operation that caused the error with the VPN service turned off. If the problem no longer occurs, disable the VPN service whenever your operating system requires an update. You could alternatively try to find another VPN option that doesn’t cause this issue.
If you’re using a proxy server to mask your IP address, you should turn it off and see if the problem goes away. Here’s a step-by-step guide on how to do it:
- To launch the Run dialog box, press Windows key + R.
- To open the Proxy window of the Settings app, type ms-settings:network-proxy and click Enter.
- When you’re on the Proxy tab, go down to Manual proxy setup and turn off the Use a proxy server toggle.
- Restart your computer and check if the issue is gone the next time it boots up. If you’re still having problems with the 0x80244018 error, try the other methods down below.
Solution #5: Reset the WU components on your PC.
You can do this either manually or by using a script. To make it easier, let’s try the automatic method first.
- Download the Reset Windows Update Agent here.
- Run the ResetWUEng program after extracting the.zip archive.
- To reset your WU components, follow the on-screen instructions.
- Check whether the issue code has been fixed by restarting your computer.
If this doesn’t work, then you can try resetting the Windows Update components manually using these steps:
- To open a new Run dialog box, press Windows key + R.
- To open a Command Prompt with administrative rights, type cmd and hit Ctrl + Shift + Enter. Choose Yes when requested by the UAC (User Account Control).
- You’ll need to quit the WU components (Windows Update Services, MSI Installer, Cryptographic services, and BITS services) in the elevated CMD by executing the following commands and pressing Enter after each line.
- net stop wuauserv
- net stop cryptSvc
- net stop bits
- net stop msiserver
- Run the following commands in the same CMD window to rename the SoftwareDistribution and Catroot2 directories after the services have been disabled.
- ren C:\Windows\SoftwareDistribution SoftwareDistribution.old
- ren C:\Windows\System32\catroot2 Catroot2.old
- Next, re-start the services that were disabled in step 3 by running the following commands and pressing Enter after each one.
- net start wuauserv
- net start cryptSvc
- net start bits
- net start msiserver
Restart your computer after closing the elevated Command Prompt. Check if the problem is resolved at the next startup. If it isn’t, try the next way down below.
Solution #6: Fix corrupted system files.
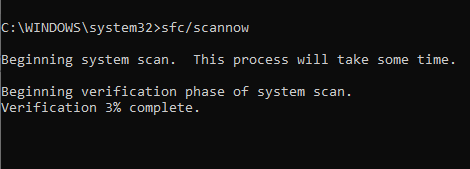
Another option that appears to have assisted many people in addressing system file corruption is to run a few built-in tools. While this procedure is normally effective, it is known to take several hours to complete, so be prepared to wait.
Here’s a brief approach to running an SFC and DISM scan to try to fix the 0x80244018 error:
- To open a new Run dialog box, press Windows key + R.
- To open a Command Prompt with administrative rights, type cmd and hit Ctrl + Shift + Enter. Choose Yes when requested by the UAC (User Account Control).
- To execute an SFC scan, type the following command in the elevated Command Prompt. This program will search your computer for corrupted files and replace them with cached copies: sfc /scannow
- Restart your computer after the operation is completed to determine if the error has been resolved at the next startup. Continue down the list of methods below if the 0x80244018 error persists.
- To open another elevated CMD window, repeat step 1.
- To begin a DISM scan, run the command below. Any corrupted files will be replaced with copies downloaded from Microsoft servers by this program. Before you begin, make sure you have a solid Internet connection.
- In the Command Prompt window, type in this command, then hit Enter: dism /online /cleanup-image /restorehealth
After the process is finished, restart your computer to see whether the error occurs again the next time you try to install an update.
Final Thoughts
To summarize, this article has explained what the error 0x80244018 is and how to fix it using six different methods. You can try these fixes if you get the same Windows issue. If you know of a better way to fix the Windows update problem 0x80244018, please post it in the comments section.